pico-pwm-audio
Raspberry Pi Pico PWM Audio Project
This code goes with a YouTube video which demonstrates PWM audio out with a simple cicruit on a raspberry pi pico.
Building
Sync
git clone https://github.com/rgrosset/pico-pwm-audio.git
Make
Build project using cmake. This requires Raspberry Pi Pico C/C++ SDK to be installed.
mkdir build
cd build
cmake ..
make
Then copy pico-pwm-audio.uf2 to your Raspberry Pi Pico!
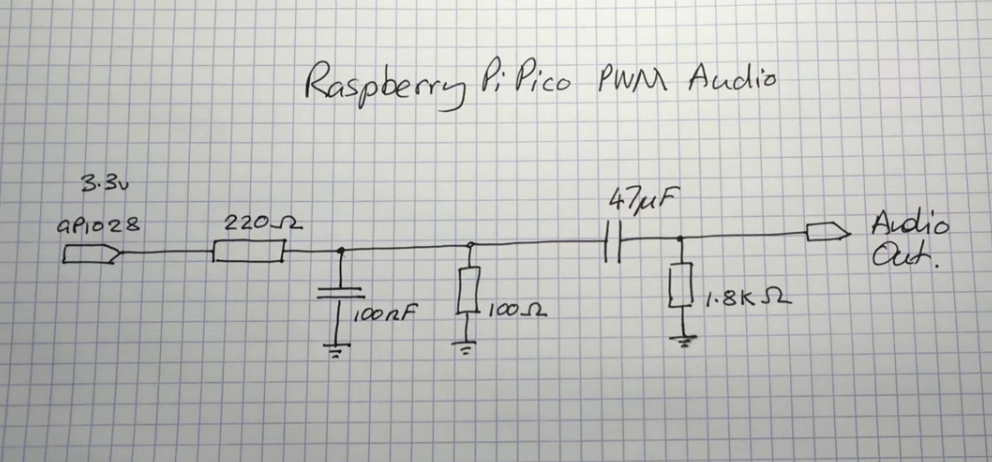
The Circuit
The circuit is based on the reference design from the raspberry-pi-foundation. We will just need one channel and the connector, as well as the logic buffer, is up to you.
You will need:
- 1.8 kΩ resistor
- 220 Ω resistor
- 100 Ω resistor
- 100 nF capacitor
- 47 µF capacitor
- an Audiojack
Using the Audito Converter Notebook.
The conventer is a Jupyter Notebook so you need to install Jupyter Notebooks for this to work. These instructions work on MacOS and Linux. For Windows the proess is the same simply follow instructions to install Python and related items for that platform.
Installing
-
First you need a working install of Python preferably a 3.x verson. To install python if you don't have it already go here https://www.python.org/downloads/
-
Second you need pip which is the python package manager, install this using the following
curl https://bootstrap.pypa.io/get-pip.py -o get-pip.py
python get-pip.py
- Install the notebook dependancies. These are the python libraries the notebook needs to run.
pip install soundfile
pip install matplotlib
pip install samplerate
- Next you need to install Jupyter Notebooks you can find instructions and many ways to install here https://jupyter.org/install my favoured way to do this is simply
pip install notebook
Usage guide
Launch the notebook user interface by issueing the command below in the same folder as this project. This will open the Jupyter user interface. Open the notebook file in the user interface.
jupyter notebook
The notebook itself is fairly self explanatory. Run each cell in order using the run buttons in the UI. The final cell will create a data array that you can copy and paste into your project. The notebook is configured to convert just about any WAV file to a mono 11Khz data which you can then use in your projects!
Have fun! Let me know if you have any feedback or questions.

