- Common Configurations
- Fedora Server Configuration Snippets
- Ubuntu Server Configuration Snippets
- macOS Configuration Snippets
- Others
- Docker Containers
$ git config --global user.name "<your_name>"
$ git config --global user.email "<your_email>"
$ git config --global pull.rebase false
$ git config --global core.editor nano- Open Terminal.
- Paste the text below, substituting in your GitHub email address.
$ ssh-keygen -t ed25519 -C <your_email@example.com>- Start the
ssh-agentin the background.
$ eval "$(ssh-agent -s)"
> Agent pid 59566
Note: If you're using macOS Sierra 10.12.2 or later, you will need to modify your ~/.ssh/config file to automatically load keys into the ssh-agent and store passphrases in your keychain.
- First, check to see if your ~/.ssh/config file exists in the default location.
$ open ~/.ssh/config
> The file /Users/YOU/.ssh/config does not exist.- If the file doesn't exist, create the file.
$ touch ~/.ssh/config- Open your
~/.ssh/configfile, then modify the file to contain the following lines. If your SSH key file has a different name or path than the example code, modify the filename or path to match your current setup.
Host github.com
  AddKeysToAgent yes
  UseKeychain yes
IdentityFile ~/.ssh/id_ed25519- Add your SSH private key to the
ssh-agentand store your passphrase in the keychain. If you created your key with a different name, or if you are adding an existing key that has a different name, replaceid_ed25519in the command with the name of your private key file.
$ ssh-add --apple-use-keychain ~/.ssh/id_ed25519- Check for existing SSH key pairs. If there are existing keys, you can either use those and skip the next step or
- Backup up the old keys and generate a new one.
ls -al ~/.ssh/id_*.pub- Configure your SSH keys (this step can be omitted if you have some keys already and do not want to generate new ones)
ssh-keygen -t ed25519 -C "<your_email>"- Copy the keys to the server:
ssh-copy-id -i <path_to_your_ssh_private_key> <remote_username>@<server_ip_address>Install OhMyZsh
Note: Latest version macOS comes with ZSH installed
$ sudo dnf install zsh # Fedora
$ sudo apt install zsh # Ubuntu

$ chsh -s $(which zsh) # You must log out from your user session and log back in to see this change
$ sh -c "$(wget -O- https://raw.githubusercontent.com/ohmyzsh/ohmyzsh/master/tools/install.sh)"Note: this is a custom configuration feel free to modify it as needed
# ~/.zshrc
zstyle ':omz:update' mode auto
zstyle ':omz:update' frequency 15

plugins=(
  git
  gitfast
  common-aliases
  ssh-agent
  brew
  copypath
  copyfile
  cp
  macos
  node
  nvm
  docker
  docker-compose
)

 # Preferred editor for local and remote sessions
if [[ -n $SSH_CONNECTION ]]; then
  export EDITOR='nano'
else
  export EDITOR='nano'
fi

# The above lines should be added by PowerLevel10k theme when it gets install
source ~/powerlevel10k/powerlevel10k.zsh-theme
# To customize prompt, run `p10k configure` or edit ~/.p10k.zsh.
[[ ! -f ~/.p10k.zsh ]] || source ~/.p10k.zsh

# https://github.com/ohmyzsh/ohmyzsh/tree/master/plugins/ssh-agent
zstyle :omz:plugins:ssh-agent agent-forwarding on
zstyle :omz:plugins:ssh-agent identities <your_identity_private_file>
zstyle :omz:plugins:ssh-agent quiet yes

# User configuration
source $ZSH/oh-my-zsh.sh
source ~/.zshrc_alias

---
# ~/.zshrc_alias
# shellcheck shell=bash

alias myip="curl https://ipecho.net/plain; echo"
alias cat="bat"
Setup Powerlevel10k Theme
$ git clone --depth=1 https://gitee.com/romkatv/powerlevel10k.git ${ZSH_CUSTOM:-$HOME/.oh-my-zsh/custom}/themes/powerlevel10kClose and reopen your terminal or use omz-reload to reload the OhMyZSH configuration, and you should be walked through
the theme setup process, upon finish you should be able to see the following lines in your ~/.zshrc configuration (
normally it gets added at the very end of the file)
source ~/powerlevel10k/powerlevel10k.zsh-theme
# To customize prompt, run `p10k configure` or edit ~/.p10k.zsh.
[[ ! -f ~/.p10k.zsh ]] || source ~/.p10k.zsh
If the above does not work for you, you can try set ZSH_THEME="powerlevel10k/powerlevel10k" in ~/.zshrc and restart
your Terminal or use omz-reload to get changes loaded.
-
Update the
/etc/auto_masterfile as follows.# ALWAYS create a copy of your original file sudo cp /etc/auto_master /etc/auto_master.ori # # Automounter master map # +auto_master # Use directory service #/net -hosts -nobrowse,hidefromfinder,nosuid /home auto_home -nobrowse,hidefromfinder /Network/Servers -fstab /- -static /- auto_nfs -soft,nobrowse,nosuid
This creates a direct map with entries in the file /etc/auto_nfs.
Hard mount: If the NFS file system is hard mounted, the NFS daemons try repeatedly to contact the server. The NFS daemon retries will not time out, they affect system performance, and you cannot interrupt them, but control returns to the client when the nfstimeout value is reached.
-
Create the target directories the remote NFS points will attach to.
# Repeat the below line as many times as needed
sudo mkdir -p /System/Volumes/Data/<folder_name>
-
Add the following lines to the
/etc/auto_nfsfile.# ALWAYS create a copy of your original file sudo cp /etc/auto_nfs /etc/auto_nfs.ori # Repeat the below line as many times as needed /System/Volumes/Data/HomeOfficeNAS/Downloads -fstype=nfs,soft,resvport,rw,noowners <server_ip_address>:/<shared_folder>
-
List the mounts provided:
showmount -e <server_ip_address>
-
Mount the remote endpoints:
sudo automount -v
You may want a friendly path to the mount point. /System/Volume/Data/<folder_name> is not easy for me to remember and is preferable to have something mount at
/. This is where/etc/synthetic.confcomes in. A few notes about synthetics:SYNTHETIC ENTITIES: Synthetic entities may not be deleted at runtime. In order to delete a synthetic entity, it must be removed from synthetic.conf, and the host must be rebooted. New files and directories may not be created within a synthetic empty directory.
FORMAT: synthetic.conf specifies a single synthetic entity per line. Each line may have one or two columns, separated by a tab character. If a line has a single column, it denotes a virtual empty directory to be created at /. If a line has two columns, it denotes a symbolic link at / whose link target is given in the second column.
In either case, the first column denotes the name of the entity to be created at
/.Modify the
/etc/synthetic.conffile as follows:# ALWAYS create a copy of your original file sudo cp /etc/synthetic.conf /etc/synthetic.conf.ori <folder_name>^ISystem/Volumes/Data/<folder_name>
Check if the content is correct using
cat -t /etc/synthetic.conf.The cat -t command prints non-printable characters. The ^I is a tab character.
Open your terminal (iTerm suggested) and run the following command:
$ /bin/bash -c "$(curl -fsSL https://raw.githubusercontent.com/Homebrew/install/HEAD/install.sh)"Run these two commands in your terminal to add Homebrew to your PATH:
$ (echo; echo 'eval "$(/opt/homebrew/bin/brew shellenv)"') >> /Users/reynierperez/.zprofile
$ eval "$(/opt/homebrew/bin/brew shellenv)"Note: you can use the included file from this repository and adjust it according your needs or create a brand new
BrewfileGo to the directory where theBrewfileis located and run the following command:
brew bundle
Go to the directory where you want to create the file and run the below command, a new file named Brewfile will be
created containing all your installed packages
brew bundle dump$ brew install cakebrew- On macOS, install Xcode Command Line Utilities:
xcode-select --install- If you have packages from old homebrew/php tap, refer to this guide for removing them then:
- Remove PHP from the Homebrew Cellar:
rm -rf $(brew --cellar)/php - Remove old PHP Launch Agents and daemons, if present:
rm -f ~/Library/LaunchAgents/homebrew.mxcl.php*
rm -f /Library/LaunchAgents/homebrew.mxcl.php*
rm -f /Library/LaunchDaemons/homebrew.mxcl.php*- Remove the deprecated homebrew/php tap, if present:
brew untap homebrew/php - Remove the deprecated exolnet/deprecated tap, if present:
brew untap exolnet/deprecated - Run brew cleanup:
brew cleanup
- Update homebrew and the formulae:
brew update - Add this tap:
brew tap shivammathur/php - Install PHP:
brew install shivammathur/php/php - After installing you have to link it:
brew link --overwrite --force shivammathur/php/php - Restart the terminal and test your PHP version:
php -v
When the installation finish you should end up with something like follows:
~ ❯ ...
/opt/homebrew/Cellar/php/8.2.9: 520 files, 83.5MB
==> Running `brew cleanup php`...
Disable this behaviour by setting HOMEBREW_NO_INSTALL_CLEANUP.
Hide these hints with HOMEBREW_NO_ENV_HINTS (see `man brew`).
==> Caveats
==> php
To enable PHP in Apache add the following to httpd.conf and restart Apache:
LoadModule php_module /opt/homebrew/opt/php/lib/httpd/modules/libphp.so

    <FilesMatch \.php$>
        SetHandler application/x-httpd-php
    </FilesMatch>

Finally, check DirectoryIndex includes index.php
DirectoryIndex index.php index.html

The php.ini and php-fpm.ini file can be found in:
/opt/homebrew/etc/php/8.2/

To start shivammathur/php/php now and restart at login:
brew services start shivammathur/php/php
Or, if you don't want/need a background service you can just run:
/opt/homebrew/opt/php/sbin/php-fpm --nodaemonize
Note: Running
brew install shivammathur/php/phpwill install the latest stable version of PHP, for other version please check here
- Add this tap:
brew tap shivammathur/extensions - Then install the required extension. See Formula directory for available formulae.
For example, to install Xdebug on PHP 8.2: brew install shivammathur/extensions/xdebug@8.2
$ brew install batNote: For Linux check this docs
- Copy file content to clipboard
$ pbcopy < file.txtYou can check if the content is there by using the "pbpaste" command:
$ pbpaste- Log into your machine and read your file
/etc/pve/storage.cfgto check where PVE is storing the backup files:
$ cat /etc/pve/storage.cfg
dir: local
	path /var/lib/vz
	content iso,vztmpl,backup
lvmthin: local-lvm
	thinpool data
	vgname pve
	content rootdir,images

zfspool: zfs_disk
	pool zfs_disk
	content rootdir,images
	mountpoint /zfs_disk
nodes pve- Go to the directory
/var/lib/vzand list the contents:
$ cd /var/lib/vz/dump/
$ ls -l
total 18618116
-rw-r--r-- 1 root root        1078 May 18 21:15 vzdump-qemu-101-2023_05_18-21_15_44.log
-rw-r--r-- 1 root root        4087 May 25 10:24 vzdump-qemu-101-2023_05_25-10_22_26.log
-rw-r--r-- 1 root root  6590814742 May 25 10:24 vzdump-qemu-101-2023_05_25-10_22_26.vma.zst
-rw-r--r-- 1 root root           7 May 25 10:24 vzdump-qemu-101-2023_05_25-10_22_26.vma.zst.notes
-rw-r--r-- 1 root root        3596 May 18 21:15 vzdump-qemu-103-2023_05_18-21_07_33.log
-rw-r--r-- 1 root root        5962 May 25 17:50 vzdump-qemu-103-2023_05_25-17_47_05.log
-rw-r--r-- 1 root root 12474096384 May 25 17:50 vzdump-qemu-103-2023_05_25-17_47_05.vma.zst
-rw-r--r-- 1 root root 13 May 25 17:50 vzdump-qemu-103-2023_05_25-17_47_05.vma.zst.notes- Copy the files from your machine
# if you are using macOS
# option 1
scp proxmox:/var/lib/vz/dump/. .
scp -r <user>@<ip_address>:/var/lib/vz/dump/. .

# if you are using Linux/macOS
scp proxmox:/var/lib/vz/dump/\* .# symlinks /usr/bin/python to python3
sudo apt update && sudo apt install python-is-python3
sudo curl -L https://yt-dl.org/downloads/latest/youtube-dl -o /usr/local/bin/youtube-dl
sudo chmod a+rx /usr/local/bin/youtube-dl
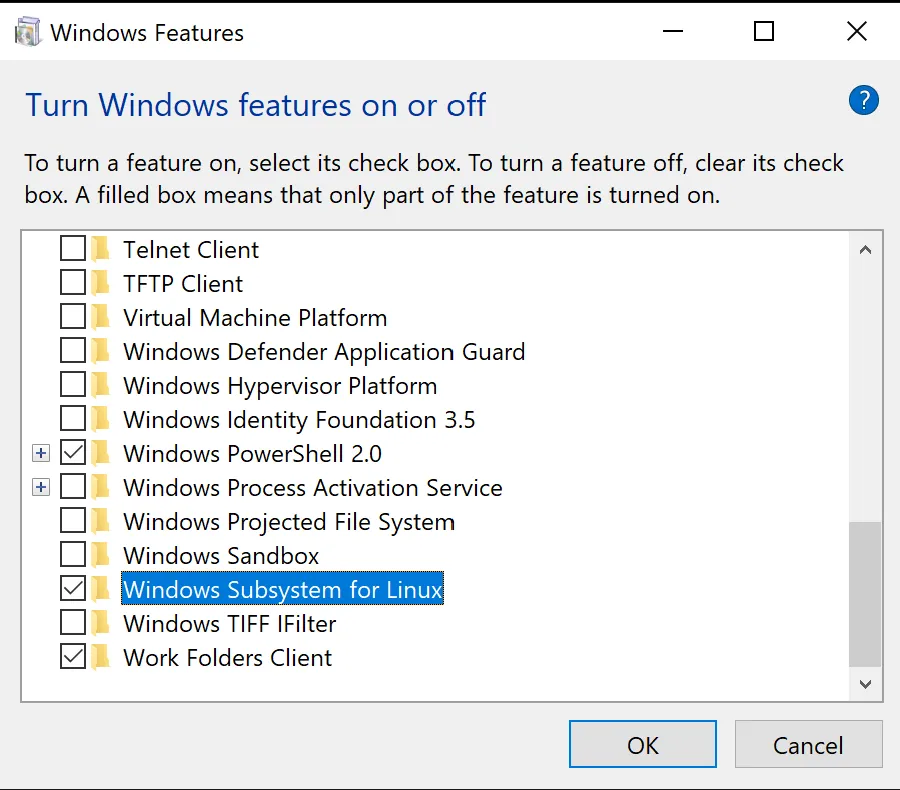
youtube-dl -UCopied!- Open Windows Feature and check the tick-box with the name Windows Subsystem for Linux. This will allow us to run
Ubuntu subsystem underneath the hood.
- Open Microsoft Store and download and install Ubuntu. You should get the latest LTS version available(here is 20.04).
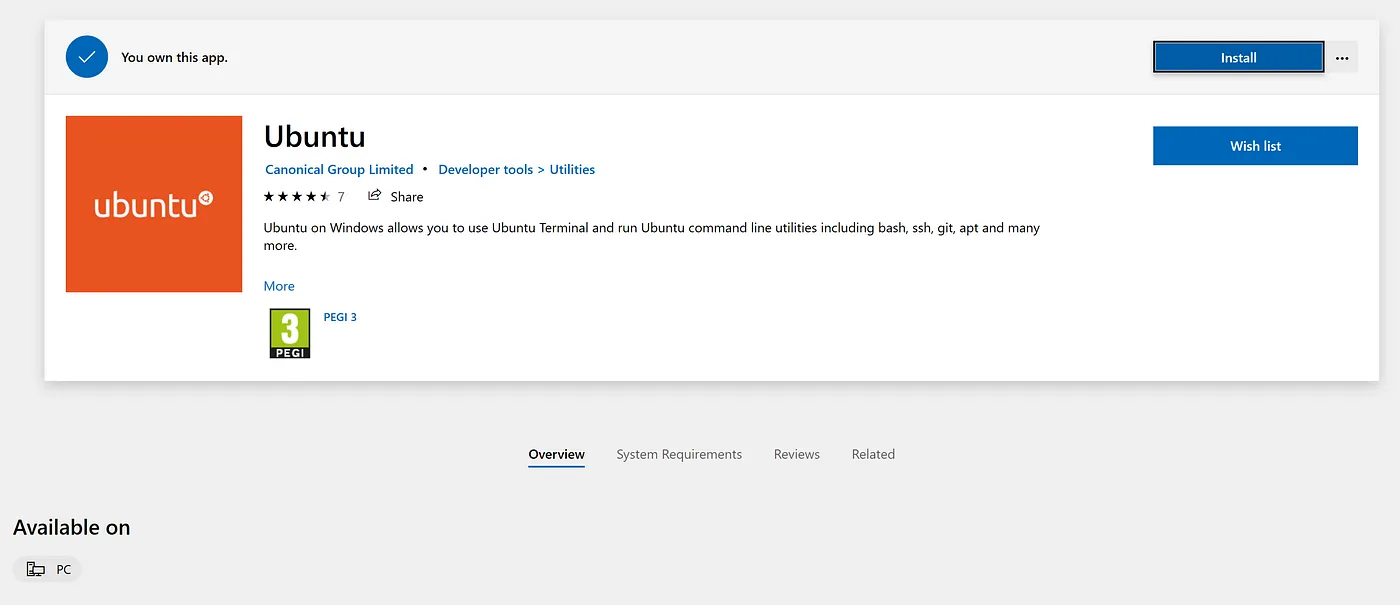 Once installed, open Ubuntu and make any initializations needed. The console will walk you through.
 - Go to cmder.app, download the Full zip file and extract it to a convenient location. (Mine was home folder).
- We continue by making our Ubuntu subsystem the default option of Cmder. Go to
Settings → Startup → Tasks. Press+button and create a new task. You can give it any name you want. I choseUbuntu::bash. In the Task parameters input you can select an icon:/icon "%CMDER_ROOT%\icons\cmder.ico". In the Commands input, you should enter the command that this task executes. This is the actual call to Bash:%windir%\system32\bash.exe ~ -cur_console:p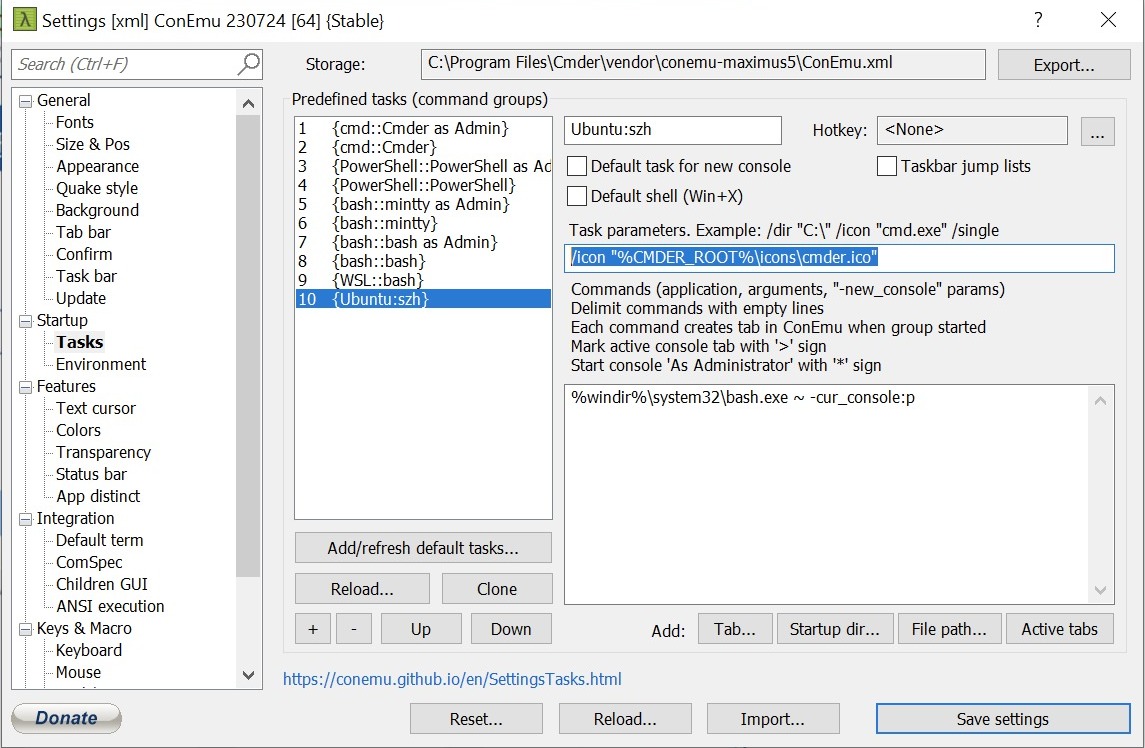
- Once you’ve finished the creation you have to make the task we created the default one. Go to
Settings → Startupand in the Specified named task dropdown choose the appropriate task.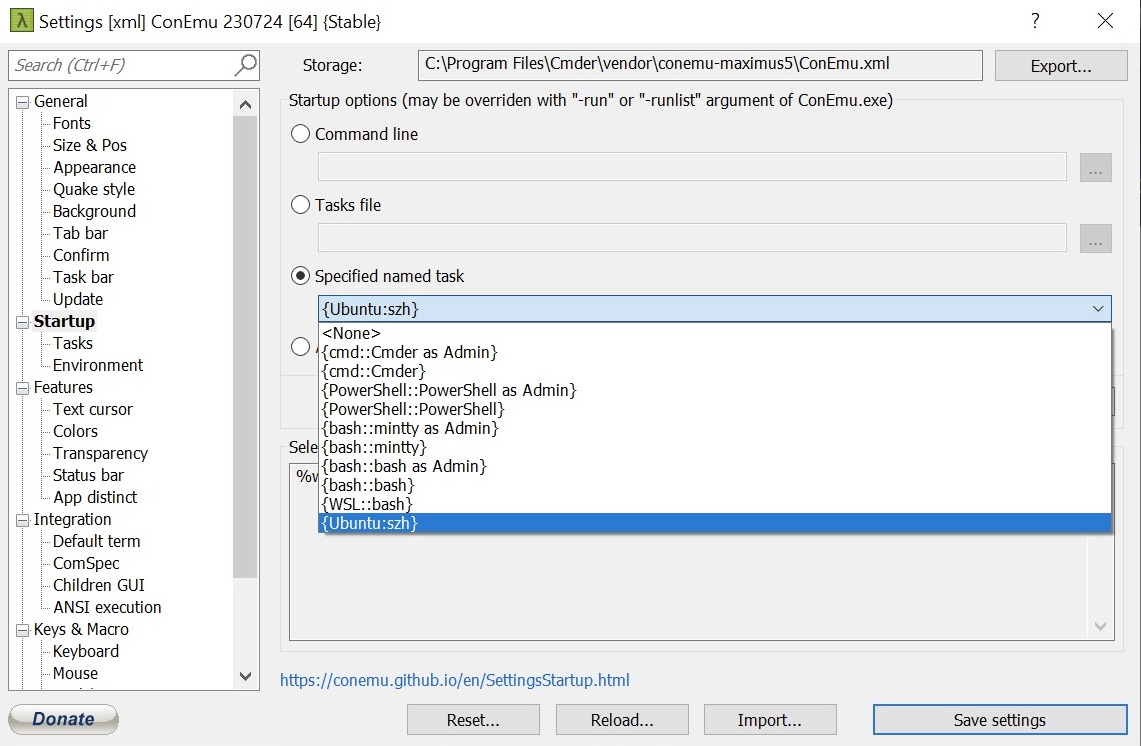
- Now if you fire up cmder you would be able to see the Ubuntu subsystem on your screen!
Note: if you are using Powerlevel10k with OhMyZSH you will need to install
the Meslo Nerd Font patched for Powerlevel10k
and set up the right fonts Go to
Settings → General → Fontsand choose the recent installed MeslolLGS font.
References:
- The Ninja console you deserve — How to install Cmder, WSL and Zsh in Windows 10
- Setup cmder + wsl
- Setting up Windows Subsystem for Linux with zsh + oh-my-zsh + ConEmu
- Set up Bash(Ubuntu) in Cmder
- zsh running on cmder
In order to use arr-scripts (highly recommended) we will need to create some extra directories. I will use my home
directory to store the container configuration, databases and so on. According to arr-scripts docs you should create
the following directories:
sudo mkdir -p <path_to_your_home>/dockerConfig/<sonarr|radarr>/custom-services.d
sudo mkdir -p <path_to_your_home>/dockerConfig/<sonarr|radarr>/custom-cont-init.d

# Example
sudo mkdir -p /home/develop/dockerConfig/sonarr/custom-services.d
sudo mkdir -p /home/develop/dockerConfig/sonarr/custom-cont-init.d
Next you will have to download
the scripts_init.bash and move it
to <path_to_your_home>/dockerConfig/<sonarr|radarr>/custom-cont-init.d.
cd /home/develop/dockerConfig/sonarr/custom-cont-init.d
wget https://github.com/RandomNinjaAtk/arr-scripts/blob/main/radarr/scripts_init.bashdocker run -d \
--name=radarr \
-e PUID=1000 \
-e PGID=1000 \
-e TZ=America/New_York \
-p 7878:7878 \
-v /home/develop/dockerConfig/radarr:/config \
-v /media/share/plexmedia/Movies:/movies \
-v /media/share/downloads:/downloads \
# Add the following volumes if using arr-scripts
-v /home/develop/dockerConfig/radarr/custom-services.d:/custom-services.d \
-v /home/develop/dockerConfig/radarr/custom-cont-init.d:/custom-cont-init.d \
--restart unless-stopped \
lscr.io/linuxserver/radarr:latestdocker run -d \
--name=sonarr \
-e PUID=1000 \
-e PGID=1000 \
-e TZ=America/New_York \
-p 8989:8989 \
-v /home/develop/dockerConfig/sonarr:/config \
-v /media/share/plexmedia/TvShow:/tv \
-v /media/share/downloads:/downloads \
# Add the following volumes if using arr-scripts
-v /home/develop/dockerConfig/sonarr/custom-services.d:/custom-services.d \
-v /home/develop/dockerConfig/sonarr/custom-cont-init.d:/custom-cont-init.d \
--restart unless-stopped \
lscr.io/linuxserver/sonarr:latestdocker run -d \
--name=prowlarr \
-e PUID=1000 \
-e PGID=1000 \
-e TZ=Etc/UTC \
-p 9696:9696 \
-v /home/develop/dockerConfig/prowlarr:/config \
--restart unless-stopped \
lscr.io/linuxserver/prowlarr:latestdocker run -d \
--name=deluge \
-e PUID=1000 \
-e PGID=1000 \
-e TZ=America/New_York \
-e DELUGE_LOGLEVEL=error \
-p 8112:8112 \
-p 6881:6881 \
-p 6881:6881/udp \
-v /home/develop/dockerConfig/deluge:/config \
-v /media/share/downloads:/downloads \
--restart unless-stopped \
lscr.io/linuxserver/deluge:latestdocker run -d \
-p 8000:8000 \
-p 9443:9443 \
--name portainer \
--restart=always \
-v /var/run/docker.sock:/var/run/docker.sock \
-v portainer_data:/data \
portainer/portainer-ce:latestdocker run -d \
--name=flaresolverr \
-p 8191:8191 \
-e LOG_LEVEL=info \
-e TZ=America/New_York \
--restart unless-stopped \
ghcr.io/flaresolverr/flaresolverr:latest