This is a plugin for SublimeText3 to enable ID-based, Wiki-style links, and #tags in your documents.
If you follow the (plain-text) Zettelkasten method (as proposed by Zettelkasten.de or takesmartnotes.com), this might appeal to you.
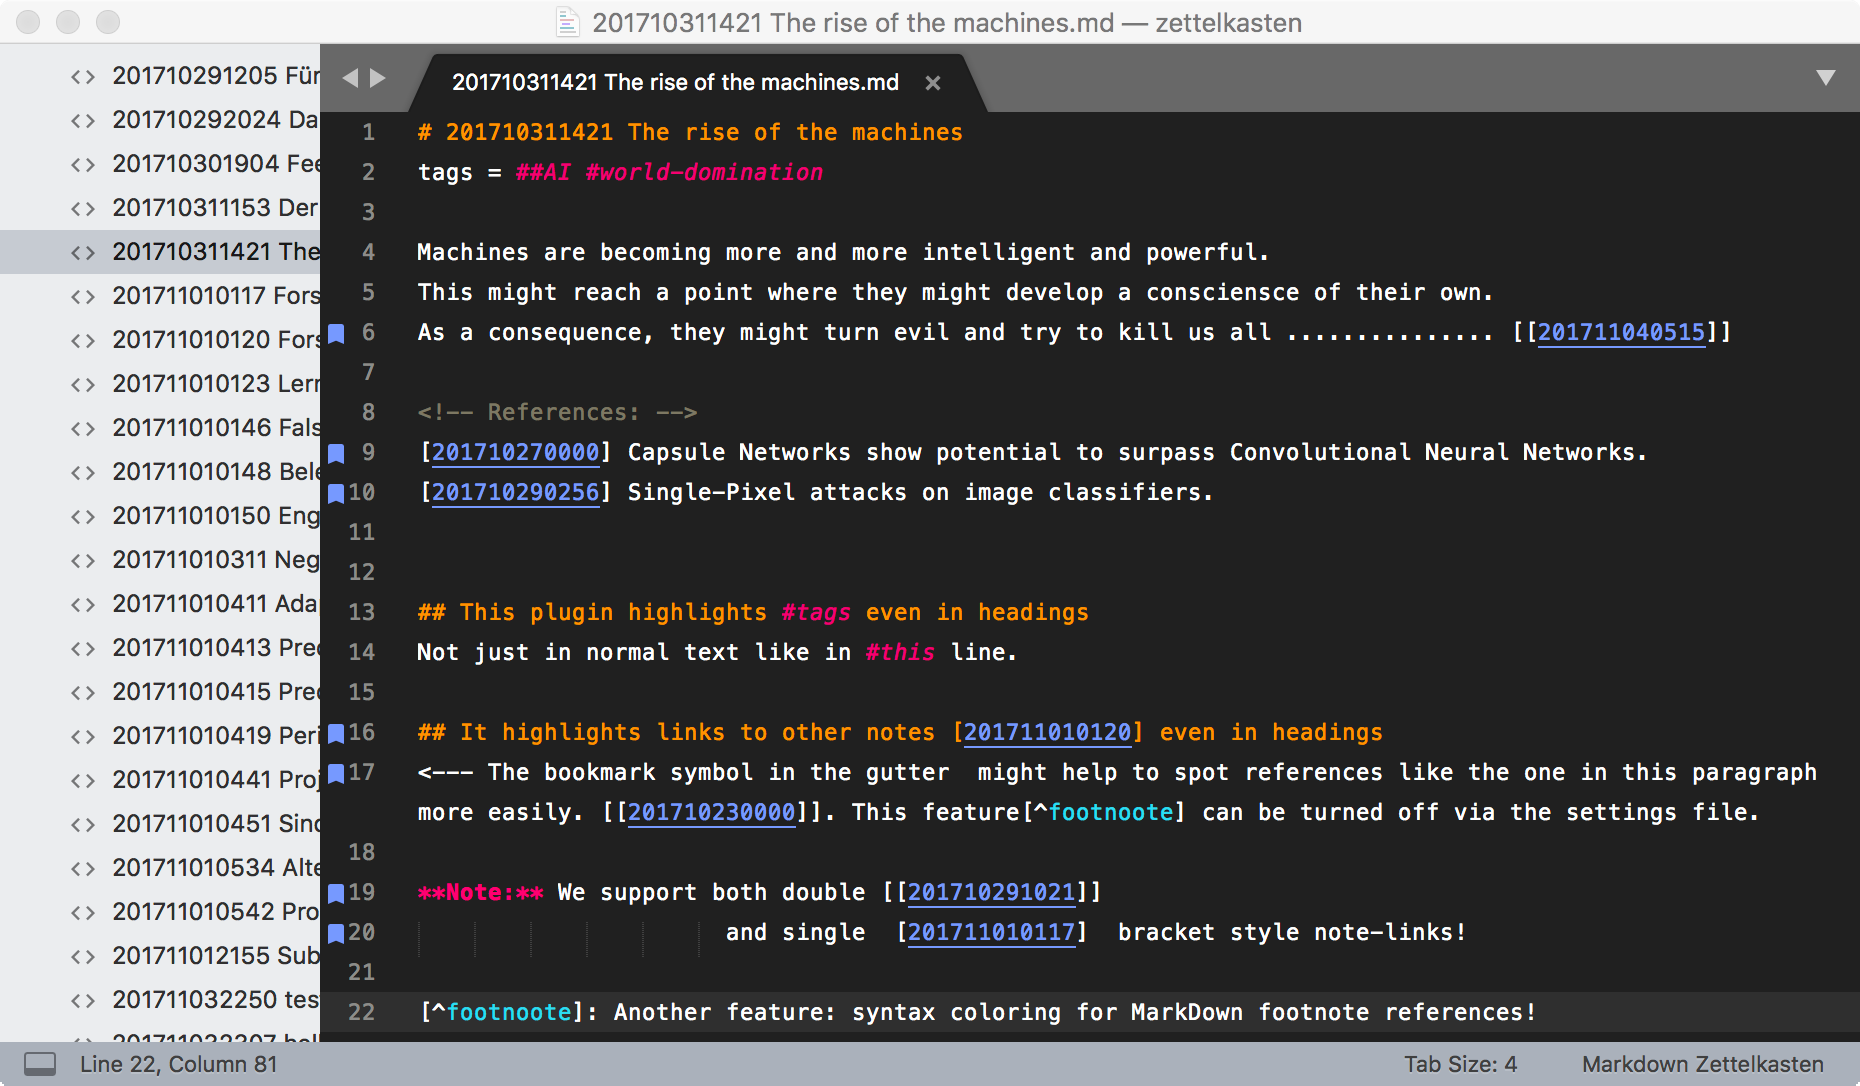
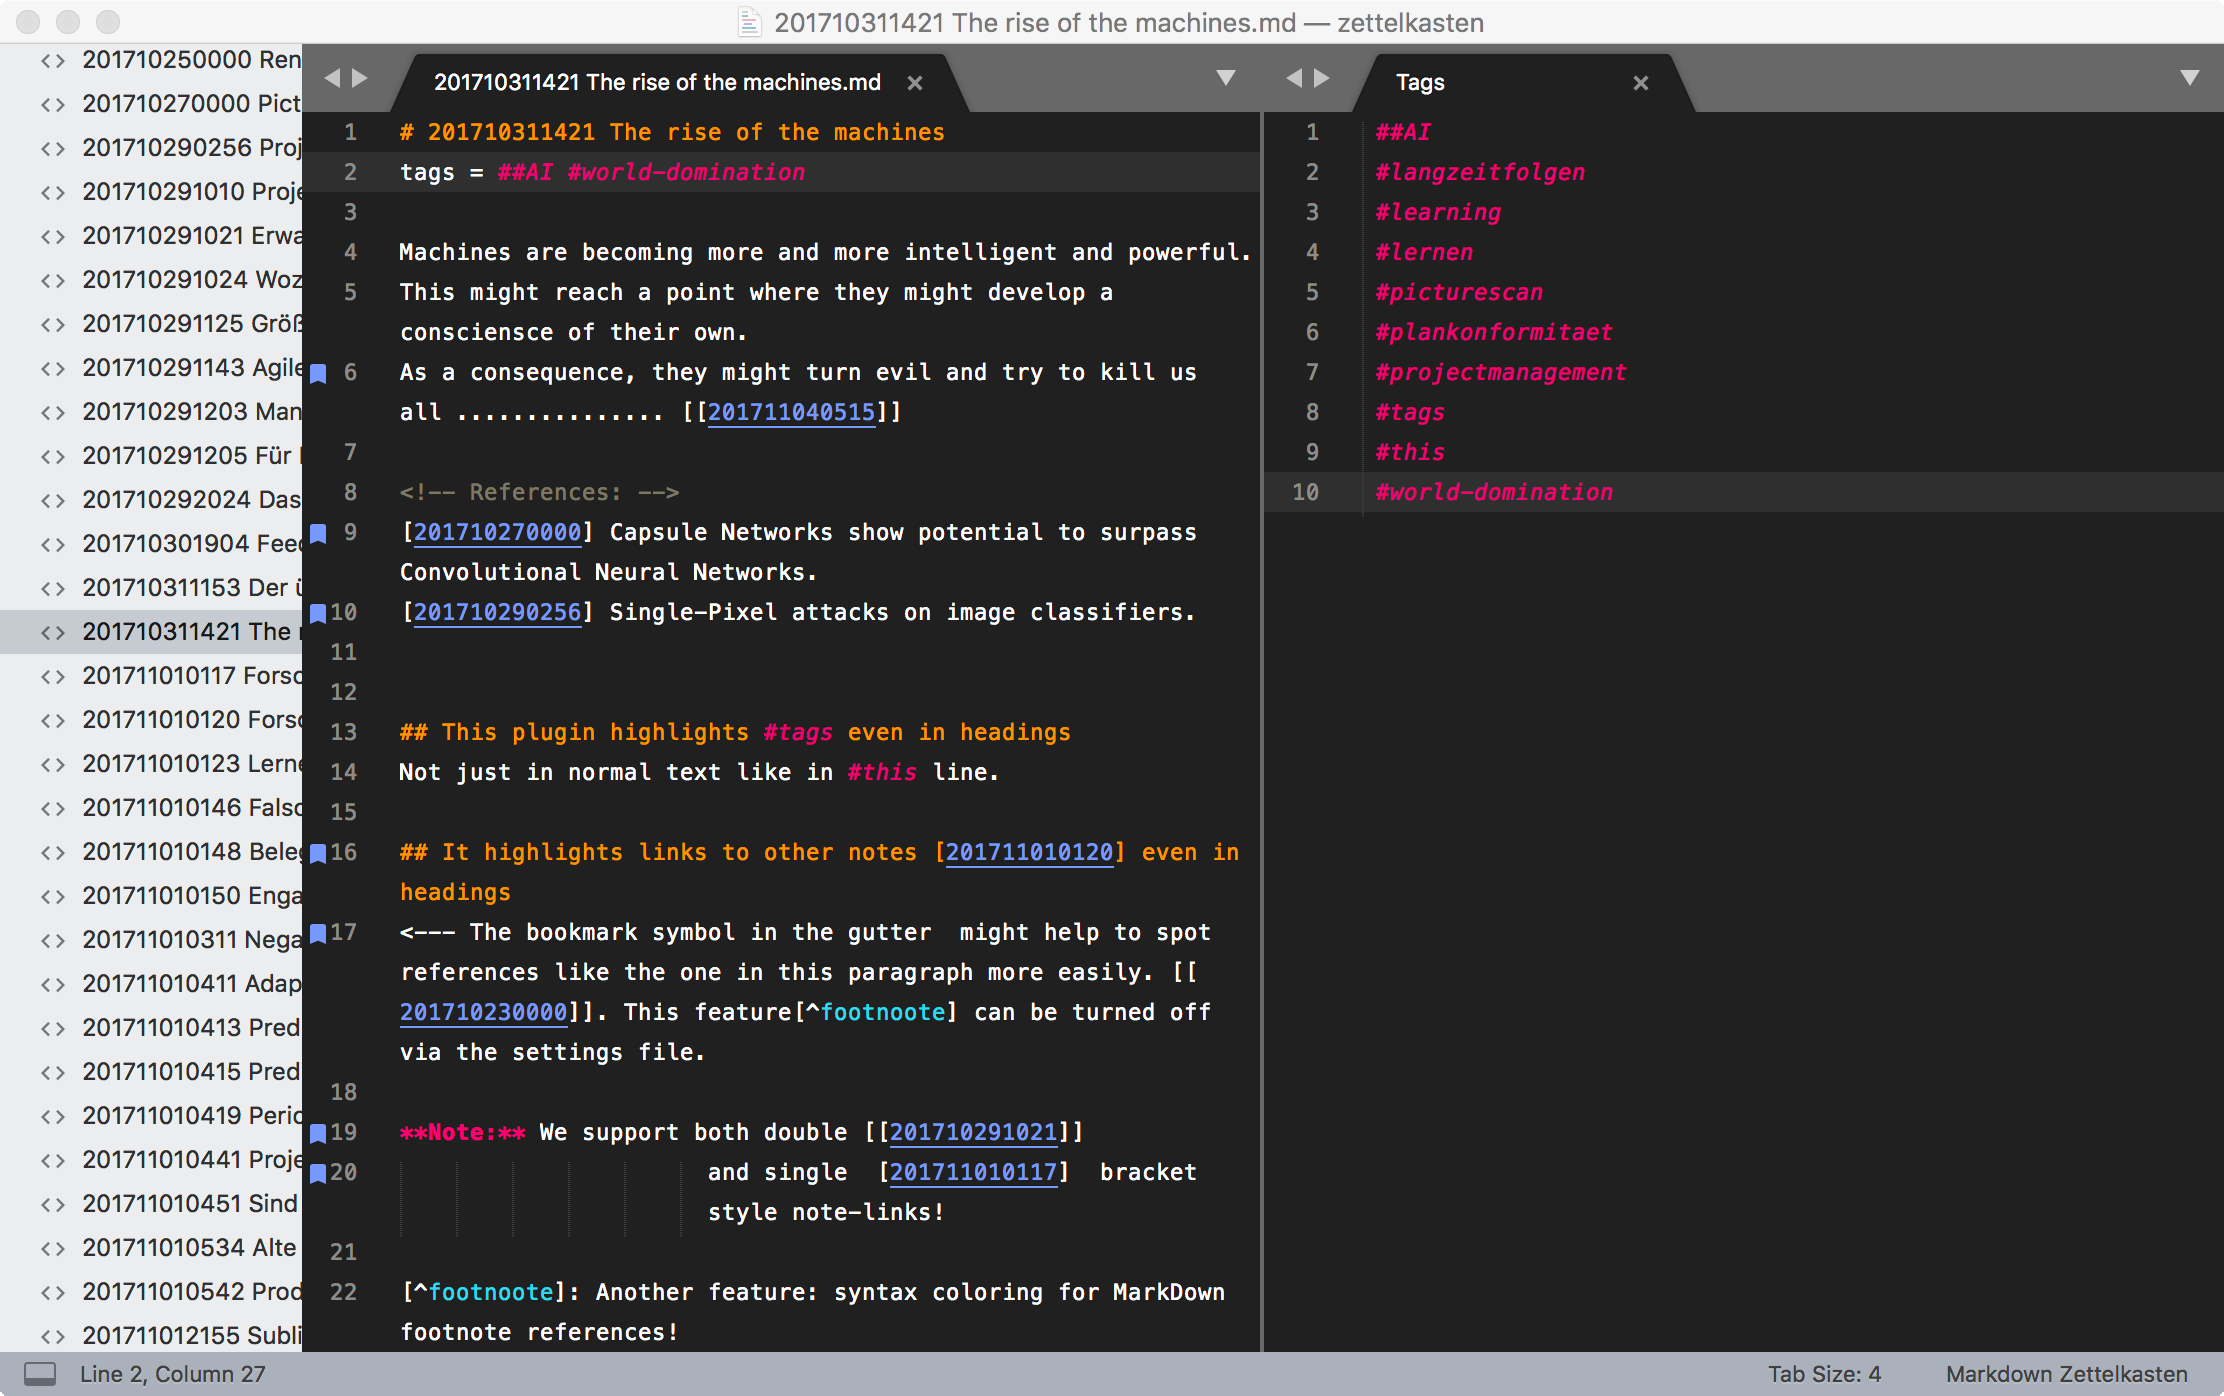
In short, it helps you manage an archive of interlinked notes that look like this:
See the Usage section below to see how this package might support your workflow.
(This package is still in active development. If you like, stay up to date with latest developments at: Its dedicated Zettelkasten.de Forum Thread)
- This plugin enables you to place wiki style links like
[[this]]or[this](and old-school links like this§201711111709) into your notes to link to other notes in your note archive. - Clicking such a link and pressing
[ctrl]+[enter]will open the corresponding note. - Alternatively, double-clicking the link while holding the
[alt]key down, will also open the corresponding note. - Clicking such a link and pressing
[alt]+[enter]will search for all notes also referencing the linked note ('friend notes'). - Typing
[[will open a list of existing notes so you can quickly link to existing notes. - Typing
[ctrl]+[space](or[alt]+[/]on Linux) will trigger note-link auto-completion for even quicker insertion of links to other notes. - Typing
[shift]+[enter]lets you enter a name for a new note. The new note is then created with a new note ID. - Implicit note creation via links to non-existing notes' titles, see below.
- The ID format is timestamp-based YYYYMMDDHHMM - eg: 201710282111, but can be switched second-precision YYYYMMDDHHMMSS - eg: 20171224183045
- Highlighting of note links
- Highlighting of #tags
- Highlighting of footnote references
[^like this one]and[ref. @pandoc]references. - Typing
[#][!]will create a scratch file containing all your #tags, sorted [#][?]opens up a list of all your #tags and lets you fuzzy search and select them (like note-links).- Clicking a #tag or citekey and pressing
[ctrl]+[enter]will search for all notes containing this tag / citekey. - Alternatively
[alt]+ double clicking the tag/citekey will do the same thing. - Support for
ag, The Silver Searcher - Expansion of overview notes with selective refresh!!!
- Templates for new notes
- Optional insertion of
[[links]] WITH note titlesinstead of just[[links]] - Inline expansion of note links, tags, and citekeys via
[ctrl]+[.] - Searching for advanced tag combinations
- Automatic Bibliographies, auto-completion for citekeys, and fuzzy-search insertion of citations
- Inline Local Image Display
- Automatic Table Of Contents
- Automatic Section Numbering
- Support for Panes
- NEW: Color Schemes
- !!! NEW !!! Zettelkasten Mode
- Installation
- Configuration
- Zettelkasten note folder
- Markdown filename extension
- Single or double brackets
- Note ID precision
- Insert links with or without titles
- IDs in titles of new notes
- New Note templates
- Highlight references to other notes
- Syntax Coloring for #tags, footnotes, and pandoc references
- Configuring SublimeText's line spacing
- Location of your .bib file
- Citation Reference Style
- Inline image preview size
- Auto inline image preview
- Default panes
- Usage
- Shortcut cheatsheet
- Creating a new note
- Creating a new note and link from selected text
- Creating a link
- Searching for friends
- Listing all notes
- Working with tags
- Expansion of overview notes with selective refresh
- Working with Bibliographies
- Inline Local Image Display
- Section Numbering and Table Of Contents
- Working with Panes
- The Ultimate Zettelkasten Mode
- Credits
Sublime Text comes with Package Control, a feature which allows you to easily install and update third party packages. You can use it to install this package and keep it up to date:
- Install Sublime Text 3
- Use the Command Palette (Tools > Command Palette...) and run Install Package Control. Sublime Text will alert you when the installation has finished.
- Use the Command Palette and run Package Control: Add Repository
- Add the URL of this repository
https://github.com/renerocksai/sublime_zkinto the panel that appears at the bottom of the window and pressEnter. - Use the Command Palette and run Package Control: Install Package and search for
sublime_zkfrom the list of available packages. Select it and pressEnterto install the package. - You can keep your packages up to date by running Package Control: Upgrade Package from the Command Palette.
Note: If you're on macOS and have troubles installing through package control as described above, please see this issue for a fix.
Note: I'm still awaiting a go from package control. Once this has gone through, you will be able to use package control like this:
- Install Sublime Text 3
- Use the Command Palette (Tools > Command Palette...) and run Install Package Control. Sublime Text will alert you when the installation has finished.
- Use the Command Palette and run Package Control: Install Package and search for
Zettelkasten - sublime_zkfrom the list of available packages. Select it and pressEnterto install the package.- You can keep your packages up to date by running Package Control: Upgrade Package from the Command Palette.
The following steps cover all dependencies and prerequisites. Skip the steps you don't need:
- Install Sublime Text 3
- Download the sublime_zk zip from this repo.
- Unzip the sublime_zk plugin. You should get a
sublime_zkfolder. - Under Preferences, go to 'Browse Packages...'. This opens the package location of SublimeText in your file browser.
- Copy the
sublime_zkfolder into the package location folder from the previous step.
You should be all set.
This plugin can make use of ag, The Silver Searcher, to dramatically speed up and improve the search for all tags, the tag selector, tagged notes search, and friend note search features. According to its Installation Instructions, it is fairly easy to install on macOS, Linux, BSD and Windows:
- macOS installation
- Linux installation
- BSD installation
- Windows installation
- Alternate Windows installation using Chocolatey:
choco install ag - Alternate Windows installation using Scoop:
scoop install ag - Note: If you use the Unofficial daily builds make sure when you download them, to put them into a folder referenced by your PATH environment variable so they can be found by the plugin.
- Alternate Windows installation using Chocolatey:
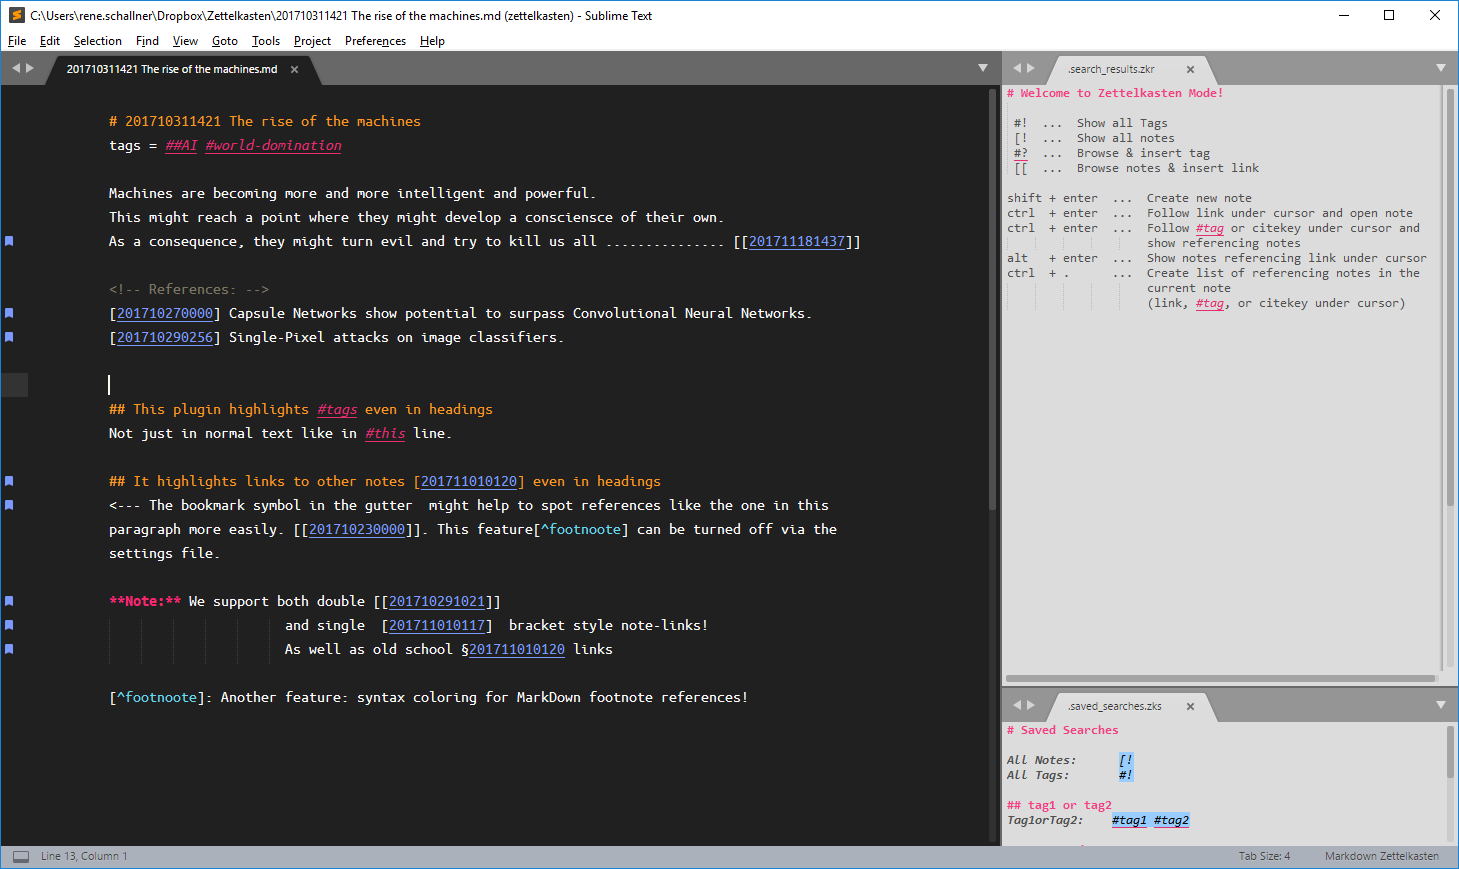
Note: You really want to install The Silver Searcher. It makes this plugin much more useful. If ag is present, the plugin makes use of a permanent search results file that gets updated with the results of searches for tags, referencing notes, the tag list, etc. This really shines when searching for tagged notes and searching for friend notes.
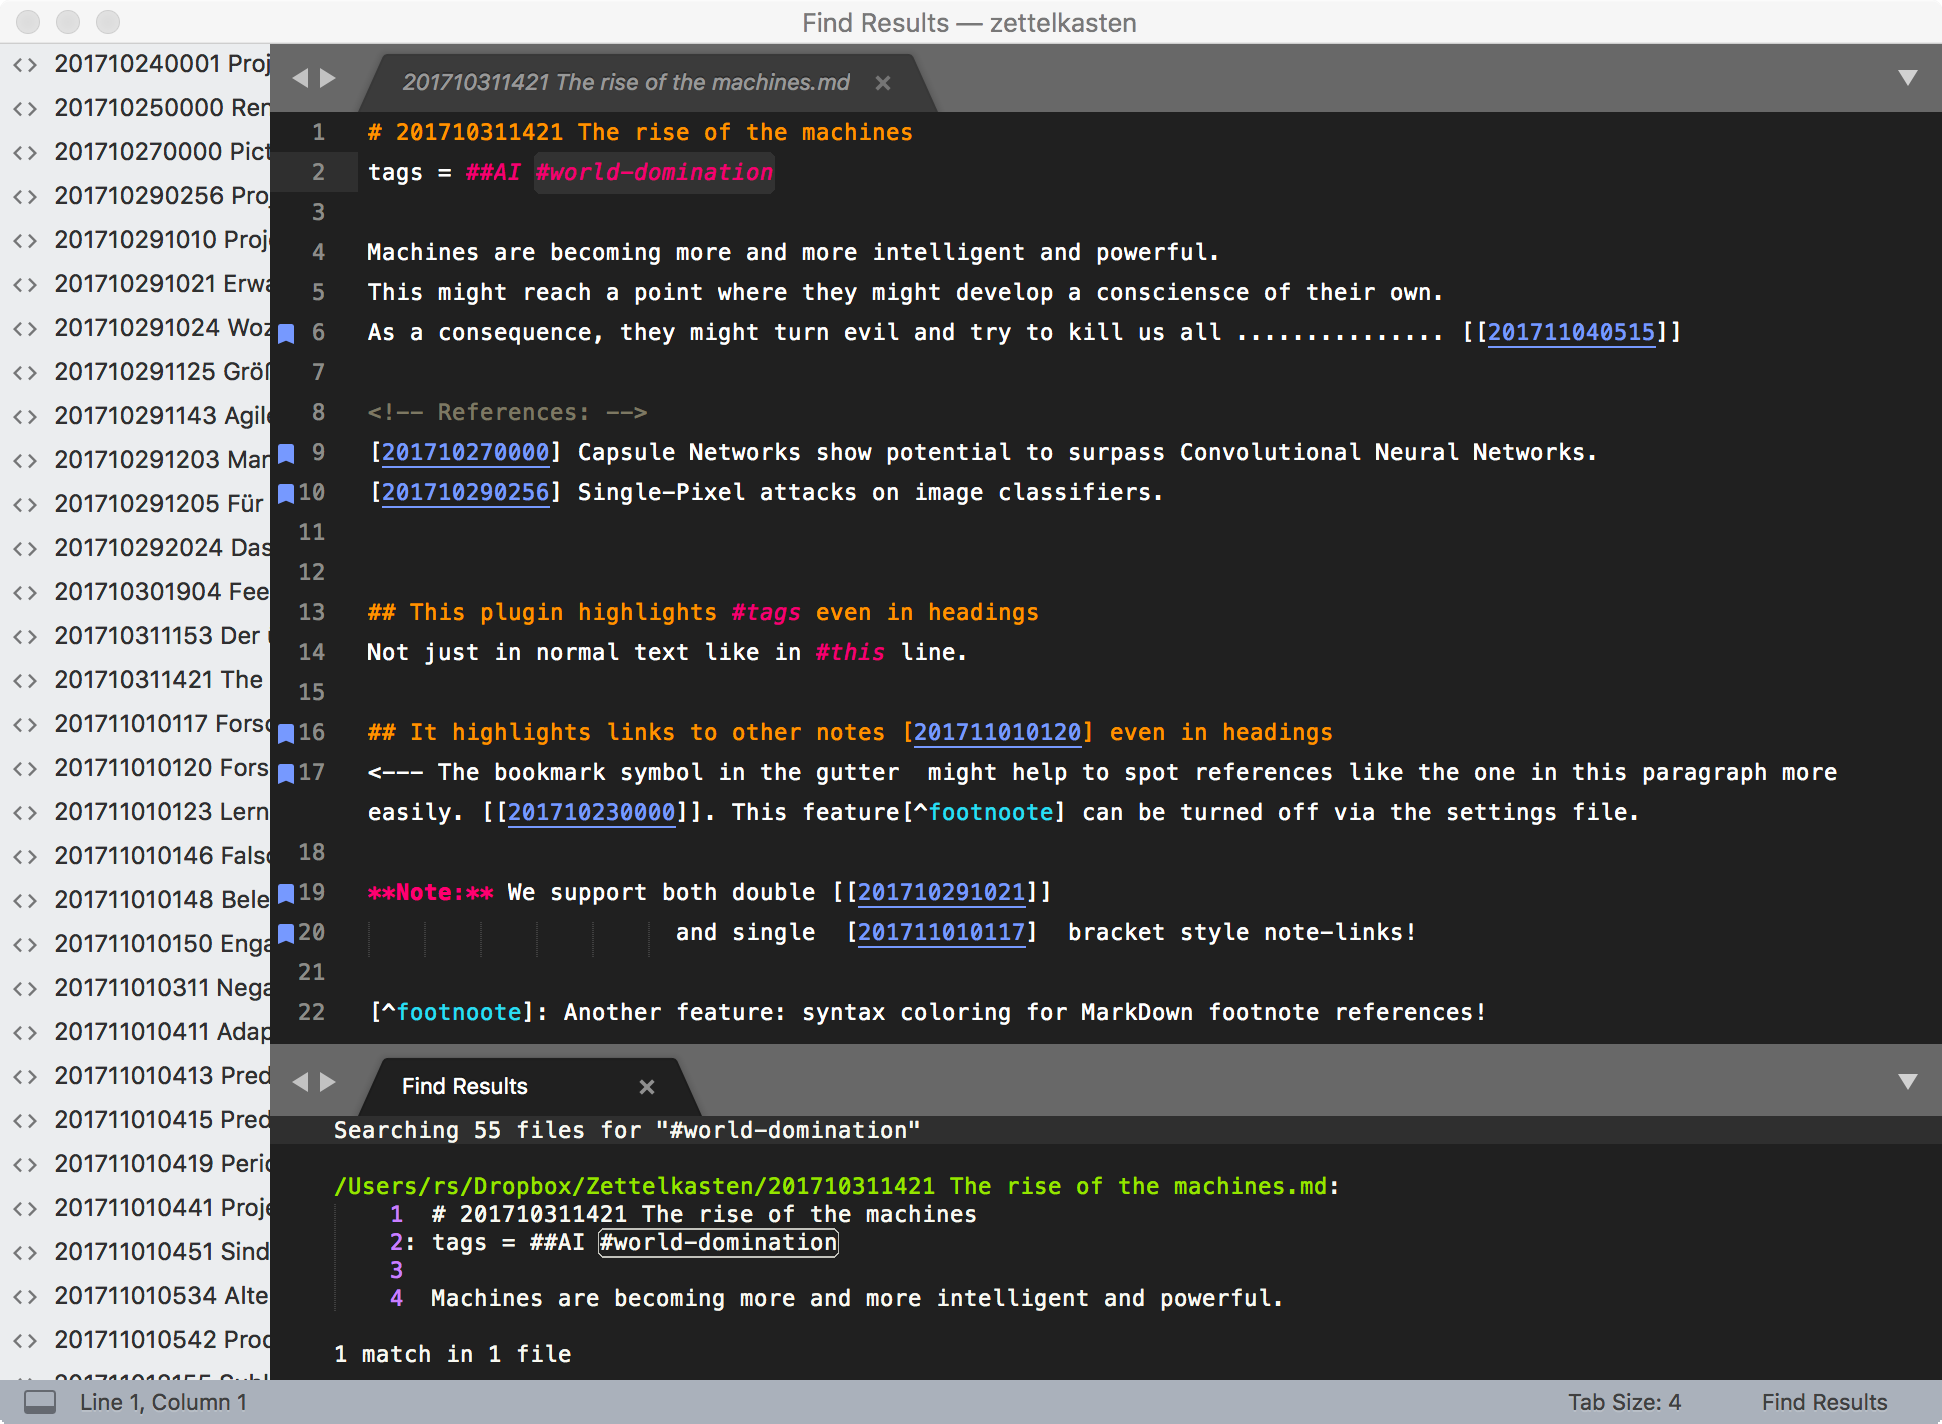
The permanent search results file is like a navigation-window and is especially useful when using a non-single layout, like in this screenshot:

Whether you use Pandoc or not for Markdown processing, the AutoBib feature requires it. Luckily it is easy to install.
No further configuration is necessary. This Zettelkasten plugin works with SublimeText projects. It will use exactly the same directory where your SublimeText project file is located.
That's easier than it might look. This is how I do it:
Just start working and create a new note! In an empty SublimeText window with no project or file open:
- bring up the command palette by pressing
[cmd]+[shift]+[p]on macOS ([ctrl]+[shift]+[p]on Windows and Linux). - type
zkto list the Zettelkasten commands. - select
ZK: New Zettel Note
After entering the note's title, SublimeText will ask you where to save your new note and its corresponding project file. From then on, you'll be working in the very project directory that you just selected or created.
Note: Once your Zettelkasten project is created, you can use the shortcut [shift]+[enter] to create new notes.
If you want to create an empty project first and then start creating notes or if you want to create a project for a folder that already contains notes, here is what I would do:
- Start with a fresh SublimeText window (containing no open files or projects).
- Use the menu: "Projects" -> "Save Project As ..." and save this empty project into your desired Zettelkasten folder, giving the project file a name other than untitled if you like.
- Now add the Zettelkasten folder to your project: "Project" -> "Add Folder To Project..." and select your Zettelkasten folder.
- Done! :-)
By default, the extension .md is used for your notes. If that does not match your style, you can change it in the sublime_zk.sublime-settings file. Just replace .md with .txt or .mdown or whatever you like.
Whether you want to use [[this link style]] or [that link style] is totally up to you. Both work. But you need to configure which style you prefer, so automatically inserted links will match your style. [[double bracket]] links are the default, and if you want to change that to single bracket links, set the double_brackets parameter to false in the sublime_zk.sublime-settings.
The default note ID format is a timestamp in YYYYMMDDHHMM format, with minute precision. If you tend to create more than one note per minute, this can be a problem. In that case, you can change the note ID format to YYYYMMDDHHMMSS, with second-precision.
The following setting influences the note ID format:
    // seconds in note IDs?
    // if true : YYYYMMDDHHMMSS 20171224183045
    // if false: YYYYMMDDHHMM   201712241830
"seconds_in_id": true,There are numerous times where the plugin inserts a [[link]] to a note into your text on your behalf. You may not only choose the single or double-bracketness of the links, you may also choose whether the note title should follow the inserted link.
The setting "insert_links_with_titles" takes care of that and is set to false by default:
// links like "[[199901012359]] and note title" instead of "[[199901012359]]"
"insert_links_with_titles": false,
Examples how inserted links might look like depending on this setting:
`insert_links_with_titles` is `true`:
[[199901012359]] and note title


`insert_links_with_titles` is `false`:
[[199901012359]]When you create a new note, its title will automatically be inserted and an ID will be assigned to it (see Creating a new note). If you want the ID to be part of the title, change the setting id_in_title from false to true.
Example for a note created with ID:
# 201710310128 This is a note with its ID in the title
tags=

The setting id_in_title is set to true.
Example for a note created without ID:
# A note without an ID
tags =

The setting id_in_title is set to false.
You can find this setting in the file sublime_zk.sublime-settings.
If you need further customizing of how your new notes should look like, you can define your own template:
In your package's settings (user) just put in a line like this:
"new_note_template": "---\nuid: {id}\ntags: \n---\n",
To produce new notes like this:
---
uid: 201711150402
tags:
---
The format string works like this:
\ncreates a new line.{id}: the note id like201712241830{title}: note title likeWhy we should celebrate Christmas{origin_id}: the id of the note you came from when creating a new note{origin_title}: the title of the note you came from when creating a new note{file}: the filename of the note like201712241830 Why we should celebrate Christmas.md{path}: the path of the note like/home/reschal/Dropbox/Zettelkasten{timestamp: format-string}: the date timestamp formatted by format-string, see [below]
origin might need a bit of explanation: When you are in note 201701010101 and create a new note via [shift]+[enter] or via [[implicit note creation via title]], the new note will get a new id, maybe 201702020202. Its {id} therefore will be 201702020202 and its {origin} will be 201701010101.
| Directive | Meaning | Example |
|---|---|---|
%a |
Weekday as locale’s abbreviated name. | Sun, Mon, …, Sat (en_US); So, Mo, …, Sa (de_DE) |
%A |
Weekday as locale’s full name. | Sunday, Monday, …, Saturday (en_US); Sonntag, Montag, …, Samstag (de_DE) |
%d |
Day of the month as a zero-padded decimal number. | 01, 02, …, 31 |
%b |
Month as locale’s abbreviated name. | Jan, Feb, …, Dec (en_US); Jan, Feb, …, Dez (de_DE) |
%B |
Month as locale’s full name. | January, February, …, December (en_US); Januar, Februar, …, Dezember (de_DE) |
%m |
Month as a zero-padded decimal number. | 01, 02, …, 12 |
%y |
Year without century as a zero-padded decimal number. | 00, 01, …, 99 |
%Y |
Year with century as a decimal number. | 2017, 2018, … |
%H |
Hour (24-hour clock) as a zero-padded decimal number. | 00, 01, …, 23 |
%I |
Hour (12-hour clock) as a zero-padded decimal number. | 00, 01, …, 12 |
%p |
Locale’s equivalent of either AM or PM. | AM, PM (en_US); am, pm (de_DE) |
%M |
Minute as a zero-padded decimal number. | 01, 02, …, 59 |
%S |
Second as a zero-padded decimal number. | 01, 02, …, 59 |
%j |
Day of the year as a zero-padded decimal number. | 001, 002, …, 366 |
%U |
Week number of the year (Sunday as the first day of the week) as a zero padded decimal number. All days in a new year preceding the first Sunday are considered to be in week 0. | 00, 01, …, 53 |
%W |
Week number of the year (Monday as the first day of the week) as a zero padded decimal number. All days in a new year preceding the first Monday are considered to be in week 0. | 00, 01, …, 53 |
%c |
Locale’s appropriate date and time representation. | Tue Aug 16 21:30:00 1988 (en_US); Di 16 Aug 21:30:00 1988 (de_DE) |
%c |
Locale’s appropriate date representation. | 08/16/88 (None); 08/16/1988 (en_US); 16.08.1988 (de_DE) |
%% |
A literal % character. |
% |
{timestamp: %Y-%m-%d %H:%M}: 2018-02-26 16:32{timestamp: %a, %b %d, %Y}: Mon, Feb 26, 2018
To produce a YAML note header (for pandoc), like this:
---
note-id: 201802270019
title:  Date Test
author: First Last
date: 2018-02-27
tags:
---
you can use the following settings:
// when creating a new note, put id into title?
 // false to disable
"id_in_title": false,

// Template for new notes
"new_note_template":
"---\nnote-id: {id}\ntitle: {title}\nauthor: First Last\ndate: {timestamp: %Y-%m-%d}\ntags: \n---\n",By default, this plugin highlights links to other notes by underlining them.
Note: This only applies to links containing an ID, like this one: [[201710290256]].
It also shows a bookmark symbol in the gutter to the left of your text. These features can be controlled via the following settings in sublime_zk.sublime-settings:
    // highlight links to other notes?
    "highlight_note_links": true,

    // when highlighting: also show bookmark symbols in the gutter?
"show_bookmarks_in_gutter": true,To enable highlighting of #tags, footnotes, and pandoc references in your newly created note, and for all your Zettelkasten notes, switch Sublime Text's syntax to sublime_zk > Markdown Zettelkasten. You can use the menu: 'View' -> 'Syntax' -> 'Open all with current extension as...', and select 'sublime_zk > Markdown Zettelkasten'.
DISCLAIMER: As of 2018-05-07 evening, this package had to incorporate pretty much the entire MarkdownExtended syntax from Jon Schlinkert. This was necessary because SublimeText build 3170 would not accept the previous syntax definition (that just referenced any existing Markdown syntax).

This package provides the color scheme Monokai Extended - Zettelkasten. You can select it via the menu: Preferences -> Color Scheme... -> Monokai Extended - Zettelkasten. (The original Monokai Extended for SublimeText has been created by @jonschlinkert).
The Monokai Extended - Zettelkasten color scheme is used for illustrations in this README.
To enable this color scheme for (just) your Zettelkasten notes automatically, stick the following into the sublime_zk.sublime-settings:
"color_scheme": "Packages/sublime_zk/Monokai Extended-zk.tmTheme",
This color scheme is installed under the name Solarized (Light)-ZK.
If you want the best Solarized aesthetics, download the Ubuntu Mono fonts and install the following 4 by double-clicking them:
UbuntuMono-R.ttfUbuntuMono-RI.ttfUbuntuMono-B.ttfUbuntuMono-BI.ttf
and then experiment with these settings in sublime_zk.sublime-settings:
    // Solarized like The Archive
    "font_face": "Ubuntu Mono",
    "color_scheme": "Packages/sublime_zk/Solarized (Light) - ZK.tmTheme",
    "font_size": 16,
    "line_padding_bottom": 4,
    "line_padding_top": 4,
    "line_numbers": false,
    "gutter": true,
"margin": 60,If you know what a Commodore 64 is, you might enjoy this theme 😄

For a perfect C64 experience, download the best C64 True Type Font, unzip it, and install the C64 Pro Mono.ttf by double clicking it.
I used the following sublime_zk.sublime-settings for the screen-shot:
    "font_face": "C64 Pro Mono",     // only if you have them installed
    "color_scheme": "Packages/sublime_zk/C64-ZK.tmTheme",
    "font_size": 12,
    "line_padding_bottom": 4,
    "line_padding_top": 4,
    "line_numbers": false,
    "gutter": true,
    "margin": 80,
    "wrap_width": 80,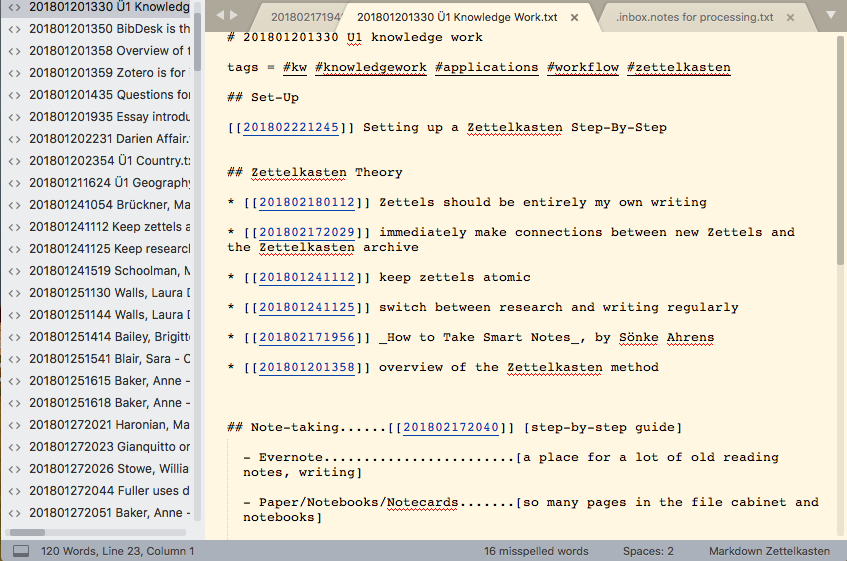
If you're interested in a color scheme that attempts to resemble the nvALT scheme, then check out Zettel Coffee.
If you want to use your own color scheme, you have to tweak it manually:
- Google is your friend - make a copy of your existing color scheme
- Add the following to your new color scheme
- (Tweak the HTML color codes)
    <dict>
      <key>name</key>
      <string>Markup: Zettelkasten note link</string>
      <key>scope</key>
      <string>markup.zettel.link</string>
      <key>settings</key>
      <dict>
        <key>fontStyle</key>
        <string>underline</string>
        <key>foreground</key>
        <string>#7a9aff</string>
      </dict>
    </dict>
    <dict>
      <key>name</key>
      <string>Markup: Zettelkasten note link title</string>
      <key>scope</key>
      <string>markup.zettel.linktitle</string>
      <key>settings</key>
      <dict>
        <key>fontStyle</key>
        <string>underline</string>
        <key>foreground</key>
        <string>#7a9aff</string>
      </dict>
    </dict>
    <dict>
      <key>name</key>
      <string>Markup: Zettelkasten tag</string>
      <key>scope</key>
      <string>markup.zettel.tag</string>
      <key>settings</key>
      <dict>
        <key>fontStyle</key>
        <string>italic</string>
        <key>foreground</key>
        <string>#e42e70</string>
      </dict>
    </dict>
    <dict>
      <key>name</key>
      <string>Markup: Zettelkasten Image attrs in image link</string>
      <key>scope</key>
      <string>meta.image.inline.markdown.imageattr</string>
      <key>settings</key>
      <dict>
        <key>foreground</key>
        <string>#F0E68C</string>
      </dict>
</dict>When looking at the screenshot at the beginning of this document, you might have noticed the line spacing. I find it very pleasant to work with text this way. To configure SublimeText to use this line spacing:
- use the menu: "Preferences" --> "Settings - Syntax specific"
- SublimeText will show you two files side-by-side
- change the one on the right side (also named
sublime_zk.sublime-settings) as follows:
// These settings override both User and Default settings for the sublime_zk syntax
{
	"line_padding_bottom": 3,
	"line_padding_top": 3,
}
Note: The above file is part of your "User" settings and will be created by SublimeText automatically. It is not the one you downloaded with this plugin. So please don't confuse the two :-)
If you work with bibliographies, this plugin can make use of your .bib files to enable auto-completion for @citekeys (or #citekeys if you use MultiMarkdown) and automatic creation of bibliographies inside of your notes.
Note: If a .bib file resides in your note archive folder then the plugin will find it automatically. No configuration needed!
Hint: If you happen to work with multiple note archives, each requiring its own .bib file, it makes sense to make the .bib files part of their corresponding note archives.
However, if you maintain your .bib file outside of your note archive then you can configure its location in the plugin's settings; just add a line like this:
"bibfile": "/path/to/zotero.bib",
In cases where both a bibfile setting is present and an actual .bib file is found in your note archive, the one in the note archive will be used.
Two major ways to handle citations in Markdown documents exist: Pandoc and MultiMarkdown. Which one you use, depends on your preferred tool-chain.
Note: Pandoc style is the default, see below how to change this.
Example for pandoc:
Reference to some awesome article [@awesome2017].

<!-- bibliography
[@awesome2017]: Mr. Awesome. 2017. _On Being Awesome_
-->
Example for MultiMarkdown:
Reference to some awesome article [][#awesome2017].

<!-- bibliography -->
[#awesome2017]: Mr. Awesome. 2017. _On Being Awesome_
The following line in the plugin's settings turns MultiMarkdown mode on:
"citations-mmd-style": true,
This plugin can show local images directly inside your note. To make sure that huge images won't steal too much of your screen, you can limit their size by width. Larger images will always be scaled to not exceed the maximum width.
The default setting limits images to be 320 pixels wide:
"img_maxwidth": 320,
Note: If you like, you can define a preview size on a per image basis. See inline local image display for more information.
If you want images displayed automatically right when you open a note, put this into the plugin settings:
"auto_show_images": true,
Please see Working with Panes how to configure the default panes notes and results should open.
- Create a new note shift + enter
- New note from text Select text, then shift + enter
- Open link with keyboard Selector on text + ctrl + enter
- Open link with mouse Alt + double-click on link
- Autocomplete find document [ + [
- Autocomplete to insert link ctrl + space
- Find references Selector in link + alt + enter
- View all tags # + !
- View all notes [ + !
- Autocomplete tag # + ?
- Find tag references Selector in tag ctrl + enter
- Expand link inline ctrl + .
- Expand tag inline (with referencing notes) ctrl + .
- Expand citekey inline (with referencing notes) ctrl + .
- Insert multimarkdown citation [ + # (needs
"citations-mmd-style": true) - Insert pandoc citation [ + @ (needs
"citations-mmd-style": false)
- Press
[shift]+[enter]. This will prompt you for the title of the new note at the bottom of your SublimeText window. - Press
[ESC]to cancel without creating a new note. - Enter the note title and press
[enter].
Note: [shift]+[enter] only works if you are in a note file or Zettelkasten project already. If it doesn't work, you can create a new note with the command palette:
- bring up the command palette by pressing
[cmd]+[shift]+[p]on macOS ([ctrl]+[shift]+[p]on Windows and Linux). - type
zkto list the Zettelkasten commands. - select
ZK: New Zettel Note
A new note will be created and assigned the timestamp based ID in the format described above.
Example: Let's say you entered "AI is going to kill us all" as the note title, then a file with the name 201710282118 AI is going to kill us all.md will be created and opened for you.
The new note will look like this:
# AI is going to kill us all
tags =
.There is a very convenient shortcut to create notes from selected text and automatically inserting a link to the new note, replacing the selected text: Just select the text you want to use as note title before pressing [shift]+[enter].
This will bring up the same input field at the bottom of the window, this time pre-filled with the selected text. When you press [enter], a new note will be created, using the selected text as its title. In addition, the selected text in the original note will be replaced by a link to the new note.
The following animation illustrates this:

As a bonus feature, you can even select multiple lines and create a new note complete with title and body:
- the first selected line will become the note's title
- all the other selected lines will become the note's body (text).

Let's assume, you work in the note "201710282120 The rise of the machines":
# The rise of the machines
tags = #AI #world-domination

Machines are becoming more and more intelligent and powerful.

This might reach a point where they might develop a consciensce of their own.
You figure, a link to the "AI is going to kill us all" note is a good fit to expand on that aspect of the whole machine-rise story, so you want to place a link in there.
You start typing:
# The rise of the machines
tags = #AI #world-domination

Machines are becoming more and more intelligent and powerful.

This might reach a point where they might develop a consciensce of their own.

As a consequence, they might turn evil and try to kill us all ........... [[
The moment you type [[, a list pops up with all the notes in your archive. You enter "kill" to narrow down the selection list and select the target note. Voila! You have just placed a link into your note, which now looks like this:
# The rise of the machines
tags = #AI #world-domination

Machines are becoming more and more intelligent and powerful.

This might reach a point where they might develop a consciensce of their own.

As a consequence, they might turn evil and try to kill us all ........... [[201710282118]]
Note: Only files ending with the extension specified in sublime_zk.sublime-settings (.md by default) will be listed in the popup list. If your files end with .txt, you need to change this setting.
Note: With this setting you can have the note's title inserted right after the link as well: [[201710282118]] AI is going to kill us all
If you now click into [[201710282118]] and press [ctrl]+[enter], the target note will be opened where you can read up on how AI is potentially going to kill us all.
Here you can see what the list of notes to choose from looks like:

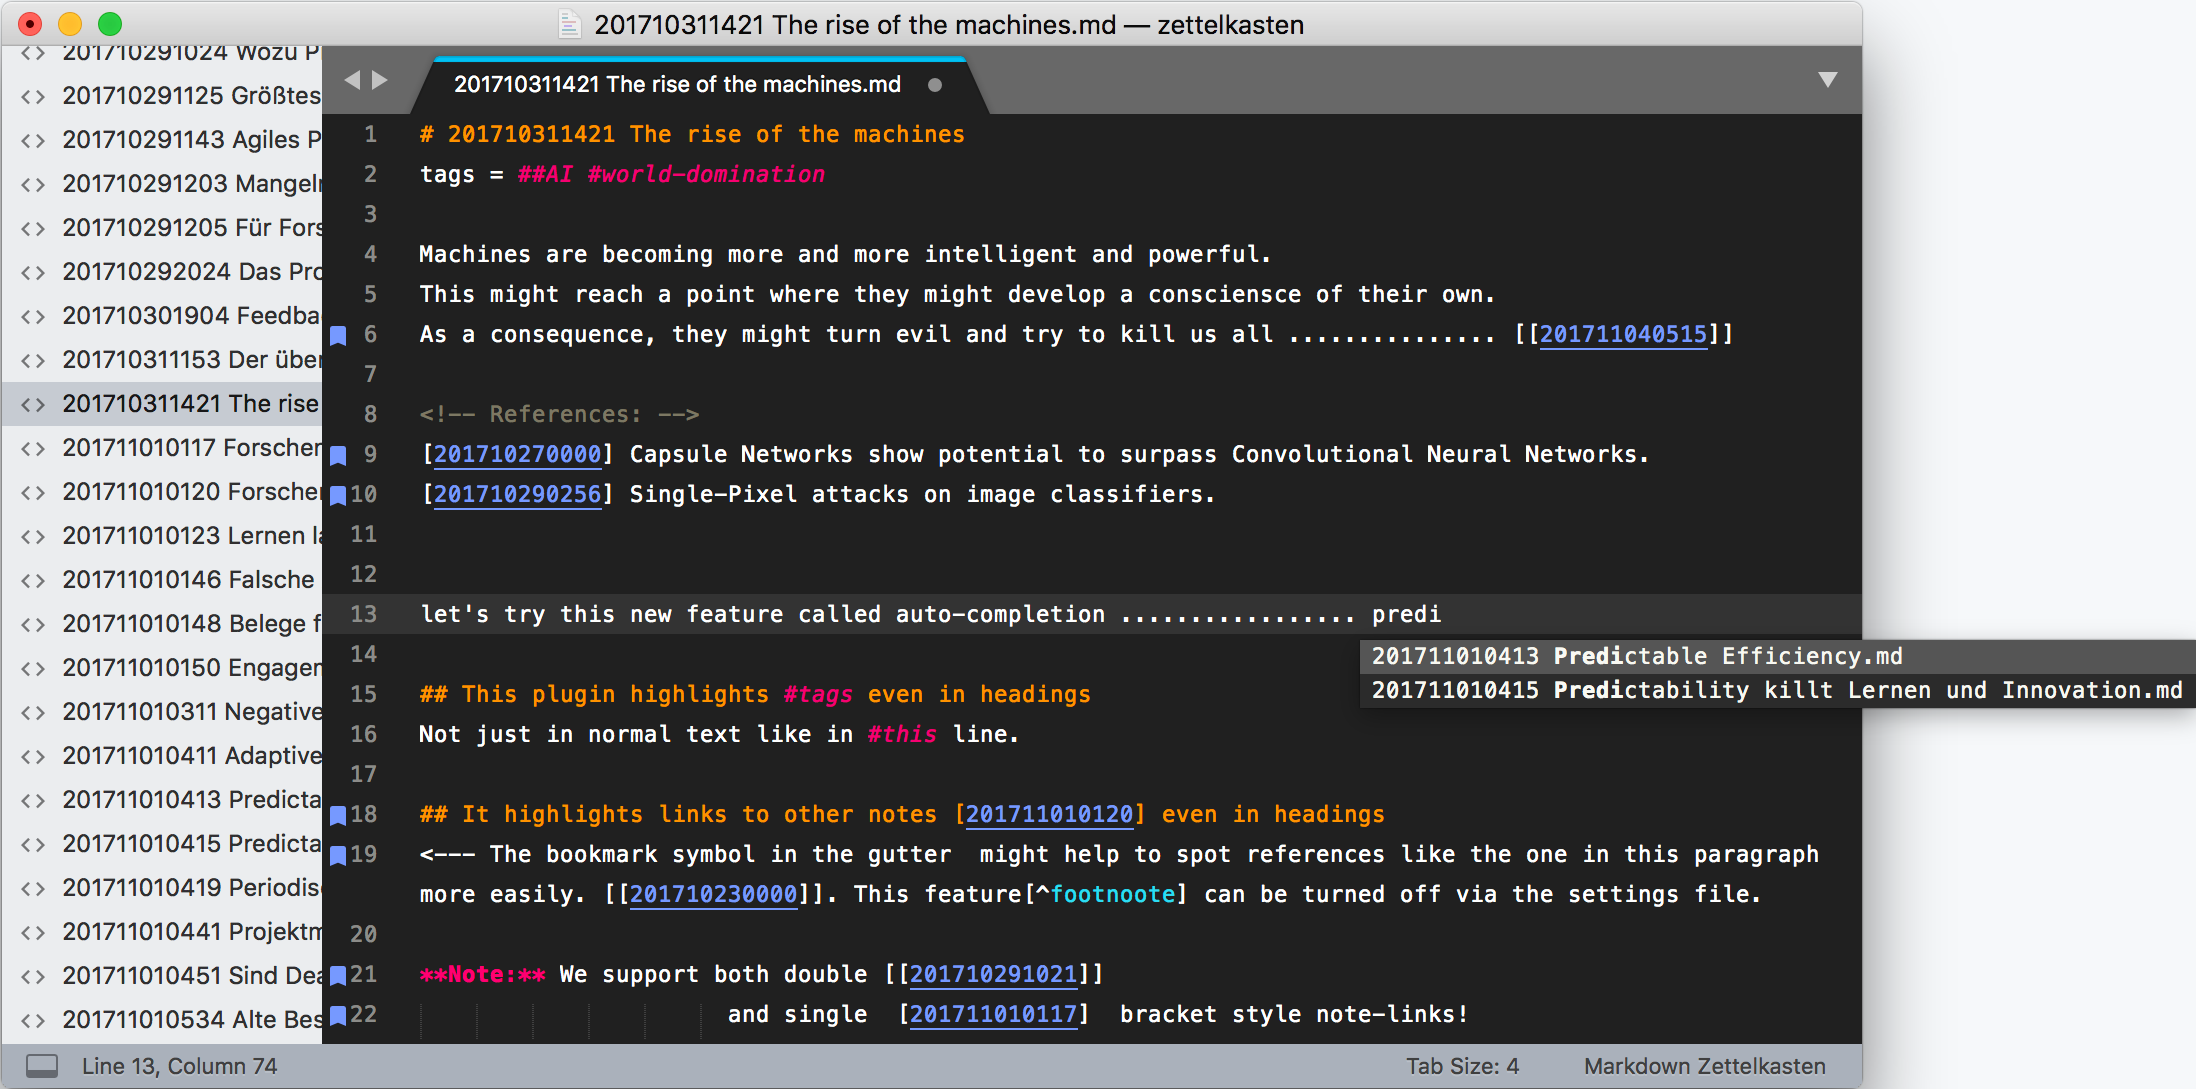
A different way to insert a link to another note is via auto-completion. This differs from the previous one in the following ways:
- auto-completion is triggered via
[ctrl]+[space](or[alt]+[/]on Linux) - the list of notes is displayed at the location of your cursor
- the font of the list is smaller, making it overall less obtrusive
You can, just as before, narrow the list auf auto-completion suggestions down by just continuing typing. However, once you write something that does not match anything in your note-list, the suggestions disappear. This is just how auto-completion works: it doesn't want to get in your way when you type something new.
Which ever method for link insertion you use is up to you.
Here is a screenshot so you can compare:
Note: With this setting you can have the note's title inserted right after the link as well, like in : [[201710282118]] AI is going to kill us all
There is another way to create a new note: Just create a link containing its title and follow the link.
To showcase this, let's modify our example from above: Say, the "AI is going to kill us all" does not exist and you're in your "The rise of the machines" note.
This is what it might look like:
# The rise of the machines
tags = #AI #world-domination

Machines are becoming more and more intelligent and powerful.

This might reach a point where they might develop a consciensce of their own.
You now want to branch into the new thought you just had, that AI might potentially eventually be going to kill us all. You prepare for that by mentioning it and inserting a link, like this:
# The rise of the machines
tags = #AI #world-domination

Machines are becoming more and more intelligent and powerful.

This might reach a point where they might develop a consciensce of their own.

As a consequence, they might turn evil and try to kill us all ........... [[AI is going to kill us all]]
Note: You will have to press [ESC] after typing [[ to get out of the note selection that pops up, before entering the note title.
Note: Of course this also works if you use a single quote link: [AI is going to kill us all].
Now, in order to actually create the new note and its link, all you have to do is to click inside the new note's title and press [control]+[enter], just as you would if you wanted to open a regular linked note.
And voila! A new note 201710282118 AI is going to kill us all.md will be created and opened for you.
But the really cool thing is, that the link in the original note will be updated to the correct ID, so again you will end up with the following in the parent note:
# The rise of the machines
tags = #AI #world-domination

Machines are becoming more and more intelligent and powerful.

This might reach a point where they might develop a consciensce of their own.

As a consequence, they might turn evil and try to kill us all ........... [[201710282118]]
Note how the note title "AI is going to kill us all" has been replaced by the note's ID "201710282118".
Note: With this setting you can have the note's title inserted right after the link as well, like in : [[201710282118]] AI is going to kill us all
The new note will be pre-filled with the following text:
# AI is going to kill us all
tags =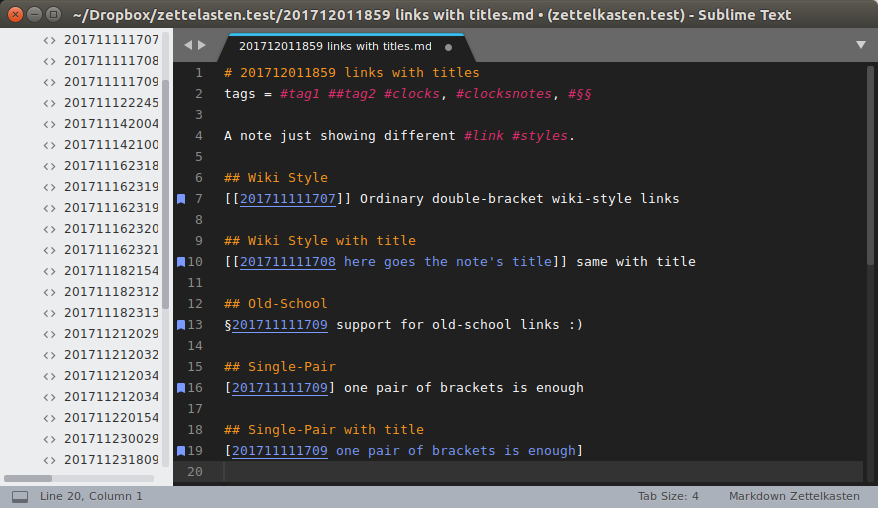
.When inserting links manually, you are can choose between the following supported link styles:
## Wiki Style
[[201711111707]] Ordinary double-bracket wiki-style links

## Wiki Style with title
[[201711111708 here goes the note's title]] same with title

## Old-School
§201711111709 support for old-school links :)

## Single-Pair
[201711111709] one pair of brackets is enough

## Single-Pair with title
[201711111709 one pair of brackets is enough]
.
This is how they are rendered in SublimeText:
If you see a link in a note and wonder what other notes also reference this note, then that is easy enough to do: Just click inside the link and press [alt]+[enter].
Note: If you have ag installed, the list of all referencing notes will pop up immediately in the permanent search result file:

However, if ag is not installed, a find-in-files panel will be opened, automatically pre-filled to search for the note-ID.

Just press [enter] to start the search. The resulting notes will be displayed in a new tab "Find Results":

Note: The Find Results tab will be re-used in subsequent searches. In the screenshot above I have used a split layout; the results will always show up in the tab at the bottom.
The shortcut [ + ! produces a list of all notes in the search results. This is probably most useful in Zettelkasten Mode.
Over time you might collect quite a number of #tags assigned to your notes. Sometimes it helps to get an overview of all of them, maybe to check for synonyms before creating a tag, etc.
When you press [#][!] (that is the # key followed by the ! key) quickly, a scratch file listing all your #tags will be created and showed right next to your text:
Note: If you don't like splitting your window, set the parameter show_all_tags_in_new_pane to false.
Of course, if you have ag installed, the permanent search file will be used to display all your tags:
Press [#]+[?] to ask for a list of all tags used in your note archive. You can narrow down the search and finally pick the tag you like.

Why is this experimental? Because it needs to scan all your notes everytime you invoke it. This is probably not very efficient in large note archives, so I consider its implementation experimental. However, if you have ag installed, then you don't need to worry about that. Ag will be detected and used automatically to speed things up a lot.
Like note-links, tags can also be "followed" by clicking them and pressing [ctrl]+[enter].
Note: If you have ag installed, the list of all referencing notes will pop up immediately in the permanent search results file:
However, if ag is not installed, a find-in-files panel will be opened, pre-filled with the clicked tag and your note archive folder.

Pressing [enter] will start the search and show the search results in a new tab.
Note: The Find Results tab will be re-used in subsequent searches. In the screenshot above I have used a split layout; the results will always show up in the tab at the bottom.
Note: If you set the parameter show_search_results_in_new_tab to false, then no new tab will be created for search results. They will be displayed in a little sort of pop-up at the bottom of the window.
To search for more sophisticated tag combinations, use the command ZK: Search for tag combination from the command palette.
It will prompt you for the tags you want to search for and understands quite a powerful syntax; let's walk through it:
search-spec: search-term [, search-term]*
search-term: tag-spec [ tag-spec]*
tag-spec: [!]#tag-name[*]
tag-name: {any valid tag string}
What does that mean?
- search-spec consist of one or more search-terms that are separated by comma
- each search-term consists of one or more tag-specs
- each tag-spec
- can be:
#tag: matches notes tagged with#tag!#tag: matches all results that are not tagged with#tag
- and optionally be followed by an
*asterisk to change the meaning of#tag- from exact
#tag - to tags starting with
#tag
- from exact
- can be:
How does this work?
- Each search is performed in the order the search-terms are specified.
- With each search-term the results can be narrowed down.
- This is equivalent to a logical AND operation
- Example:
#car, #dieselwill first search for#carand then narrow all#carmatches down to those also containing#diesel.- This is equivalent to
#carAND#diesel.
- This is equivalent to
- Each tag-spec in a search-term adds to the results of that search-term.
- This is equivalent to a logical OR operation.
- Example:
#car #planewill match everything tagged with#carand also everything tagged with#plane- This is equivalent to
#carOR#plane.
- This is equivalent to
- Each tag-spec can contain an
*asterisk placeholder to make#tag*stand for all tags starting with#tag- This works for
#tag*and!#tag*. - Examples:
#car*: will match everything that contains tags starting with#car, such as:#car,#car-manufacturer, etc.!#car*: will match all results that do not contain tags starting with#car:#plane #car-manufacturerwill be thrown away#submarinewill be kept
- This works for
Examples:
#transport !#car : all notes with transport + all notes not containing car (such as #plane)
There is no comma. Hence, two search terms will be evaluated and the results of all of them will be combined (OR).
#transport, !#car: all notes with transport - all notes containing car
Here, there is a comma. So first all notes tagged with #transport will be searched and of those only the ones that are not tagged with #car will be kept (AND).
Pretty powerful.
#transport #car, !#plane : #transport or #car but never #plane
#transport #car !#plane : #transport or #car or anything else that's not #plane
I omitted examples using the * placeholder, it should be pretty obvious.
The following screen-shot illustrates the advanced tag search in action:
- at the top right the results for
##AI, !#world*are shown: only one note matches - at the bottom right the results for
##AIare shown - the left side shows both notes containing
##AI, one of them also tagged with#world-dominationwhich gets eliminated by, !#world*.

Let's say you have an overview note about a topic that links to specifics of that topic that looks like this:
O - Text production

This is an **overview note** about text production with the Zettelkasten method.

A few general words about our tool: Sublime ZK
[[201711111707]] Sublime ZK is awesome
[[201711111708]] Sublime ZK is great

Then we go more in-depth:
[[201711111709]] The specifics of how we produce text with the plugin

Cool!
This overview is just a collection of note links with brief descriptions and a bit of additional text.
Now, if you wanted to turn this overview note into a text containing the contents of the linked notes instead of just the links, then you can expand the note like this:
- bring up the command palette by pressing
[cmd]+[shift]+[p]on macOS ([ctrl]+[shift]+[p]on Windows and Linux). - type
zkto list the Zettelkasten commands. - select
ZK: Expand Overview Note
Et voila! Depending on your linked notes, the overview note will be expanded into a new unsaved tab, maybe looking like this:

As you can see, the lines containing note links are replaced by the contents of their notes, enclosed in comment lines. You can now edit and save this file to your liking.
Note: If you want to refresh this expanded overview (see below) later, then please leave those comments in!
Note:: If you modify the text of a linked note (between comment lines), then remove the extra ! to prevent your change to get overwritten when refreshing this overview.
It might happen that you change some notes that are already expanded into your new expanded overview note. If that happens and you have left the comments in, then you can refresh the expanded overview:
- bring up the command palette by pressing
[cmd]+[shift]+[p]on macOS ([ctrl]+[shift]+[p]on Windows and Linux). - type
zkto list the Zettelkasten commands. - select
ZK: Refresh Expanded Note
Note: Only notes with comments starting with <!-- ! will be considered for a refresh.
Tip: That means: To keep your edits of specific expanded notes from being overwritten by a refresh, just delete the extra !, making the comment start with <!-- . Alternatively, you can, of course, delete the comment lines for parts you are sure will never need refreshing.
The following animation illustrates expansion and refreshing:
Overview note expansion is cool, but there are situations where you might not want to expand all links of a note but just a few. Also, since expansion does not descend into links of expanded notes, you might want to manually expand those.
Manually expanding a note link is easy: You must have your cursor over ("in") a note link, obiously. The key combination [ctrl]+[.] or ZK: Expand Link inline from the command palette will then trigger the expansion. In contrast to the expansion method for overview notes in the previous section, the line containing the link will be preserved.
Here is an example using the already well-known AI notes: Let's start with our first note:
# The rise of the machines
tags = #AI #world-domination

Machines are becoming more and more intelligent and powerful.

This might reach a point where they might develop a consciensce of their own.

As a consequence, they might turn evil and try to kill us all ........... [[201710282118]]
Now if you put your cursor inside the [[201710282118]] link and press [ctrl]+[.], the text will change into this:
# The rise of the machines
tags = #AI #world-domination

Machines are becoming more and more intelligent and powerful.

This might reach a point where they might develop a consciensce of their own.

As a consequence, they might turn evil and try to kill us all ........... [[201710282118]]

<!-- !    [[201710282118]] AI is going to kill us all    -->
# AI is going to kill us all
tags =

<!-- (End of note 201710282118) -->
(We've never actually written anything into the linked note. Usually there would be lots of text)
Note: To remember [ctrl]+[.]: I wanted to use ... as shortcut for expansion but it didn't work out 😄
Hint: If, after expansion, you don't like what you see, just undo! 😄
Note: Use this at your own risk when ever planning on refreshing an overview note. You are going to have nested expansions and precisely those will get overwritten when the parent note is refreshed.
Another workflow for producing overview notes is by #tag. So if you want to produce an overview note referencing all notes tagged by a single tag, just press [ctrl]+[.] while the cursor is inside a #tag. This will produce a bulleted list of notes tagged with the #tag.
The following animation shows inline expansion of #tags in action:

In order to produce an outline of all notes citing a specific source, just press [ctrl]+[.] while the cursor is inside a citekey. This will produce a bulleted list of notes containing a reference to the citekey.
Note: This works with @pandoc and #multimarkdown style citation keys and is independent of whether the citekey is part of an actual citation ([@citekey] or [][#citekey]) or just occurs in your text as @citekey or #citekey.
The following animation shows inline expansion of citekeys in action:

If your note archive contains one or you configured a .bib file, then you can use the shortcut [@ or [# to insert a citation. Which one you use depends on your preferences, whether your prefer pandoc or multimarkdown.
A fuzzy-searchable list of all entries in your bibfile will pop up, containing authors, year, title, and citekey. To select the entry you like, just press [enter]. To exit without selecting anything, press [esc].
When you made your choice, a citation link will be inserted into the text: [@citekey] (or [][#citekey] if you use MultiMarkdown style).
The following animation shows this in action:
If your note archive contains one or you configured a .bib file, then the auto-completion suggestions you get via [ctrl]+[space] (or [alt]+[/] on Linux) will also contain your cite-keys, marked by a starting @ symbol. (If you use MultiMarkdown style, they will start with a # sign instead). Pressing [enter] will insert a pandoc citation like this: [@citekey] (or [][#citekey] if you use MultiMarkdown style).
Note: Never actually press the @ key when searching for cite-keys. At least on my system SublimeText will always insert the current suggestion when pressing @ :(.
It is common practice to keep local bibliographies in your notes. This makes each note self-contained and independent of .bib files. Manually maintaining a list of all your cited sources can be tedious and error-prone, especially in the case of long notes with many citations. Provided a .bib file is part of your note archive or you have configured one, then this plugin can take care of all your citations for you.
Note: This will only work if you have pandoc and its companion pandoc-citeproc installed in a location that is referenced by your PATH environment variable! See the how to install pandoc, it's a breeze.
In any note with citations:
- just bring up the command palette with
[ctrl]+[shift]+[p](or[cmd]+[shift]+[p]on macOS) - type
zkto see all the Zettelkasten commands - and select
ZK: Auto-Bib
This will add a long comment to your note in the following format (line wrapping added for github manually):
<!-- references (auto)

[@AhrensHowTakeSmart2017]: Ahrens, Sönke. 2017. _How to Take Smart Notes: One Simple Technique
to Boost Writing, Learning and Thinking for Students, Academics and Nonfiction Book Writers_. 1st ed.
CreateSpace Independent Publishing Platform.

[@FastZettelkastenmethodeKontrollieredein2015]: Fast, Sascha, and Christian Tietze. 2015.
_Die Zettelkastenmethode: Kontrolliere dein Wissen_. CreateSpace Independent Publishing Platform.

-->
The animation below shows how handy this is 😄
Note: You don't have to cite in the [@pandoc] notation. If a cite-key is in your text, it will get picked up. However, the generated references section will use the [@pandoc] notation, except if you set change the setting citations-mmd-style to true, then the [#citekey]: ... MultiMarkdown notation will be used.
WARNING: Do not write below the generated bibliography. Everything after <!-- references (auto) will be replaced when you re-run the command!
In order to be able to search for all notes citing the same source, just like note-links and #tags, citation keys can also be "followed" by pressing [ctrl]+[enter].
Note: This works with @pandoc and #multimarkdown style citation keys and is independent of whether the citekey is part of an actual citation ([@citekey] or [][#citekey]) or just occurs in your text as @citekey or #citekey.
As usual, if you have ag installed, as is recommended, this will make the most sense, because search results will show up in the external search results, as is illustrated by the following animation:

Markdown notes are great! Especially because they are text-based. Sometimes, though, they contain images. Well, links to images: you only see them when you convert your note into a format that supports images.
Thanks to this plugin, you can now even view your local images directly in SublimeText:
- just bring up the command palette with
[ctrl]+[shift]+[p](or[cmd]+[shift]+[p]on macOS) - type
show - select
ZK: Show Images
Note: This only works with images stored in your note archive folder (or a subfolder thereof).
You can configure a size limit for images to make sure big ones don't cover all your screen.
To hide them:
- bring up the command palette with
[ctrl]+[shift]+[p](or[cmd]+[shift]+[p]on macOS) - type
show - select
ZK: Hide Images
Note: If you want images automatically displayed right when you open a note, you can configure that.
You can define a specific preview size per image by adding image attributes inside a pair of curly braces as shown below:
{width=100% height=100%}
{width=200px height=200px}
.Note:
- SublimeText requires you to specify both width and height when you specify your own attributes.
- SublimeText seems to have its own interpretation of how big a pixel is
- If you don't want to manually convert width and height to scaled values, then just use percentages. Start with 100% for each and take it from there.
This plugin lets you pep up your texts with automatically numbered sections and tables of content.
Some notes can get quite long, especially when turning overview notes into growing documents. At some stage it might make sense to introduce a table of contents into the text. This can be useful when using the markdown preview plugin to quickly check your text in a browser.
To insert a table of contents at your current cursor position:
- bring up the command palette with
[ctrl]+[shift]+[p](or[cmd]+[shift]+[p]on macOS) - type
zktoc - select
ZK: Auto-TOC
The table of contents will be placed between two automatically generated comments that also serve as markers for the plugin. It will consist of a bulleted list consisting of links to the headings in your text. The links are only relevant when converting your text into another format, e.g. by using the markdown preview plugin.
Why a bulleted list and not a numbered one? You might have numbered the sections yourself. Numbered lists would get in the way in that case. Also, numbered lists produce ii. instead of 1.2 when nesting them.
Example before TOC:
# 201711250024 Working with tocs
tags = #sublime_zk #toc


## This is a very long note!
At least we pretend so.

## It contains many headings
That's why we are going to need a table of contents.

### **with funny chäråcters!**
Funny characters can be a challenge in the `(#references)`.

## as can duplicate headings

# as can duplicate headings
.
Example after TOC:
# 201711250024 Working with tocs
tags = #sublime_zk #toc

<!-- table of contents (auto) -->
* [201711250024 Working with tocs](#201711250024-working-with-tocs)
    * [This is a very long note!](#this-is-a-very-long-note)
    * [It contains many headings](#it-contains-many-headings)
        * [**with funny chäråcters!**](#with-funny-characters)
    * [as can duplicate headings](#as-can-duplicate-headings)
* [as can duplicate headings](#as-can-duplicate-headings_1)
<!-- (end of auto-toc) -->

## This is a very long note!
At least we pretend so.

## It contains many headings
That's why we are going to need a table of contents.

### **with funny chäråcters!**
Funny characters can be a challenge in the `(#references)`.

## as can duplicate headings

# as can duplicate headings
.
Note: Whenever you need to refresh the table of contents, just repeat the above command.
Note: You can configure the separator used to append a numerical suffix for making references to duplicate headers distinct: by changing the toc_suffix_separator in the settings. It is set to an underscore by default (markdown preview, parsers based on Python's markdown module). If you use pandoc, you should set it to -.
The following animation shows TOC insertion and refreshing in action:

Especially when your text is large enough for needing a table of contents, it is a good idea to number your sections. This can be done automatically by the plugin as follows:
- bring up the command palette with
[ctrl]+[shift]+[p](or[cmd]+[shift]+[p]on macOS) - type
zk - select
ZK: Number Headings
Automatically inserted section numbers will look like in the following note:
# 1  201711250024 Working with tocs
tags = #sublime_zk #toc


## 1.1  This is a very long note!
At least we pretend so.

## 1.2  It contains many headings
That's why we are going to need a table of contents.

### 1.2.1  **with funny chäråcters!**
Funny characters can be a challenge in the `(#references)`.

## 1.3  as can duplicate headers

# 2  as can duplicate headers
.
Note: You can refresh the section numbers at any time by repeating the above command.
Note: To switch off numbered sections, use the command ZK: Remove Heading Numbers.
The animation below shows both section (re-)numbering and auto-TOC:
This only applies if you have split your window into multiple panes and you are not using the Zettelkasten Mode. By default, notes are opened in the first pane and if you have ag installed, search results are opened in the second pane. So in a 2-column layout notes are left and results are right. In a 2-row layout notes are at the top, results at the bottom. Notes are opened when clicking on a note-link or creating a new note, results are displayed by the various search operations, tag list, etc.
If you have a more complex layout or you want to change the default target panes, there is a command for you:
- bring up the command palette by pressing
[cmd]+[shift]+[p]on macOS ([ctrl]+[shift]+[p]on Windows and Linux). - type
zkto list the Zettelkasten commands. - select
ZK: Select Panes for opening notes/results
This will first prompt you for the pane number notes should be opened in and, if you have ag installed, it will then prompt you for the pane number results should be opened in.
To help you with finding out the pane numbers, it shows a pane identifier inside each pane, reading "Pane n", where n is the pane's number.
The following screenshot illustrates that:

The plugin will remember your choices as long as SublimeText is running. To make these changes permanent, add the following to the plugin's settings:
    // Pane where notes are opened when a link is clicked or a new note is created
    // Pane 0 is the 1st pane ever
    "pane_for_opening_notes": 0,
    //Pane where search results and tag lists, etc are opened (if ag is installed)
    // Pane 1 is the second pane, created when you split the window
    //    in a 2-column layout, this is the right column
    //    in a 2-row layout, this is the bottom row
"pane_for_opening_results": 1,For a sublime Zettelkasten experience, you can enter the Zettelkasten mode:
- bring up the command palette by pressing
[cmd]+[shift]+[p]on macOS ([ctrl]+[shift]+[p]on Windows and Linux). - type
zkto list the Zettelkasten commands. - select 'ZK: Enter Zettelkasten Mode'
This will:
- split your SublimeText window into 3 parts:
- the left parts where your tabbed notes are displayed
- the top right part where search results are displayed
- the bottom right part where your saved searches are displayed
The Zettelkasten Mode allows for easy mouse navigation through your note archive.
Remember: ALT + DOUBLECLICK is sometimes more convenient than CTRL + ENTER
If your search results are empty, a little welcome text with some useful keyboard shortcuts will be displayed. If you don't have any saved searches yet, a few sample searches will be created. This is shown in the screen-shot below:
Note: If you have upgraded this package and entered the Zettelkasten Mode for the first time, SublimeText may be confused about the syntax of your notes. In that case, open a note and use the menu: 'View' -> 'Syntax' -> 'Open all with current extension as...', and select 'sublime_zk > Markdown Zettelkasten'.
The Zettelkasten mode introduces a saved searches file. This is a simple Text file where you can name and store search terms.
Its syntax is very simple; to define a search, you just add a line, consisting of the following parts:
- an optional search name
- a colon
: - a search-spec (see advanced tag search for more information)
#!(all tags) and[!(all notes) are also valid search-specs
The search-spec will be highlighted in the file, so you know exactly what will be searched for.
You can place Markdown headings anywhere in the file, too, like this:
# Tag Searches
just one  tag:          #tag
tag1 or  tag2:          #tag1  #tag2
tag1 and tag2:          #tag1, #tag2

# A bit more complex
tag1 but not tag2:                 #tag1, !#tag2
tag1 or anything that's not tag2 : #tag1 !#tag2

# Wildcard searches
anything starting with auto : #auto*
anything starting with auto but nothing starting with plane: #auto*, !#plane*
You can execute the search in one of two ways:
- Place the cursor on a search line (no need to hit the search spec) and press ctrl + enter
- Press ALT and double-click in a search line
In the animation below, the mouse was used.

Credits, where credits are due:
- I derived parts of this work from Dan Sheffler's MyWiki code. See his GitHub and see some striking similarities ;-).
- (Of course it has evolved a lot since. A special shoutout to @toolboxen from the forum at zettelkasten.de for all the ideas, github issues, and pull requests!)
- Thanks to Niklas Luhmann for coming up with this unique way of using a Zettelkasten.
- Thanks to the guys from zettelkasten.de for their Zettelkasten related resources. There are not that many out there.
While we're at it, I highly recommend the following books (German); Google and Amazon are your friends:
- "Das Zettelkastenprinzip" / "How to take smart notes" (more info here...) will blow your mind.
- "Die Zettelkastenmethode" from Sascha over at zettelkasten.de will also blow your mind and expand on the plain-text approach of using a digital Zettelkasten.