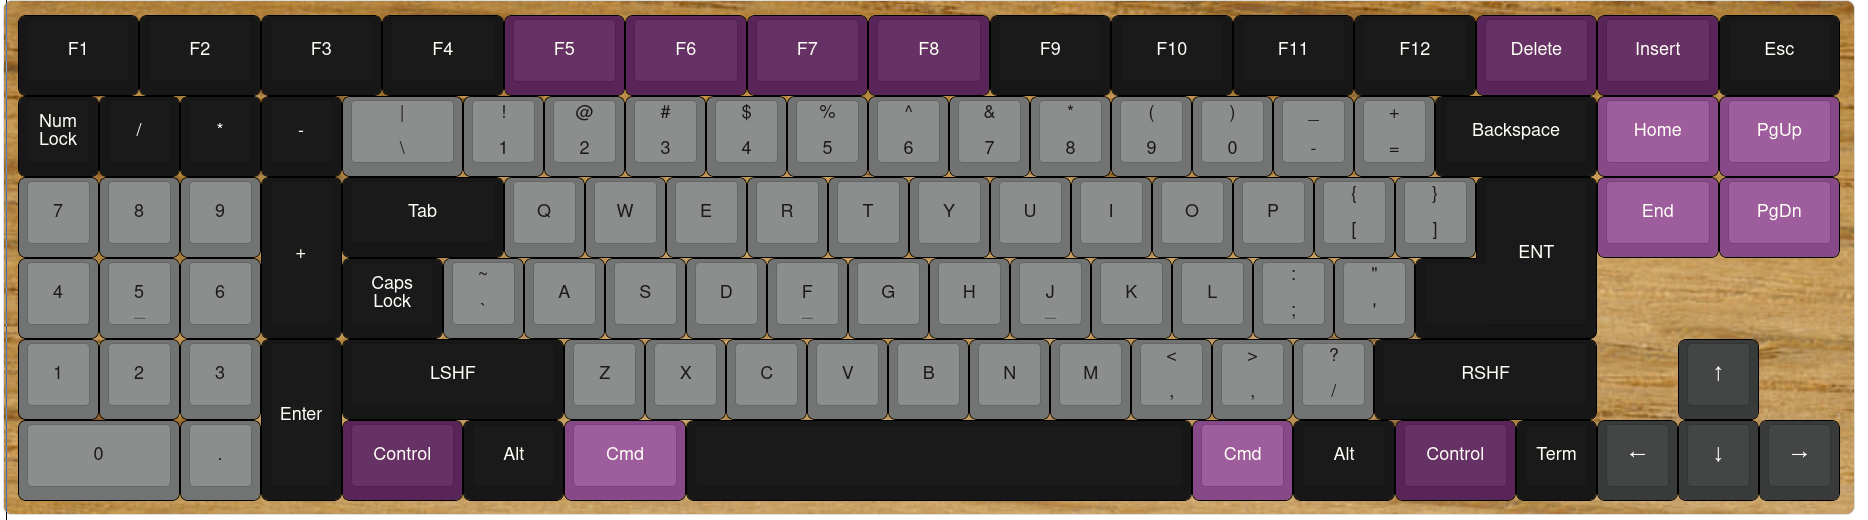
This is a 101-key plateless PCB-based mechanical keyboard inspired by JayK and ONO-SENDAI MATRIX 83 as well as the Amiga 500 keyboard layout.
I went in the opposite route of most modern mechanical keyboards and used larger-size keys without any layers or "function" key. It is organised roughly into four sections - the numpad on the left, the alphanumeric keys in the middle, and navigation keys on the right, with a function key row on the top.
The numpad is on the left to improve ergonomics for data entry. The mouse is a kind of navigation function, so with the mouse on the right, the navigation keys and mouse are clustered together instead of having a numpad between them. In an IBM style layout, I would have to swap hands a lot to switch between the arrow keys and mouse while entering data with the numpad.
The top row and navigation keys are all 1.5U - inspired by the Amiga 500 keyboard which has larger function and delete keys. They are a bit easier to hit as a result. The escape key being on the far right might seem strange, but I really prefer it after using it for a while. The placement of insert and escape keys is really excellent for use with Vim keybindings - I can use insert to enter insert mode and the escape key right next to it to get back to normal mode. I removed the scroll lock and pause/break keys because I have never used them in my life. I removed the printscreen key because it seems superfluous to have a special key for such a specific function, instead I have a keycombo to capture screenshots in my window manager.
The alphanumeric keys are mostly similar to an IBM keyboard, however I opted for the "bigass" enter key because it just feels so good to hit. Instead of a tiny backspace key, I have a regular-size backspace. I rearranged the grave and backslash keys to make room, shrinking the capslock key which I almost never use. Inspired by Unix and Amiga keyboards, the whole left modifier section is extended. This means both shift keys are a full 2.75U. The 2U tab is great for programming where tab is used very regularly.
There is an extra key to the left of the left arrow key, which I am using to open an application launcher. You could also map it as a function key if you want some of the missing keys or media controls or something.
The PCB is intended to be sandwiched between two pieces of wood, a top one with a cutout in the middle for all the keys, and a bottom one with a cutout for the Teensy LC. If a harder material than wood is used, you might need to make space for the pins of the switches and the SMD resistors. Softer materials don't have this requirement because the switch pins can stab into them a bit without issue. Eight M3 screws hold the pieces together. I chose a plateless design for simplicity and to reduce parts count.
It uses a Teensy LC as the microcontroller. I chose this because it is very small and low cost. It has a 10x10 keyboard matrix with the delete key going directly to ground. The only LEDs are under the caps lock and num lock keys, and a power LED above the arrow keys. I would recommend using 470 ohm resistors for the caps and num lock LEDs and a higher value resistor like 1.5k ohm for the power LED as the power LED is constantly on and can get annoying if it's too bright.
I succesfully built this keyboard and have been using it as my daily driver for several months now. The most difficult part was finding keycaps for the unusual layout. First, I ordered a full DSA keycap set which had a "bigass" enter key included; it was quite difficult to find this type of enter key in DSA. Then I ordered about 24 blank 1.5U keys in colours that complemented the initial keycap set, and 4 blank 2.75U keys for the dual 2.75U shifts. Then for the Tab and Command keys, I ordered some custom-printed individual DSA keycaps from signature plastics for 5 dollars each. I was easily able to find a key with an LED hole for the numlock key, but I still haven't found one suitable for the 1.25U capslock. I would highly recommend using DSA keycaps as it has the same profile for every row, unlike all other key profiles like DCS, OEM, SA etc.
If you want to custom-design a keycap set to fit this keyboard, you will need to include at least:
- "bigass" enter key
- 2U Tab
- 1.25U caps lock, preferrably with some way for the LED to shine through it.
- Dual 2.75U shift keys
- Dual 1.5U control keys
- One 1.5U command key and one 1.25U command key
It's relatively easy to find 1.5U blanks so I'd consider them less important to include as they will add a lot of cost to a regular keycap set. But if you want, the required 1.5U keys include F1 to F12, Delete, Insert, Escape, Page Up, Page Down, Home, and End
The PCB is made in Kicad and requires keebs.pretty for the keyboard footprints. I had to make a custom footprint for the ""bigass"" enter key. It also requires the teensy symbol and footprint libraries from github user XenGi. The PCB still has an older layout written on the silkscreen.
I used C with the Teensy/Arduino keyboard libraries to register keypresses and send them to a computer. Thanks to @cruxic for the Teensy makefile. It has a delay of ~150us between checking each column to avoid duplicate keypresses. Simply build the board, plug in the Teensy LC via usb, install Teensy/arduino libraries correctly, then type make load and you should get a working keyboard. NOTE: You may need to edit the ROWS or COLS in main.c to get the layout working for your keyboard. I burnt some pins on my teensy and remapped.