Autonomous Car project in AtoI Lab : PiCar Version
- If you are using AtoI Car, i.e., AtoI-Car, go to https://github.com/jaykay0408/dmcar-atoi
- If you are using new PiCar, i.e., Picar-X, go to https://github.com/jaykay0408/dmcar-new
Objectives:
- Understanding AI with Deep Learning and Computer Vision
- Become familiar with Python, Keras, Tensorflow and OpenCV
- Use Edge TPU with pre-trained models for classification and object detection
- Gain experience with research on autonomous vehicle and AI
This will be a group project by two or three (2-3) students. The main purpose of this project is to become familiar with AI techniques, specifically Convolutional Neural Network (CNN), and to apply them to real world problems, i.e., autonomous vehicle. You need to follow the instruction to conduct the project.
Note: All files that are necessary in this project are available at project GitHub site https://github.com/jaykay0408/dmcar-student
| Component | Price($) | Quantity | URL |
|---|---|---|---|
| SunFounder Smart Video Car Kit V2.0 | 115.00 | 1 | https://www.amazon.com/dp/B06XWSVLL8 |
| Raspberry Pi 4 Model B - 4GB RAM . | 35.00 | 1 | https://vilros.com/products/raspberry-pi-4-4gb-ram |
| Raspberry Pi 4 Power Supply (USB-C) . | 9.99 | 1 | https://www.amazon.com/dp/B07TYQRXTK/ |
| SanDisk Ultra 32GB MicroSD Memory Card | 7.99 | 1 | https://www.amazon.com/dp/B073JWXGNT/ |
| micro HDMI male to HDMI female cable . | 6.99 | 1 | https://www.amazon.com/dp/B00B2HORKE/ |
| Black Electrical Tape | 10.00 | 6 | https://www.amazon.com/dp/B0143LD8QY/ |
| Wooden Stop Sign | 12.99 | 1 | https://www.amazon.com/dp/B076FL4HSK/ |
| Google Coral USB Accelerator | 59.99 | 1 | https://coral.ai/products/accelerator |
| USB Web Camera (120 degree) | 6.99 | 1 | https://www.amazon.com/dp/B08G48M1XH/ |
| 18650 Batteries 6000mah 3.7v With Charger | 8.64 | 1 | Ebay link |
| Total Price per Car | 250 ~ 270 | 1 |

Assembly Instruction at http://bit.ly/DMCAR1
As an autonomous vehicle for this lab, we are going to use "Smart Video Car Kit V2.0 for Raspberry Pi" as below:
- Model: Sunfounder Smart Video Car Kit V2.0 for Raspberry Pi
- Name in this project: DM-Car
- URL: https://www.sunfounder.com/smart-video-car-kit-v2-0.html

You can assembly a car using the instruction included in a box. However, the quality of printed images is not clear, so you should be very careful to assembly the car. The only difference point is the location of camera. In order to provide a wide angle of camera, you can setup a camera in a middle of body (instead of the front) as shown in a figure below.

Note that pan and tilt servos for a camera will not be used for the project. However, you still need to install them to mount a camera correctly. In case a new USB camera (wide-angle) is used, you can mount a USB camera on pan and tilt part.
In addition, you need to follow the instruction “Configure the Servo to 90 degree” before you secure 3 servos (pan, tilt and steering). Run “picar servo-install” on your Raspberry Pi until you complete the assembly.
After the assembly, calibrate the car by following the instruction on a manual and keep the calibration results from the following config file:
$ cat /home/pi/SunFounder_PiCar-V/remote_control/remote_control/driver/config
forward_A = 0
forward_B = 0
turning_offset = 14
pan_offset = -64
tilt_offset = 30
[Optional] Understanding Raspberry Pi
- If you are not familiar with Raspberry Pi 4, learn Raspberry Pi first at http://bit.ly/DMCAR2
Homework: Submit the followings:
- Create GitHub project (per team)
- At least 10 photos that describe the process of assembly
- Photos that shows the connection to Raspberry Pi during the assembly
- Any ideas to improve the quality of dmcar?
- Submission: GitHub, and submit the URL of your GitHub
DM-Car has 3 PCB as below:
- Robot HATS: Connecting Raspberry Pi into controllers
- PCA 9685 PWM Driver: controlling 1 servos for front steering wheel and 2 servos for pan and tilt of a camera
- TB6612 Motor Driver: controlling 2 servos for back wheels
In this project, we are going to use Raspberry Pi 4 to control servos using Python. Due to the limited time, an instructor will provide pre-configured raspbian OS image. Please, follow the instructions below to setup Raspberry Pi.
Note that if an instructor provides pre-configured SD Card, move to Step 3 (i.e., Skip Step 1 and Step 2)
Step 1: Download pre-configured raspbian OS image
- Instructor will provide the link to download, or
Step 2: Create SD card for Raspberry Pi using downloaded image
- Write a downloaded image into SD card using proper software
- See the following link for more details: https://www.raspberrypi.org/documentation/installation/installing-images/README.md
- Add the following two files to connect wi-fi (skip this if you use
Option 1 in Step3)
- ssh: no contents inside
- wpa_supplicant.conf: edit contents for proper wifi info. Otherwise, you can download 2 files from class Github
Step 3: Connect to Raspberry Pi using USB Serial Cable If you know IP address of your Raspberry Pi, skip Step 3. Then, move to Step 4. This step is for setting-up wi-fi on your Raspberry Pi first time. For more information about the connection to Rapsberry Pi using USB Serial Cable, you can refer the following slide at http://bit.ly/DMCAR4
- [Step 1] Enable Serial Console
- [Step 2] Installation Software
- MacOS
- Windows
- [Step 3] Connect Console Cable
- Connect to Raspberry Pi
- Connect to Auto-Car controller
- [Step 4] Connect to RPi
- From MacOS
- From Windows
- [Step 5] Wi-Fi Setup
- [Step 6] Check IP address
Step 4: Connect to Raspberry Pi using VNC viewer For more information about the connection to Rapsberry Pi, you can refer the following slide at http://bit.ly/DMCAR3
-
Option 1: directly setup wi-fi using a mice, a keyboard and a monitor (HDMI)
- Use this option if you have the followings:
- USB mouse
- USB keyboard, and
- Monitor with HDMI adaptor
- Configure wi-fi setting like any other computer
- Use this option if you have the followings:
-
Option 2: direct connection using VNC viewer
- Use this option if you are using wi-fi under the followings:
- hot-spot using your cell phone
- private router, e.g., router at home
- router prepared by an instructor, or
- Network that enable/open port number 5900
- Install VNC viewer on your PC: https://www.realvnc.com/en/connect/download/viewer/
- Find IP address using a router or IP scan program

- Enter the IP address on VNC viewer
- Username: pi
- Password: raspberry
- Use this option if you are using wi-fi under the followings:
-
Option 3: cloud connection using VNC server
-
Use this option if you are using wi-fi under the followings:
- Enterprise wi-fi network, e.g., campus or company
- WPA2 Enterprise authentication
- Network that disable/block port number 5900
-
Establishing a cloud connection for VNC server on your raspberry pi
- Sign up for a RealVNC account at https://www.realvnc.com/raspberrypi/#sign-up
- On your Raspberry Pi, sign in to VNC Server using your new
RealVNC account credentials, i.e., e-mail and password:
(right click VNC icon on top menu bar -> click Licensing)

-
Install VNC viewer on your PC: https://www.realvnc.com/en/connect/download/viewer/
-
Sign in to VNC Viewer using the same VNC server account credentials
-
Then either tap or click to connect to your Raspberry Pi

-
-
Option 4: Hotspot for Raspberry Pi (Do Not use this option unless you are really familier with Raspberry Pi)
- Use this option if you want to use your Raspberry Pi as a hotspot without internet
- Start Terminal
- Run the following commands in a terminal
$ wget http://bit.ly/rpihotspot $ tar xvf rpihotspot $ cd rpi-hotspot -
Install Hotspot on your Raspberry Pi
$ sudo ./install-hotspot.sh [wifi-name] [channel number]- [wifi-name] = SSID network name to connect
- [channel number] = 1 ~ 13, default = 8, but use other number if not connected
- For example, sudo ./install-hotspot.sh dmLee 8
-
Reboot.


Step 5: Setup networks if needed
Step 6: Update raspbian OS using terminal
$ sudo apt-get update
$ sudo apt-get upgrade
Homework: submit the followings:
- Screenshots or photos of each step of setting-up
- Any ideas to improve the connectivity of picar (i.e., Raspberry Pi)
In order to focus on main goal of the project, i.e., applying a deep learning algorithms into an autonomous vehicle, an instructor provides a package of programs and libraries for an autonomous vehicle. DM-Car has the following functionalities:
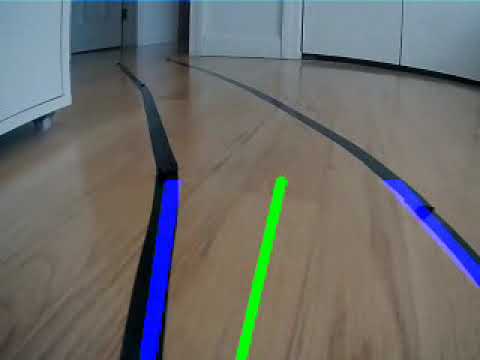
- Lane detection both straight and curve lanes
- Controlling back wheel servos
- Controlling front steering wheel servo
- Camera module (OpenCV)
- PID control (Optional)
- Creating Video Clip
- Sequence of Image Files for dataset
- Deep Learning Models for Autonomous Car
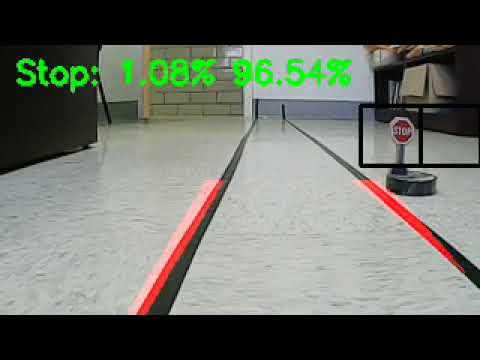
- Stop Not-Stop Model: CNN LeNet model
- Lane Follower Model: Nvidia CNN model
- Google Colab 1
- Stop Not-Stop Image Classification Model: "Stop No-Stop model" by Retrain a classification model for Edge TPU using post-training quantization (with TF2)
- Google Colab 2
- Traffic Sign Object Detection Model: "Traffic Sign Model" by Retrain EfficientDet for the Edge TPU with TensorFlow Lite Model Maker (with TF2)
- Google Colab 3
First, download the autonomous vehicle DM-Car program from Github site. First, login Raspberry Pi using VNC viewer (or ssh).
$ git clone https://github.com/jaykay0408/dmcar-student
Start virtualenv (name 'picar3')
$ workon picar3
(picar3) $ dmcar-student
dmcar-student consist of the following files and directory:

- dmcar.py
- main file to control autonomous car with Stop detector
- To run the program
$ python dmcar.py -b 4- MODEL: stop_not_stop.model
- You need to handle mainly this file to operate DM-Car
- dmcar_lane.py
- main file to control autonomous car (lane only)
- To run the program
$ python dmcar_lane.py -b 4- No model is needed
- dmcar_model.py
- lane follower using NVIDIA CNN model
- To run the program
$ python dmcar_model.py -b 4- MODEL: lane_navigation.model
- dmcar_coral.py
- Stop NoStop model using pre-trained MobileNet V2
- To run the program
$ python dmcar_coral.py -b 4- MODEL: stop_not_stop.tflite
- LABEL: stop_not_stop.txt
- dmcar_coco.py
- Traffic Sign model using EfficientDet object detection
- To run the program
$ python dmcar_coco.py -b 4- MODEL: traffic_sign.tflite
- LABEL: traffic_sign.txt
- lane_detection.py
- functions to detect lanes and helper functions:
- Line.py
- Line class
- stop_detector.py
- test program for stop/non-stop CNN model $ python stop_detector.py
- You can use this file to test your trained model
- test-control.py and test-servo.py
- test programs for controlling servos
- db_file: calibration data for each servo
- fw = front_wheels.Front_Wheels(debug=False, db=db_file)
- front wheels contral
bw.ready() bw.speed = 50 bw.forward() bw.backward() bw.stop() - bw = back_wheels.Back_Wheels(debug=False, db=db_file)
- back wheels control
fw.ready() fw.turn_left() fw.turn_right() fw.turn_straight() fw.turn(ANGLE) - SPEED
- Speed of DM-Car: range from 0 to 100
- For testing purpose: 25 ~ 50
- ANGLE
- 90 (Straight), 45 (45 left), 135 (45 right)
- picar
- directory for servos (2 back wheels and 1 front wheels) in a car mostly doesn't have to change
- model_stop_not_stop
- directory for building stop_not_stop.model for dmcar.py
- model_traffic_sign
- directory for building dataset of traffic sign using Colab
- dmcar_coco.py
- model_lane_follow
- directory for building dataset of lane follower
- dmcar_model.py
- models
- directory to keep created models
Apply calibration values to DM-Car program either editing or copying config file.
$ cp /home/pi/SunFounder_PiCar-V/remote_control/remote_control/driver/config /home/pi/dmcar-student/picar/config
OR
Edit /home/pi/dmcar-student/picar/config file with the calibration values from Phase 1.
Homework: Submit the followings:
- How to improve the lane detection
- How to improve the controlling front wheels and back wheels motors (i.e., servos)
- Create a video clip that captures moving car following lane
In this phase, you are going to make picar follow lanes, a.k.a lane follower. There are 2 methods as below:
- Method 1: Lane follower using OpenCV
- Method 2: Lane follower using Deep Learning model (i.e., NVIDIA CNN model)
You will use a popular, open-source computer vision package, called OpenCV, to help picar autonomously navigate within a lane.
- Start Terminal, picar3 virtual environment, and go to a directory
$ workon picar3 (picar3) $ cd dmcar-student - Run dmcar.py file to test the model
(picar3) $ dmcar_lane.py -b 4 - There are several options you can try:
- "-v", "--video": path to the output video clip header, e.g., -v out_video
- "-b", "--buffer": max buffer size, default=5
- "-f", "--file": ath for the training file header, e.g., -f out_file. Files will be stored at ~/dmcar_student/model_lane_follow/train_data
You will use a deep learning approach to make our picar follow lane autonomously. For the training model, Nvidia CNN model is used in this method. The inputs to the Nvidia model are video images from a camera mounted on a car, and outputs are the steering angle of the car. At the core of the NVidia model, there is a Convolutional Neural Network. Start "picar3" virtual environment using "workon picar3".
- Start Terminal, picar3 virtual environment, and go to a directory
$ workon picar3 (picar3) $ cd dmcar-student/ - Create a dataset by driving pycar
(picar3) $ python dmcar_lane.py -b 4 -f data # Check if training files are created successfully at ~/dmcar_student/model_lane_follow/train_data - Run training. This will take 2 ~ 3 hours depending on size of dataset
(picar3) $ cd ~/dmcar-student/model_lane_follow (picar3) $ python train_lane_model.py - Move a created model to models directory
(picar3) $ cp ./model_lane_follow/train_model/lane_navigation_check.h5 ~/dmcar-student/models/lane.model - Run dmcar_model.py file to test the model
(picar3) $ dmcar_model.py -b 4
If you want to save the time to create a model, you can use Colab as below:
- Create a dataset (image) for Google Colab
(picar3) $ cd ~/dmcar-student/model_lane_follow (picar3) $ tar cvzf train_data.tgz train_data - Upload train_data.tgz file to Google Drive "data" folder.
- If you do not have "data" folder, you need to creat it first
- On Rapsberry Pi, start Web Browser (click circle shape earth on top menu bar)
- Goto Google Colab 3
- You can click a short cut on "Bookmark Bar" (Lane Follow ...)
- Run cell by cell OR Run All-Cell
- When finishing the Colab, model file will be downloaded to your /home/pi/Downloads. Move the downloaded model file to models directory
(picar3) $ cd ~ (picar3) $ mv ./Downloads/lane_navigation_check.h5 ./dmcar-student/models/lane.model - If model name is different from "lane.model", change
MODEL_PATH at dmcar_model.py
# define the paths to the Nvidia learning model
MODEL_PATH = "./models/lane.model"
In this phase, you are going to create Deep Learning model to classify or detect traffic signs (starting from "Stop Sign", then extend to other traffic signs including "Speed", "Traffic Signal", and others. To create Deep Learning model, there are 4 main methods as below:
- On-device
- Google Colab
- Cloud Service (GCP, AWS or Azure)
- Docker
In this project, we are going to use either 1. or 2. method. However, you can try 3. and 4. later. There are 4 different models in this phase (mostly based on Convolutional Neural Network as a basic Deep Learning architecture).
- Model 1: Training Model for Stop Signs using CNN (LeNet)
- Model 2: Re-Training Model for Stop Signs using Google Colab (MobileNet V2 classifier for the Edge TPU)
- Model 3: Pre-trained Object Detection Model for Edge TPU (SSD MobileNet V2 trained on COCO)
- Model 4: Re-Training Model for Traffic Signs using Google Colab (EfficientDet-Lite detector for the Edge TPU)
To create training model for traffic signs using CNN (LeNet), use the Exercise Lab: Section 5. However, you can use the same Exercise Lab on your Raspberry Pi. Don't forget to start "picar3" virtual environment using "workon picar3".
- Start Terminal, picar3 virtual environment, and go to a directory
$ workon picar3 (picar3) $ cd dmcar-student/model_stop_not_stop - Create a dataset by following the Exercise Lab under images directory
(picar3) $ python download_images.py --urls urls.txt --output images/stop - Run training
(picar3) $ python train_network.py --dataset images --model stop_not_stop.model - Move a created model to models directory
(picar3) $ mv stop_not_stop.model ../models/ - If model name is different from "stop_not_stop.model", change
MODEL_PATH at dmcar.py
# define the paths to the Stop/Non-Stop Keras deep learning model MODEL_PATH = "./models/stop_not_stop.model" - Run dmcar.py file to test the model
(picar3) $ dmcar.py -b 4
Model 2: Creating Training Model for Traffic Signs using Google Colab (MobileNet V2 classifier for the Edge TPU)
To create training model for traffic signs, use Colab for MobileNet V2 classifier for the Edge TPU. You can use the same dataset created in Model 1.
- Start Terminal, picar3 virtual environment, and go to a directory
$ workon picar3 (picar3) $ cd dmcar-student/model_stop_not_stop - Create a dataset (image) for Google Colab
(picar3) $ tar cvzf stop_nostop.tgz images - Upload stop_nostop.tgz file to Google Drive "data" folder.
- If you do not have "data" folder, you need to creat it first
- On Rapsberry Pi, start Web Browser (click circle shape earth on top menu bar)
- Goto Google Colab 2
- You can click a short cut on "Bookmark Bar" (Stop Nostop ...)
- Run cell by cell OR Run All-Cell
- When finishing the Colab, model file will be downloaded to your /home/pi/Downloads. Move the downloaded model file to models directory
(picar3) $ cd ~ (picar3) $ mv ./Downloads/stop_not_stop.tflite ./dmcar-student/models (picar3) $ mv ./Downloads/stop_not_stop.txt ./dmcar-student/models - If model name is different from "stop_not_stop.model", change
MODEL_PATH and LABEL_PATH at dmcar_coral.py
# define the paths to the Stop/Non-Stop Keras learning model MODEL_PATH = "./models/stop_not_stop.tflite" LABEL_PATH = "./models/stop_not_stop.txt" - Connect Google Coral USB into USB 3 Port (Bule Color) on your Raspberry Pi
- Run dmcar_coral.py file to test the model
(picar3) $ dmcar_coral.py -b 4
In this model, a car uses a pre-trained object detection model for Edge TPU, called SSD MobileNet V2 which is trained on COCO dataset. You can find more pre-trained object detection models at Coral website.
In order to use a pre-trained model, you need to download pre-trained model and its label file.
- Start Terminal, picar3 virtual environment, and go to models directory
$ workon picar3 (picar3) $ wget https://github.com/jaykay0408/Auto-Car-Data-Mining/raw/master/coco_model.tflite (picar3) $ wget https://github.com/jaykay0408/Auto-Car-Data-Mining/raw/master/coco_labels.txt - If model name or label file name is different, change
MODEL_PATH and LABEL_PATH at dmcar_coco.py
MODEL_PATH = "./models/coco_model.tflite" # General CoCo Model LABEL_PATH = "./models/coco_labels.txt" # CoCo Model Label - Connect Google Coral USB into USB 3 Port (Bule Color) on your Raspberry Pi
- Run dmcar_coral.py file to test the model
(picar3) $ dmcar_coco.py -b 4
Model 4: Re-Training Model for Traffic Signs using Google Colab (EfficientDet-Lite detector for the Edge TPU)
To create re-training model for traffic signs, use Colab for EfficientDet-Lite detector for the Edge TPU. You need to create a dataset of traffic signs where each object is labeled with CSV format.
- First, taking at least 40 photos using a cell phone or PiCar. Each photo should have several traffic signs including stop, traffic signal, speed25, speed50, yield, rail road and person. You can setup variety of situation to take a photo, such as distance, tilt and different shapes. To use a USB camera mounted on PiCar, you can use the following command or create python script with OpenCV library.
$ raspistill -o image.jpg - After taking photos, move all image files to a directory below. Start Terminal, picar3 virtual environment, and go to a directory
$ workon picar3 (picar3) $ cd ~/dmcar-student/model_traffic_sign/data # Copy all files to here - Label all objects (i.e., traffic sign) using labelImg python tool
(picar3) $ cd ~/labelImg (picar3) $ python labelImg.py # Open directory (i.e., ~/dmcar-student/model_traffic_sign/data), then perform labeling - After labeling all images, create a dataset (data) for Google Colab
(picar3) $ cd ~/dmcar-student/model_traffic_sign/ (picar3) $ python xml_to_csv.py -d data (picar3) $ cat ./data/traffic_labels.csv'.csv # Check if csv file is created successfully (picar3) $ tar cvzf data.tgz data - Upload data.tgz file to Google Drive "data" folder.
- If you do not have "data" folder, you need to creat it first
- On Rapsberry Pi, start Web Browser (click circle shape earth on top menu bar)
- Goto Google Colab 3
- You can click a short cut on "Bookmark Bar" (Traffic Sign ...)
- Run cell by cell OR Run All-Cell
- When finishing the Colab, model file will be downloaded to your /home/pi/Downloads. Move the downloaded model file to models directory
(picar3) $ cd ~ (picar3) $ mv ./Downloads/traffic_sign_edgetpu.tflite ./dmcar-student/models (picar3) $ mv ./Downloads/traffic_sign.tflite ./dmcar-student/models (picar3) $ mv ./Downloads/traffic_sign.txt ./dmcar-student/models - You can use either traffic_sign_edgetpu.tflite or traffic_sign.tflite. edgetpu.tflite is move efficient and less power comsumption. If model name is different, change MODEL_PATH and LABEL_PATH at dmcar_coco.py
# define the paths to the Stop/Non-Stop Keras learning model MODEL_PATH = "./models/traffic_sign_edgetpu.tflite" LABEL_PATH = "./models/traffic_sign.txt" - Connect Google Coral USB into USB 3 Port (Bule Color) on your Raspberry Pi
- Run dmcar_coral.py file to test the model
(picar3) $ dmcar_coco.py -b 4
Homework: Submit the followings:
- Uploading collected dataset into proper storage, such as Google drive or any available shared storage
- Then, share the link of uploaded dataset
- Submit python code to train the models
- Uploading trained model(s) to Github
- Answer the following questions:
- Image Size
- How to design CNN architecture including how many layers, what kind of layers, and so on
- How to optimize the model including parameter values, image augumentation, drop out, backpropagation, learning rate, # of epoch and so on
- Evaluations
- How to overcome the limitations in your DM-Car implementation
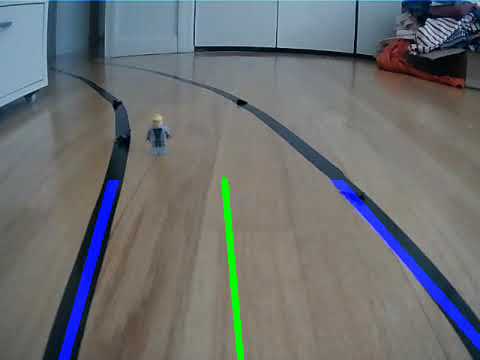
In Phase 6 (for the last step), picar will be tested using re-trained model in Model 4 of Phase 5 for the following task.

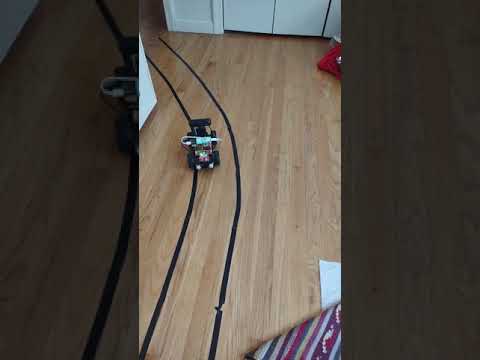
Specification of Testing road
- Dimensions:
- Width: 8 ~ 9 inches (but, 8 inch is suggested)
- Length: minimum 10 feet (mix straight line and curve line)
- Surface: any flat area is fine
- Color of surface: any color is fine, but not too dark. Also, solid and bright color will give the best performance
- Lane:
- Color: black
- Width: ¾ inches
- All connected and straight lane
- Use the vinyl electric tape to create lane as shown below image
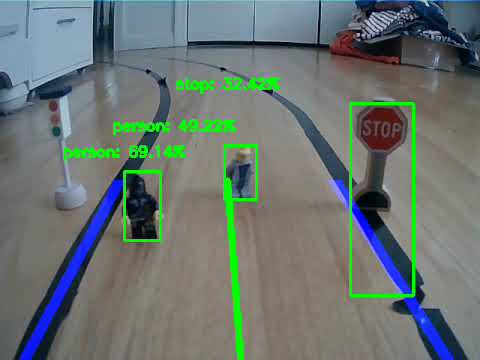
- Traffic signs
- Traffic signs and required action when detected
- STOP: stop and go
- YIELD: slow down and go normal speed
- Low SPEED: change speed to low
- High SPEED: change speed to high
- Traffic Signal: detect traffic signal (no change on picar)
- RR (Rail Road): stop and go
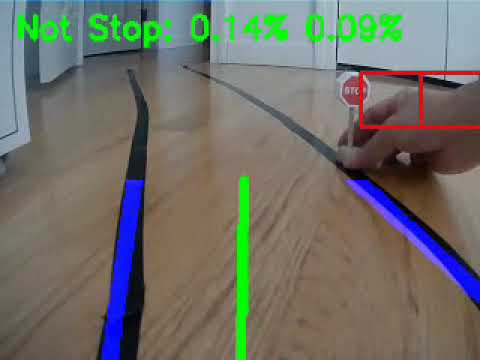
- Person will be put suddenly: stop until a person is removed
- Dimensions
- Total Hight: 3 ~ 5 inches
- Sign: 1 x 1 inches
- Setup right-hand side of the road
- At least 2 feet between 2 signs
- Sample Signs
- Traffic signs and required action when detected

Your picar should follow the tasks below:
- Start
- Drive between two lanes
- Detect traffic signs
- Perform a task for each sign
- STOP: stop and go
- YIELD: slow down and go normal speed
- Low SPEED: change speed to low
- High SPEED: change speed to high
- Traffic Signal: detect traffic signal (no change on picar)
- RR (Rail Road): stop and go
- Person: stop until removed
- Stop at the end of road
Homework: Submit the followings
- Target traffic signs and their tasks (in addition to defaults)
- Collected datasets
- Proposed deep learning models
- Implementation of the proposed model (i.e., source code)
- Evaluations
- Submission
- Documenting the following at GitHub, then submit the Github link
- Proposed deep learning model
- Regarding dataset
- Implementation including source code, trained model and any others
- Evaluations
- Upload dataset into any shareable storage such as google drive or Dropbox, then submit the link
- Submit screenshots and short clips that shows your implementation and progress
- Documenting the following at GitHub, then submit the Github link
The final phase of this project is a competition with other teams.
- When: TBA
- Where: TBA
- Rule:
- Each team has 2 trials
- A team who gets the highest point is a winner
- Points
- Correct detection for each sign: + 20 points
- Perform task for each sign: + 20 points
- Successful stop at the end: + 20 points
- Out of lane: - 5 points
- Unexpected stop or go: - 5 points
- Manual operation: - 20 points
- Touching a picar: - 40 points
Homework: Submit the followings:
- Video tapping the final competition
- Edit 2 ~ 3 minutes video
- Upload the video into YouTube
- Submit the link
You must use Github for your documentation
- Due: Before the final competition day
- Also, submit 5 minutes final video or Youtube link
- Submission: Github link
-
dmcar.py : main file to control autonomous car with Stop detector : $ python dmcar.py -b 4 : MODEL: stop_not_stop.model
-
dmcar_lane.py : main file to control autonomous car (lane only) : $ python dmcar_lane.py -b 4
-
dmcar_model.py : lane follower using NVIDIA CNN model : $ python dmcar_model.py -b 4 : MODEL: lane_navigation.model
-
dmcar_coral.py : Stop NoStop model using pre-trained MobileNet V2 : $ python dmcar_coral.py -b 4 : MODEL: stop_not_stop.tflite : LABEL: stop_not_stop.txt
-
dmcar_coco.py : Traffic Sign model using EfficientDet object detection : $ python dmcar_coco.py -b 4 : MODEL: traffic_sign.tflite : LABEL: traffic_sign.txt
-
lane_detection.py : functions to detect lanes and helper functions
-
Line.py : Line class
-
find_resolution.py : finding available resolution of USB Webcam
-
stop_detector.py : test program for stop/non-stop CNN model : $ python stop_detector.py
-
test-control.py : test program for controlling servos
-
test-servo.py : test program for servo
-
picar : directory for servoes (2 back wheels and 1 front : wheels) in a car : mostly doesn't have to change
-
model_stop_not_stop : directory for building stop_not_stop.model for : dmcar.py
-
model_traffic_sign : directory for building dataset of traffic sign : using Colab : dmcar_coco.py
-
model_lane_follow : directory for building dataset of lane follower : dmcar_model.py : Nvidia model
-
Stop No Stop model : Google Colab to create Stop NoStop model : Classification model
-
Traffic Signs model : Google Colab to create Traffic Sign model : Object Detection model