 _________________  _____       _           _
/  ___|  _  \  _  \/  __ \     | |         | |                   Developed By
\ `--.| | | | | | || /  \/     | |     __ _| |__          --------------------------
 `--. \ | | | | | || |         | |    / _` | '_ \         Rutger Blom  &  Luis Chanu
/\__/ / |/ /| |/ / | \__/\  _  | |___| (_| | |_) |        NSX vExpert     VCDX #246
\____/|___/ |___/   \____/ (_) \_____/\__,_|_.__/
This repository contains Ansible scripts that perform fully automated deployments of complete nested VMware SDDC Pods. Each Pod contains:
- A VyOS Router
- vCenter Server
- ESXi Hosts
- NSX-T Local Manager
- NSX-T Edge Nodes
- vRealize Log Insight
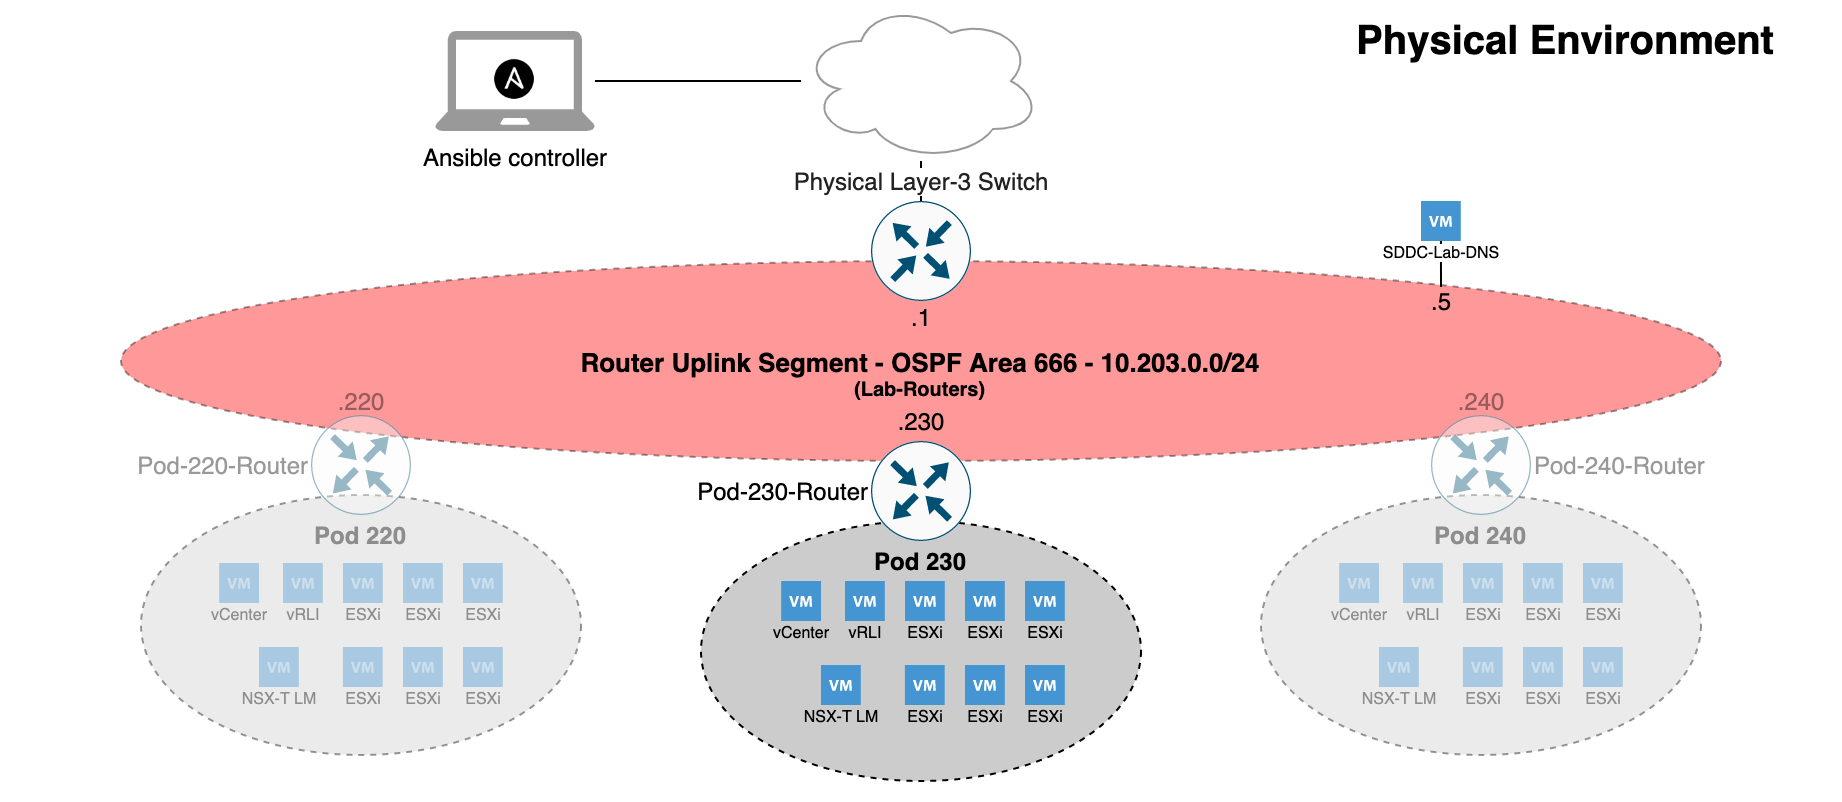
- A DNS/NTP Server (multi-Pod)
The primary use case is consistent and speedy provisioning of nested VMware SDDC lab environments.
The following are the requirements for successful Pod deployments:
- A physical standalone ESXi host running version 6.7 or higher.
- A virtual machine with a modern version of Ubuntu (used as the Ansible controller)
- The default deployment settings require DNS name resolution. You can leverage an existing DNS server, but it must be configured with the required forward and reverse zones and support dynamic updates.
- Access to VMware product installation media.
- For deploying NSX-T you will need an NSX-T license (Check out VMUG Advantage or the NSX-T Product Evaluation Center).
- If IPv6 deployment is enabled (Deploy.Setting.IPv6 = True):
- Pod.BaseNetwork.IPv6 must be a fully expanded /56 IPv6 network prefix. By default, RFC4193 ULA fd00::/56 prefix is used as a placeholder.
- Router Version should be set to "Latest" (default)
- It is recommended that the physical layer-3 switch be configured with OSPFv3 enabed on the Lab-Routers segment
- The Ansible controller must be IPv6 enabled, and have IPv6 transit to the DNS server
- DNS server must be IPv6 enabled
- DNS server must have IPv6 forward and reverse zones
- Within each Pod, only the following components are currently configured with IPv6:
- Nested VyOS Router (All interfaces)
- NSX-T Segments
- NSX-T eBGP Peering with the Router
The following are recommendations based on our experience with deploying Pods:
- Use a physical layer-3 switch with appropriate OSPF configuration matching the OSPF settings in your config.yml file. Dynamic routing between your Pods and your physical network will make your life easier.
- Hardware configuration of the physical standalone ESXi host:
- 2 CPUs (10 cores per CPU)
- 320 GB RAM
- 1 TB storage capacity (preferably SSD). Either DAS or 10 Gbit NFS/iSCSI
- Virtual hardware configuration of the Ansible controller VM:
- 1 CPUs
- 8 GB RAM
- 150 GB hard disk
- VMware Paravirtual SCSI controller
- VMXNET 3 network adapter
- Deploy the pre-configured DNS server for DNS name resolution within Pods instead of using your own.
-
Configure your physical network:
- Create an Lab-Routers VLAN used as transit segment between your layer-3 switch and the Pod VyOS router.
- Configure OSPFv2/OSPFv3 on the Lab-Routers segment.
-
Install the required software on your Ansible controller:
- sudo apt install python3 python3-pip xorriso git
- sudo pip3 install ansible pyvim pyvmomi netaddr jmespath dnspython
- git clone https://github.com/rutgerblom/SDDC.Lab.git
-
Copy/rename the sample files:
- cp config_sample.yml config.yml
- cp licenses_sample.yml licenses.yml
- cp software_sample.yml software.yml
- cp templates_sample.yml templates.yml
-
Modify config.yml and licenses.yml according to your needs and your environment
-
Create the Software Library directory structure using:
- sudo ansible-playbook utils/util_CreateSoftwareDir.yml
-
Add installation media to the corresponding directories in the Software Library (/Software)
To deploy a Pod:
-
Generate a Pod configuration with:
ansible-playbook playbooks/createPodConfig.yml -
Start a Pod deployment per the instructions. For example:
sudo ansible-playbook -e "@/home/ubuntu/Pod-230-Config.yml" deploy.yml
Deploying an SDDC Pod will take somewhere between 1 and 1.5 hours depending on your environment and Pod configuration.
Similary you remove a Pod with:
sudo ansible-playbook -e "@/home/ubuntu/Pod-230-Config.yml" undeploy.yml
Here are some known items to be aware of:
- If you attempt to deploy a pod, and receive a message indicating "Error rmdir /tmp/Pod-###/iso: [Errno 39] Directory not empty: '/tmp/Pod-###/iso'", that's because a previous pod deployment failed (for whatever reason), and some files remained in the /tmp/Pod-### directory. To resolve this issue, delete the entire /tmp/Pod-### directory, and then re-deploy the Pod. If an ISO image is still mounted (which you can check by running 'mount'), then you will need to unmount the ISO image before you can delete the /tmp/Pod-### directory. In all examples, the "###" of Pod-### is the 3-digit Pod Number.
For detailed installation, preparation, and deployment steps, please see the "Deploying your first SDDC.Lab Pod" document.
A big thank you to Yasen Simeonov. His project at https://github.com/yasensim/vsphere-lab-deploy was the inspiration for this project. Another big thank you to my companion and lead developer Luis Chanu (VCDX #246) for pushing this project forward all the time. Last but not least thank you vCommunity for trying this out and providing valuable feedback.
