The FakeFinder project builds upon the work done at IQT Labs in competing in the Facebook Deepfake Detection Challenge (DFDC). FakeFinder builds a modular, scalable and extensible framework for evaluating various deepfake detection models. The toolkit provides a web application as well as API access for integration into existing media forensic workflow and applications. To illustrate the functionality in FakeFinder we have included implementations of six existing, open source Deepfake detectors as well as a template exemplifying how new algorithms can be easily added to the system.
We have included instructions to reproduce the system as we have built it, using the AWS ecosystem (EC2, S3, EFS and ECR). The current tool accomodates two possible workflows:
The default behavior when using the Dash-App. This work flow prioritizes availability by using warm (existing BUT stopped EC2 instances) or hot (existing AND running EC2 instances) virtual machines to run the inference on videos to be queried.
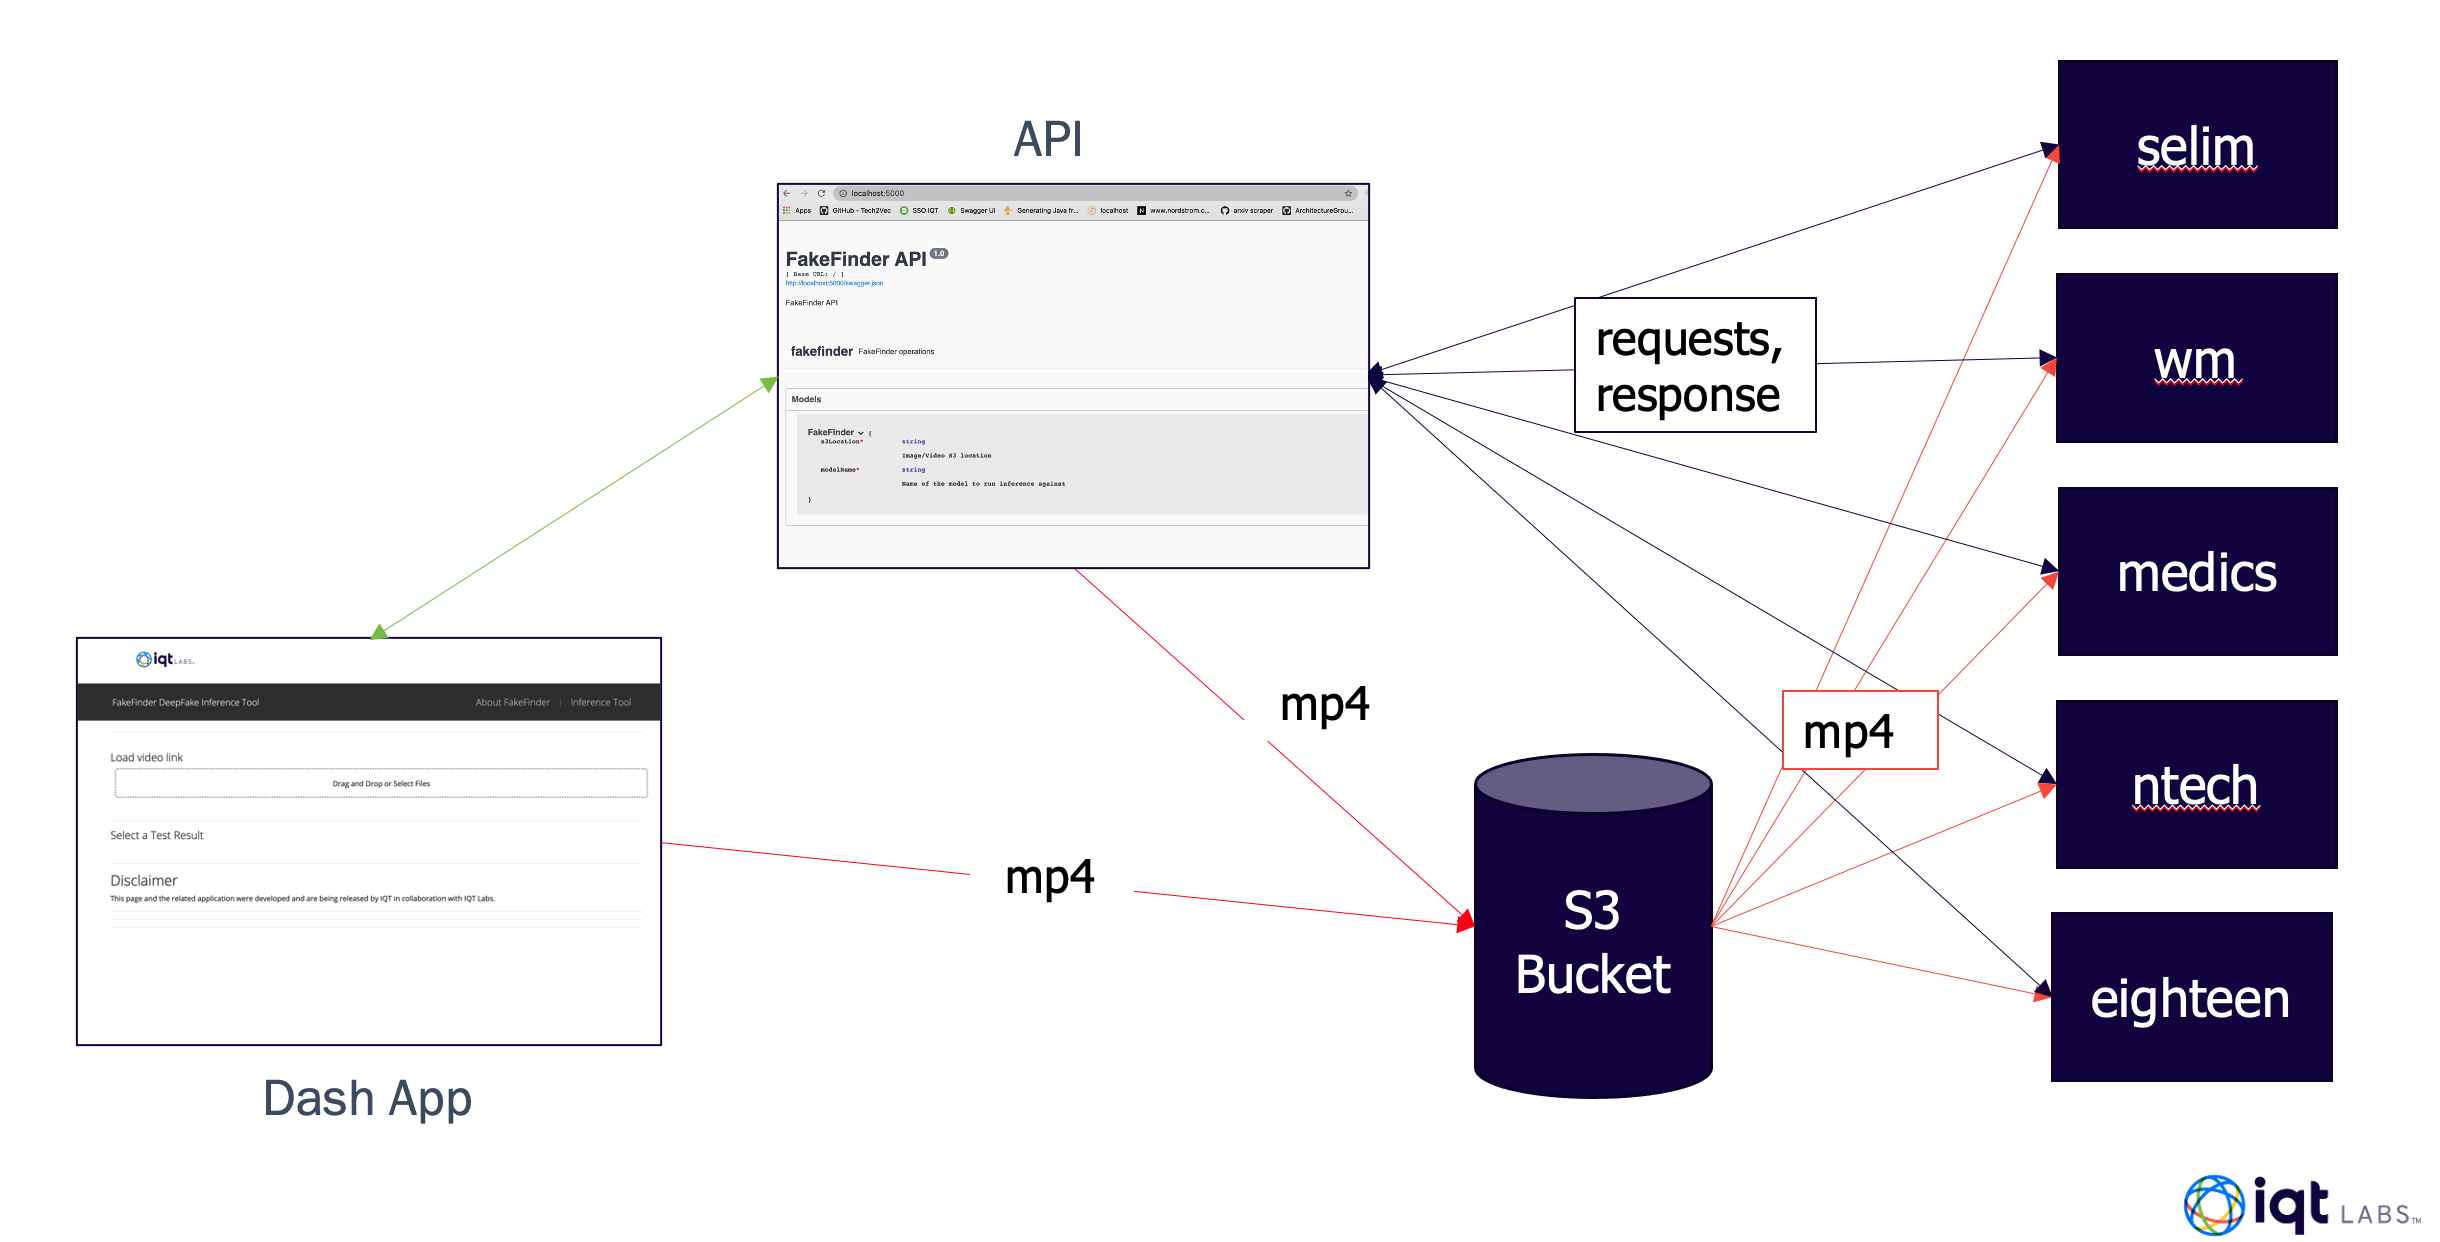
This is the default behavior when calling the system through the API and is intended for cases when a large amount of files need to be queried. In this workflow you can specify the number of replicas of each worker and split the files to be tested between them. This workflow leverages cold (don't currently exist) virtual machines. Using pre-built images on a container registry we can scale the inference workflow to as many instances as is required, accelerating the number of files analyzed per second at the cost of a larger start-up time.
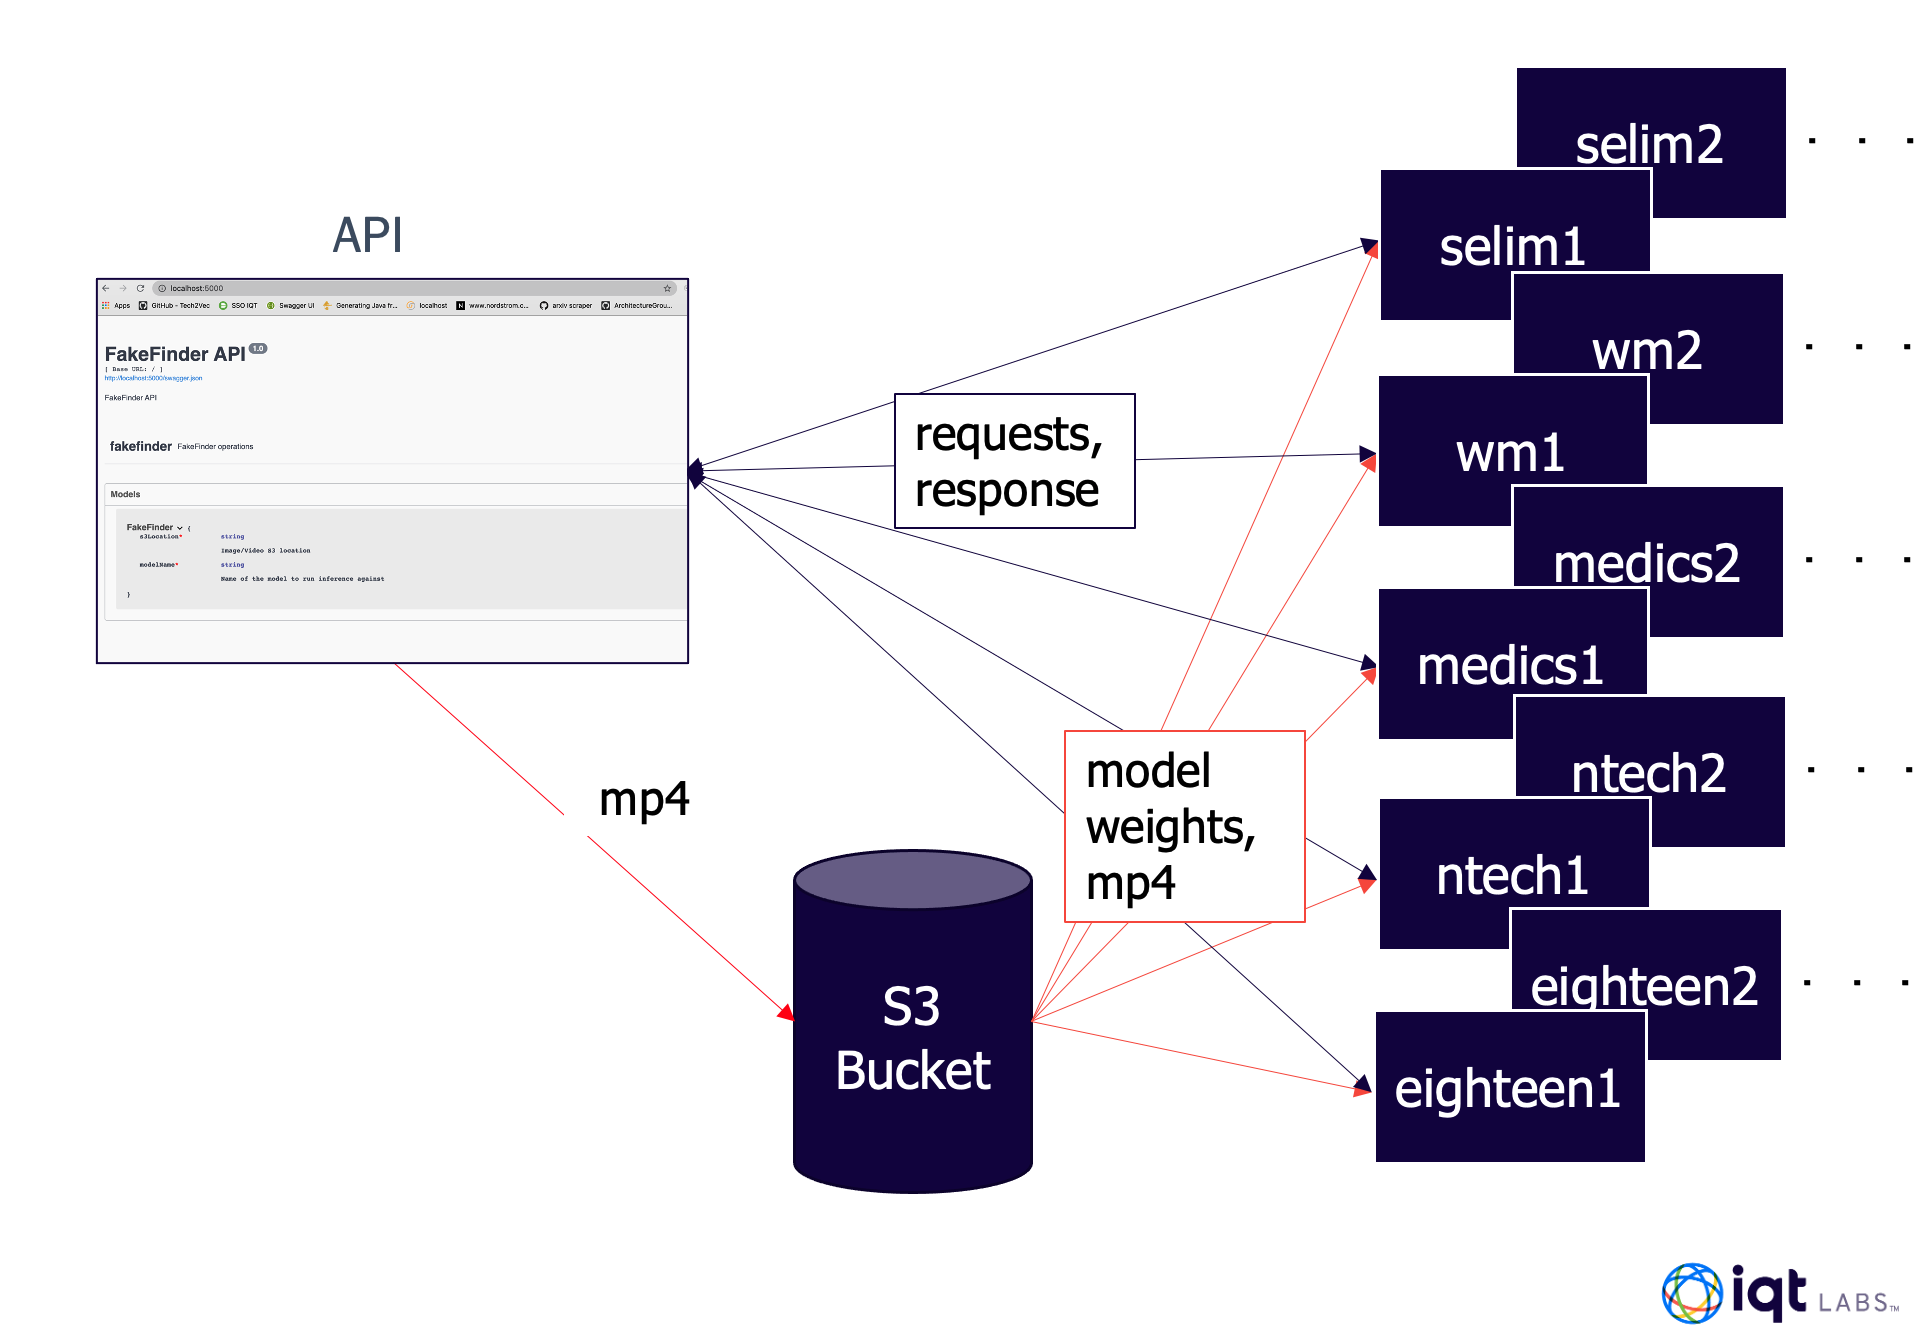
Although designed for extensability, the current toolkit includes implementations for six detectors open sourced from the DeepFake Detection Challenge(DFDC) and the DeeperForensics Challenge 2020(DFC).
The detectors included are:
| Name | Input type | Challenge | Description |
|---|---|---|---|
| selimsef | video (mp4) | DFDC1 | Model Card |
| wm | video (mp4) | DFDC1 | Model Card |
| ntech | video (mp4) | DFDC1 | Model Card |
| eighteen | video (mp4) | DFDC1 | Model Card |
| medics | video (mp4) | DFDC1 | Model Card |
| boken | video (mp4) | DFC2 | Model Card |
Additionally, we have included template code and instructions for adding a new detector to the system in the detector template folder.
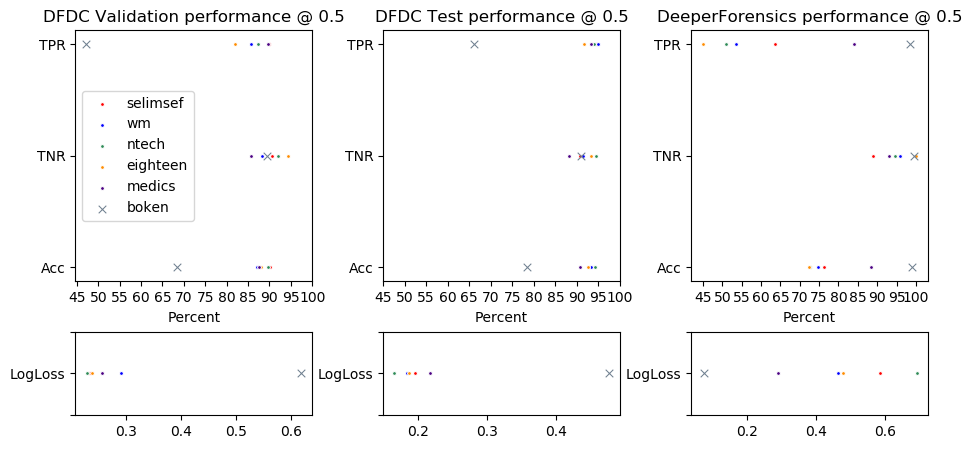
As part of the inplementation we have evaluated the current models against the test sets provided by both (1, 2) competitions after they closed. The following figure shows the True Positive Rate (TPR), False Positive Rate (FPR) and final accuracy (Acc) for all six models against these data. We have also included the average binary cross entropy (LogLoss) whcih was ultimately used to score the competition.
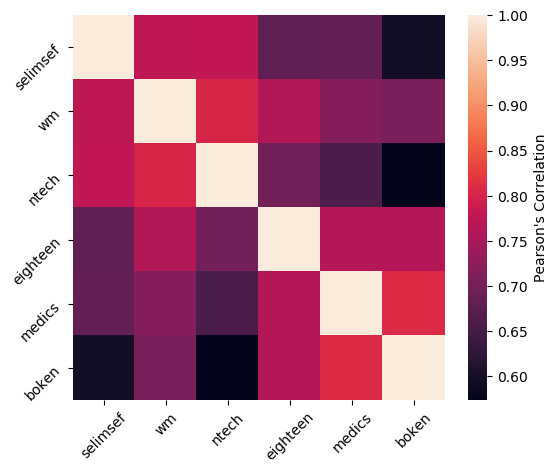
We have also measured the correlation between the six detectors over all of the evaulation dataset, shown in the following figure (Note: a correlation > 0.7 is considered a strong correlation)
We built FakeFinder using several components of the AWS ecosystem:
-
Elastic File System (EFS) for storing model weights in a quickly accessible format.
-
Elastic Compute Cloud (EC2) instances for doing inference, as well as hosting the API server and Dash app.
-
Simple Storage Service (S3) for storing videos uploaded using the API server or Dash app and accessed by the inference instances.
-
Elastic Container Registry for storing container images for each detector that can so they can be easily deployed to new instances when the tool is operating in the scalable mode.
We also made use of Docker for building and running containers, and Flask for the API server and serving models for inference. Here we provide instructions on reproducing the FakeFinder architecture on AWS. There are a few prerequisites:
- All of the following steps that involve AWS resources should be done from the same AWS account to ensure all EC2 instances can access the S3 bucket, ECR, and EFS drive. Specifically we recommend doing all command line work in the first three steps from a
p2.xlargeEC2 instance running the Deep Learning AMI (Ubuntu 18.04) created under this account. - AWS command line interface will be used in multiple steps, so it must be installed first (instructions here).
- Some of the detectors use submodules so use the following command to clone the FakeFinder repo. We recommend using ssh for cloning.
git clone --recurse-submodules -j8 git@github.com:IQTLabs/FakeFinder.git
- Henceforth, let
FF_PATHequal the absolute path to the root of the FakeFinder repo.
You will need to create an S3 bucket that will store videos that are uploaded by the Dash app or API server, and store the bucket name as S3_BUCKET_NAME.
To access the weights for each model, email jberkowitz@iqt.org and we will send you a presigned link that expires after seven days. With this link, run the following commands:
wget -O ffweights.tar.gz ${PRESIGNED_LINK}
tar -xvzf ffweights.tar.gz
This will create a top level directory called weights, with sub-directories for each detector. This can either be done on every EC2 instance that will be hosting a detector container, or the weights can be downloaded into an EFS directory that is mounted on each EC2 instance. See here for instructions on creating a file system on Amazon EFS. Store the file system's IP as EFS_IP. Run the following commands from the home directory of an EC2 to mount the EFS directory, and download the weights to it.
mkdir /data
sudo mount -t nfs4 -o nfsvers=4.1,rsize=1048576,wsize=1048576,hard,timeo=600,retrans=2,noresvport ${EFS_IP}:/ /data
aws s3 sync /data s3://ffweights
This repo contains Dockerfiles for the Dash App, API server, and each of the implemented detectors. You will need to clone this repository, build images for each detector, and push them to an AWS ECR as part of reproducing FakeFinder. Follow the instructions here to create an image repository on AWS ECR, and take note of your repository's URI (store as ECR_URI). You will also need to login and authenticate your docker client before pushing images.
To build images for each of the detectors do the following steps for each detector:
Switch to the directory for the given detector
cd ${FF_PATH}/detectors/${DETECTOR_NAME}
where DETECTOR_NAME is the name of the detector (listed above). Inside app.py in that directory, the variable BUCKET_NAME is defined (usually on line 12). Replace the default value with the name of the S3 bucket you created (stored in S3_BUCKET_NAME) and save the changes.
Next, run the following command
docker build -t ${DETECTOR_IMAGE_NAME} .
Where DETECTOR_IMAGE_NAME is a descriptive name for the image (usually just the same as DETECTOR_NAME). Next, tag the image you just built so it can be pushed to the repository:
docker tag ${DETECTOR_IMAGE_NAME}:latest ${ECR_URI}:${DETECTOR_IMAGE_NAME}
And then push the image to your ECR repository:
docker push ${ECR_URI}:${DETECTOR_IMAGE_NAME}
FakeFinder API has two configuration files to support the cold and warm AWS EC2 instance creation. These instances support batch and UI mode. We define cold EC2 instances as the process where an EC2 instance is launched and readied for running inference on demand from the user. In contrast, the warm instance refers to a pre-built instance that exists in a stopped state. Warm instances are created from the same image as the one that is used for launching cold instances. The file images.json in the api top level directory contains the tags of the ECR images used to create cold AWS instances. The file models.json at the same level contains the instance ids of the warm (stopped) EC2 instances. When adding a new model to the FakeFinder for inferencing, the image tag and static instance id should be added to these config files.
You can also test these images locally. To use GPUs in these containers you will need to install the NVIDIA container toolkit, and utilize the NVIDIA runtime when running the container. By default, containers run from these images start a Flask app that serves the detector for inference, but you can overwrite this with the --entrypoint flag. The following command will run a container for the specified detector and launch a bash shell within it.
docker run --runtime=nvidia -v <path_to_weight_directory>/weights/${DETECTOR_NAME}/:/workdir/weights --entrypoint=/bin/bash -it -p 5000:5000 ${DETECTOR_IMAGE_NAME}
Once you have setup your S3 Bucket, EFS directory, and built and pushed all the model images to your ECR you can configure EC2 instances for FakeFinder's warm/hot operating mode. Instructions for reproducing the cold mode can be found in the /api directory. We use g4dn.xlarge instances running the Deep Learning AMI (Ubuntu 18.04) Version 41.0 for inference.
- Instances will need to be assigned an IAM role with AmazonEC2ContainerRegistryReadOnly and AmazonS3ReadOnlyAccess
- Instances will need to be assigned a security group with the following inbound and outbound rules.
- Inbound SSH access on port 22
- Inbound TCP access on port 5000
- Allow all outbound traffic on all ports.
For each detector you will need to launch an EC2 instance with the aforementioned configuration, ssh into it, and execute the following steps.
- Create a directory and mount your EFS drive with the weights into it.
mkdir /data

sudo mount -t nfs4 -o nfsvers=4.1, rsize=1048576, wsize=1048576, hard, timeo=600, retrans=2, noresvport ${EFS_IP}:/ /data
- Add the EFS drive to
/etc/fstabto make it persist over reboots
sudo chmod a+w /etc/fstab

echo "${EFS_IP}:/ /data  nfs     nfsvers=4.1,rsize=1048576,wsize=1048576,hard,timeo=600,retrans=2,noresvport     0       0" >> /etc/fstab

sudo chmod a-w /etc/fstab
- Pull the image from your ECR
docker pull ${ECR_URI}:${DETECTOR_IMAGE_NAME}
- Run the container with the
--restart unless-stoppedoption so that the container automatically starts when the instance does.
docker run --runtime=nvidia --restart unless-stopped -v /data/weights/${DETECTOR_NAME}/:/workdir/weights -d -p 5000:5000 ${DETECTOR_IMAGE_NAME}
- Stop the instance, but not the container
sudo shutdown -h
- Take note of the instance ID and replace the value in
FF_PATH/api/models.jsonwith the key corresponding to the detector.
The EC2 instance used for setting up the API server should be configured using the same IAM roles and security groups as described above. These security groups and IAM roles should allow passwordless access to S3 and other EC2 instances in the tenant where the server is hosted.
It can be run on a Red Hat Enterprise Linux platform. An Inbound rule for port 80 should be added to the server to enable access to the Swagger endpoint.
The API server is in docker container. It can be built and started on port 5000 with the following commands.
sudo docker build -t fakefinder-api .
sudo docker run --rm -it --name fakefinder-api -p 5000:5000 fakefinder-api
Once it is up and running, the Swagger endpoint can be accessed at -
http://<ip address>:5000/
The following endpoints are available -
POST INFERENCE - To run inference, send a Post request to -
http://<ip address>:5000/fakefinder
GET MODELS - To get a list of available models, send a Get request to -
http://<ip address>:5000/fakefinder
POST AWS S3 UPLOAD - To upload a file to S3 bucket before inference, send a request to -
http://<ip address>:5000/uploadS3
In order to start the dash web application, you'll need to setup another AWS EC2 instance.
We suggest using a t2.small instance running Ubuntu 18.04.
- The Instance will need to be assigned an ApiNode IAM role with AmazonEC2FullAccess and AmazonS3FullAccess
- The instance will need to be assigned a security group with the following inbound and outbound rules.
- Inbound SSH access on port 22
- Inbound HTTP access on port 80
- Inbound Custom TCP access on port 8050
Once launched, take note of the IP address and ssh into the machine.
Checkout the git repository, move into the dash directory. and build the docker container:
git clone https://github.com/IQTLabs/FakeFinder.git
cd FakeFinder/dash
You'll need to change the BUCKET_NAME and FF_URL variables in the apps/definitions.py file
to point to your bucket and API url, respectively.
After doing so, the dash app server can be built by the following commands:
chmod +x build_docker.sh
./build_docker.sh
This may take a few minutes to prep all the necessary requirements. The build and launch will be complete when you see the following terminal output:
Successfully tagged dash:beta
Dash is running on http://0.0.0.0:8050/

 * Serving Flask app "app" (lazy loading)
 * Environment: production
   WARNING: This is a development server. Do not use it in a production deployment.
   Use a production WSGI server instead.
 * Debug mode: on
You should then be able to point a browser to the dash app's IP address to access the web application.
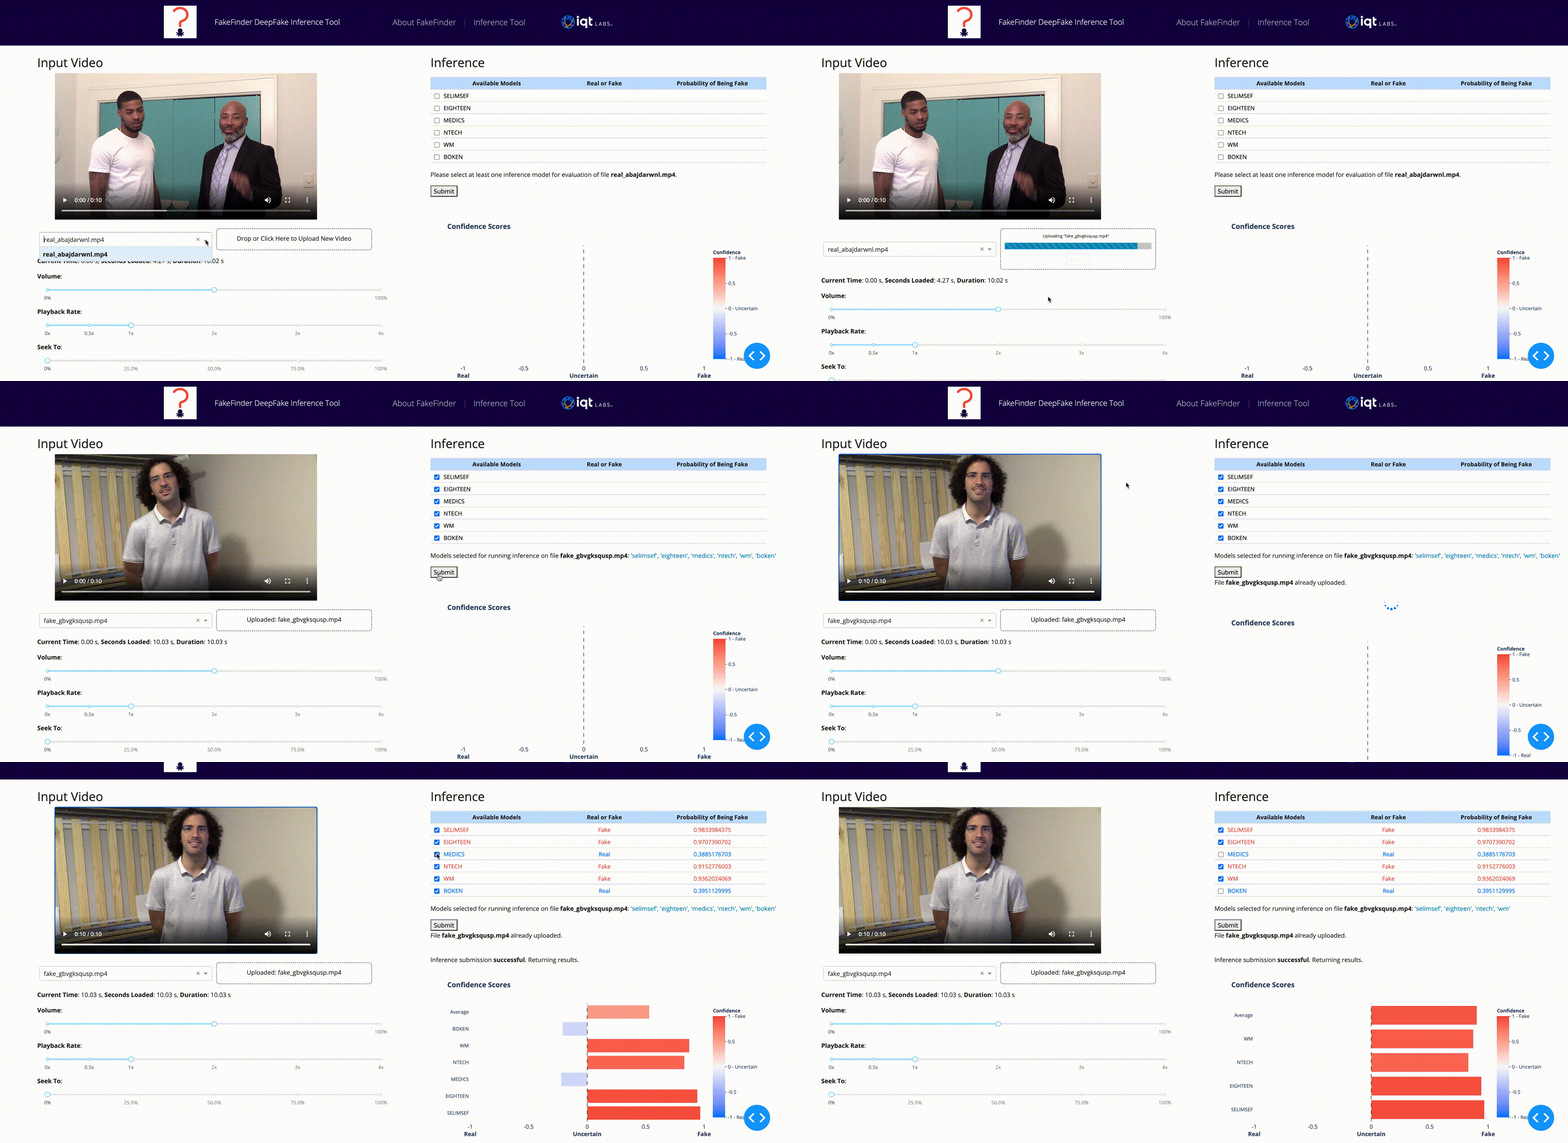
The above example demonstrates using the Inference Tool section of the web app. Users can upload a video by clicking on the Upload box of the Input Video section. The dropdown menu autopopulates upon upload completion, and users can play the video via a series of controls. There is the ability to change the volume, playback speed and current location within the video file.
In the Inference section of the page, users may select from the deep learning models available through the API. After checking the boxes of requested models, the Submit button will call the API to run inference for each model. The results are returned in the table, which includes an assignment of Real or Fake based on the model probability output, as well as graphically, found below the table. The bar braph presents the confidence of the video being real or fake for each model and for submissions with more than one model, an average confidence score is also presented.
POST INFERENCE - To run inference, send a Post request to -
http://<ip address>:5000/fakefinder
The Post inference request supports 2 modes - UI and Batch. The GPU-powered AWS EC2 instances can be expensive to run indefinitely. On the other hand, bringing up an GPU EC2 instance from an image in an on-demand scenario takes some time. In view of these considerations, the API provides two modes that support either using AlwaysON or Warm (Stopped) instances, and Cold start(newly created from image) instances. The first of these is the UI mode and provides significantly better response time than second one which is the batch mode.
The inference request model is shown below -
FakeFinder{
batchMode*	boolean
default: false
Set this field to true if processing video/image files in batch mode. If requests are coming from a UI this should be set to false.

alwaysOn	boolean
default: true
Set this field to true if starting/stopping ec2 instances

s3Location*	string
Image/Video S3 location. If uploading the file ththe value should be bucket name.

modelName*	string
Name of the model to run inference against

splitRequests	boolean
default: false
Split the request containing a list of videos to multiple requests containing single video.

numSplitRequests	integer
default: 1
Number of splits of the list containing videos.

}
In this mode "batchMode" is set to False. There is an option of running inference against running or stopped instances by toggling the "AlwaysOn" attribute. If this attribute is set to "True" the API expects running ec2 instances to which inference request can be sent. If this is set to False, the API will start the inference server corresponding to the "modelName" attribute first before running the inference. The later scenario will have a longer response time compared to the first one. A request containing long list of files can also be split into multiple requests, however, the reponse will always be an aggregate of all the requests.
In this mode "AlwaysOn" is set to False. API always creates an EC2 instance from the image stored in the container registery. The image is selected based on the "modelName" parameter. There is an option to split a request containing large number of files to different ec2 instances. If split request is selected, the API divides the list of files, spawns ec2 instances based on "numSplitRequests" and sends different requests to each of the instances. This provides the scaling needed for large scale inferencing scenarios. The reponse will always be an aggregate of all the requests.
GET MODELS - To get a list of available models, send a Get request to -
http://<ip address>:5000/fakefinder
The API is fully configurable and can support any number of inferencing models. A new model can be added, swapped or deleted as described in earlier sections. At any given time, a list of supported models can be obtained by sending a Get request.
POST AWS S3 UPLOAD - To upload a file to S3 bucket before inference, send a request to -
http://<ip address>:5000/uploadS3
The API also supports uploading a file to S3 bucket before making an inferencing request.
