Arduino-FFB-wheel
Stand alone directInput USB device recognized in Windows as a joystick with force feedback functionality, based on BRWheel by Fernando Igor from 2017.
Firmware features:
- supported Arduino boards: Leonardo, Micro and ProMicro (ATmega32U4, 5V, 16MHz)
- 4 analog axis + 1 for optical encoder, 2 FFB axis (only 1 has pwm or dac output)
- automatic or manual analog axis calibration
- up to 16 buttons by 4x4 matrix or via button box firmware uploaded to Arduino Nano/Uno
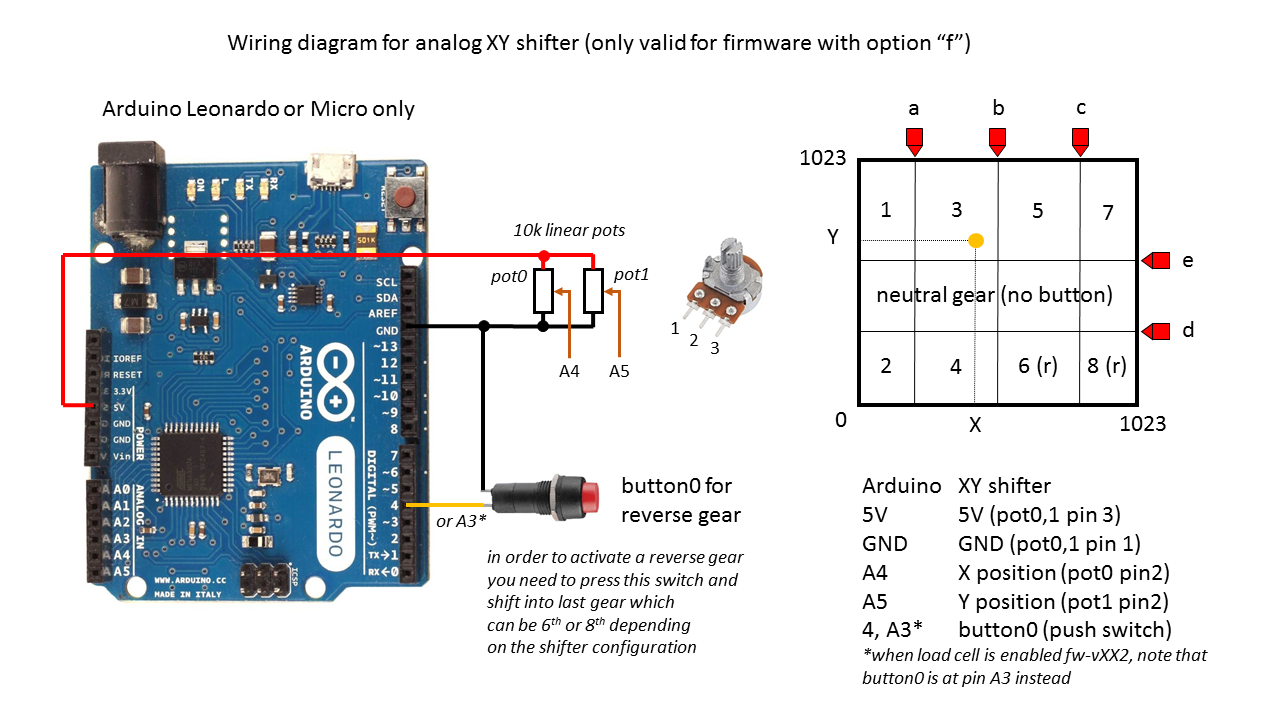
- analog XY H-pattern shifter, configurable to 6/8 gears + reverse
- fully supported 16bit FFB effects (custom force effect not implemented)
- envelope and conditional block effects, start delay, durration, deadband, direction enable
- FFB calculation and axis/button update rate is 500Hz (2ms period)
- many firmware options (external 12bit ADC/DAC, automatic/manual pedal calibration, z-index support/offset/reset, hatswitch, button matrix, external shift register, hardware wheel re-center, xy analog H shifter)
- RS232 serial interface for configuration of all wheel parameters
- fully adjustable FFB output in the form of 2 channel digital 16bit PWM or analog 12bit DAC signals
- available pwm modes: pwm+-, pwm+dir, pwm0.50.100, rcm
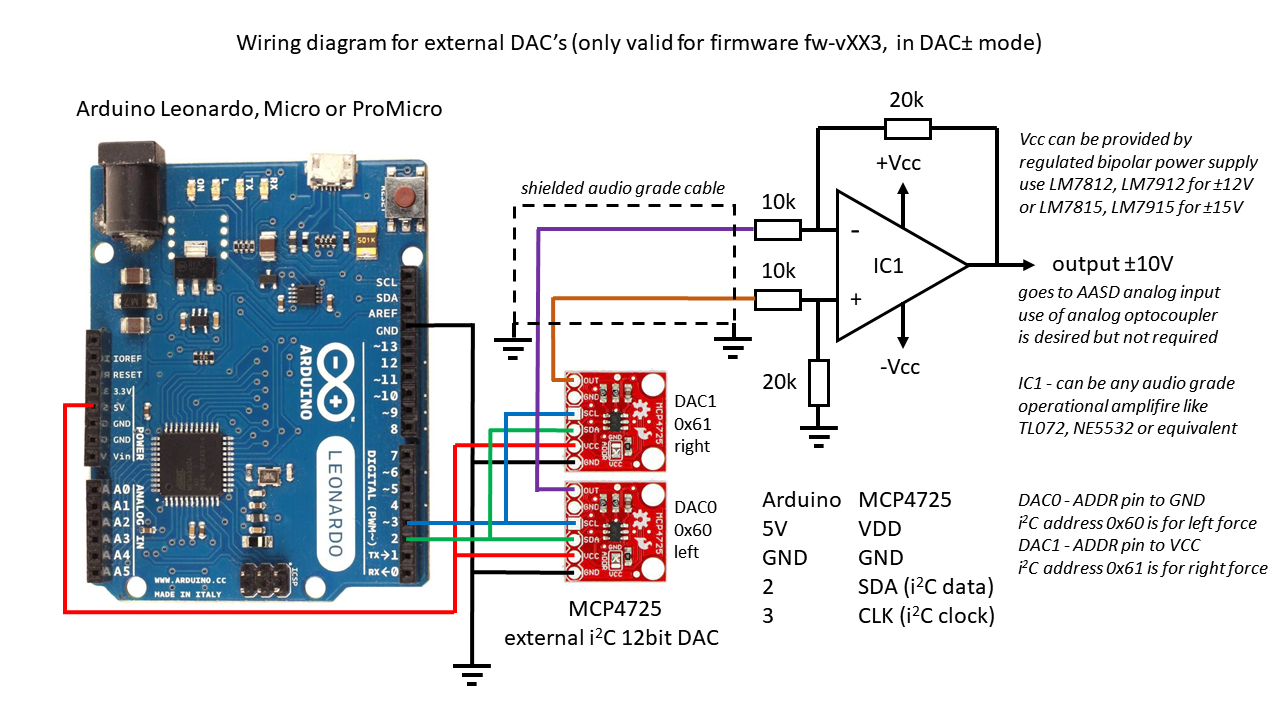
- available dac modes: dac+-, dac+dir
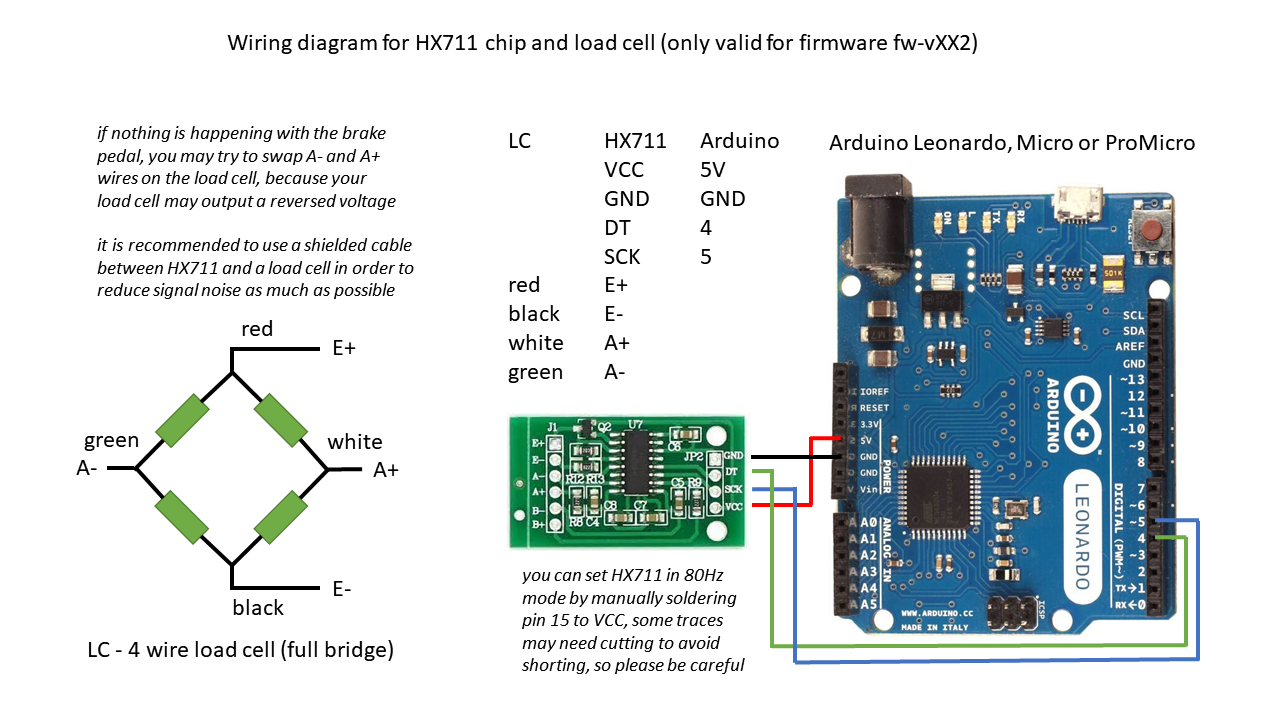
- load cell support for HX711 chip (for brake pedal axis only)
- all wheel parameters are stored in EEPROM (and automatically loaded at each powerup)
- original wheel control user interface Arduino FFB gui for an easy configuration and monitoring of all inputs/outputs
Detailed documentation and more information about the firmware can be found in txt files inside docs folder. Compiled firmware in HEX format for Arduino Leonardo and Micro can be found in leonardo hex, while firmware for Arduino ProMicro (with replacement pinout) is located in micro hex folder. All neccessary wiring diagrams are in wirings folder.
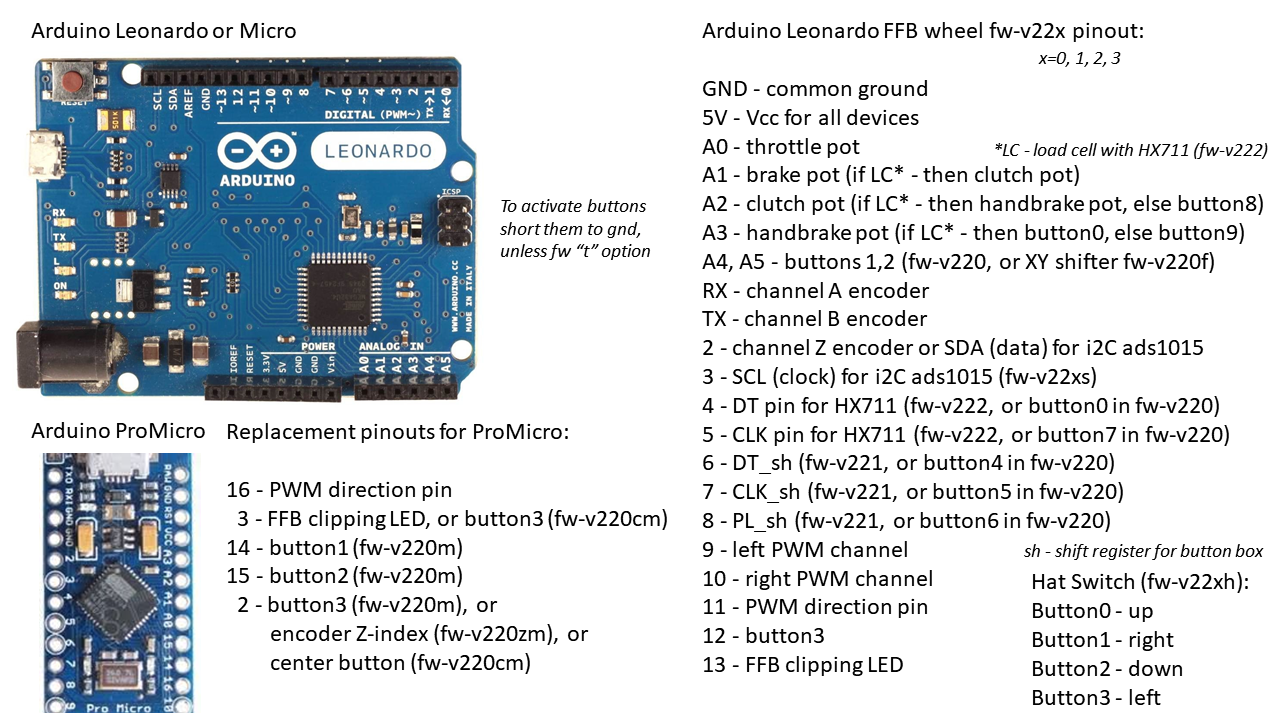
Firmware pinouts and wiring diagrams
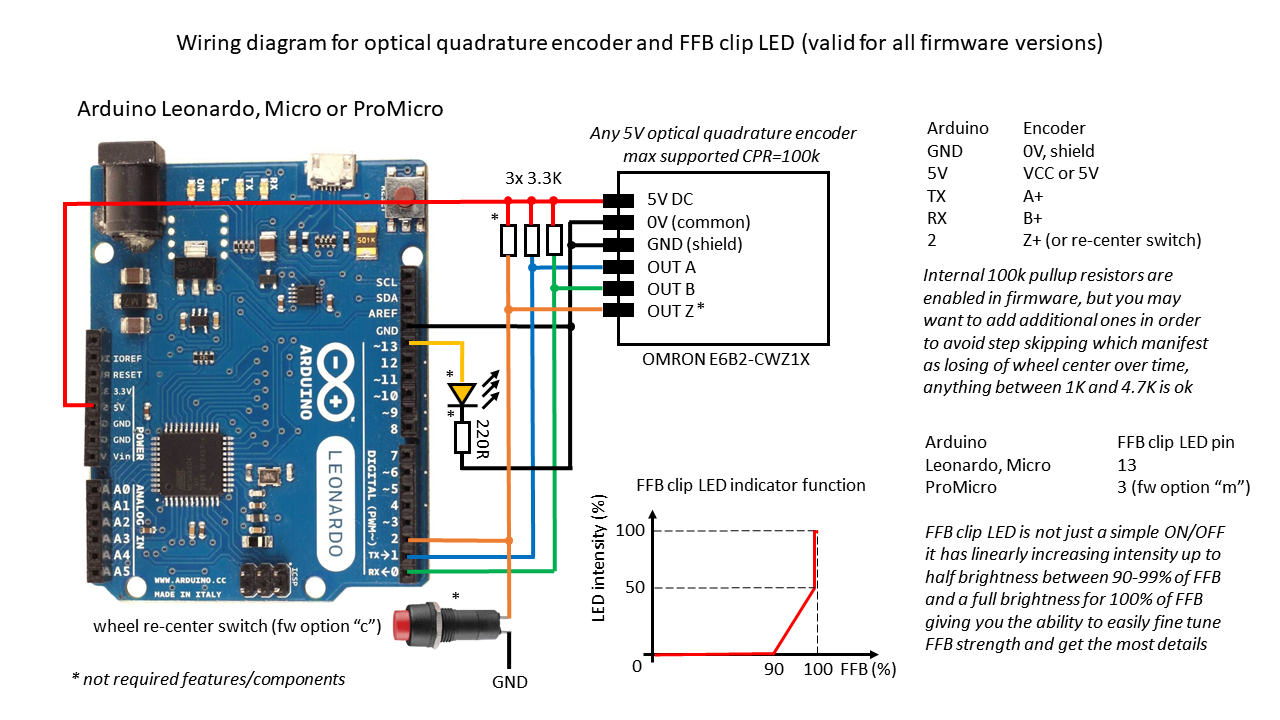
Encoder and LED wiring
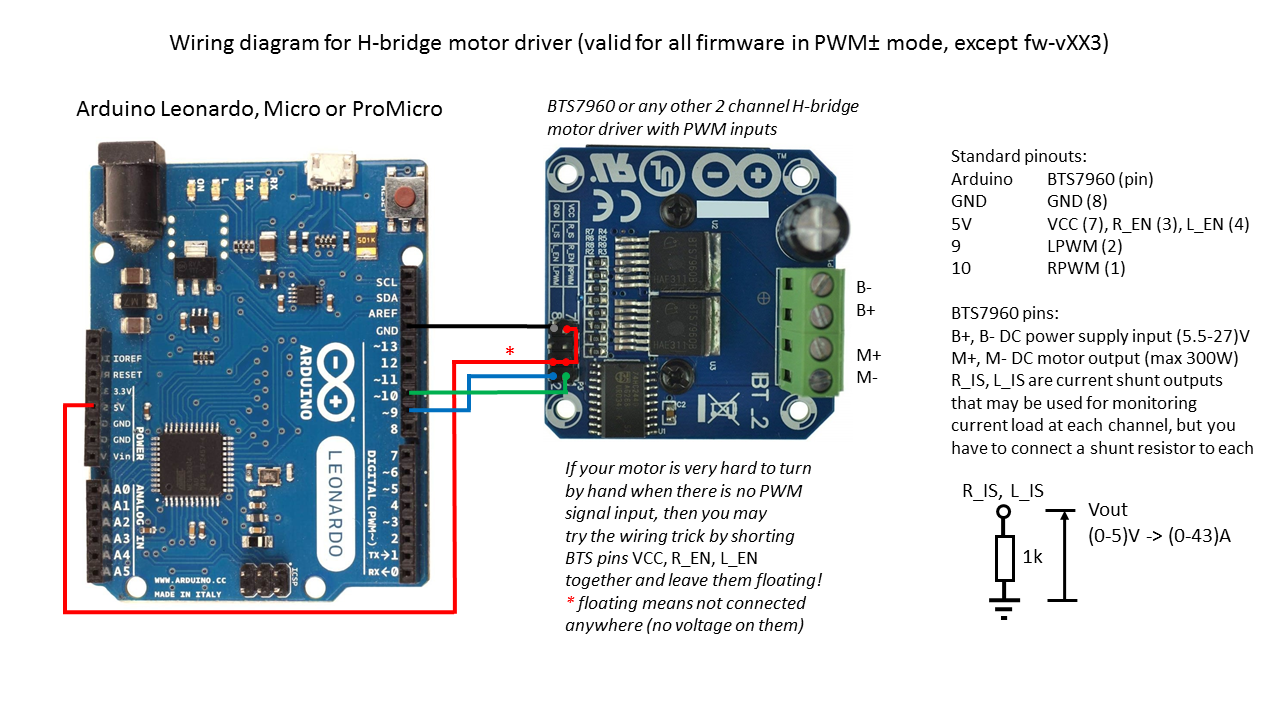
Motor driver wiring
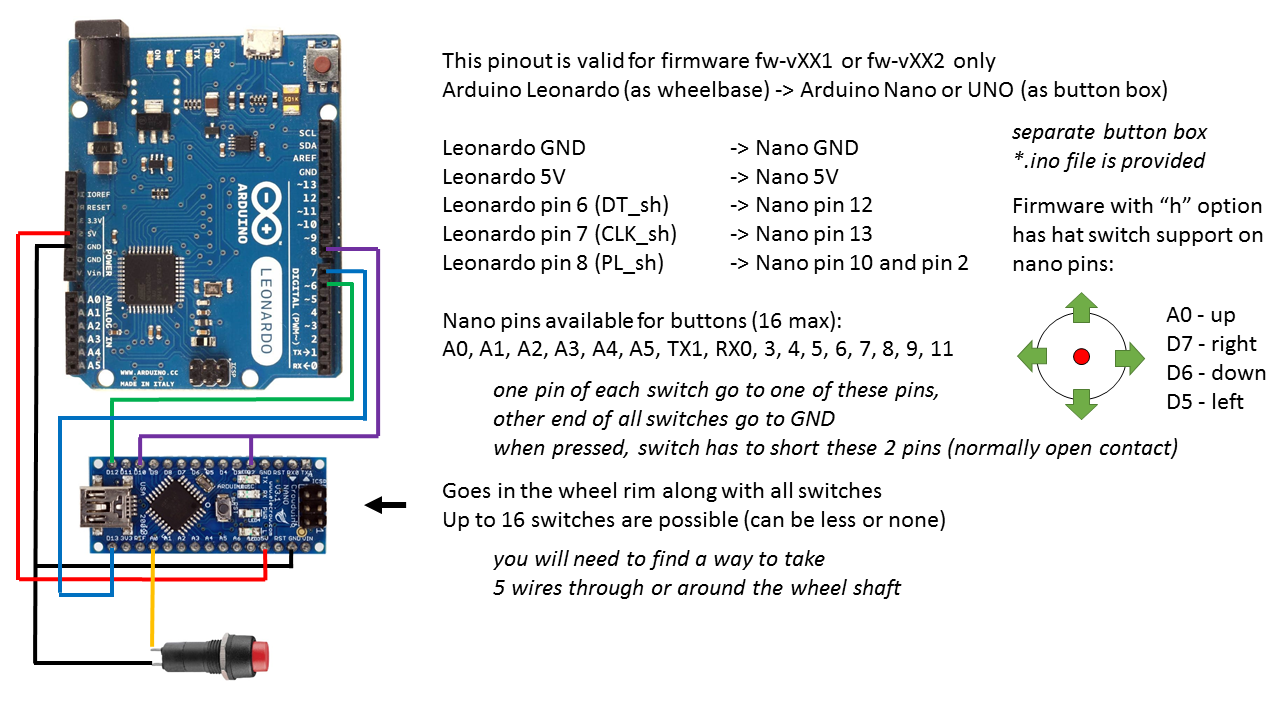
Button box firmware pinouts - for Arduino Nano/Uno
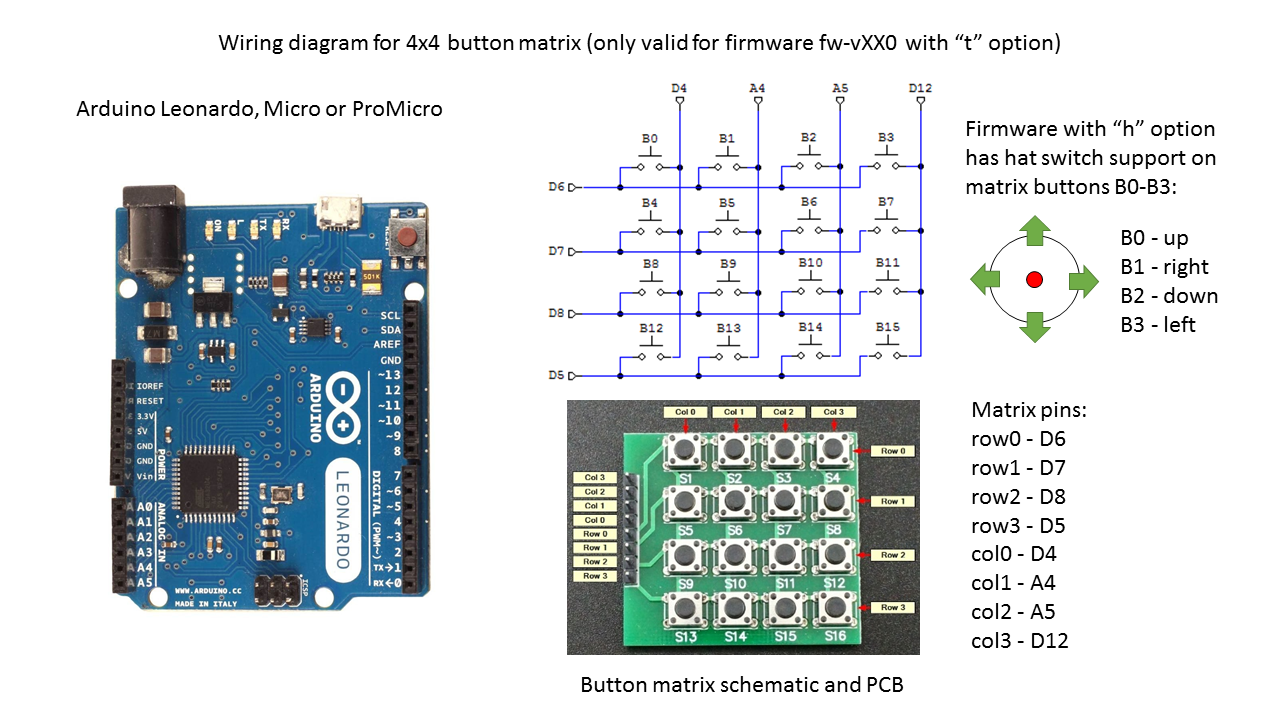
Button matrix pinouts
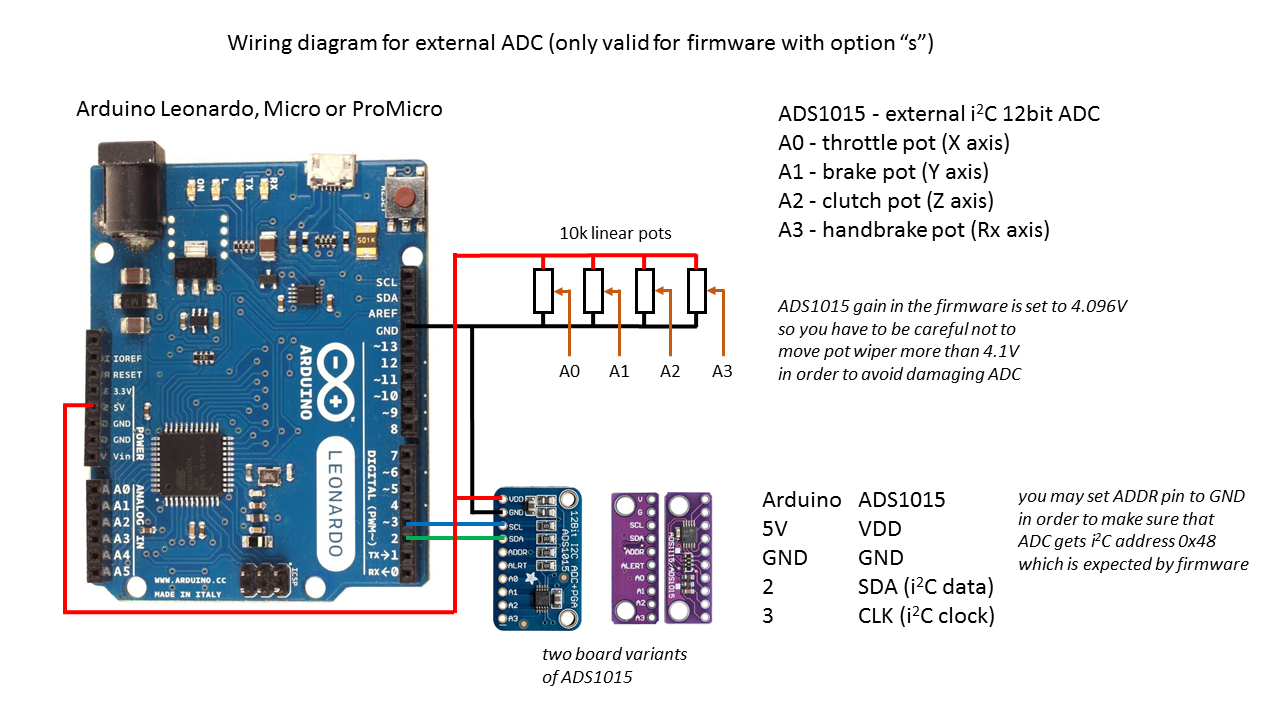
External i2C device pinouts
HX711 and load cell wiring
XY shifter wiring
Firmware option description
Due to 32k flash memory limitation in Arduino Leonardo (ATmega32U4), each HEX file is compiled with a certain firmware option. A one letter abreviation for each option is placed in the firmware version string and one needs to consider carefully which one to chose. In the release, I've compiled for you a few most often used firmware option combinations.
Firmware version string consists out of 3 digits and some letters (example: fw-v210ahz). The first two digits (XX) are reserved for major firmware version, while the 3rd digit (0,1,2,3) stands for:
- fw-vXX0 basic version (1 optical encoder, 4 analog axis, 8 buttons, 2ch PWM output)
- fw-vXX1 adds support for shift register
- fw-vXX2 adds support for shift register+HX711
- fw-vXX3 adds support for shift register+HX711+MCP4725 analog DAC's
Here is the complete list of all available options that may be added to any of the above firmware*:
- "a" pedal axis autocalibration enabled (otherwise a manual calibration is enabled)
- "z" Z-index encoder support
- "c" hardware wheel re-center support
- "h" Hat Switch (D-pad) support
- "s" external ADC support for pedals with ADS1015
- "i" averaging of analog inputs
- "t" 4x4 button matrix support
- "f" analog XY shifter support
- "e" two extra digital buttons enabled instead of analog clutch and handbrake axis
- "m" replacement pinouts for Arduino ProMicro
note* some combinations are not possible at the same time, like "fw-vXXXzs", or "fw-v213z" beacause they would use the same hardware interrupt pin for more than 1 function, while some are not possible due to ATmega32U4 32k memory limit
Firmware download
Firmware upload procedure
You can use XLoader:
- set 57600baud, ATmega32U4 microcontroler and select desired HEX
- press reset button on Arduino (or shortly connect RST pin to GND)
- select newly appeared COM port (Arduino in bootloader mode*) and press upload, you will only have a few seconds
*It is possible that some cheap chinese clones of Arduino Leonardo, Micro or ProMicro do not have a bootloader programmed. In that case you need to upload the original Arduino Leonardo bootloader first. You can find more details about it here: https://docs.arduino.cc/built-in-examples/arduino-isp/ArduinoISP
How to compile the source
In order to compile the firmware yourself you may use windows7, 8, 10 or 11, you need to install Arduino IDE v1.8.19 and Arduino Boards v1.6.21. You must place all libraries in your .../documents/Arduino/Libraries folder. In windows folder options set to show hidden files and folders then navigate to C:\Users\yourusername\AppData\Local\Arduino15\packages\arduino\hardware\avr\1.6.21\cores. Rename the folder "arduino" as a backup as we will need some files from it latter, I just add "arduino_org" to the filename. Create a new folder called "arduino" and place the entire content from modified core into newly created "arduino" folder. Navigate back to "arduino_org" folder and copy files "IPAddress.cpp", "IPAddress.h", "new.cpp" and "new.h", then paste and replace the ones inside the "arduino" folder. That should fix all errors and you should be able to compile the code. Bare in mind that if you make any changes to HID or USB core files you will need to repeat the procedure and paste all modified files in the newly created "arduino" folder each time.
Troubleshooting X-axis stuck at -540deg
If you used some of the earlier firmware versions prior to fw-v22X, windows remembered the axis raw HID calibration which was +-32k. This issue occurs when you upload lattest firmware with new X-axis calibration 0-65k, which is incompatible with previous HID calibration that windows remembered for this ffb joystick device. However, there is a very easy fix for it, all we need to do is to reset the device calibration in windows. This can be done by using program DXtweak2. Open the program and select Arduino Leonardo as a device if you have more than 1 ffb capable devices. Click on device defaults button, then click apply button and close the program. That's all.
Credits
- FFB HID and USB core for Arduino by: Peter Barrett
- BRWheel firmware by: Tero Loimuneva, Saku Kekkonen, Etienne Saint-Paul and Fernando Igor https://github.com/fernandoigor/BRWheel/tree/alphatest
