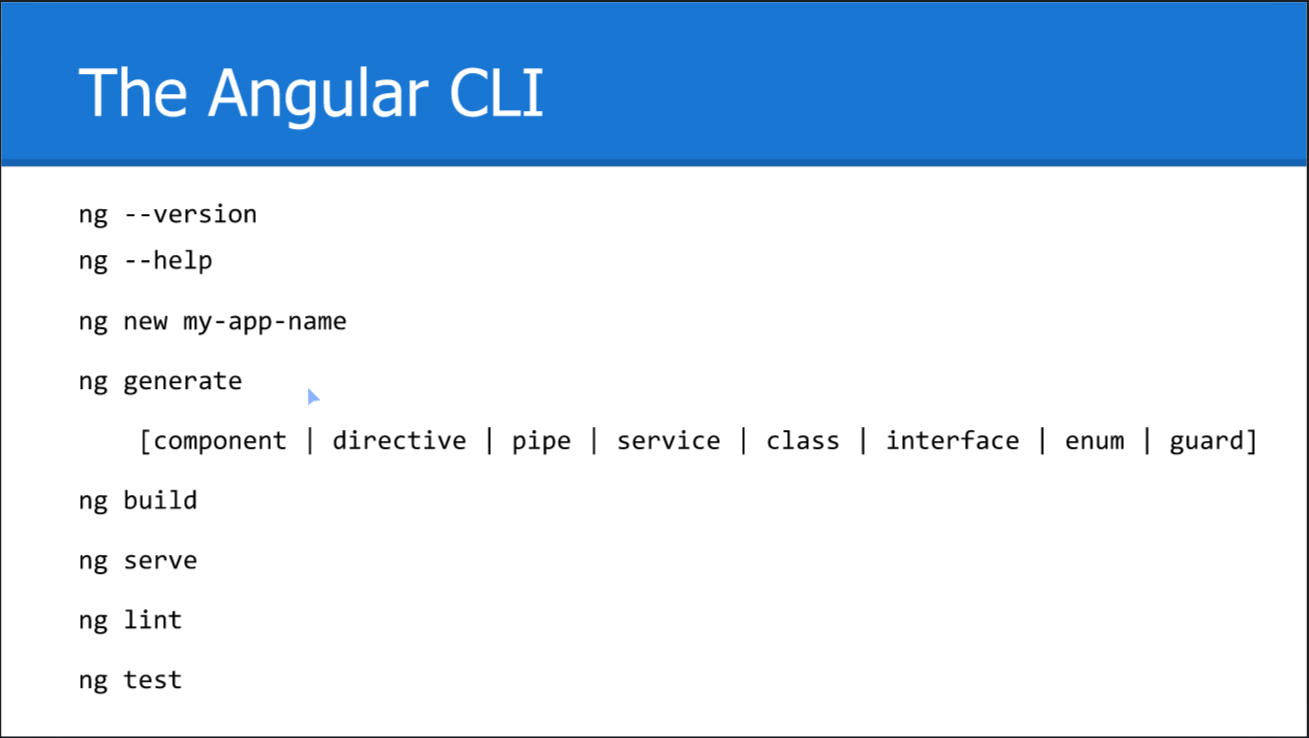
This project was generated with Angular CLI version 12.2.4.
Run ng serve for a dev server. Navigate to http://localhost:4200/. The app will automatically reload if you change any of the source files.
- Easy to use
- Provides MVC Architecture
- Compatible with both desktops and mobile applications
- Provides filters to filter out different data types
- Two way data binding
- Availability of different modules
- Very good testing abilities
- Flexible & Extensible
- Requires TypeScript 3.4
- Provides opt-in-Ivy preview (Ivy - next gen compilation & rendering preview)
- Can produce legacy and modern JS bundles
- Provides backwards compatibility of router
- Opt-in usage sharing
- Has dependency updates
- Provides Web Worker bundling
npm i -g @angular/cli
ng version or npx ng version
ng new project-name or npx ng new project-name
ng new project-name --no-strict or npx ng new project-name --no-strict
ng generate compnent component_name or
ng g c component_nameor
ng g c component_name --spec false or
ng g c component_name --skip-tests=true
Typescript      ------> Template
(BusinessLogic) <------ (HTML)
Output Data
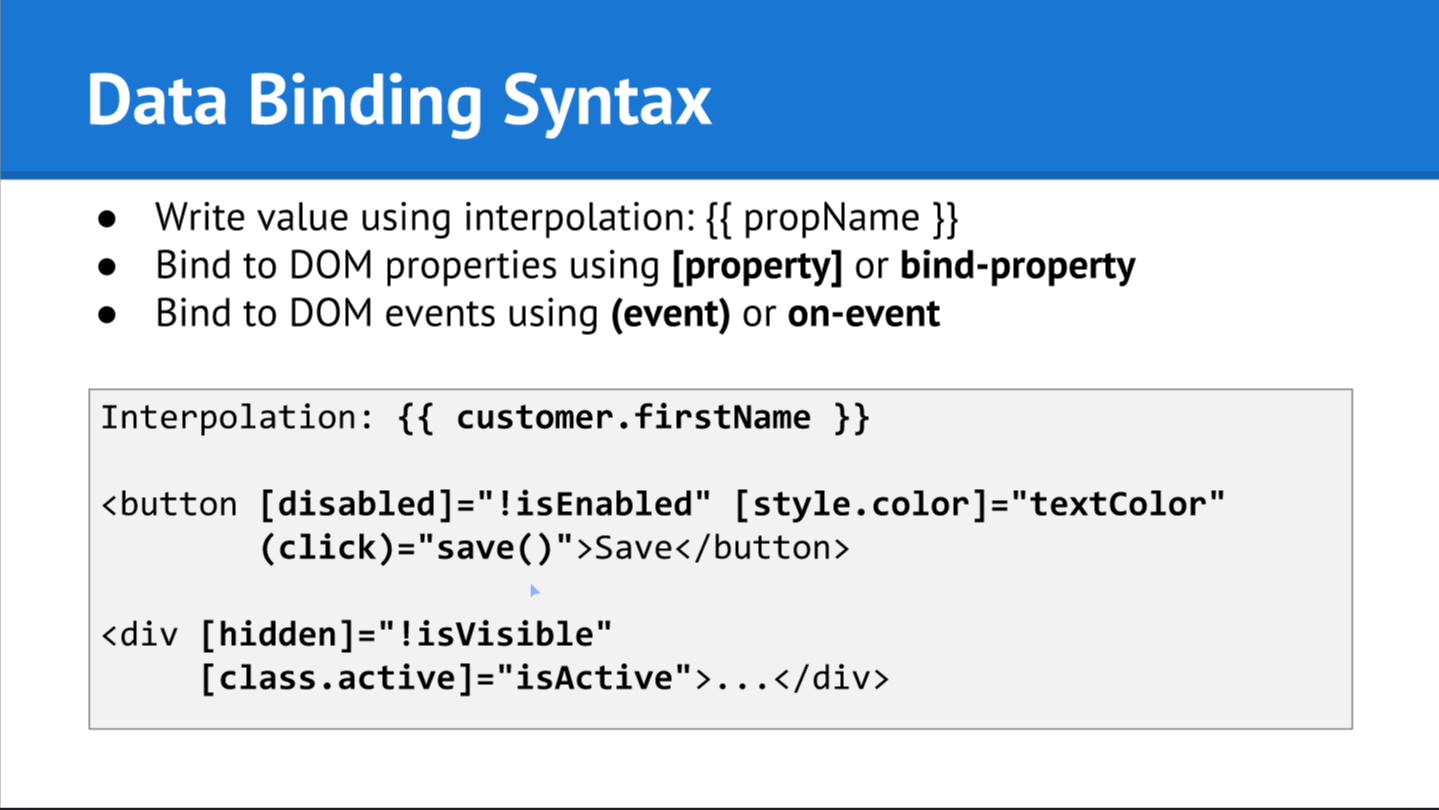
- String Interpolation
{{data}} - Property Binding
[property] ="data"
React to (User) Events
- Event Binding
(event) = "expression"
Combination of both
Two way binding [(ngModel)]="data"
When you need to concatenate strings, you must use interpolation instead of property binding. Property Binding is used when you have to set an element property to a non-string data value.
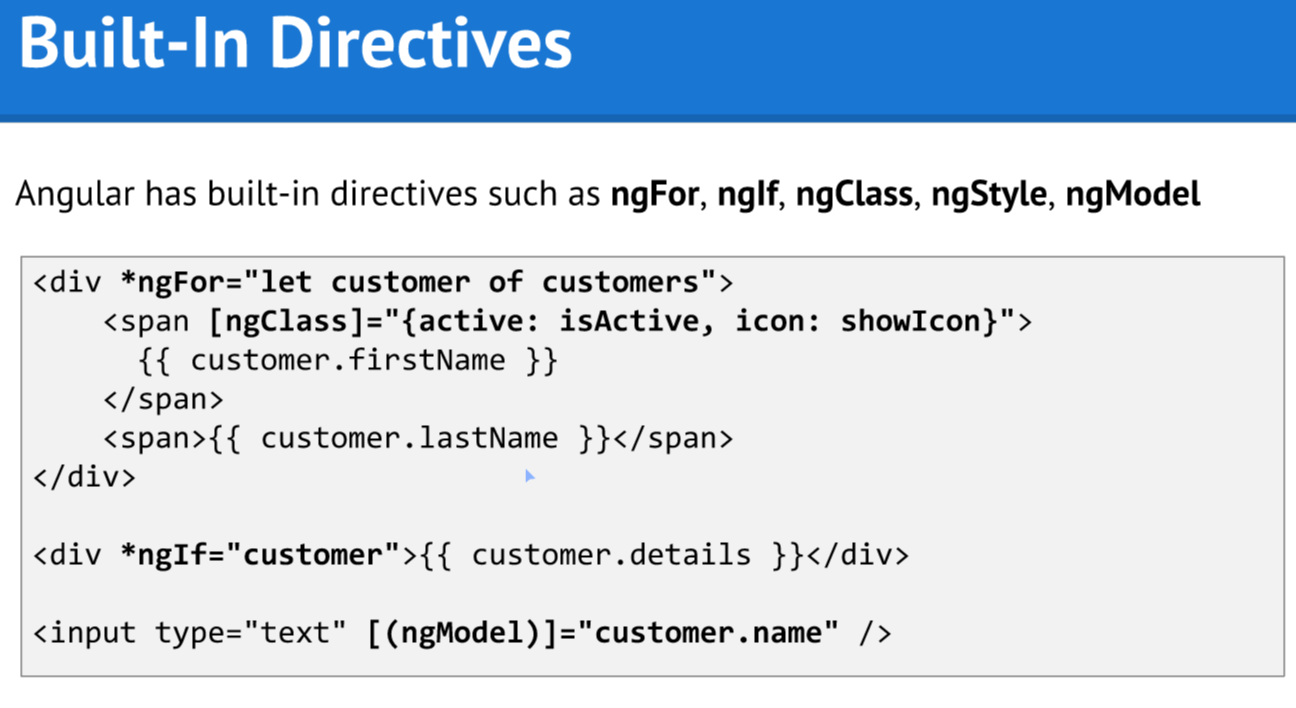
- Structural Directive
Structural directives are able to change the behavior of DOM by adding and removing DOM elements. The directive NgFor, NgSwitch, and NgIf is the best example of structural directives.
<p *ngIf="serverCreated ; else noServer">Server name is {{ serverName }}</p>
<ng-template #noServer> No server was created</ng-template>- Attribute Directive
Attribute directives are able to change the behavior of DOM. The directive NgStyle is an example of Attribute directives which are used to change styles elements at the same time.
<p
  [ngStyle]="{ backgroundColor: getColor() }"
  [ngClass]="{ online: serverStatus === 'Online' }"
>
  Server with id {{ serverId }} is on {{ getServerStatus() }}.
</p>

<app-server *ngFor="let server of servers"></app-server>- HTML elements - Native properties & Events
- Directives - Custom properties & Events
- Components - Custom properties & Events
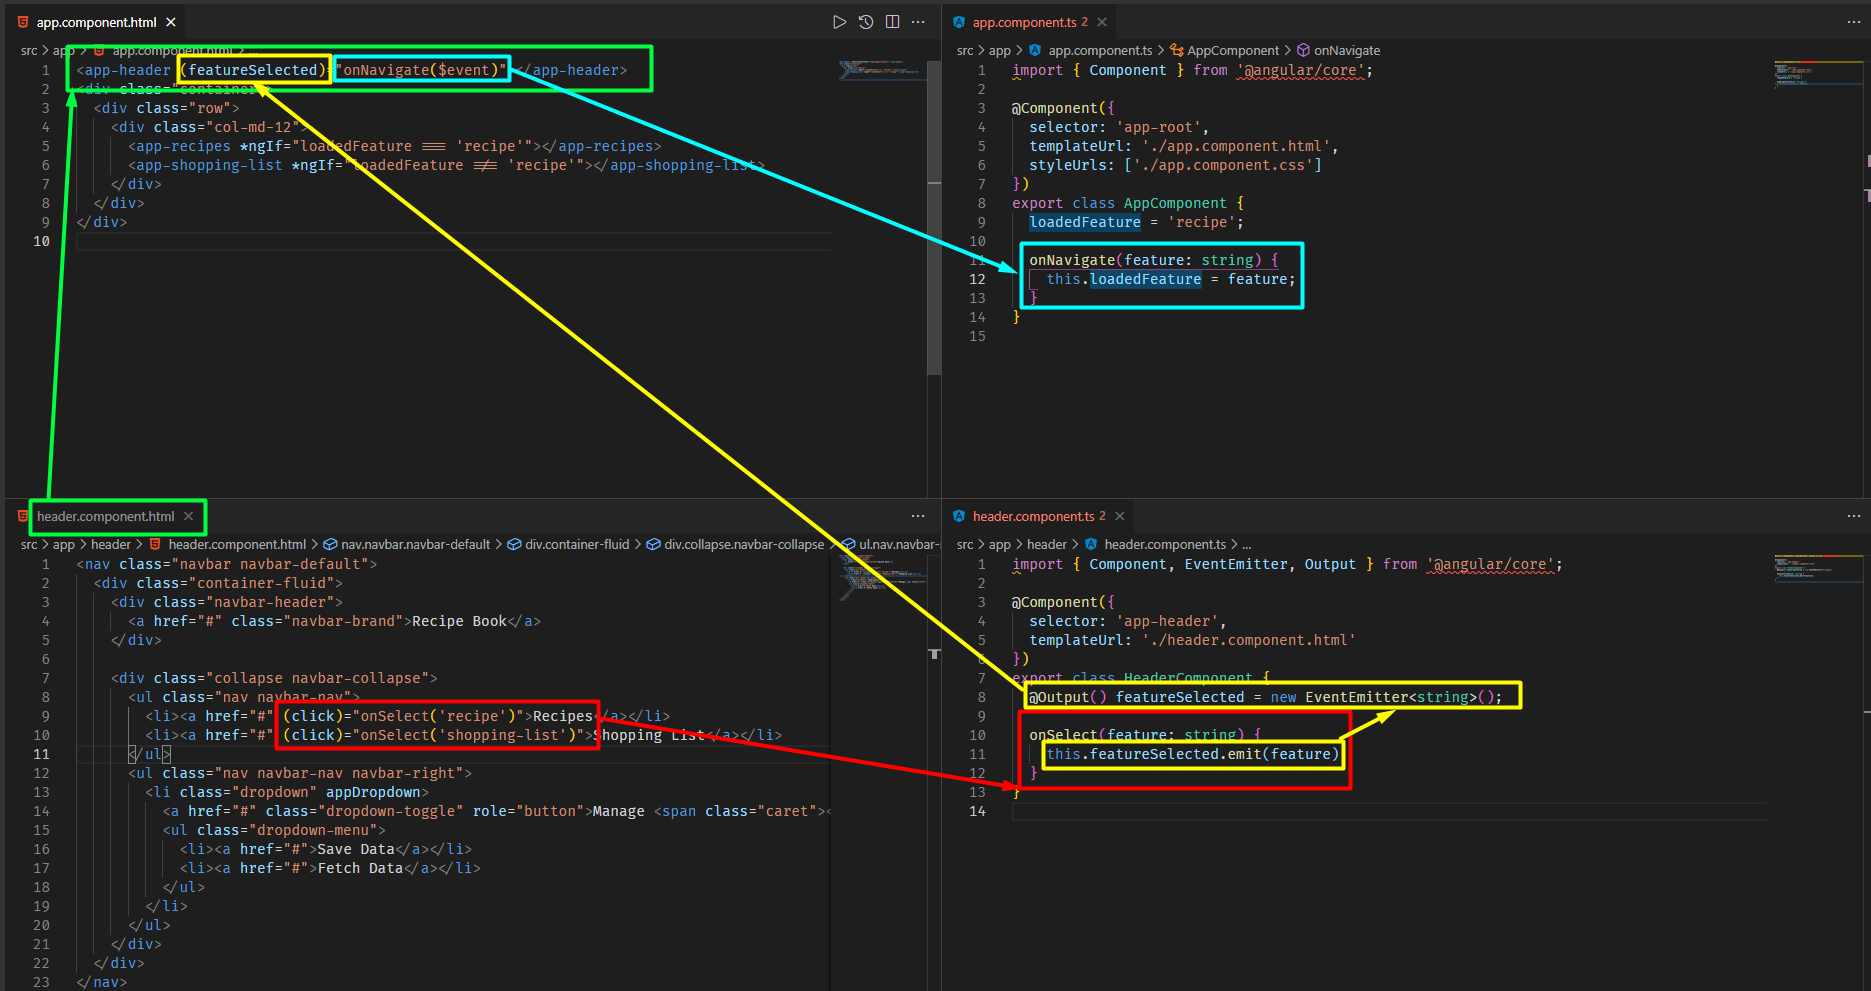
@Input('Alias') propertyName = value; //to get the property accessible outside of component
@Output('Alias') eventName = new EventEmitter<{type}>(); //to make event listen to changes outside of componentAvoid mixing components that use different view encapsulation. Where it is necessary, you should be aware of how the component styles will interact.
-
ViewEncapsulation.Emulated- making them available throughout the application, but are "scoped" so they only affect elements within the component's template. -
ViewEncapsulation.None- making them available throughout the application, and are not "scoped" so they can affect any element in the application. Will affect matching elements within the shadow DOM. -
ViewEncapsulation.ShadowDom- ensuring that they only affect elements within the component's template.
All the styles for ViewEncapsulation.Emulated and ViewEncapsulation.None components are also added to the shadow DOM host of each ViewEncapsulation.ShadowDom component.
<input #phone placeholder="phone number" />

<!-- lots of other elements -->

<!-- phone refers to the input element; pass its `value` to an event handler -->
<button (click)="callPhone(phone.value)">Call</button>`Angular assigns a template variable a value based on where you declare the variable:
- If you declare the variable on a component, the variable refers to the component instance.
- If you declare the variable on a standard HTML tag, the variable refers to the element.
- If you declare the variable on an element, the variable refers to a TemplateRef instance, which represents the template. For more information on , see How Angular uses the asterisk, *, syntax in Structural directives.
- If the variable specifies a name on the right-hand side, such as #var="ngModel", the variable refers to the directive or component on the element with a matching exportAs name.
- AppModule - Same instance of service available Application-wide
- AppComponent - Same instance of service available for all components (but not for other services)
- Any Other Component - Same instance of service available for the component and all its child components
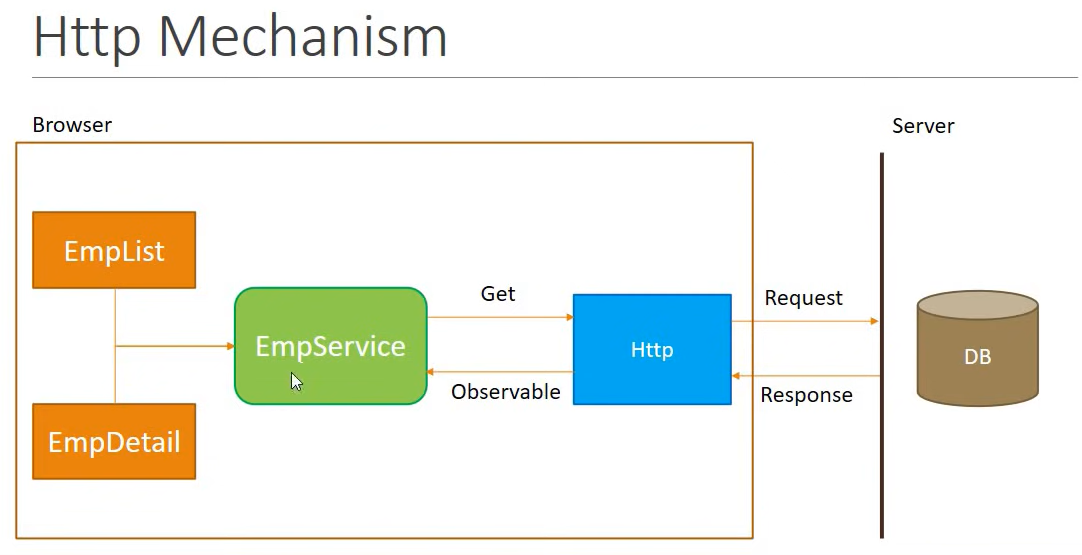
A sequence of items that arrive asynchronously over time
HTTP call - single item (HTTPS response)
- HTTPS Get request from EmpService
In app.module.ts, import the module & add it to imports array
// FILE : app.module.ts
import { HttpClientModule } from "@angular/common/http";

@NgModule({
  declarations:[],
  imports:[HttpClientModule],
  providers:[*Service],
  bootstrap:[AppComponent]
})
In *.service.ts, declare as dependency in constructor & import HttpClient Then make a request in *.service.ts file
@Injectable()
export class *Service {
  constructor(private http:HttpClient){}
  getData() {
    return this.http.get('server-url_OR_some-file-path');
  }
}- Receive the observable and cast it into an employee array
Create a interface in app folder, employee.ts
export interface IEmployee {
  id: number;
  name: string;
  age: number;
}
Import the interface in *.service.ts & update the get function
import {Observable} from 'rxjs/Observable';
import { IEmployee } from "./employee";

getData():Observable<IEmployee[]> {
    return this.http.get<IEmployee[]>('server-url_OR_some-file-path');
}- Subscribe to the observable from EmpList & EmpDetail
In the component, we need the data, use the service & call the function getEmployee under ngOnInit to assign it to an array
ngOnInit() {
  this._employeeService.getData().subscribe(data => this.employees = data);
}- Assign the employee array to a local variable
RxJS
- Reactive extensions for JS
- External library to work with observables
Use a catch statement with a function to display the error in view
  import {HttpClient, HttpErrorResponse} from '@angular/common/http';
  import {Observable} from 'rxjs/Observable';
  import 'rxjs/add/operator/catch';
  import 'rxjs/add/observable.throw';

  import { IEmployee } from "./employee";
  getData():Observable<IEmployee> {
      return this.http
      .get<IEmployee[]>('server-url_OR_some-file-path')
      .catch(this.errorHandler);
  }

  errorHandler(error: HttpErrorResponse) {
    return Observable.throw(error.message || 'Server Error');
  }
Similarly, use the return data & check whether error is there in the response from subscribe
ngOnInit() {
  this._employeeService
  .getData()
  .subscribe(data => this.employees = data,
             error => this.errorMsg = error);
}Two Approaches
-
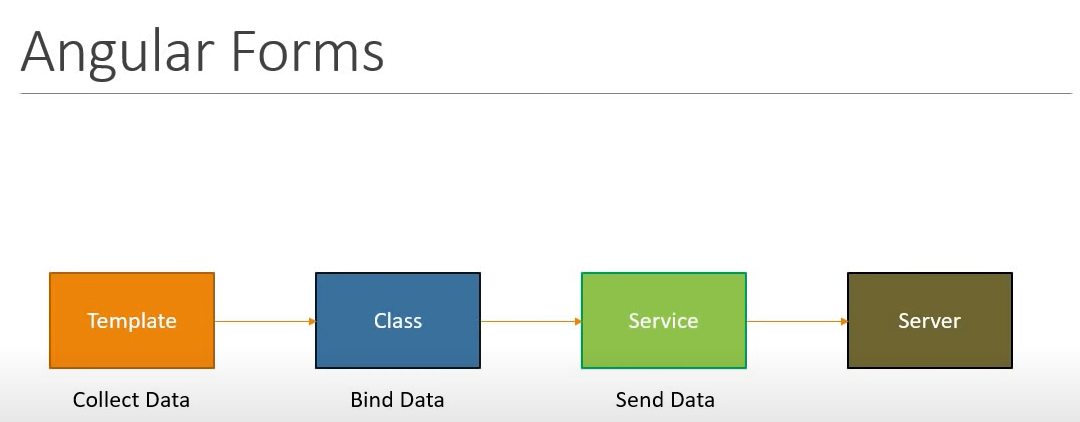
Template Driven Forms - Heavy on component template
Pros- Easy to use & similar to Angular JS forms
- Two way data binding with ngModel
- Bulky HTML & minimal component code
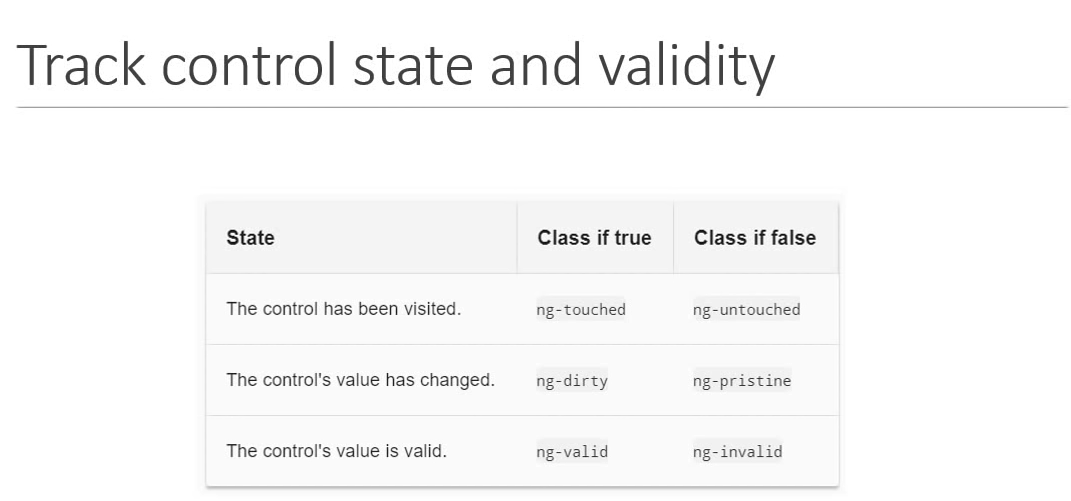
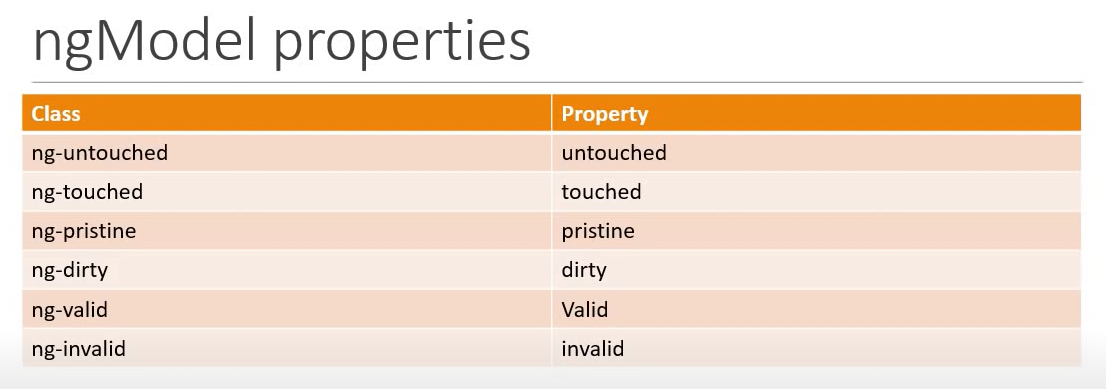
- Automatically tracks the form & form elements state & validity
Cons
- Unit testing is challenge
- Readability decreses with comples forms and validations
When to choose
- Suitable for simple scenarios
-
Reactive Forms - Heavy on component class
FormGroup&FormControlare building blocks of reactive formsPros
- Code & logic resides in component class
- No two way binding
- Well suited for complex scenarios
- Dynamic form fields
- Custom Validation
- Dynamic Validation
- Unit testing
Cons
- Hard for beginners

