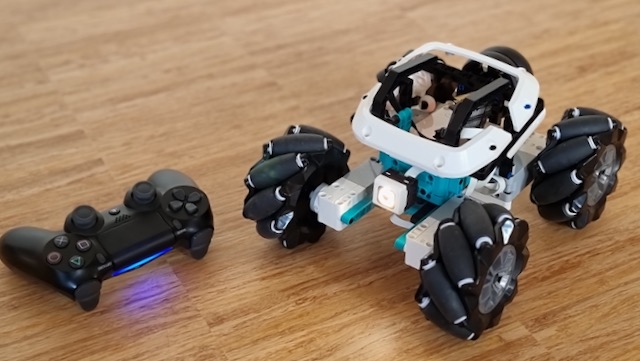
This is an ESP32 firmware that connects to most Bluetooth classic gamepads, based on Bluepad32. You can then call the esp32 over UART from your MINDSTORMS hub to get the gamepad state. We developed this firware specifically for the LMS-ESP32 board, although it should run on most ESP32 devices.
We have successfully tested it with PS4 and Ninentendo Switch controllers. PS3 will work too, but it is really hard to connect.
- MINDSTORMS code is in the mpy-robot-tools repo
- Building instructions on Patreon
- MINDSTORMS code is in the mpy-robot-tools repo
- Building instructions on Patreon
Install esptool. I use pipenv, so I go pipenv install esptool. But for most people pip will be fine:
pip install esptoolThen enter the command below. It will autodetect the ESP32 if one is connected. If you have multiple boards connected, add -p /dev/cu.usbserial-143220 (Mac) or -p /dev/ttyAMA0 (Linux)
esptool.py -b 460800 --before default_reset --after hard_reset --chip esp32 write_flash --flash_mode dio --flash_freq 40m --flash_size detect 0x10000 build/app-template.bin 0x1000 build/bootloader/bootloader.bin 0x8000 build/partition_table/partition-table.binOnce the LMS-ESP32 is powered on, it will pair with any gamepads it sees. Just put the gamepad in pairing mode. Most gamepads have a dedicated button for this. On the PS4 controller you need to hold the PS and SHARE buttons for a few seconds. The light on the controller turns blue once connected.
This project is based on the bluepad template project 3.0.0 (Feb 28, 2022). If you want to update to update to a newer bluepad version, you need to clone the template again and copy these files over the template:
- components/Adafruit_NeoPixel
- components/UartRemote
- components/arduinoFFT
- components/ESP32Servo
- main/arduino_main.cpp
- main/CMakeLists.txt
This is an application to be used with Espressif IoT Development Framework.
Please check ESP-IDF docs for getting started instructions.
Requires ESP-IDF v4.4 or newer.
Includes the following ESP-IDF components, with a pre-configured sdkconfig file:
- Arduino Core for ESP32 component
- Bluepad32 component
- BTStack component
-
Install ESP-IDF v4.4. For further info, read: ESP-IDF Getting Started for Windows
- Either the Online or Offline version shoud work
- When asked which components to install, don't change anything. Default options are Ok.
- When asked whether ESP can modify the system, answer "Yes"
-
Launch the "ESP-IDF v4.4 CMD" (type that in the Windows search box)
-
From the ESP-IDF cmd, clone the template
git clone --recursive https://gitlab.com/ricardoquesada/esp-idf-arduino-bluepad32-template.git my_project
-
Compile it
# Compile it
cd my_project
idf.py build

# Flash + open debug terminal
idf.py flash monitor
-
Requirements and permissions
Install ESP-IDF dependencies (taken from here):
# For Ubuntu / Debian
sudo apt-get install git wget flex bison gperf python3 python3-pip python3-setuptools cmake ninja-build ccache libffi-dev libssl-dev dfu-util libusb-1.0-0
And in case you don't have permissions to open
/dev/ttyUSB0, do: (taken from here)# You MUST logout/login (or in some cases reboot Linux) after running this command sudo usermod -a -G dialout $USER
-
Install and setup ESP-IDF
# Needs to be done just once
# Clone the ESP-IDF git repo
mkdir ~/esp && cd ~/esp
git clone -b release/v4.4 --recursive https://github.com/espressif/esp-idf.git

# Then install the toolchain
cd ~/esp/esp-idf
./install.sh
-
Compile the template
Clone the template:
# Do it everytime you want to start a new project
# Clone the template somewhere
mkdir ~/src && cd ~/src
git clone --recursive https://gitlab.com/ricardoquesada/esp-idf-arduino-bluepad32-template.git my_project
Export the ESP-IDF environment variables in your shell:
# Do it everytime you open a new shell
# Optional: add it in your ~/.bashrc or ~/.profile
source ~/esp/esp-idf/export.sh
And finally compile and install your project.
# Compile it
cd ~/src/my_project
idf.py build

# Flash + open debug terminal
idf.py flash monitor
To include 3rd party Arduino libraries in your project, you have to:
- Add them to the
componentsfolder. - Add a file
component.mkand/orCMakeLists.txtinside the component's folder
component.mk is needed if you use make to compile it. And CMakeLists.txt is needed if you use idf.py to compile it.
Let's use a real case as example:
Suppose you want to use ESP32Servo project. The first thing to notice is that the source files are placed
in the src folder. We have to create a component.mk and/or CMakeLists.txt files that tells the
ESP-IDF to look for the sources in the src folder.
Example:
# 1) We clone ESP32Servo into components folder
cd components
git clone https://github.com/madhephaestus/ESP32Servo.git
cd ESP32Servo
And now create create these files files inside components/ESP32Servo folder:
# 2) Create component.mk file
# Only needed if you use "make" to compile the project
# Copy & paste the following lines to the terminal:
cat << EOF > component.mk
COMPONENT_ADD_INCLUDEDIRS := src
COMPONENT_SRCDIRS := src
EOF
# 3) Create CMakeLists.txt file
# Only needed if you use "idf.py" to compile the project
# Copy & paste the following lines to the terminal:
cat << EOF > CMakeLists.txt
idf_component_register(SRC_DIRS "src"
INCLUDE_DIRS "src"
REQUIRES "arduino")
EOFFinally, if you use idf.py, you have to update the dependencies in the main/CMakeLists.txt. E.g:
# Needed if you use "idf.py" to compile the project
cd main
edit CMakeLists.txt
...and append ESP32Servo to REQUIRES. The main/CMakeLists.txt should look like this:
idf_component_register(SRCS "${srcs}"
                    INCLUDE_DIRS "."
                    REQUIRES "${requires}" "ESP32Servo")
And that's it. Now you can include ESP32Servo from your code. E.g:
// Add this include in your arduino_main.cpp file
#include <ESP32Servo.h>Arduino IDE is not supported, but you can use Visual Studio Code + ESP-IDF plugin.
You can do:
- All the regular Visual Studio Code regular features
- ...plus configure, build, flash and monitor your project
- ...and much more
Subjective opinion: VSCode + ESP-IDF plugin is muuuuuch better than Arduino IDE. Highly recommended!
- Discord: any question? Ask them in our Discord server.


