Blueprint
A boilerplate to create Rails 5 apps in seconds.
Overview
Blueprint is a boilerplate to create Rails 5 apps easily and quickly. This boilerplate was born from an internal document that you can find here.
Ideas/feedback/suggestions are welcome. Please open a PR to suggest a new feature.
Libraries
Libraries included in this rails app:
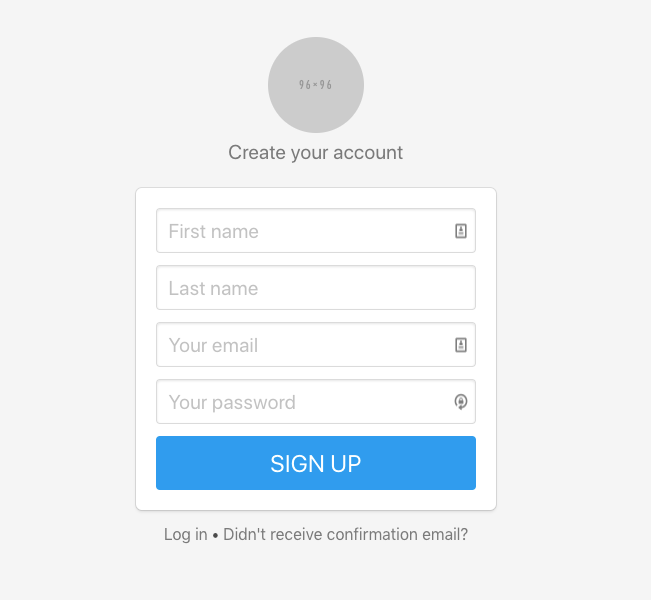
- User authentication via Devise
- Login/Sign up pages already designed and easily customizable
- Script that handles flash messages
- Easy CSS animations with Animated.css
- Design via Bulma + Sass
- Rename your app in 1 command with Rename
- Troubleshoot problems faster with Better Errors
- Production-ready DB setup via postgres
- Google Analytics with Turbolinks support
- Preview emails in your browser (instead of sending them) with LetterOpener
- DotEnv for environment variables support
Installation
- Clone the repo
git clone git@github.com:ManuelFrigerio/rails-blueprint.git - Go to the folder
cd rails-blueprintand rungem install bundle && bundle install - Run
rails db:setup && rails db:migrateto create db and included Users table - To rename the app run
rails g rename:into New-Name
Environment variables
Blueprint uses a few environment variables to set defaults and save you time.
You can see which environment variables you need in the .env-example file. In your development environment, rename the .env-example file to .env and restart the server.
Sending emails
To send emails Blueprint uses SparkPost, an extremely realiable, developer-friendly and cheap ($9/month for 50K emails) email service. After you signup/login, get your API key here: https://app.sparkpost.com/account/api-keys.
Simply make sure to set the SPARKPOST_API_KEY variable in your environment with your Sparkpost API key. You can also override other settings by changing the initializer (config/initializers/sparkpost_rails.rb) as explained here.
Organised mailers folders
By default, when you create a new mailer in Rails you have to create a folder under the views folder. However, if you have many mailers (eg: UserMailer, OrderMailer, NotificationMailer, etc), this often results in a messy view folder.
To solve this problem, Blueprint allows you to create you mailer folders under the new views/mailers folder.
When you create a new mailer (e.g: OrderMailer), simply create the corresponding folder (e.g: order_mailer) under the views/mailers folder.
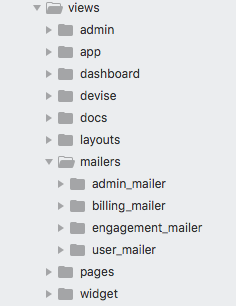
Check out the user_mailer folder as an example.
Customize Bulma
You can customize colours, sizes, breakpoints, etc by changing the variables in the assets/stylesheets/bulma/utilities/initial-variable.scss and assets/stylesheets/bulma/utilities/derived-variable.scss files. You cna learn more about Bulma's Sass variables here.
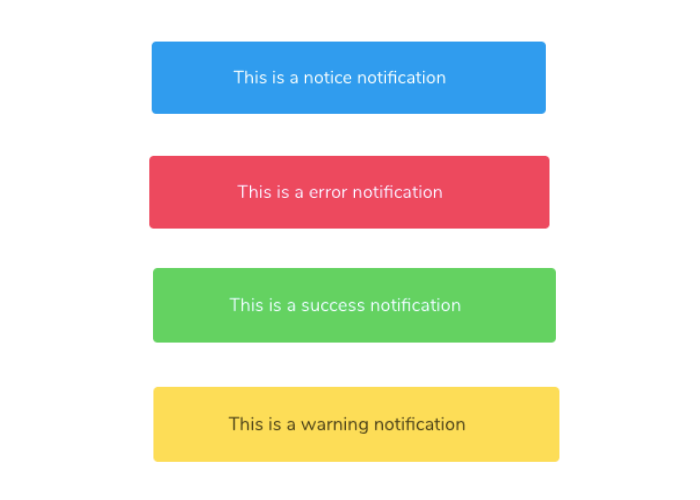
Flash messages
Blueprint ships with a built-in JavaScript utility to handle flash messages. Flash messages will appear as notifications at the top of the screen for 3,5 seconds.

You can use 4 different type of flash messages:
flash[:notice] = "This is a notice notification"
flash[:error] = "This is a error notification"
flash[:success] = "This is a success notification"
flash[:warning] = "This is a warning notification"
Each flash type comes with a different colour.
Trigger flash messages manually
You can manually trigger flash messages everywhere in your app with the following code:
showNotice("This is a notice notification");
showSuccess("This is a success notification");
showError("This is a error notification");
showWarning("This is a warning notification");
Flash notification position
You can change the default position by adding a second parameter "bottom" to the function, like this:
showNotice("This is a notice notification", "bottom");
You can change the position of all flash messages in your app to bottom by editing the file layouts/scripts/flash, eg:
<% if flash[:success] %>
  showSuccess("<%= flash[:success] %>", "bottom");
<% end %>
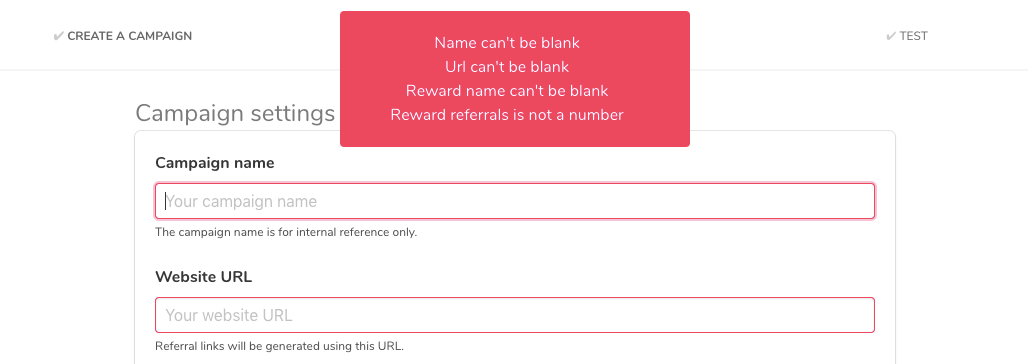
Form validation
Form validations are also handled automatically. If any validations fail, the respective inputs will turn red as shown in the screenshot below.
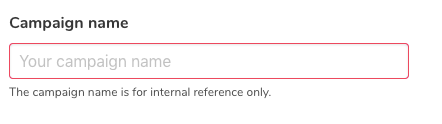
This is done with the help of an initializer that overrides Rails's default behaviour and add a .is-danger class to the inputs that fail the validation. If you decide not to use Bulma, you can still customize the error class by changing line 4 of the customize_errors.rb initializer.
You can also use flash messages to show validation errors. Blueprint has got a handy helper that you simply paste inside a form:
<%= form_for @object %>
  <%= render "layouts/scripts/form_errors", obj: @object %>
<% end %>
Other options
- If you are on Heroku, generate a master key by running this command
$ heroku config:set RAILS_MASTER_KEY=<your-master-key>Make sureyour-master-keyis an alphanumeric string 32 chars. - Go to devise.rb and change the default email address
config.mailer_sender - Create
.envfile and set your environment variables on your machine (see.env-example)
Roadmap
- ✅ Use Bulma Sass files to easily change CSS settings
- ☑️ Add some premade examples of dashboard/landing/biling pages
- ☑️ Add support for Google/Facebook/Twitter auth (using omniauth)
- ☑️ Add logic to handle subscriptions using Stripe's webhooks
- ☑️ Create configuration file for 1-click deployment on Heroku
- ☑️ Basic admin dashboard which also allows to sign in as another user
- ☑️ Add basic Pricing page
- ☑️ Add instructions to use different theme
- ☑️ Create a command line based script to customize the installation (add/remove gems, create tables, etc)
- ☑️ Add friendly_id gem
- ☑️ Add SitemapGenerator to... automatically generate a sitemap.
Contributions
Feel free to implement anything from the roadmap, submit pull requests, create issues, discuss ideas or spread the word. When adding a gem, make sure to add clear instructions in the Installation section on how to use it.
Screenshots
Flash messages

Signup screen