Path: layers/Box.sty
diff --git a/B.sty b/Box.sty
index 38818a8..854edbb 100644
--- a/B.sty
+++ b/Box.sty
@@ -42,13 +42,13 @@

         \coordinate (a1) at (0 , \y/2 , \z/2);
         \coordinate (b1) at (0 ,-\y/2 , \z/2);
-        \tikzstyle{depthlabel}=[pos=0,text width=14*\z,text centered,sloped]
+        \tikzstyle{depthlabel}=[pos=0.5,text width=14*\z,text centered,sloped]

         \path (c) edge ["\small\zlabel"',depthlabel](f); %depth label
         \path (b1) edge ["\ylabel",midway] (a1);  %height label


-        \tikzstyle{captionlabel}=[text width=15*\LastEastx/\scale,text centered]
+        \tikzstyle{captionlabel}=[text width=2cm,text centered]
         \path (\LastEastx/2,-\y/2,+\z/2) + (0,-25pt) coordinate (cap)
         edge ["\textcolor{black}{ \bf \caption}"',captionlabel](cap) ; %Block caption/pic object label
Box.sty is the revised version.
Path: layers/RightBandedBox.sty
diff --git a/R.sty b/RightBandedBox.sty
index 7d74a51..adad188 100644
--- a/R.sty
+++ b/RightBandedBox.sty
@@ -60,12 +60,12 @@

         \coordinate (a1) at (0 , \y/2 , \z/2);
         \coordinate (b1) at (0 ,-\y/2 , \z/2);
-        \tikzstyle{depthlabel}=[pos=0,text width=14*\z,text centered,sloped]
+        \tikzstyle{depthlabel}=[pos=0.5,text width=14*\z,text centered,sloped]

         \path (c) edge ["\small\zlabels"',depthlabel](f); %depth label
         \path (b1) edge ["\ylabel",midway] (a1);  %height label

-        \tikzstyle{captionlabel}=[text width=15*\LastEastx/\scale,text centered]
+        \tikzstyle{captionlabel}=[text width=3cm,text centered]
         \path (\LastEastx/2,-\y/2,+\z/2) + (0,-25pt) coordinate (cap)
         edge ["\textcolor{black}{ \bf \caption}"',captionlabel] (cap); %Block caption/pic object label
RightBandedBox.sty is the revised version.
Path: pycore/tikzeng.py
-
Modify SoftmaxColor
-
Add PoolReluColor
-
Add to_Linear function
-
Add to_LinearRelu function
-
Modify to_Conv function
- Input parameters changed from "s_fiter, n_filter" to "x, y, n_filter"
- x: depth (the length of feature map)
- y: height (the width of feature map)
- n_filter: width (number of the convolution kernel)
- Input parameters changed from "s_fiter, n_filter" to "x, y, n_filter"
-
Modify to_Pool function
-
Add to_PoolRelu function
-
Add to_ConvRelu function
-
Add to_dashed_connection function
-
Add to_dashed_connection_half function
-
Add to_Flatten function
More details at tikzeng.py

Code of the example in my_example.py

Code of the example in EEGNet.py
The following is the original description
Latex code for drawing neural networks for reports and presentation. Have a look into examples to see how they are made. Additionally, lets consolidate any improvements that you make and fix any bugs to help more people with this code.
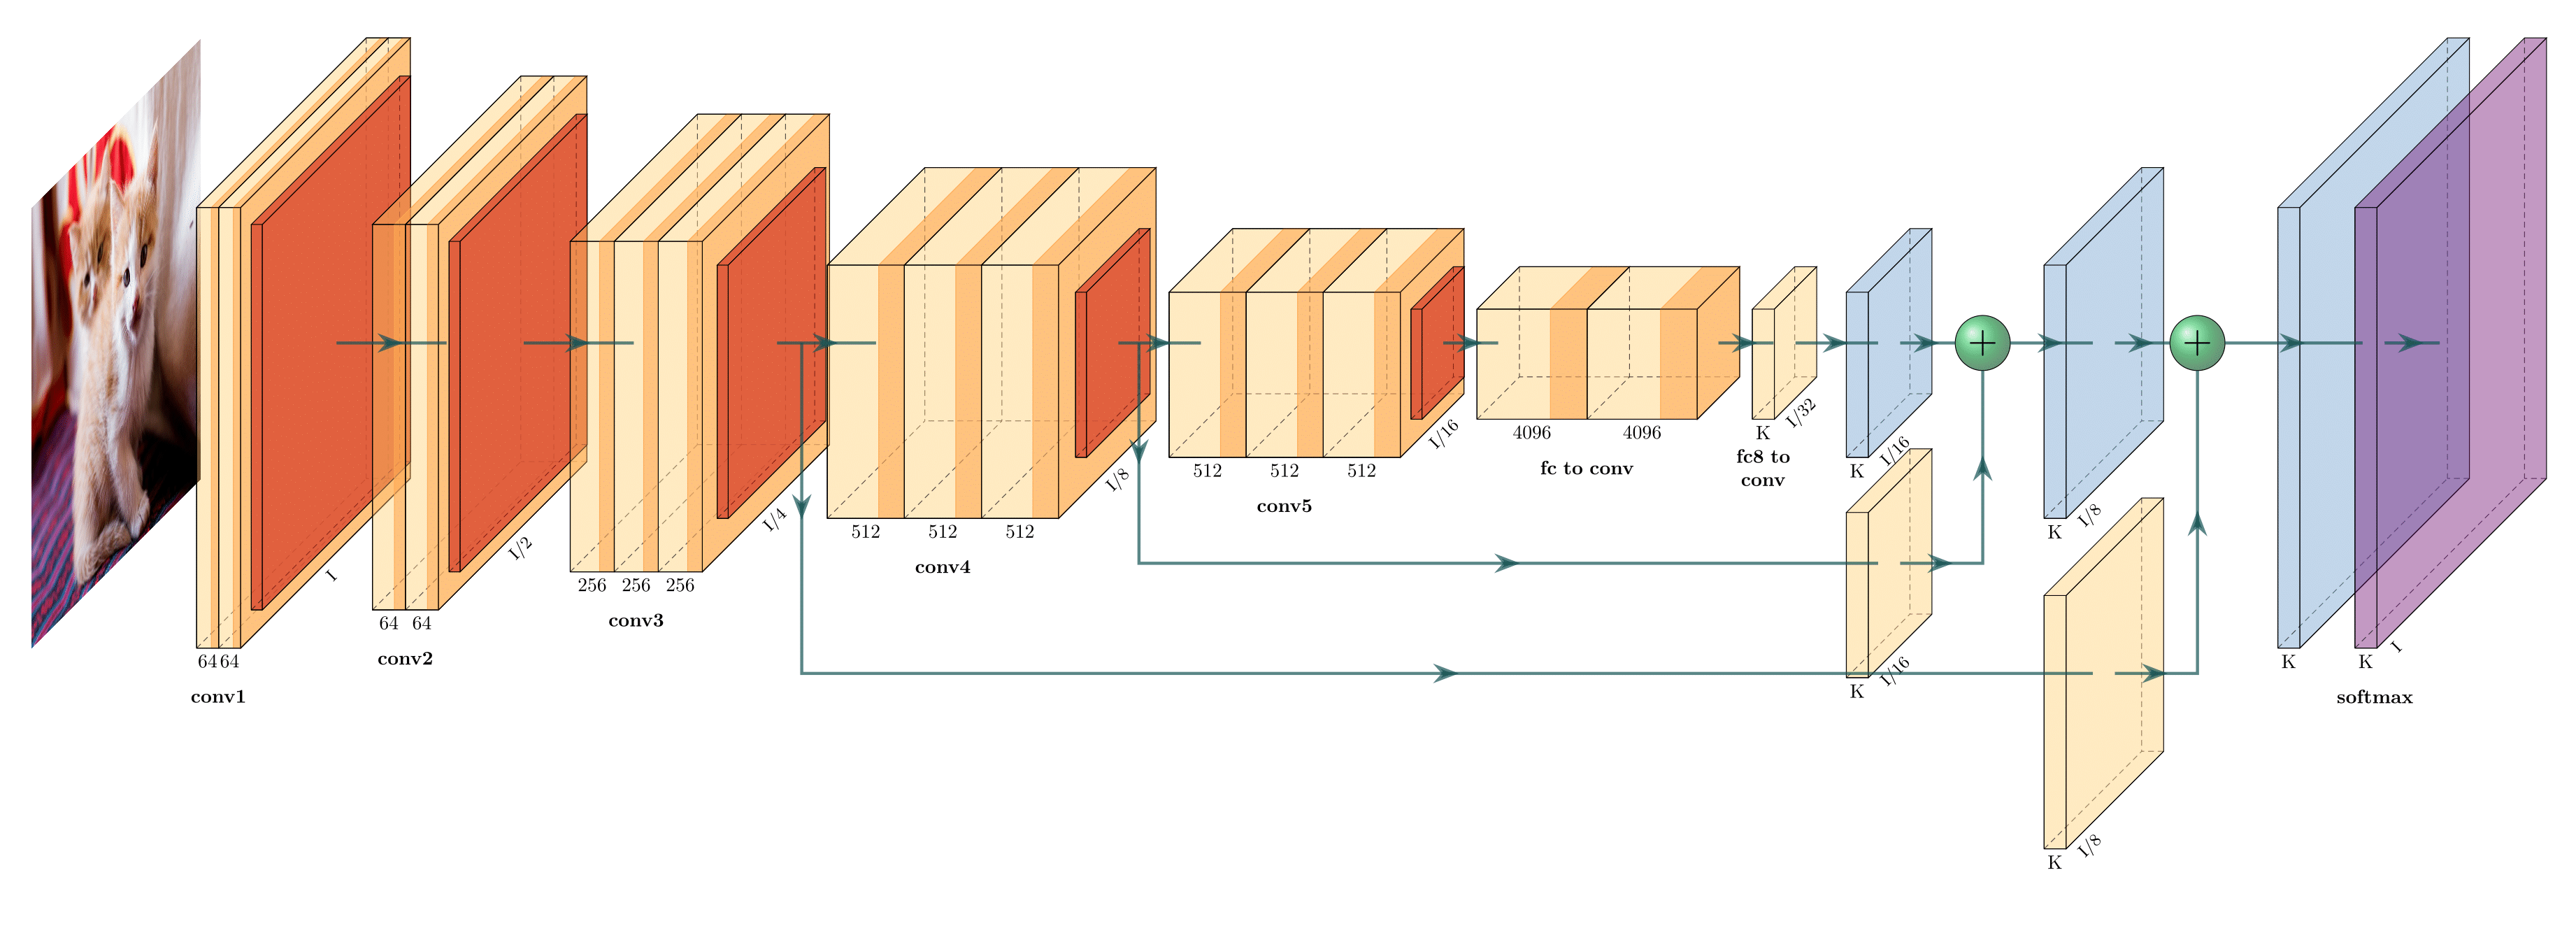
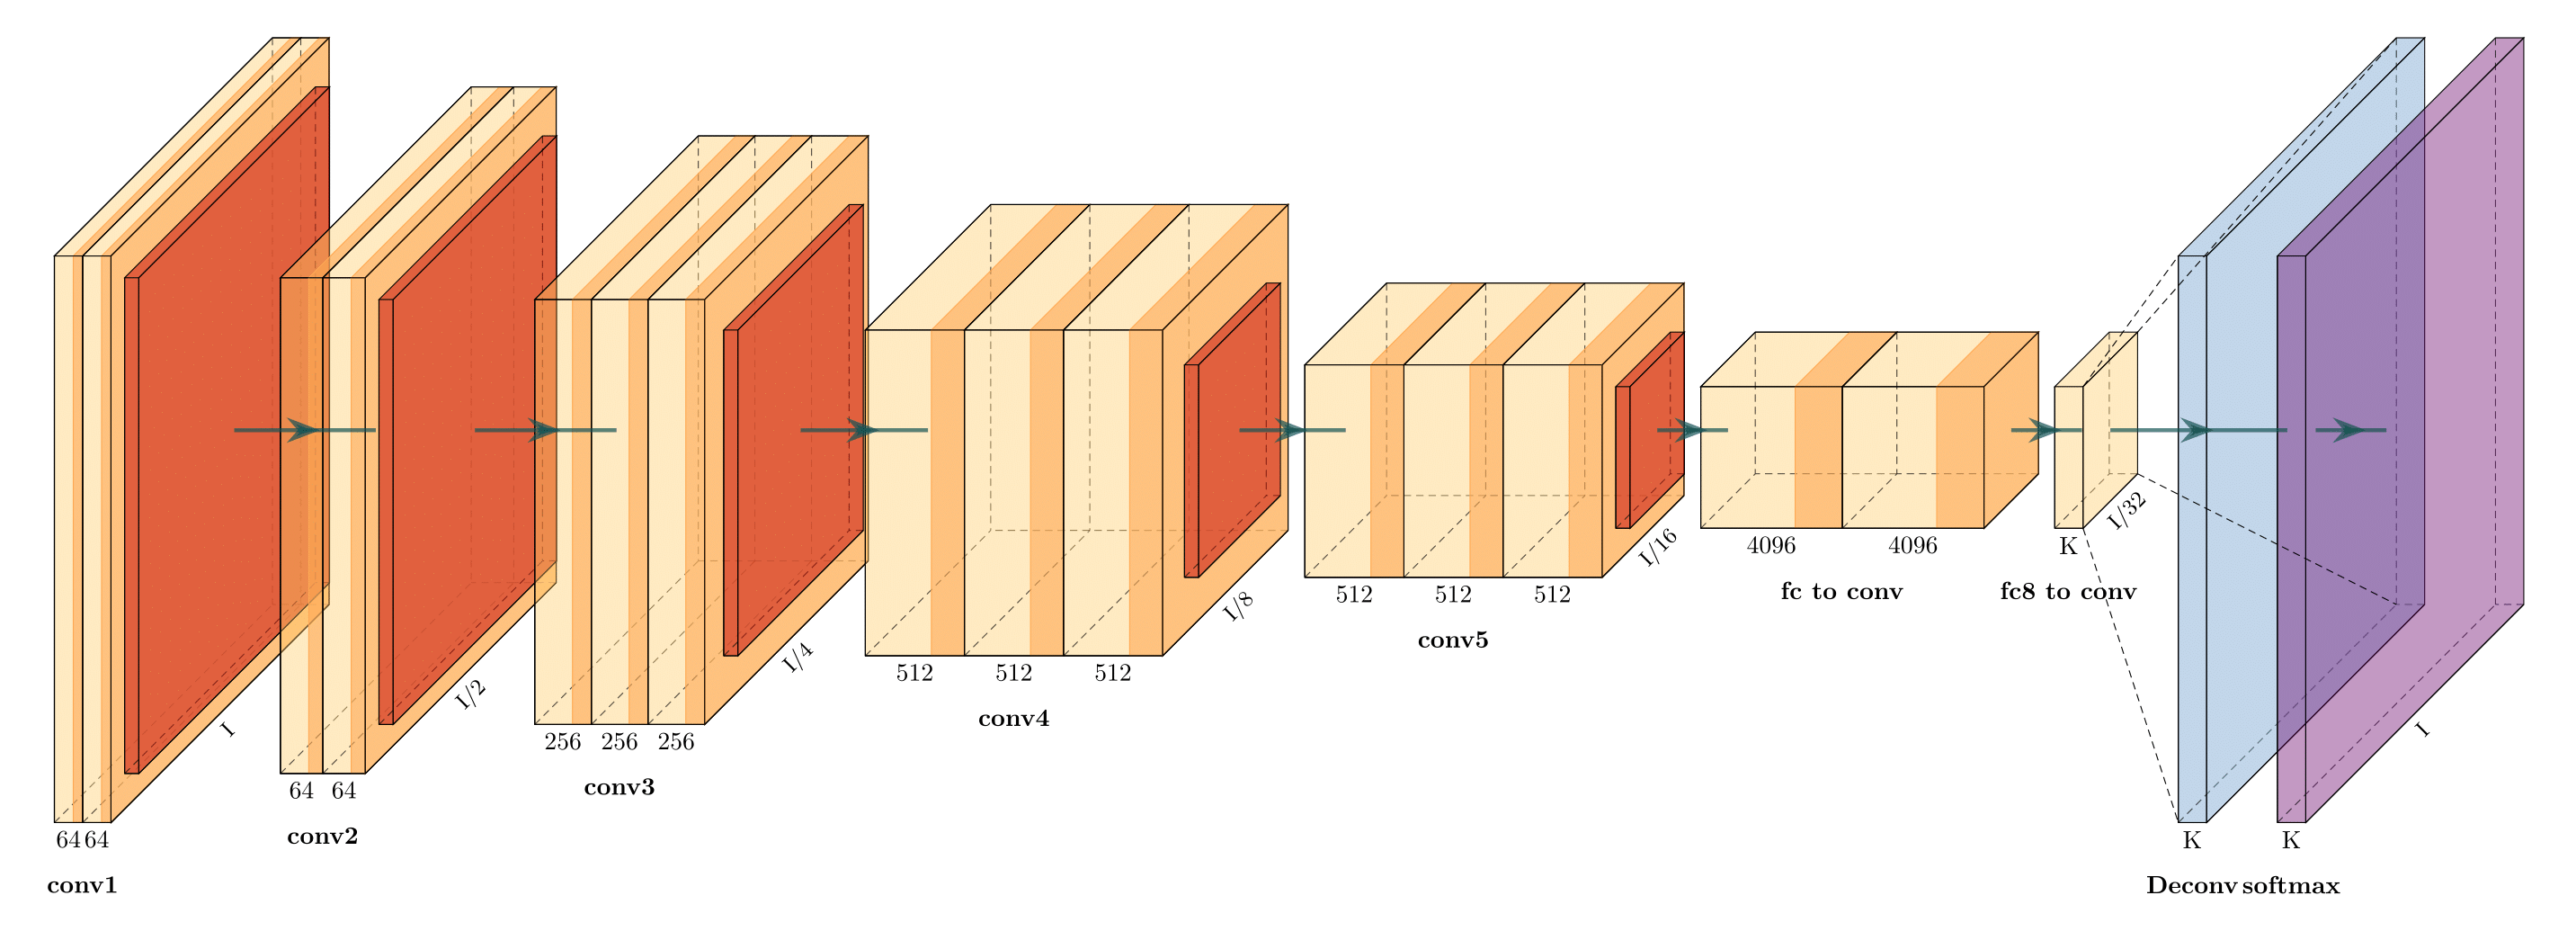
Following are some network representations:

-
Install the following packages on Ubuntu.
-
Ubuntu 16.04
sudo apt-get install texlive-latex-extra -
Ubuntu 18.04.2 Base on this website, please install the following packages.
sudo apt-get install texlive-latex-base sudo apt-get install texlive-fonts-recommended sudo apt-get install texlive-fonts-extra sudo apt-get install texlive-latex-extra -
Windows
- Download and install MikTeX.
- Download and install bash runner on Windows, recommends Git bash or Cygwin(https://www.cygwin.com/)
-
-
Execute the example as followed.
cd pyexamples/
bash ../tikzmake.sh test_simple
- Python interface
- Add easy legend functionality
- Add more layer shapes like TruncatedPyramid, 2DSheet etc
- Add examples for RNN and likes.
See examples directory for usage.
First, create a new directory and a new Python file:
$ mkdir my_project
$ cd my_project
vim my_arch.py
Add the following code to your new file:
import sys
sys.path.append('../')
from pycore.tikzeng import *

# defined your arch
arch = [
    to_head( '..' ),
    to_cor(),
    to_begin(),
    to_Conv("conv1", 512, 64, offset="(0,0,0)", to="(0,0,0)", height=64, depth=64, width=2 ),
    to_Pool("pool1", offset="(0,0,0)", to="(conv1-east)"),
    to_Conv("conv2", 128, 64, offset="(1,0,0)", to="(pool1-east)", height=32, depth=32, width=2 ),
    to_connection( "pool1", "conv2"),
    to_Pool("pool2", offset="(0,0,0)", to="(conv2-east)", height=28, depth=28, width=1),
    to_SoftMax("soft1", 10 ,"(3,0,0)", "(pool1-east)", caption="SOFT"  ),
    to_connection("pool2", "soft1"),
    to_end()
    ]

def main():
    namefile = str(sys.argv[0]).split('.')[0]
    to_generate(arch, namefile + '.tex' )

if __name__ == '__main__':
    main()
Now, run the program as follows:
bash ../tikzmake.sh my_arch