Qiscus Chat SDK IOS Sample UI
This repo is aimed to give an example on how to build a chat UI using Qiscus Chat SDK. Qiscus Chat Sample UI is built with full functionalities so that you can figure out the flow and main activities of common Chat apps. This sample app is built on top of Qiscus Chat SDK, for further feature you can figure out in our docs
Screen Shots
You can see some of sample UI in this repository


Requirements
- iOS 9.0+
- minimum Xcode 11.2
- Swift 5
Dependency
- Alamofire
- AlamofireImage
- SwiftyJSON
- SimpleImageViewer
- SDWebImage
How to Run
To run this app without push notification, no need follow this step, just do pod install, but if you need to run with push notification you should follow these steps.
Note: swift4.2 branch for Swift 4.2, swift5 branch for Swift 5 xcode 10.x.x master branch for Swift 5+ xcode 11.x.x
Step 1 : Get Your APP ID
Firstly, you need to create your application in dashboard, by accessing this link dashboard. You can create more than one APP ID.
Step 2 : Install Qiscus Chat SDK
Qiscus Chat SDK requires minimum IOS SDK 9, To integrate your app with Qiscus, it can be done in 2 steps. Firstly, you need to add dependency QiscusCore in your Podfile,
pod 'QiscusCore'
Secondly, you need to pod install from terminal
pod install
Step 3 : Initialization Qiscus Chat SDK
You need to initiate your APP ID for your chat App before carry out to Authentication. Can be implemented in the initial startup. Here is how you can do that:
QiscusCore.setup(WithAppID: "yourAppId")
Note:
The initialization should be called always . The best practise you can put in AppDelegate
Step 4 : Change Name in Bundle Identifier and Create Certificate
You need change name of bundle identifier and create your cert in Apple Developer
Step 5: Setup Push Notification
The Qiscus Chat SDK receives pushes through both the Qiscus Chat SDK protocol and Apple Push Notification Service (APNS), depending on usage and other conditions. Default notification sent by Qiscus Chat SDK protocol. In order to enable your application to receive apple push notifications, some setup must be performed in both application and the Qiscus Dashboard.
Do the following steps to setup push notifications:
- Create a Certificate Signing Request(CSR).
- Create a Push Notification SSL certificate in Apple Developer site.
- Export a p12 file and upload it to Qiscus Dashboard.
- Register a device token in Qiscus SDK and parse Qiscus APNS messages.
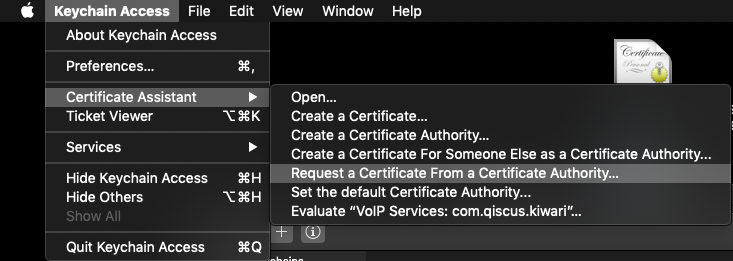
Step Push Notification 1: Create A Certificate Signing Request(CSR)
Open Keychain Access on your Mac (Applications -> Utilities -> Keychain Access). Select Request a Certificate From a Certificate Authority.
In the Certificate Information window, do the following:
- In the User Email Address field, enter your email address.
- In the Common Name field, create a name for your private key (for example, John Doe Dev Key).
- The CA Email Address field must be left empty.
- In the Request is group, select the Saved to disk option.

Step Push Notification 2: Create A Push Notification SSL Certificate In Apple Developer Site.
Log in to the Apple Developer Member Center and find the Certificates, Identifiers & Profiles menu. Select App IDs, find your target application, and click the Edit button.


Turn on Push Notifications and create a development or production certificate to fit your purpose.

Step Push Notification 3: Export A p12 File and Upload It To Qiscus Dashboard
Under the Keychain Access, click the Certificates category from the left menu. Find the Push SSL certificate you just registered and right-click it without expanding the certificate. Then select Export to save the file to your disk.


Then, log in to the dashboard and upload your .p12 file to the Push Notification section, under Settings.
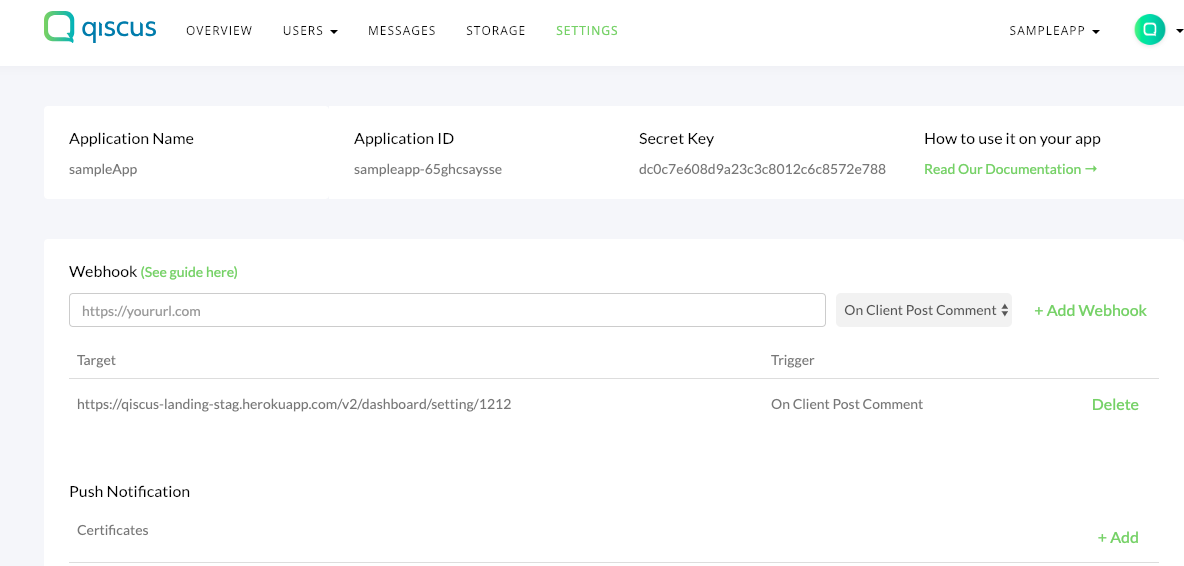
klik add and fill the form upload certificates
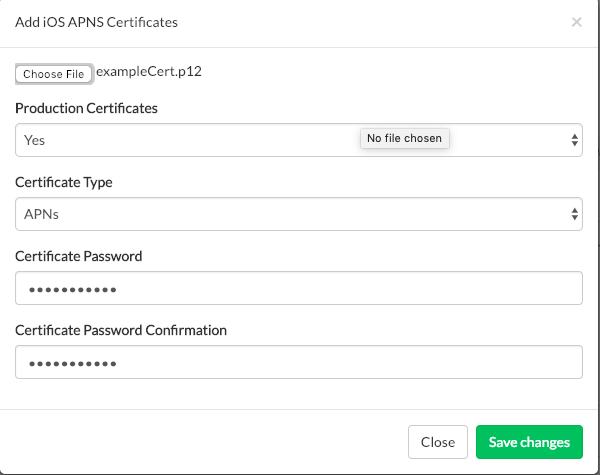
**Note:
**Example of this certificate for production, you need create cert Push Notification for development, and Export A p12 File and Upload It To Qiscus Dashboard if you run from Xcode
Step Push Notification 4: Register A Device Token In Qiscus SDK And Parse Qiscus APNS Messages.
In your app's AppDelegate, store your device token as a variable.
func application(_ application: UIApplication, didFinishLaunchingWithOptions launchOptions: [UIApplication.LaunchOptionsKey: Any]?) -> Bool {
        if #available(iOS 10.0, *) {
            // For iOS 10 display notification (sent via APNS)
            UNUserNotificationCenter.current().delegate = self

            let authOptions: UNAuthorizationOptions = [.alert, .badge, .sound]
            UNUserNotificationCenter.current().requestAuthorization(
                options: authOptions,
                completionHandler: {_, _ in })
        } else {
            let settings: UIUserNotificationSettings =
                UIUserNotificationSettings(types: [.alert, .badge, .sound], categories: nil)
            application.registerUserNotificationSettings(settings)
        }

        application.registerForRemoteNotifications()

        return true
    }
func application(_ application: UIApplication, didRegisterForRemoteNotificationsWithDeviceToken deviceToken: Data) {

        var tokenString: String = ""
        for i in 0..<deviceToken.count {
            tokenString += String(format: "%02.2hhx", deviceToken[i] as CVarArg)
        }
        print("token = \(tokenString)")
        QiscusCore.shared.register(deviceToken: tokenString, onSuccess: { (response) in
            //
        }) { (error) in
            //
        }
    }


func application(_ application: UIApplication, didReceive notification: UILocalNotification) {
       print("AppDelegate. didReceive: \(notification)")
}

func application(_ application: UIApplication, didReceiveRemoteNotification userInfo: [AnyHashable : Any]) {
        print("AppDelegate. didReceiveRemoteNotification: \(userInfo)")
}

func application(_ application: UIApplication, didReceiveRemoteNotification userInfo: [AnyHashable : Any], fetchCompletionHandler completionHandler: @escaping (UIBackgroundFetchResult) -> Void) {
        print("AppDelegate. didReceiveRemoteNotification2: \(userInfo)")
}

// [START ios_10_message_handling]
@available(iOS 10, *)
extension AppDelegate : UNUserNotificationCenterDelegate {

    // Receive displayed notifications for iOS 10 devices.
    func userNotificationCenter(_ center: UNUserNotificationCenter,
                                willPresent notification: UNNotification,
                                withCompletionHandler completionHandler: @escaping (UNNotificationPresentationOptions) -> Void) {
        let userInfo = notification.request.content.userInfo

        // Print full message.
        print(userInfo)
    }

    func userNotificationCenter(_ center: UNUserNotificationCenter,
                                didReceive response: UNNotificationResponse,
                                withCompletionHandler completionHandler: @escaping () -> Void) {
        let userInfo = response.notification.request.content.userInfo


        // Print full message.
        print(userInfo)

        completionHandler()
    }
}
// [END ios_10_message_handling]
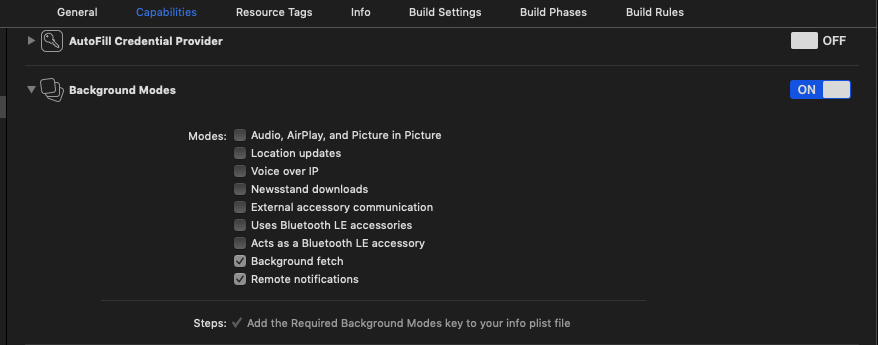
Don't forget set Remote notifications and Background fetch in menu Capabilities
Step Push Notification 6: Test PN from third party
for example using tool Easy APNs Provider :

**Note:
**Follow step 1 - 6 tools to test push notification. **We test using cert Apple Development IOS Push Service
Contribution
Qiscus Chat SDK Sample UI is fully open-source. All contributions and suggestions are welcome!
Security Disclosure
If you believe you have identified a security vulnerability with Qiscus Chat SDK, you should report it as soon as possible via email to contact.us@qiscus.com. Please do not post it to a public issue.