Hello Everyone! ![]()
![]()
![]()
![]()
This is the page for EC601(Fall 2017) A1 OpenCV Exercise @github/qinjinjia/ec601_OpenCV
The Author: 👦 Qinjin Jia qjia@bu.edu 👉@github/qinjinjia
Q1. How does a program read the cvMat object, in particular, what is the order of the pixel structure?
cvMat is a very old data struct written in C from OpenCV 1.x, which has been replaced by class Mat written in C++.
CvMat                      // 2D array
  |-- int   type;          // elements type (uchar,short,int,float,double) and flags
  |-- int   step;          // full row length in bytes
  |-- int   rows, cols;    // dimensions
  |-- int   height, width; // alternative dimensions reference
  |-- union data;
      |-- uchar*  ptr;     // data pointer for an unsigned char matrix
      |-- short*  s;       // data pointer for a short matrix
      |-- int*    i;       // data pointer for an integer matrix
      |-- float*  fl;      // data pointer for a float matrix
      |-- double* db;      // data pointer for a double matrix
typedef struct CvMat {

int type;
int step;

int* refcount;

union
{
    uchar* ptr;
    short* s;
    int* i;
    float* fl;
    double* db;
} data;

union
{
    int rows;
    int height;
};

union
{
    int cols;
    int width;
};
} CvMat;
A program can read the cvMat object by utilzing a pointer. Channels are stored interleaved. That is, if you have a 3 channel matrix, say representing the RGB components of an image, then it will be stored as rgbrgbrgb. Taking this into account when doing the pointer arithmetic.
If the type is 8 bit unsigned integer and with 3 channels, each channel occupies 8-bit space and therefore 3-channel occupies 24-bit space. Then, the order of pixel structure would be like this,
| Length | 8 bits | 8 bits | 8 bits | 8 bits | 8 bits | 8 bits | ... |
|---|---|---|---|---|---|---|---|
| Channel | 0 | 1 | 2 | 0 | 1 | 2 | ... |
We can think it like rgbrgbrgbrgb...
Ref1: CvMat Struct Reference (accessed on Nov. 5, 2017)
Ref2: Accessing image elements (accessed on Nov. 5, 2017)
Q1. ColorImage.cpp is a program that takes a look at colorspace conversions in OpenCV. Run the code in ColorImage.cpp and comment on the outputs. Implement the same thing in Python and save each image.
🌞 Please check the ColorImage.py code here 🔗 ColorImage.py
🌝 Please check the Saved Images from ColorImage.py here 🔗 exercise2_py_results
🌚 The Saved Images can also be found below, 👇
| Row\Col | Colorspace | Left | Mid | Right |
|---|---|---|---|---|
| 1 | RBG | Blue | Green | Red |
| 2 | YCbCr | Y | Cb | Cr |
| 3 | HSV | Hue | Saturation | Value |


Colorspaces refer to systems for representing the colors to be used for sensing, representation and on a computer display. Red, green, and blue can be combined in various proportions to obtain any color in the visible spectrum. Hue, Saturation, Value can also be combined in various proportions to obtain the same color. In addition to this, many othre colorspaces can also be used to represent the same color. A colorspace can be converted to another colorspace easily.
Different image operation can be achieved by utilizing the most suitable colorspace. For instance, if one want to change the saturation of an RGB image, converting RGB image to HSV colorspace and then manipulating the S channel would be easier than operating image in RGB colorspace.
Q2. Print out the values of the pixel at (20,25) in the RGB, YCbCr and HSV versions of the image. What are the ranges of pixel values in each channel of each of the above mentioned colorspaces?
| Colorspace | Pixel | Value | Range |
|---|---|---|---|
| RGB | R(20,25) | 225 | 0~255 |
| G(20,25) | 122 | 0~255 | |
| B(20,25) | 106 | 0~255 | |
| YCbCr | Y(20,25) | 151 | 0~255 |
| Cb(20,25) | 181 | 0~255 | |
| Cr(20,25) | 103 | 0~255 | |
| HSV | Hue(20,25) | 4 | 0~179 |
| Saturation(20,25) | 135 | 0~255 | |
| Value(20,25) | 225 | 0~255 |
❗ The range of each channel of each colorspace is based on CV_8U image in OpenCV.
| Colorspace | Channel | Range |
|---|---|---|
| LAB | Lightness | 0~100 |
| A | -127~127 | |
| B | -127~127 | |
| RGB | R | 0~255 |
| G | 0~255 | |
| B | 0~255 | |
| YCbCr | Y | 0~255 |
| Cb | 0~255 | |
| Cr | 0~255 | |
| HSV | Hue | 0~179 |
| Saturation | 0~255 | |
| Value | 0~255 | |
| CMYK | Cyan | 0~100 |
| Magenta | 0~100 | |
| Yellow | 0~100 | |
| Key | 0~100 |
Ref: OpenCV Documentation - Miscellaneous Image Transformations (accessed on Nov. 5, 2017)
Q1. Look at the code in Noise.cpp and implement the code in Python. Also, print the results for different noise values in the Gaussian case, mean = 0, 5, 10, 20 and sigma = 0, 20, 50, 100 and for the salt-and-pepper case, pa = 0.01, 0.03, 0.05, 0.4 and pb = 0.01, 0.03, 0.05, 0.4.
🌒 Please check the Noise.py code here 🔗 Noise.py
🌝 Please check the Saved Images from Noise.py here 🔗 exercise3_py_results
| Row\Col | Gaussian Noise | Box Filter | Gaussian Filter | Median |
|---|---|---|---|---|
| 1 | mean=0, sigma=0 | Best | ||
| 2 | mean=5, sigma=20 | |||
| 3 | mean=10, sigma=50 | |||
| 4 | mean=20, sigma=100 |
🌚 Gaussian Noise (mean=0, sigma=0):


🌓 Gaussian Noise (mean=5, sigma=20):


🌔 Gaussian Noise (mean=10, sigma=50):


🌕 Gaussian Noise (mean=20, sigma=100):


| Row\Col | Salt-and-Pepper Noise | Box Filter | Gaussian Filter | Median |
|---|---|---|---|---|
| 1 | pa=0.01, pb=0.01 | Best | ||
| 2 | pa=0.03, pb=0.03 | |||
| 3 | pa=0.05, pb=0.05 | |||
| 4 | pa=0.4, pb=0.4 |
🌚 Salt-and-Pepper Noise Noise (pa=0.01, pb=0.01):


🌓 Salt-and-Pepper Noise Noise (pa=0.03, pb=0.03):


🌔 Salt-and-Pepper Noise Noise (pa=0.05, pb=0.05):


🌕 Salt-and-Pepper Noise Noise (pa=0.4, pb=0.4):


Q2. Change the kernel sizes for all the filters with all different values for noises and print the results for 3x3, 5x5 and 7x7 kernels. Comment on the results. Which filter seems to work ”better” for images with salt-and-pepper noise and gaussian noise?
🌞 The images for differnt Kernel Size and different Filter can be found below, 👇
| Row\Col | Gaussian Noise | Box Filter | Gaussian Filter | Median |
|---|---|---|---|---|
| Kernel 3*3 | Best | |||
| Kernel 5*5 | Well | |||
| Kernel 7*7 | Good |


🌝 The images for differnt Kernel Size and different Filter can be found below, 👇
| Row\Col | Salt-and-Pepper Noise | Box Filter | Gaussian Filter | Median |
|---|---|---|---|---|
| Kernel 3*3 | Best | |||
| Kernel 5*5 | Well | |||
| Kernel 7*7 | Good |


🌞 In summary:
Effect of Kernel size:
Smaller Kernel size, better result.
| Kernel | Result |
|---|---|
| Kernel 3*3 | Best |
| Kernel 5*5 | Well |
| Kernel 7*7 | Good |
'Best' filter for different types of noise:
Gaussian Filter is good at Gaussian Noise, Median Filter does well in Salt-and-Pepper Noise.
| Noise Type | Best Filter |
|---|---|
| Gaussian Noise | Gaussian Filter |
| Salt-and-Pepper Noise | Median Filter |
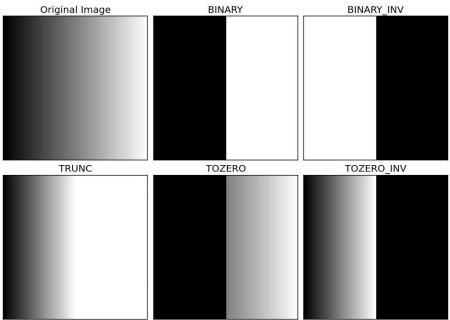
Q1. Look at Threshold.cpp and implement the code in Python, and observe the results for different threshold values. Comment on the results.
🌒 Please check the Threshold.py code here 🔗 Threshold.py
🌓 Please check the Saved Images from Threshold.py here 🔗 exercise4_py_results
🌔 The Saved Images can also be found below, 👇
| Row\Col | 1 | 2 | 3 | 4 |
|---|---|---|---|---|
| 1 | Input Image | Thresholded Image | Binary threshold | Band Thresholding |
| 2 | Semi Thresholding | Adaptive Thresholding |


| Row/Col | Th before | Th after | Comment |
|---|---|---|---|
| Input Image | N/A | N/A | N/A |
| Thresholded Image | threshold_value = 128 | threshold_value = 200 | Less pixels are truncated |
| Binary threshold | current_threshold = 128 | current_threshold = 200 | More pixels are forced to 255 |
| Band Thresholding | threshold1, threshold2 = 27, 125 | threshold1, threshold2 = 75, 100 | More pixels are forced to 255 |
| Semi Thresholding | current_threshold = 128 | current_threshold = 200 | N/A |
| Adaptive Thresholding | 101, 10 | 71, 30 | Brighter |


Q2. What are the disadvantages of binary threshold?
The main 👎 disadvantages of binary threshold is that it will force each pixel to two extremes (i.e. 0 or 255), this results in many information lost.
Also, the binary threshold magnifies the effect of the 🔆 lighting conditions.
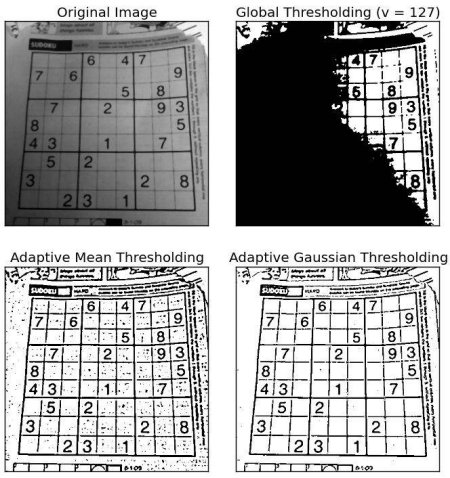
Q3. When is Adaptive Threshold useful?
Using a global value as threshold value is not good in all the conditions where image has different 🔆 lighting conditions in different areas. However, the algorithm of adaptive thresholding calculates the threshold for a small regions of the image (i.e. different thresholds for different regions of the same image). Therefore, adaptive thresholding would be useful for images with varying illumination.
Below piece of code compares global thresholding and adaptive thresholding for an image with varying illumination [Ref]:
import cv2
import numpy as np
from matplotlib import pyplot as plt

img = cv2.imread('sudoku.png', 0)
img = cv2.medianBlur(img, 5)
ret,th1 = cv2.threshold(img, 127, 255, cv2.THRESH_BINARY)
th2 = cv2.adaptiveThreshold(img, 255, cv2.ADAPTIVE_THRESH_MEAN_C, cv2.THRESH_BINARY,11,2)
th3 = cv2.adaptiveThreshold(img, 255, cv2.ADAPTIVE_THRESH_GAUSSIAN_C, cv2.THRESH_BINARY,11,2)
titles = ['Original Image', 'Global Thresholding (v = 127)',
          'Adaptive Mean Thresholding', 'Adaptive Gaussian Thresholding']
images = [img, th1, th2, th3]
for i in xrange(4):
    plt.subplot(2,2,i+1),plt.imshow(images[i],'gray')
    plt.title(titles[i])
    plt.xticks([]),plt.yticks([])
plt.show()
Result:
Ref: OpenCV Documentation - Image Thresholding (accessed on Nov. 5, 2017)
🌒 Please check the TemplateMatching.py code here 🔗 TemplateMatching.py
🌝 Please check the Saved Images from TemplateMatching.py here 🔗 match_img.jpg

![]()
![]()
![]()
![]()
![]()
![]()
![]()
![]()
![]()
![]()
![]()
![]()
![]()
![]()
![]()
![]()
![]()
![]()
![]()
![]()
![]()
![]()
![]()
![]()
![]()
![]()
![]()
![]()
![]()
![]()
![]()
![]()
![]()
![]()
![]()
![]()
![]()
![]()
![]()
![]()
![]()
![]()
![]()