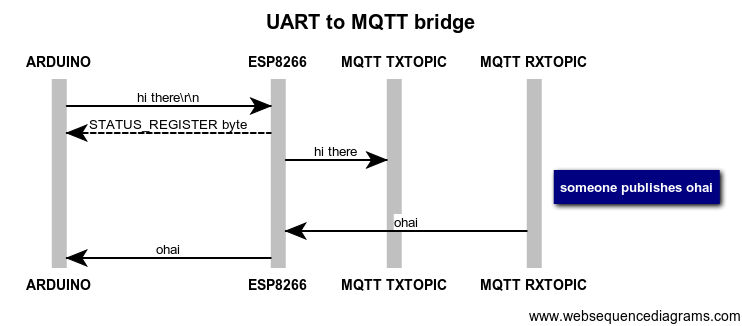
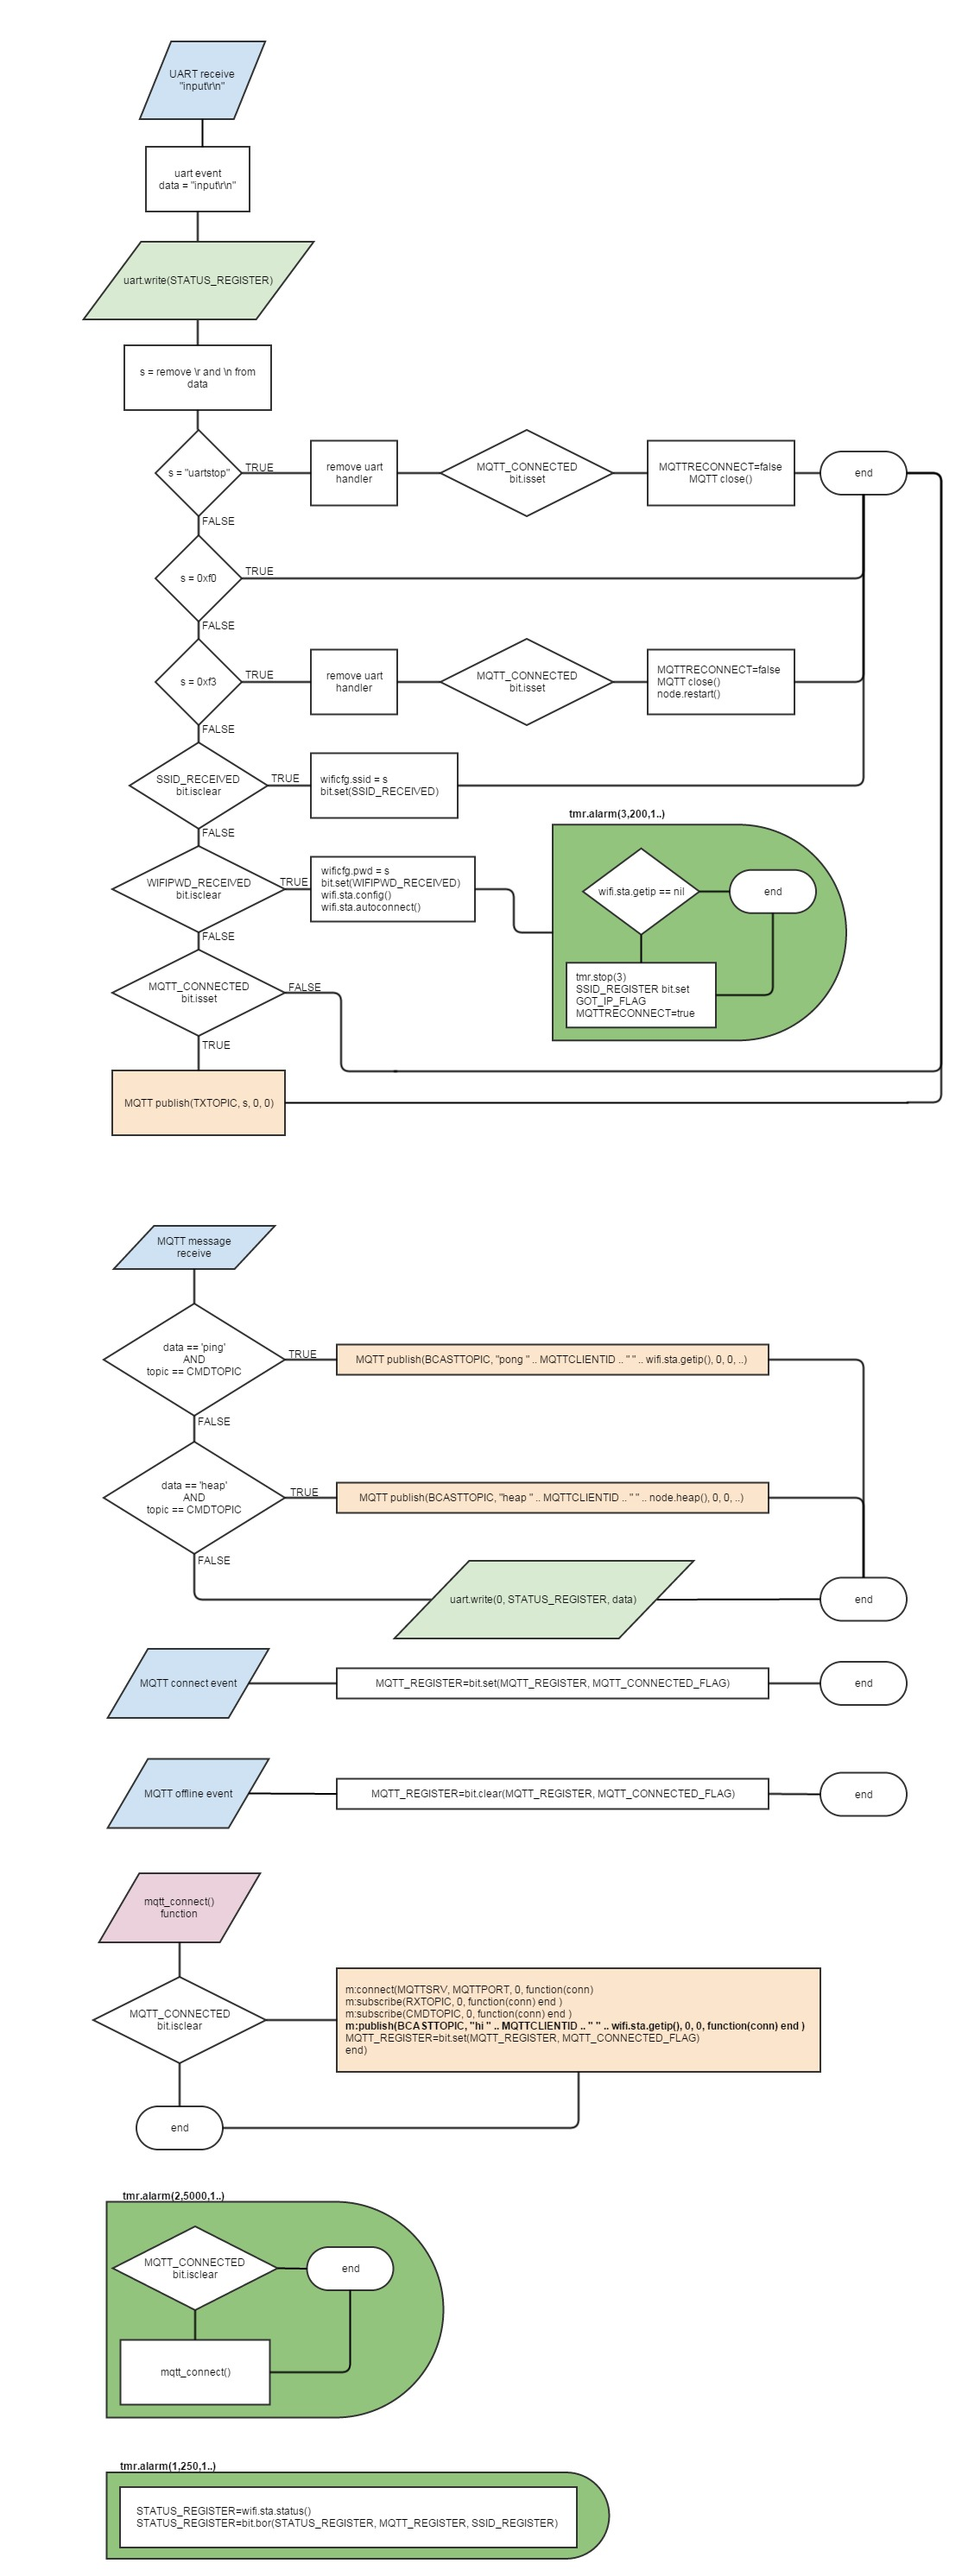
The purpose of this code is to make simple bridge between any UART enabled system (Arduino, etc) and MQTT broker over WIFI network. User should simply send and receive data from UART enabled application and also send and receive data by publishing and subscribing on predefined topics on MQTT broker. Data received on nodemcu UART RX pin will be published on topic TXTOPIC. Data received on topic RXTOPIC will be sent out via nodemcu UART TX pin. Some special characters and commands are defined in order to see nodemcu status. See flowchart diagram and description below for details.
When you power up nodemcu the UART handling routine is initialised and waits for user input.
The desired data should be terminated by \r (carriage return) character termination at the end. This character is defined in UART_TERMINATOR1 variable.
Aftere receiving string\r\n the nodemcu strips all \r' and \n` characters and then immediately responds with STATUS_REGISTER byte. Then it examines string from input and takes appropriate action.
The first thing to be done is to pass to nodemcu which SSID and password should be used to connect to WIFI.
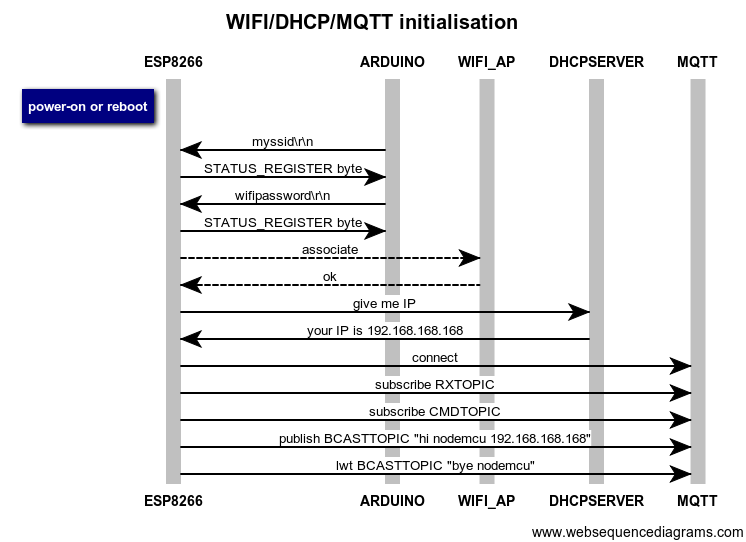
After nodemcu is powered up the LUA interpreter executes init.lua. UART handling routine is then initialised which waits for SSID and WIFI password. You should send it to nodemcu like this:
myssid\r
wifipassword\r
After receiving this it tries to connect to AP and after that it should establish connection with MQTT broker. MQTT settings are hardcoded at the moment so you MUST change variables named with MQTT* in order to connect your nodemcu to your MQTT broker installation.
nodemcu is always listening for bytes 0xf0 and 0xf3 which also must be terminated by UART_TERMINATOR1 character.
If you send 0xf0 the nodemcu responds with one byte which represents status register value.
If you send 0xf3 the nodemcu disconnects from MQTT broker and reboots.
You can also send uartstop which removes UART handling routine currently in place and returns you back to the LUA interpreter.
After successful connection to MQTT broker nodemcu subscribes to CMDTOPIC and RXTOPIC topics. It also publishes its presence on topic BCASTTOPIC saying hi nodemcu 192.168.x.y. IP address is replaced with its IP address on your network. It also informs MQTT broker with last will and testament of stating bye MQTTCLIENTID on topic BCASTTOPIC. Nodemcu reponds to uptime command on CMDTOPIC topic. It responds with pong nodemcu 192.168.x.y back to clients topic.
UART handler is also passing the receiving data from uart to MQTT topic TXTOPIC. If anything is received on RXTOPIC it is passed to UART. The first byte it sends out on UART is always status register value.
Status register bits explanation:
RMPSIAAA
00111101

R   - reserved / unused
M   - 1 if MQTT is connected, 0 otherwise
P   - 0 means waiting for wifi password (should be entered immediately after ssid), 1 means got wifi password
S   - 0 means waiting for ssid input (after power-on / reboot), 1 means got ssid
I   - 1 means got IP from DHCP, 0 means wifi.sta.getip() is nil
AAA - convert these bits to decimal and see the wifi.sta.status() return values - https://github.com/nodemcu/nodemcu-firmware/wiki/nodemcu_api_en#wifistastatus
      000 = 0: STATION_IDLE,
      001 = 1: STATION_CONNECTING,
      010 = 2: STATION_WRONG_PASSWORD,
      011 = 3: STATION_NO_AP_FOUND,
      100 = 4: STATION_CONNECT_FAIL,
      101 = 5: STATION_GOT_IP.
For example:
01111101 means: connected to MQTT broker, got SSID, got wifi password, STATION_GOT_IP
00000101 means: connected to AP but waiting for SSID and wifi password input, dont have IP, not connected to MQTT broker. This happens after reboot.
Code is written in such manner that it should reconnect if connection to MQTT broker goes offline for some reason. It also reconnects if WIFI AP disappears and appears later. I tried this.
Before uploading init.lua to nodemcu you should inspect global variables and edit at least MQTTSRV and point it to your MQTT broker IP. Variables like MQTTPORT, MQTTUSER, MQTTPASS should be set according to your MQTT setup. If you dont use user/pass authentication in your MQTT setup then you MUST set both MQTTUSER and MQTTPASS variables to nil:
MQTTUSER=nil
MQTTPASS=nil
Don't forget to save. Then you upload init.lua to your nodemcu / esp8266 using your favourite esp file uploader. I find it easy with http://esp8266.ru/esplorer/ . I tried on Windows 7 and Linux. Im using nodemcu_float_0.9.6-dev_20150704.bin firmware version from https://github.com/nodemcu/nodemcu-firmware/releases
I suggest you connect your ESP8266 or nodemcu to ARDUINO in similar fashion as it is described in this blogpost: http://microcontrollerkits.blogspot.com/2015/02/wifi-module-esp8266-at-command-test.html
In case page becomes unavailable see the pictures below:
For Arduino 5V Power Supply and Logic ( Need logic Converter )
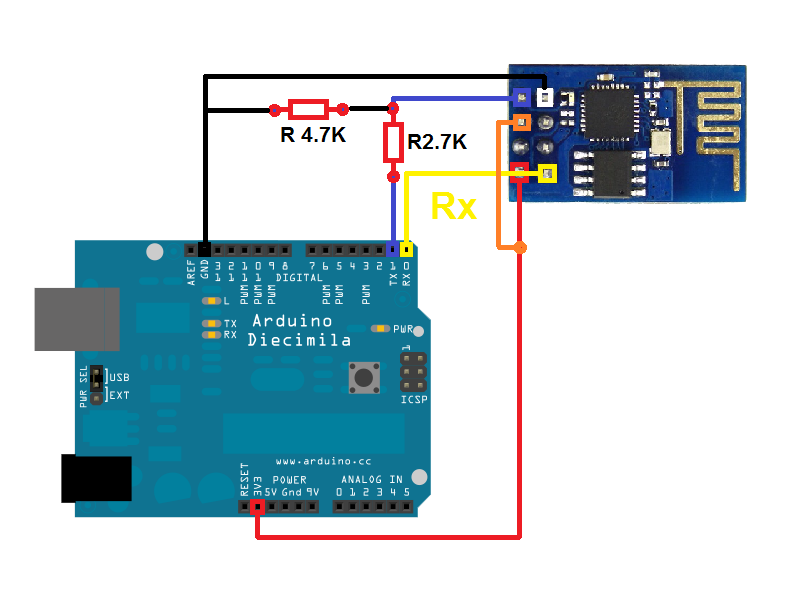
For Arduino 3.3V Power Supply and Logic

-lua firmware (nodemcu_float_0.9.6-dev_20150704.bin) on nodemcu / esp8266
-tool to upload .lua files
Please report when you encounter unwanted behaviour :)
If you find this useful you can buy me a coffee :) https://ko-fi.com/markor