An easy implementation of FPN in PyTorch based on our easy-faster-rcnn.pytorch project.

- Supports PyTorch 0.4.1
- Supports
PASCAL VOC 2007andMS COCO 2017datasets - Supports
ResNet-18,ResNet-50andResNet-101backbones (from official PyTorch model) - Supports
ROI PoolingandROI Alignpooling modes - Matches the performance reported by the original paper
- It's efficient with maintainable, readable and clean code
-
PASCAL VOC 2007
- Train: 2007 trainval (5011 images)
- Eval: 2007 test (4952 images)
Implementation Backbone GPU Training Speed (FPS) Inference Speed (FPS) mAP image_min_side image_max_side anchor_ratios anchor_scales pooling_mode rpn_pre_nms_top_n (train) rpn_post_nms_top_n (train) rpn_pre_nms_top_n (eval) rpn_post_nms_top_n (eval) learning_rate momentum weight_decay step_lr_size step_lr_gamma num_steps_to_finish Ours ResNet-101 GTX 1080 Ti ~ 3.3 ~ 9.5 0.7627|0.7604 (60k|70k) 800 1333 [(1, 2), (1, 1), (2, 1)] [1] align 12000 2000 6000 1000 0.001 0.9 0.0001 50000 0.1 70000 Scroll to right for more configurations
-
MS COCO 2017
- Train: 2017 Train drops images without any objects (117266 images)
- Eval: 2017 Val drops images without any objects (4952 images)
Implementation Backbone GPU Training Speed (FPS) Inference Speed (FPS) AP@[.5:.95] image_min_side image_max_side anchor_ratios anchor_scales pooling_mode rpn_pre_nms_top_n (train) rpn_post_nms_top_n (train) rpn_pre_nms_top_n (eval) rpn_post_nms_top_n (eval) learning_rate momentum weight_decay step_lr_size step_lr_gamma num_steps_to_finish Original Paper ResNet-101 - - - 0.362 - - - - - - - - - - - - - - - Ours ResNet-101 GTX 1080 Ti ~ 3.3 ~ 9.5 0.363 800 1333 [(1, 2), (1, 1), (2, 1)] [1] align 12000 2000 6000 1000 0.001 0.9 0.0001 900000 0.1 1640000 Scroll to right for more configurations
-
PASCAL VOC 2007 Cat Dog
- Train: 2007 trainval drops categories other than cat and dog (750 images)
- Eval: 2007 test drops categories other than cat and dog (728 images)
-
MS COCO 2017 Person
- Train: 2017 Train drops categories other than person (64115 images)
- Eval: 2017 Val drops categories other than person (2693 images)
-
MS COCO 2017 Car
- Train: 2017 Train drops categories other than car (12251 images)
- Eval: 2017 Val drops categories other than car (535 images)
-
MS COCO 2017 Animal
- Train: 2017 Train drops categories other than bird, cat, dog, horse, sheep, cow, elephant, bear, zebra and giraffe (23989 images)
- Eval: 2017 Val drops categories other than bird, cat, dog, horse, sheep, cow, elephant, bear, zebra and giraffe (1016 images)
-
Python 3.6
-
torch 0.4.1
-
torchvision 0.2.1
-
tqdm
$ pip install tqdm -
tensorboardX
$ pip install tensorboardX
-
Prepare data
-
For
PASCAL VOC 2007-
Download dataset
- Training / Validation (5011 images)
- Test (4952 images)
-
Extract to data folder, now your folder structure should be like:
easy-faster-rcnn.pytorch
    - data
        - VOCdevkit
            - VOC2007
                - Annotations
                    - 000001.xml
                    - 000002.xml
                    ...
                - ImageSets
                    - Main
                        ...
                        test.txt
                        ...
                        trainval.txt
                        ...
                - JPEGImages
                    - 000001.jpg
                    - 000002.jpg
                    ...
        - ...
-
-
For
MS COCO 2017-
Download dataset
- 2017 Train images [18GB] (118287 images)
COCO 2017 Train = COCO 2015 Train + COCO 2015 Val - COCO 2015 Val Sample 5k
- 2017 Val images [1GB] (5000 images)
COCO 2017 Val = COCO 2015 Val Sample 5k (formerly known as
minival) - 2017 Train/Val annotations [241MB]
- 2017 Train images [18GB] (118287 images)
-
Extract to data folder, now your folder structure should be like:
easy-faster-rcnn.pytorch
    - data
        - COCO
            - annotations
                - instances_train2017.json
                - instances_val2017.json
                ...
            - train2017
                - 000000000009.jpg
                - 000000000025.jpg
                ...
            - val2017
                - 000000000139.jpg
                - 000000000285.jpg
                ...
        - ...
-
-
-
Build CUDA modules
-
Define your CUDA architecture code
$ export CUDA_ARCH=sm_61-
sm_61is forGTX 1080 Ti, to see others visit here -
To check your GPU architecture, you might need following script to find out GPU information
$ nvidia-smi -L
-
-
Build
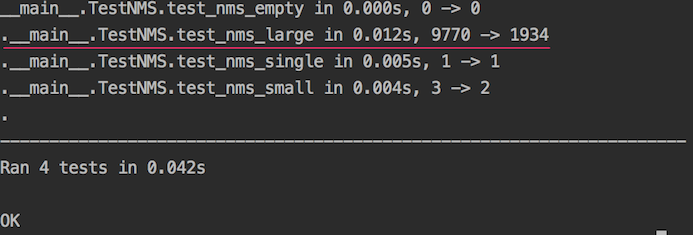
Non-Maximum-Suppressionmodule$ nvcc -arch=$CUDA_ARCH -c --compiler-options -fPIC -o nms/src/nms_cuda.o nms/src/nms_cuda.cu $ python nms/build.py $ python -m nms.test.test_nms-
Result after unit testing
-
-
Build
ROI-Alignmodule (modified from RoIAlign.pytorch)$ nvcc -arch=$CUDA_ARCH -c --compiler-options -fPIC -o roi/align/src/cuda/crop_and_resize_kernel.cu.o roi/align/src/cuda/crop_and_resize_kernel.cu $ python roi/align/build.py
-
-
Install
pycocotoolsforMS COCO 2017dataset-
Clone and build COCO API
$ git clone https://github.com/cocodataset/cocoapi
$ cd cocoapi/PythonAPI
$ make
It's not necessary to be under project directory
-
If an error with message
pycocotools/_mask.c: No such file or directoryhas occurred, please installcythonand try again$ pip install cython -
Copy
pycocotoolsinto project$ cp -R pycocotools /path/to/project
-

-
Train
-
To apply default configuration (see also
config/)$ python train.py -s=coco2017 -b=resnet101 -
To apply custom configuration (see also
train.py)$ python train.py -s=coco2017 -b=resnet101 --pooling_mode=align
-
-
Evaluate
-
To apply default configuration (see also
config/)$ python eval.py -s=coco2017 -b=resnet101 /path/to/checkpoint.pth -
To apply custom configuration (see also
eval.py)$ python eval.py -s=coco2017 -b=resnet101 --pooling_mode=align /path/to/checkpoint.pth
-
-
Infer
-
To apply default configuration (see also
config/)$ python infer.py -c=/path/to/checkpoint.pth -s=coco2017 -b=resnet101 /path/to/input/image.jpg /path/to/output/image.jpg -
To apply custom configuration (see also
infer.py)$ python infer.py -c=/path/to/checkpoint.pth -s=coco2017 -b=resnet101 -p=0.9 /path/to/input/image.jpg /path/to/output/image.jpg
-
-
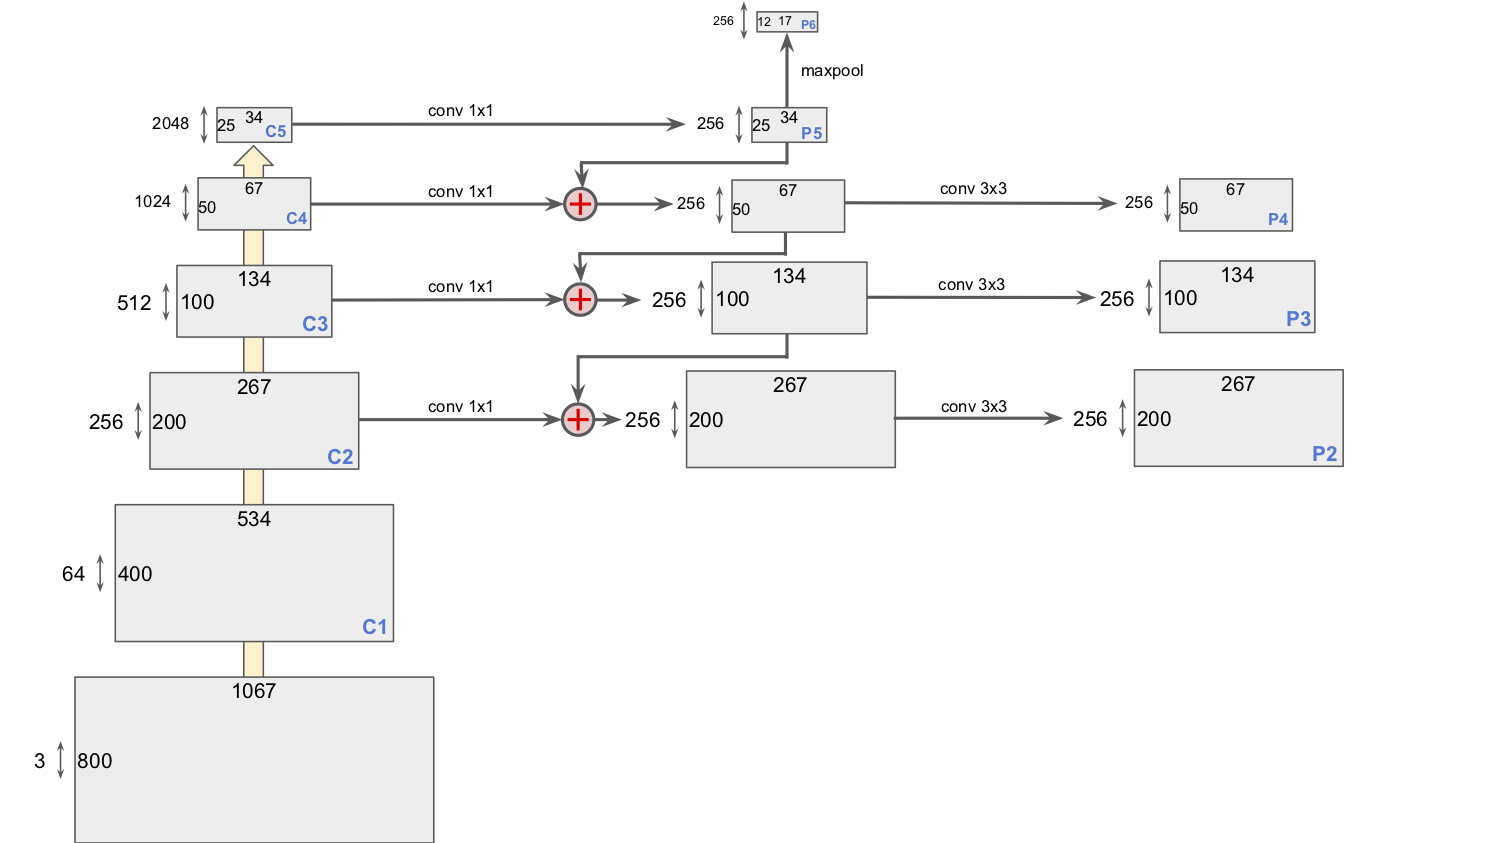
Illustration for feature pyramid (see
forwardinmodel.py)# Bottom-up pathway c1 = self.conv1(image) c2 = self.conv2(c1) c3 = self.conv3(c2) c4 = self.conv4(c3) c5 = self.conv5(c4) # Top-down pathway and lateral connections p5 = self.lateral_c5(c5) p4 = self.lateral_c4(c4) + F.interpolate(input=p5, size=(c4.shape[2], c4.shape[3]), mode='nearest') p3 = self.lateral_c3(c3) + F.interpolate(input=p4, size=(c3.shape[2], c3.shape[3]), mode='nearest') p2 = self.lateral_c2(c2) + F.interpolate(input=p3, size=(c2.shape[2], c2.shape[3]), mode='nearest') # Reduce the aliasing effect p4 = self.dealiasing_p4(p4) p3 = self.dealiasing_p3(p3) p2 = self.dealiasing_p2(p2) p6 = F.max_pool2d(input=p5, kernel_size=2)
-
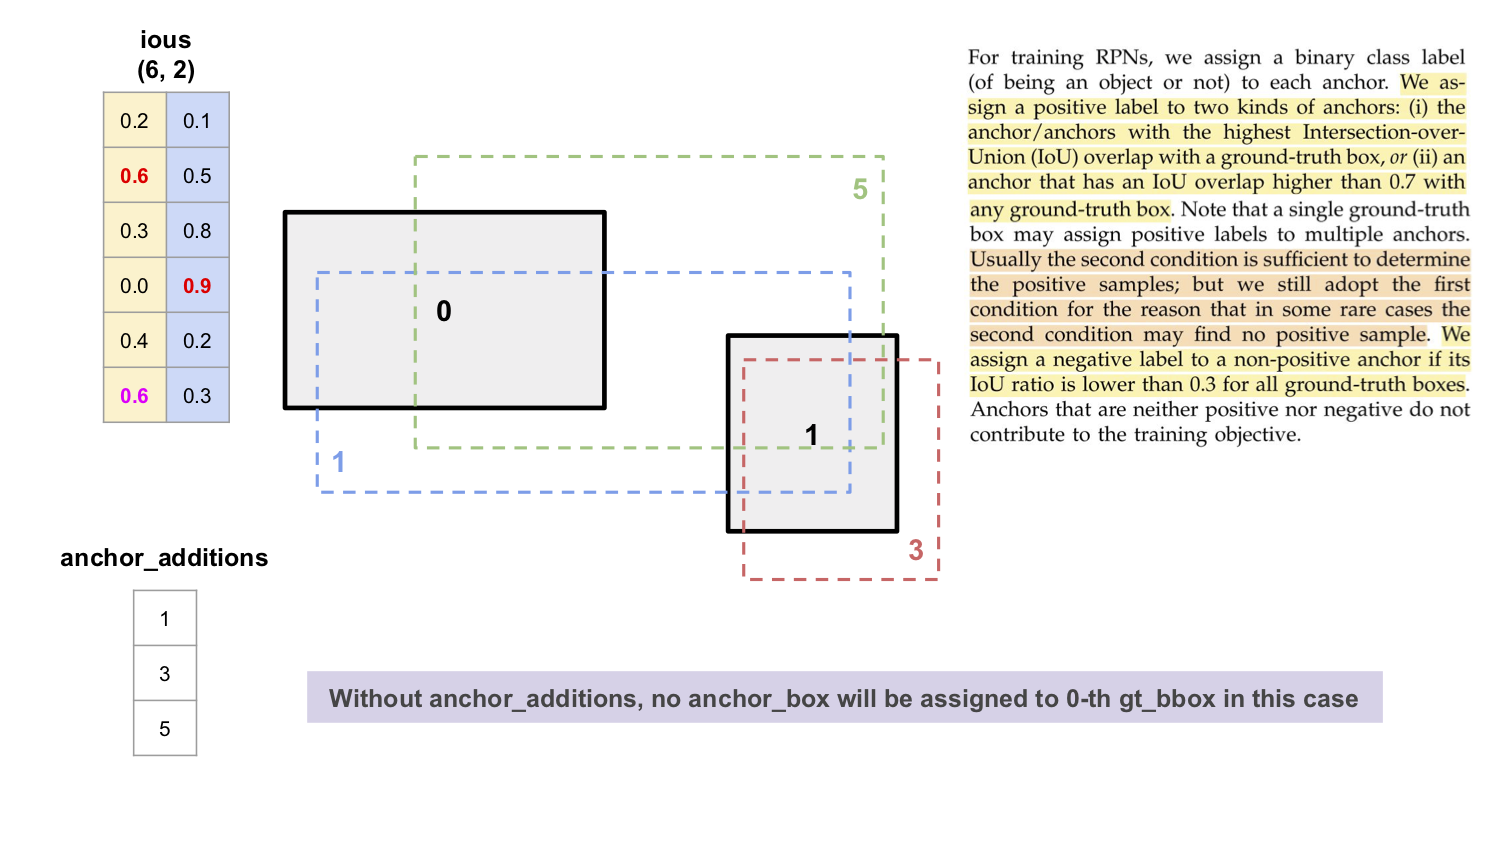
Illustration for "find labels for each
anchor_bboxes" inregion_proposal_network.py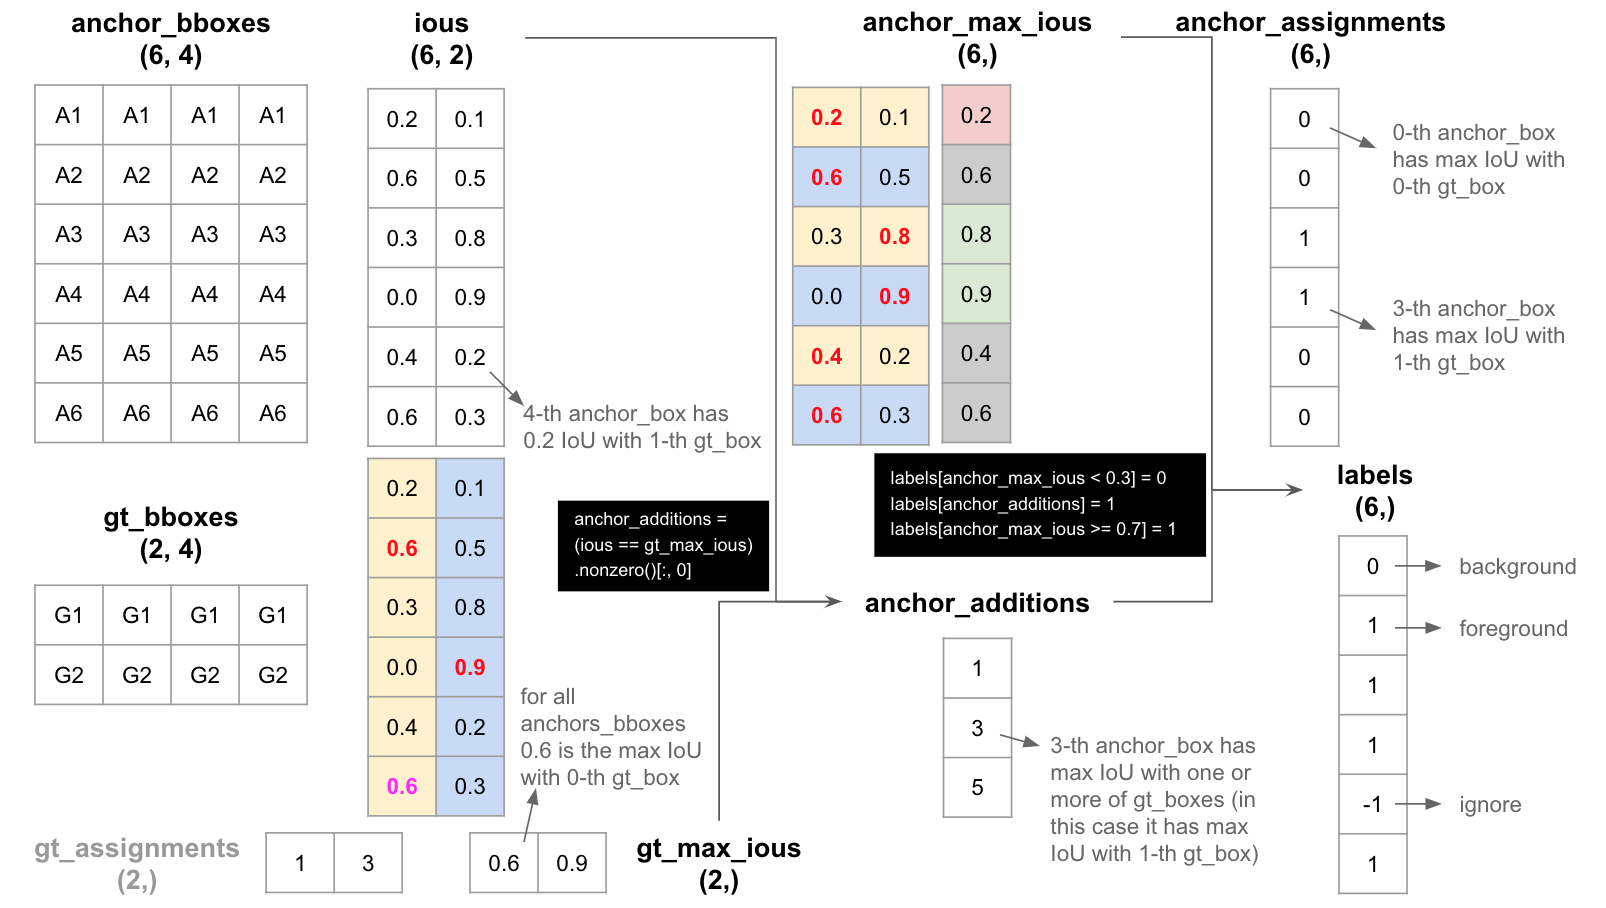
-
Illustration for NMS CUDA


