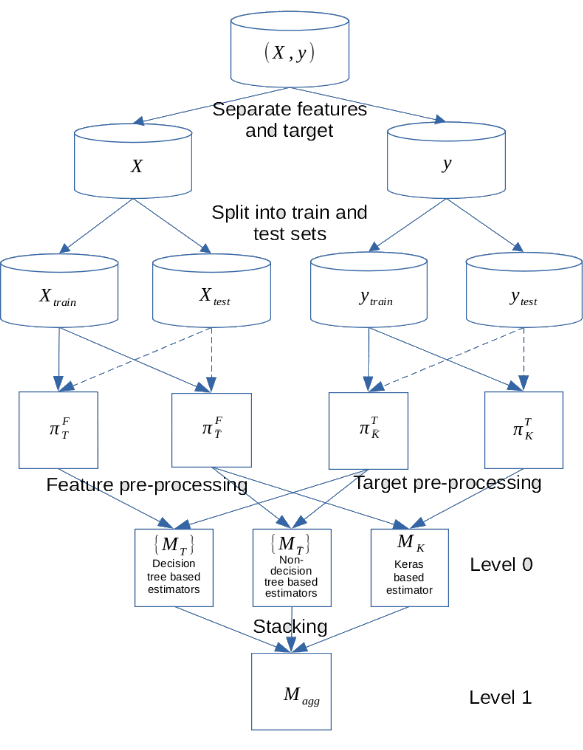
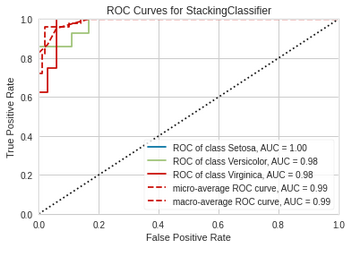
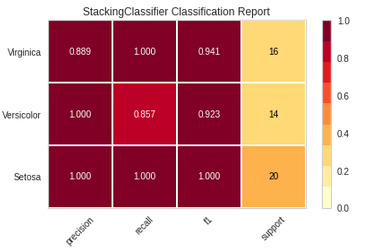
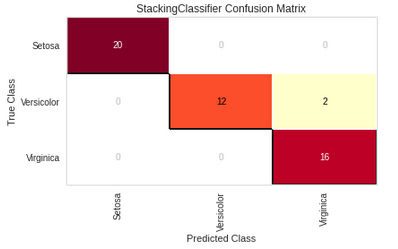
EZStacking is a development tool designed to adress supervised learning problems.
EZStacking handles classification, regression and time series forecasting problems for structured data (cf. Notes hereafter).
EZStacking allows the final model to be optimised along three axes:
- the number of features
- the number of level 0 models
- the complexity (depth) of the level 0 models.
The main principles used in EZStacking are also presented in these two articles:
- Model stacking to improve prediction and variable importance robustness for soft sensor development Maxwell Barton, Barry Lennox - Digital Chemical Engineering Volume 3, June 2022
- Stacking with Neural network for Cryptocurrency investment Avinash Barnwal, Haripad Bharti, Aasim Ali, and Vishal Singh - Inncretech Inc., Princeton, February 2019.
The development process produces:
- a development notebook (generated by a Jupyter notebook generator based on Scikit-Learn pipelines and stacked generalization) containing:
- an exploratory data analysis (EDA) used to assess data quality
- a modelling building a reduced-size stacked estimator
- a server (with its client) returning a prediction, a measure of the quality of input data and the execution time
- a test generator that can be used to evaluate server performance
- a Docker container generator that contains all the necessary files to build the final Docker container based on FastAPI and uvicorn, and a file for the deployment of the API in Kubernetes
- a zip package containing all the files produced during the process.
Notes:
- the time series forecasting problem is based on the transformation of time series to supervised learning problem
- EZStacking must be used with *.csv dataset using separator ','
- the column names must not contain spaces (otherwise it will produce error during server generation)
- for the time series forecasting, one of the columns in the dataset must be a temporal value.
First you have to:
- install Anaconda
- create the virtual environment EZStacking using the following command:
conda env create -f EZStacking.yaml - activate the virtual environment using the following command:
conda activate EZStacking - install kernel in ipython using the following command:
ipython kernel install --user --name=ezstacking - launch the Jupyter server using the following command:
jupyter-lab --no-browser
Note: jupyter-lab is a comfortable development tool more flexible than jupyter notebook.
You simply have to:
- deactivate the virtual environment using the following command:
conda deactivate - remove the virtual environment using the following command:
conda remove --name EZStacking --all - remove the kernel using the following command:
jupyter kernelspec uninstall ezstacking
In Jupyter, first open the notebook named EZStacking.ipynb:
Then click on Run All Cells:
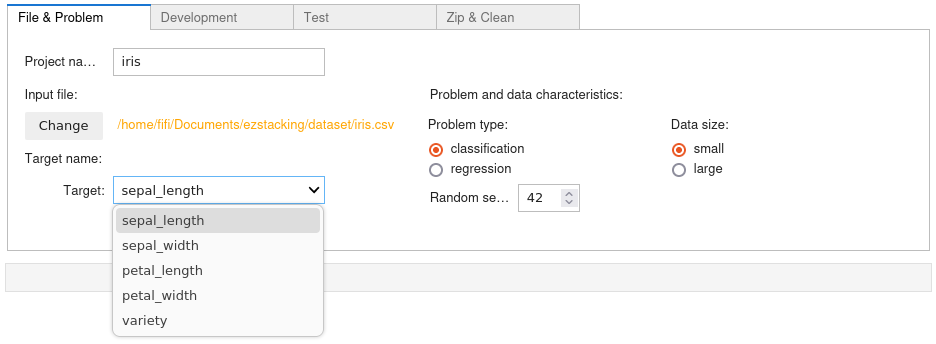
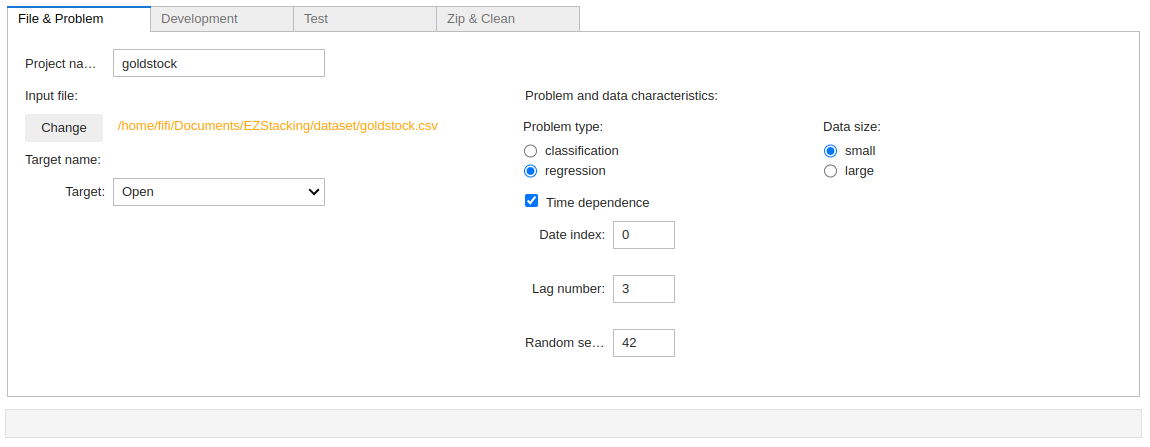
First select your file, then select the target name (i.e. the variable on which we want to make predictions), the problem type (i.e. classification if the target is discrete, regression if the target is continous, if the problem is time dependent, the time indexing column and the lag number must be filled) and the data size:
Notes:
- the data size is small, if the number of row is smaller than 3000
- the lag number is the number of past observations used to train the model
- Random seed is used for replicability.
Now, let's choose the options:
| Option | Notes |
|---|---|
| Yellow bricks | The graphics will be constructed with Matplotlib and Yellow bricks |
| Seaborn | The graphics will be constructed with Matplotlib and Seaborn |
| fastEDA | The graphics will be constructed with Matplotlib and fastEDA |
| ydata-profiling | The graphics will be constructed with Matplotlib and ydata-profiling |
Notes:
- time-dependent problems benefit from specific interactive visualization tools based on statmodels:
- seasonal decomposition with one period
- seasonal decomposition with two periods
- unobserved components decomposition
- the visualisation option Seaborn can produce time consuming graphics.
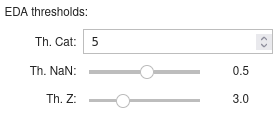
Notes:
- threshold_cat: if the number of different values in a column is less than this number, the column will be considered as a categorical column
- threshold_NaN: if the proportion of NaN is greater than this number the column will be dropped
- threshold_Z: if the Z_score (indicating outliers) is greater than this number, the row will be dropped.
Notes:
- test size: proportion of the dataset to include in the test split
- threshold_E: if target entropy is greater than this number, RepeatedStratifiedKFold will be used.
- if the option Undersampling is checked, then an undersampler must be chosen with care.
| Model | Data size | Model | Data size | |
|---|---|---|---|---|
| Gradient Boosting | both | SGD | both | |
| Support vector | small | Logistic Regression | both | |
| Keras | both | Linear Regression | both | |
| Gaussian Process | small | ElasticNet | both | |
| Decision Tree | small | Multilayer Perceptron | small | |
| Random Forest | both | KNeighbors | small | |
| AdaBoost | both | Gaussian Naive Bayes | small | |
| Histogram-based Gradient Boosting | both |
Notes:
- if the option "No correleation" is checked, the model will not integrate decorrelation step
- if the option "No model optimization" is checked, the number of models and of features will not be reduced
- if no estimator is selected, the regressions (resp. classifications) will use linear regressions (resp. logistic regressions)
- depending on the data size, EZStacking uses the estimators given in the preceding table for the level 0
- estimators based on Keras or on Histogram-Based Gradient Boosting benefit from early stopping, those based on gaussian processes do not benefit of it
- the Gaussian methos option is only available for small dataset.
Known bugs using Keras:
- for classification problems: the generated API doesn't work with Keras
- the ReduceLROnPlateau callback produces an error when saving the model.
| Option | Notes |
|---|---|
| Level 1 model type | Regression (linear or logistic) or decision tree |
| Level 1 cross validation | Apply cross validation on level 1 model during training |
Notes:
- threshold_corr: if the correlation is greater than this number the column will be dropped
- threshold_score: keep models having test score greater than this number.
- threshold_model: keep this number of best models (in the sens of model importance)
- threshold_feature: keep this number of most important features
Simply enter a file name:
Just click on the button  , you should find your notebook in the current folder (otherwise a Python error will be emitted).
Then open the notebook, and click on the button Run All Cells.
You just have to fill the numbers of (passing and non-passing) tests. Then click on the button  , it will generate the file
 test.sh.
Now, at the bottom of the generated notebook, click on the link  .
.
It opens the server notebook, then execute the line run server.py (and check carfully if the server is well started). If you have chosen the link http://127.0.0.1:8000/docs it opens the classical test gui of FastAPI.
If you have clicked on the link client, it opens the client notebook and you just have to execute the first command, the result should look like the following:

Docker Desktop is the tool used for this part.
The last step of the main notebook is the generation of all the useful files used to build the Docker container associated with the model.
These files are stored in a folder having the name of the project.
Open a terminal in this folder and launch the following command to build the container:
docker build -t <project_name> .
The container can be run directly in Docker Desktop, you can also use the following command line:
docker run --rm -p 80:80 <project_name>
Note:
- Models using Keras will not work due to technical problem with SciKeras
The program also generates a file for the API deployment in Kubernetes:
Deployment in Kubernetes:
kubectl apply -f <project_name>_deployment.yaml
Control the deployment of the service:
kubectl get svc
Delete the service:
kubectl delete -f <project_name>_deployment.yaml
Note:
- If the container is running in Docker, it must be stopped before testing it in Kubernetes.
If you click on the button  , EZStacking generates a zip archive file containing:
- the initial dataset
- the developement notebook
- the model
- the data schema
- the client and the server
- a generic notebook to test FastAPI endpoint.
Further more, it also suppresses from the folder the elements added to the archive, the files generated for the Docker container are simply deleted (it is assumed that the container had been built in Docker).
Note: it is advisable to close properly the generated notebooks (Ctrl + Shift + Q).
Once the first notebook has been generated, the development process can be launched.
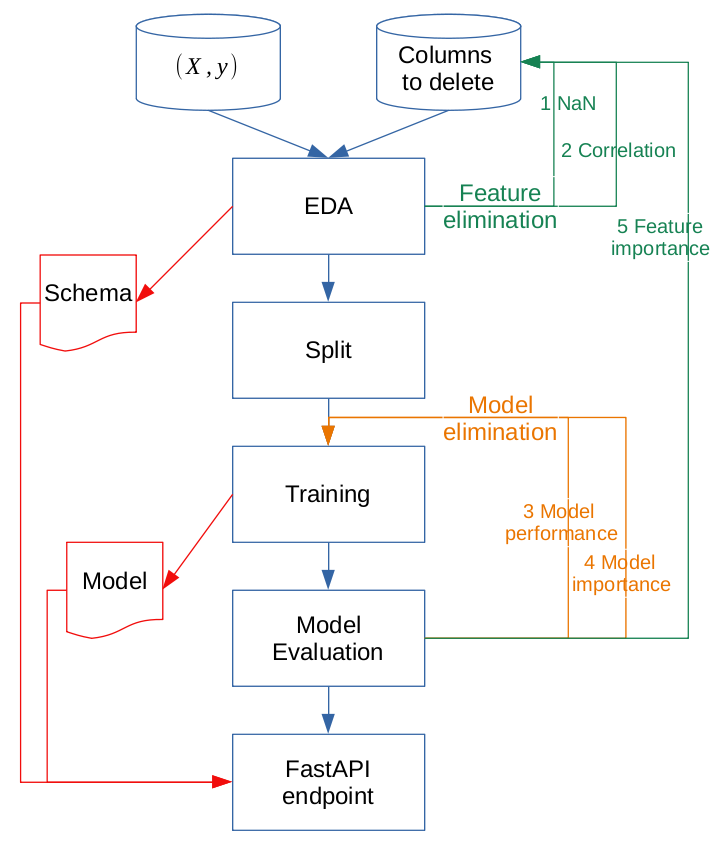
You simply have to follows the following workflow:
EDA can be seen as a toolbox to evaluate data quality like:
- dataframe statistics
- cleaning i.e. NaN and outlier dropping
- ranking / correlation
Note: the EDA step doest not modify data, it just indicates which actions should be done.
This process returns:
- a data schema i.e. a description of the input data with data type and associated domain:
- minimum and maximum for continous features,
- a list for categorical features
- a list of columns
dropped_colsthat should be suppressed (simply adding at the departure of the EDA this list to the variableuser_drop_cols, then it is necessary to re-launch from the EDA).
Notes:
- Tip: starting with the end of the EDA is a good idea (
Run All Above Selected Cell), so you do not execute unnecessary code (at the first step of development) - Yellow Brick offers different graphs associated to ranking and correlation and many more informations
- The main steps of data pre-processing:
- not all estimators support NaN : they must be corrected using iterative imputation (resp. simple imputation) for numerical features (resp. categorical features).
- data normalization and encoding are also key points for successful learning
- only the correlations with the target are interesting, the others must be removed (for linear algebra reasons)
- Those steps are implemented in the first part of the modelling pipeline.
The first step of modelling is structured as follow:
During the splitting step:
- if the dataset is large, the test set should be reduced to 10% of the whole dataset
- imbalanced classes are measured using Shannon entropy, if the score is too low, the splitting is realized using RepeatedStratifiedKFold.
Note: for imbalanced class management, EZStacking also offers optionally different subsampling methods as an option.
This initial model is maybe too large, the modelling process reduces its size in terms of models and features as follow:
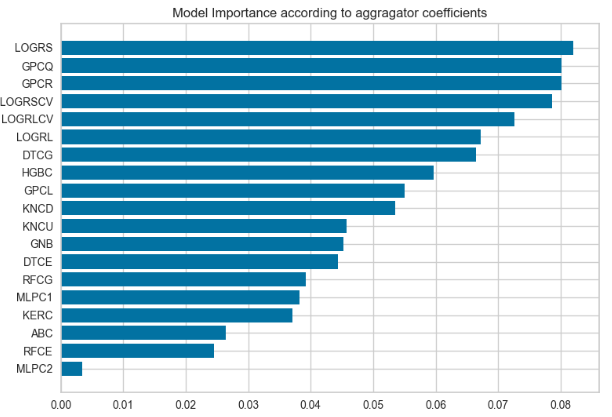
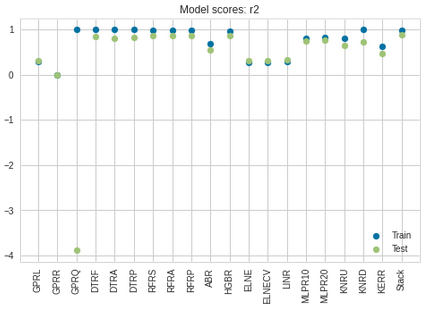
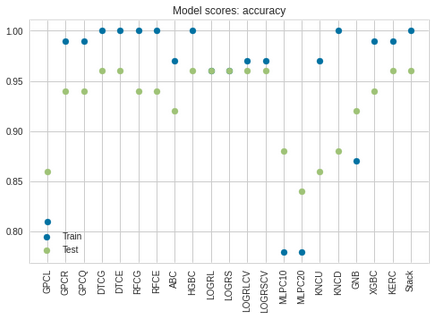
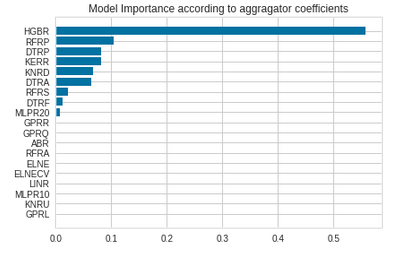
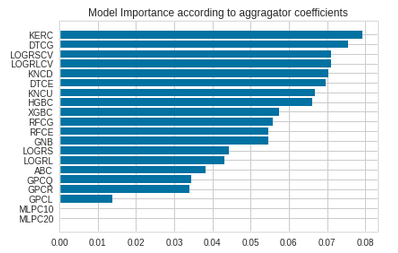
- the set of estimators is reduced according to the test scores and the importance of each level 0 models
| Regression test scores | Classification test scores |
|---|---|
 |
 |
| Regression model importance | Classification model importance |
|---|---|
 |
 |
- the reduced estimator is trained
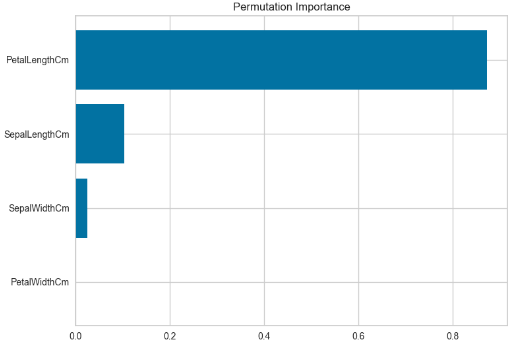
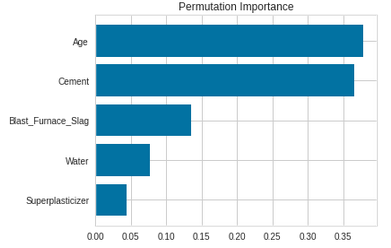
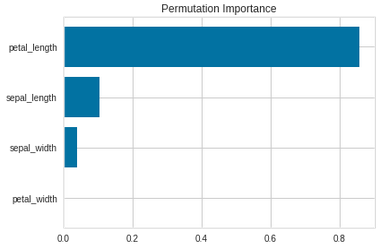
- the feature importance graphic indicates which columns could also be dropped
| Regression feature importance | Classification feature importance |
|---|---|
 |
 |
- those columns are added to variable
dropped_colsdepending on the value ofthreshold_feature dropped_colscan be added touser_drop_colsat the departure of the EDA (then it is necessary to re-launch from the EDA).
Notes:
- the calculation of the model importance is based on the coefficients of the regularized linear regression used as level 1 estimator
- the feature importance is computed using permutation importance
- it is important not to be too stingy, it is not necessary to remove too many estimators and features, as this can lead to a decrease in performance.
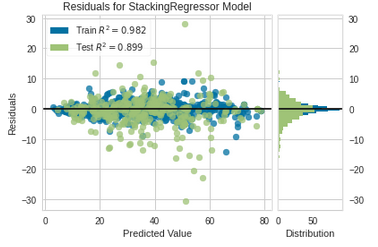
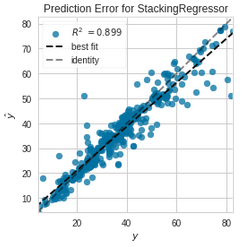
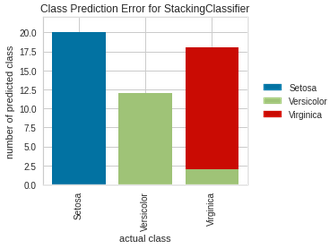
| Regression | Classification |
|---|---|
 |
 |
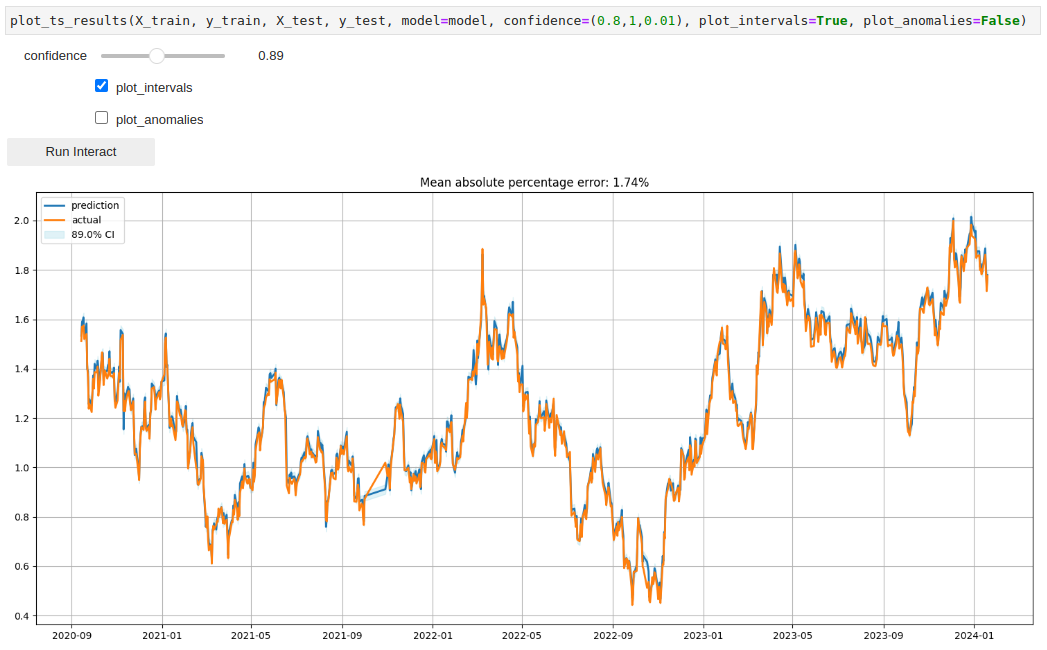
| Time series forecasting |
|---|
 |
| Regression | Classification |
|---|---|
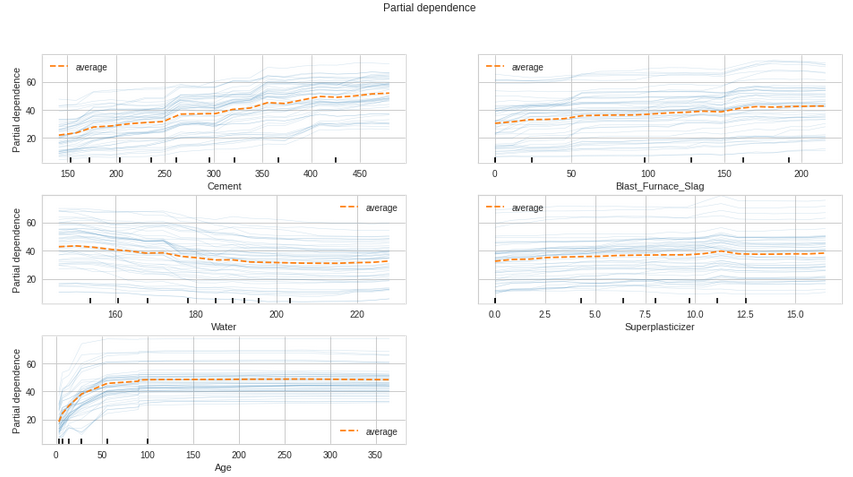 |
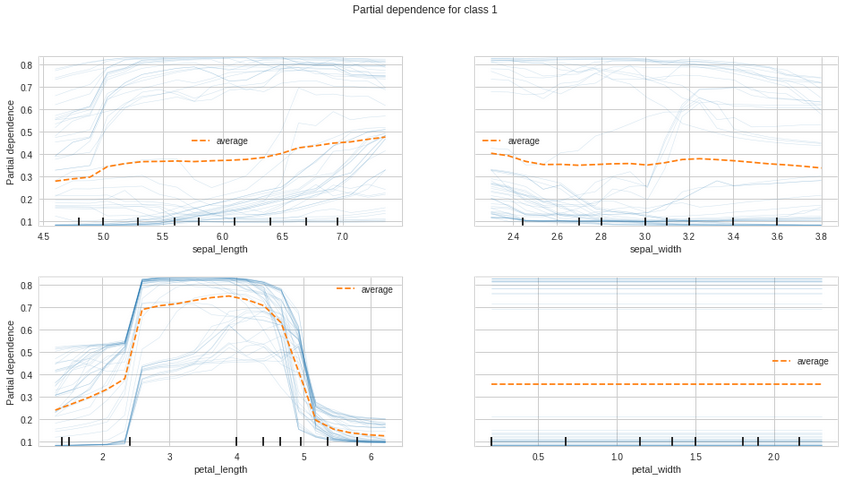 |
EZStacking also generates an API based on FastAPI.
The complete development process produces three objects:
- a schema
- a model
- a server source.
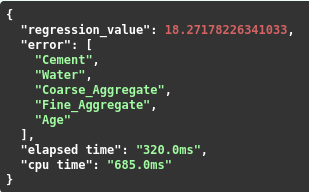
They can be used as basic prediction service returning:
- a prediction
- a list of columns in error (i.e. the value does not belong to the domain given in the schema)
- the elapsed and CPU times.
Example:
| Regression with data drift | Classification without data drift |
|---|---|
 |
 |
The schema is also used to build the file of passing and non-passing tests, indeed a passing test (resp. a non-passing test) means that all features belong to their domains given in the schema (resp. at least one feature does not belong to its domain).
As we have already seen, the server returns the consumption of each request, in the test phase we also have access to the global consumption linked to the execution of all requests.
A test file for Docker (and Kubernetes) is also created, it is located in the directory associated with the Docker container.
Some results are given in Kaggle.
- Stacking, Model importance and Others
- Stacked generalization David H. Wolpert, Neural Networks, Volume 5, Issue 2, 1992, Pages 241-259
- Issues in Stacked Generalization K. M. Ting, I. H. Witten
- Model stacking to improve prediction and variable importance robustness for soft sensor development Maxwell Barton, Barry Lennox - Digital Chemical Engineering Volume 3, June 2022, 100034
- Stacking with Neural network for Cryptocurrency investment Avinash Barnwal, Haripad Bharti, Aasim Ali, and Vishal Singh - Inncretech Inc., Princeton
- Gaussian Processes for Machine Learning Carl Eduard Rasmussen and Christopher K.I. Williams MIT Press 2006
- The Kernel Cookbook David Duvenaud
- ...
- Machine learning tools
- Good ressources to learn Python and machine learning (those I used...)
- Python courses (in French), Guillaume Saint-Cirgue
- Machine learning, Andrew Ng & Stanford University
- Deep Learning Specialization, Andrew Ng & DeepLearning.ai
- Machine Learning Engineering for Production, Andrew Ng & DeepLearning.ai
- Machine Learning Mastery, Jason Brownlee
- ...


