Cutlasses
Click image, or https://youtu.be/_0Ykc3huzv0 to watch demo.
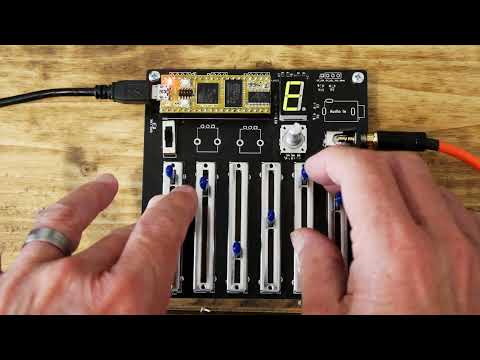
DaisyDrone is a drone synth, with 6 sliders, Inspired by @hainbach101 ‘s use of vintage oscillators and test equipment. This combines 18 sine waves. Each slider controls the gain of a set of 3 sine waves at slightly offset pitches centred around a frequency within the key shown in the display. The frequency of the sines increases from left to right. The magic comes from the way they are summed (controlled by the 3-way switch). Either averaged (boring!), or wavefolded with a sine wave or a triangle wave. The wave folding produces the rhythmic elements. An encoder is used to set the note of the base frequency, displayed in the 7 segment display.
Build Notes:
- You can either order PCBs from the Gerbers in the Hardware folder, or use the Schematic to lay out a design on strip board (vero board)
- The PCB uses SMD components, you'll need a pair of tweezers and a bit of practise to do these! Once you've got the knack it's quicker and easier than through-hole in my opinion.
- On the PCB the pots and encoders aren't marked. The encoder is the one nearest the output jacks. To the left of that is the pot that is setup to control master volume. The pot to the left of that is currently unassigned.
- Components marked [NOT USED] can be left unpopulated. They are there for future protoyping (audio in, I2C interface, extra pot)
- It is advisable to install the Daisy Seed with Female Header, so you can remove it and use it on other projects
- Due to the USB pins being used on the DaisyDrone PCB, you either need to program via USB with the Daisy unattached to the PCB, or the Daisy Seed needs programming via JTAG on the board. https://www.electro-smith.com/daisy/stlink-v3mini
- You will need to install the Daisy C++ toolchain to compile the code, here is a video walkthrough https://www.youtube.com/watch?v=e4KaBs6qSkU
- For the paths to work correctly you should install DaisyDrone code in the alongside DaisyExamples (i.e. in the same folder as DaisyExamples lives)
- Most values of potentiometer (pot) should be fine, I use 10K, but if you have some 20Ks, 50Ks etc, you can use those.
- I use M3 stand-offs with M3 bolts to raise the PCB above the desk
BOM


