Credited to https://github.com/shiruken/hackintosh
Installation guide for my vanilla Hackintosh v3 build dual-booting macOS Catalina and Windows 10. The version numbers reported in this guide were the releases available at the time of installation and more than likely can be replaced with the latest iteration.
EFI: Copy of current EFI directory from the macOS boot drive

- The Build
- Prepare Install Media
- Install Clover
- Gather Kexts
- Configure Clover
- BIOS Settings
- Prepare for macOS Installation
- Install macOS Catalina
- Post Installation
- Install Windows 10
- Final Clover Configuration
- Benchmarks
- Issues
- Upgrade Log
- References
- Resources
- CPU: Intel Core i7-9900KS Special Edition
- CPU Cooler: Corsair H100i RGB PLATINUM (Connected to CPU_FAN and F_USB2)
- Motherboard: Gigabyte Z390 AORUS PRO WIFI
- Memory: 2 x Corsair Vengeance RGB Pro 16 GB DDR4-3200
- Storage (macOS): PNY XLR8 CS3030 2 TB M.2 NVME SSD (M2M Slot)
- Storage (Windows): PNY XLR8 CS3030 2 TB M.2 NVME SSD (M2A Slot)
- Video Card: Sapphire 5700 XT Nitro+ Special Edition
- Sound Card: Sound BlasterX G1
- Webcam + Mic: Logitech BRIO
- Wireless Card: Fenvi T-919 (Bluetooth connect to HS11)
- Power Supply: Corsair RM1000x 80+ Gold
- Case: LIAN LI PC-O11 Dynamic Razer Edition Black
- Monitor: Dell S2719DG 27" LED QHD GSYNC Monitor
- Keyboard: Logitech MX Keys Advanced Wireless
- Mouse: Logitech MX Master 3 Wireless Mouse
View the build on PCPartPicker: https://pcpartpicker.com/list/kBK7TC (Mismatched)
-
Download the macOS BigSur installer (v11.1) from the Mac App Store
-
Open Terminal and format the target USB drive as with the following command:
diskutil partitionDisk /dev/{YOUR_DISK_ID} GPT JHFS+ "USB" 100% -
Create the bootable macOS installer:
sudo /Applications/Install\ macOS\ Big\ Sur.app/Contents/Resources/createinstallmedia --volume /Volumes/MyVolume -
Once the program finishes, your USB drive should now be called
Install macOS Catalina
- Download Opencore Install Package (0.6.5) and Opencore Configurator
- Install OpenCore to the USB device and customize with the EFI folder I have included.
- AppleALC.kext (v1.4.3)
- IntelMausiEthernet.kext (v2.5.0)
- Lilu.kext (v1.3.9)
- USBInjectAll.kext (v0.7.1)
- VirtualSMC.kext (v1.0.9)
- SMCProcessor.kext
- SMCSuperIO.kext
- WhateverGreen.kext (v1.3.4)
- Use Clover Configurator to mount the EFI partition of the USB drive
- Copy the downloaded .kexts to
EFI/CLOVER/kexts/Other/on the USB drive EFI partition - Copy
VirtualSmc.efitoEFI/CLOVER/drivers/UEFI/on the USB drive EFI partition
The exact kexts and drivers I used during my installation can be found in EFI_install/.
The configuration plist for the installation is heavily based upon Dortania's OpenCore Install Guide for the Coffee Lake microarchitecture. The major difference is with how the iGPU is enabled because I encountered difficulties when using device property injections. Each section of the configuration used during installation is documented below. A sanitized version of the config file can be found in EFI_install/CLOVER/. You will need to use Clover Configurator or macserial to generate a valid serial number and board serial number for the iMac19,1 SMBIOS.
ACPI


Boot

Boot Graphics

CPU

Devices


Disable Drivers

GUI

Graphics

Kernel and Kext Patches

Rt Varibles

SMBIOS

System Parameters

-
BIOS/MacOS_Bios_Pre: Load this BIOS settings or manually do BIOS Settings below -
Save & Exit
- Load Optimized Defaults
-
M.I.T.
- Advanced Frequency Settings
- Extreme Memory Profile (X.M.P.) → Profile 1
- Smart Fan 5 Settings
- CPU_FAN (or whichever header was used for the AIO CPU cooler)
- Speed Control → Full Speed
- Control Mode → Voltage
- CPU_FAN (or whichever header was used for the AIO CPU cooler)
- Advanced Frequency Settings
-
BIOS
- Windows 8/10 Features → Windows 8/10
- CSM Support → Disabled
-
Peripherals
- Initial Display Output → IGFX
- Internal Graphics → Enabled
- DVMT Pre-Allocated → 32M
- DVMT Total Gfx Mem → 256M
- Audio Controller → Enabled (I have disable in my case)
- Above 4G Decoding → Enabled
- USB Configuration
- Legacy USB Support → Enabled
- XHCI Hand-off → Enabled
- Network Stack Configuration
- Network Stack → Disabled
-
Chipset
- Vt-d → Disabled
-
Power
- Intel Platform Trust Technology (PTT) → Disabled
- ErP → Disabled
- RC6 (Render Standby) → Enabled
-
Save & Exit
- Choose Save and Exit to save BIOS settings and reboot
- Connect DisplayPort or HDMI cable to the graphics card output
- Insert macOS Installer USB drive into the USB 3.0 port adjacent to Ethernet connector
- Connect keyboard and mouse to USB 2.0 ports
- Remove any other SSD and Drives from your computer

- Restart computer and select the USB drive as the default BIOS boot device
- Select
Install macOS Catalinaas the Clover boot volume - Launch Disk Utility and format the destination drive (Samsung 970 Evo)
- Name:
Macintosh SSD - Format:
Mac OS Extended (Journaled)orAPFS(will be reformatted asAPFSduring installation) - Scheme:
GUID Partition Map
- Name:
- Launch Install macOS and select the
Macintosh SSDdrive as the destination- As the system restarts, keep selecting
Boot macOS Install from Macintosh SSDfrom the Clover menu - If the system freezes, use the power button to shut down the computer and turn off the power supply. Wait a few minutes before restarting to continue the installation process.
- As the system restarts, keep selecting
- Once the installation is complete, select
Boot macOS from Macintosh SSDfrom the Clover menu- Proceed through the normal macOS setup but delay signing into iCloud until post installation is complete
BIOS/MacOS_Bios_Ins: Load this BIOS settings
- Mount the EFI partition of
Macintosh SSDand copy over the entire EFI directory from the USB drive - Shutdown the computer
- Boot up the bios setting and select the internal drive (PNY 2TB M2M SLOT) as the default BIOS boot device
- Select
Boot macOS from Macintosh SSDfrom the Clover menu - You should now have a bootable macOS installation!
Note: You can now remove the USB drive but keep it handy for debugging issues with your Hackintosh.
- Modify the Clover configuration on the EFI partition of
Macintosh SSD- Boot
- Remove the
-wegnoegpuboot argument - Add the
agdpmod=pikeraboot argument
- Remove the
- Devices
- Clear value of
IntelGFXfield - Add new device:
PciRoot(0x0)/Pci(0x2,0x0)- Add property:
AAPL,ig-platform-id-0300983E-DATA
- Add property:
- Clear value of
- Graphics
- Uncheck
Inject Intel
- Uncheck
- Boot
- Reboot the computer and modify the BIOS Settings
- Peripherals
- Initial Display Output → PCIe Slot 1
- Chipset
- Internal Graphics → Enabled
- DVMT Pre-Allocated → 64M
- DVMT Total Gfx Mem → 256M
- Peripherals
- Save the changes and reboot the computer
- Disconnect the HDMI cable from the motherboard and connect a DisplayPort cable to the graphics card
- You should now be using the natively-supported discrete graphics card (as of macOS 10.15.1) to power your display(s) in conjunction with the headless iGPU for compute tasks.
- Hackintool can be used to verify the availability of the iGPU for hardware decoding under the
VDA Decodersystem parameter.
- Hackintool can be used to verify the availability of the iGPU for hardware decoding under the


Note: You should also make these changes to your USB drive Clover configuration so that it can properly boot your system if the Macintosh SSD EFI partition gets messed up. If you don't update the configuration, you'll have to swap back to using the integrated graphics instead of the discrete graphics card.
Apple's USB driver implementation restricts macOS to only 15 HS/SS ports. During the installation process, we utilized RehabMan's USBInjectAll kext and USB port limit kext patches to com.apple.iokit.IOUSBHostFamily and com.apple.driver.usb.AppleUSBXHCI to circumvent this restriction. While useful during installation, it is generally recommended that these workarounds be removed in favor of a custom SSDT or port injector kext for the final system configuration to avoid buffer overruns and sleep/wake issues. In order to map out the custom port injection for the system, we will be using corpnewt's USBMap Python script and following along with the process described in Carl Mercier's YouTube video.
If you have the Gigabyte Z390 AORUS PRO WIFI motherboard and want the same USB port mapping I utilize, you can download my USBMap.kext, SSDT-USBX.aml, and SSDT-USBX.dsl and skip to Step 5.
-
Add the
change EHC1 to EH01andchange EHC2 to EH02patches to the ACPI Clover configuration on the EFI partition ofMacintosh SSDand reboot
-
Open Terminal and run the following commands to download and execute the USBMap script:
git clone https://github.com/corpnewt/USBMap cd USBMap chmod +x USBMap.command ./USBMap.command -
Press
dthen[enter]to begin the port discovery process. Using a USB device (e.g. flash drive), systematically test each external USB port to identify its corresponding ID. The complete USB port layout for the Gigabyte Z390 AORUS PRO WIFI motherboard is detailed in the image below. Once the desired ports have been identified, pressqthen[enter]to return to the main menu.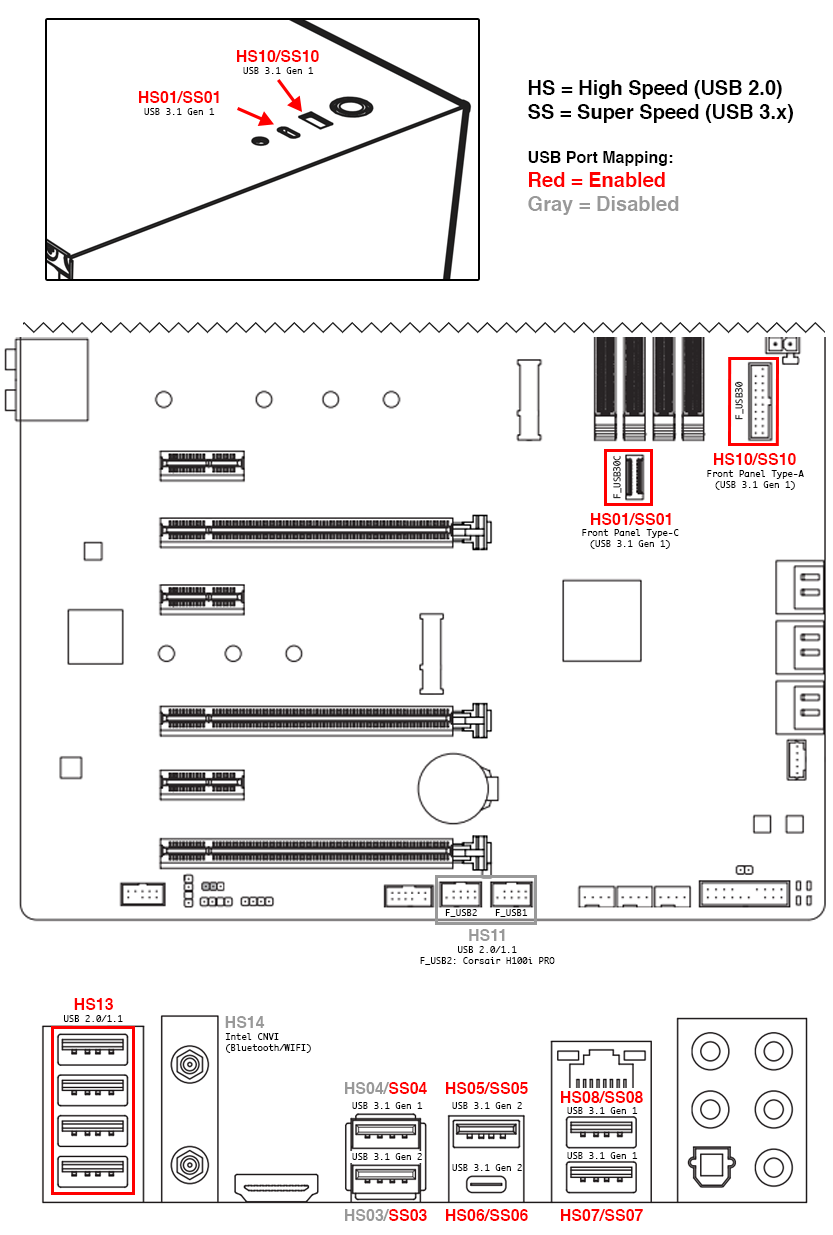
-
Press
pthen[enter]to begin creating the custom port mapping kext- Press
athen[enter]to enable all ports - Using the list of identified ports, enter the numbers of the ports you want to disable
- No more than 15 XHC ports can be enabled
2,3,4,9,11,12,14,15,16,18,25→HS02,HS03,HS04,HS09,HS11,HS12,HS14,USR1,USR2,SS02,SS09- Disables Bluetooth, AIO control, and USB 2.0 for the two ports immediately beneath the HDMI port
- The enabled ports are red and the disabled ports are gray in the image above
- Press
kthen[enter]to build the custom USBMap.kext file - Allow the program to move the files to your EFI partition or copy them manually:
USBMap.kext→EFI/CLOVER/kexts/Other/SSDT-USBX.aml→EFI/CLOVER/ACPI/patched/SSDT-USBX.dsl→EFI/CLOVER/ACPI/patched/
- Press
-
Modify the Clover configuration on the EFI partition of
Macintosh SSD- ACPI
- Remove the
change EHC2 to EH02patch (not present on this system)
- Remove the
- Kernel and Kext Patches
- Remove the
com.apple.iokit.IOUSBHostFamilykext patch - Remove the
com.apple.driver.usb.AppleUSBXHCIkext patch
- Remove the
- ACPI
-
Delete the
USBInjectAll.kextfromEFI/CLOVER/kexts/Other/on the EFI partition ofMacintosh SSD -
You should now have fully custom-mapped USB ports on your system! Use the USBMap script after a reboot to verify the correct ports are enabled.


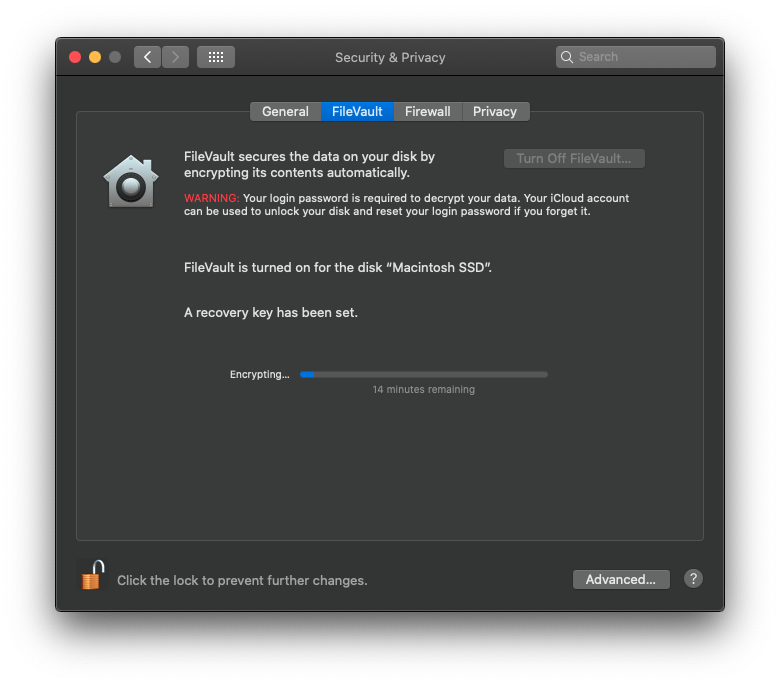
FileVault is used to encrypt the startup disk on your Hackintosh. Enabling it is entirely optional but probably a good idea for the security conscious, especially if you are building a portable system. Before turning on the feature, you will need to make sure you have several drivers installed to allow Clover to interact with the encrypted drive. These instructions are based on the advice from this tonymacx86 comment and this vanilla laptop guide.
-
If present, remove any of the following outdated Clover-installed FileVault 2 UEFI drivers:
AppleImageCodec.efiAppleKeyAggregator.efiAppleKeyFeeder.efiAppleUITheme.efiFirmwareVolume.efiHashServiceFix.efi
-
Download AppleSupportPkg v2.0.9 and copy the following two drivers to
EFI/CLOVER/drivers/UEFI/:AppleGenericInput.efiAppleUiSupport.efi
-
Modify the Clover configuration on the EFI partition of
Macintosh SSD- Boot
- Default Boot Volume →
Preboot
- Default Boot Volume →
- GUI
- Remove
Prebootfrom hidden volumes (if present)
- Remove
- Boot
-
Open System Preferences > Security & Privacy and navigate to the FileVault tab
- Click
Turn On FileVaultand select an option for setting the recovery key - Wait for encrypting to complete
- Click
-
Restart your system, which should now default to the
FileVault Preboot from Prebootoption, and enter your password at login to decrypt the system drive.

Note: You should also make these changes to your USB drive Clover configuration so that it can properly boot your system if the Macintosh SSD EFI partition gets messed up. If you don't update the configuration, then the Clover bootloader will not be able to properly handle the FileVault-encrypted drive.
-
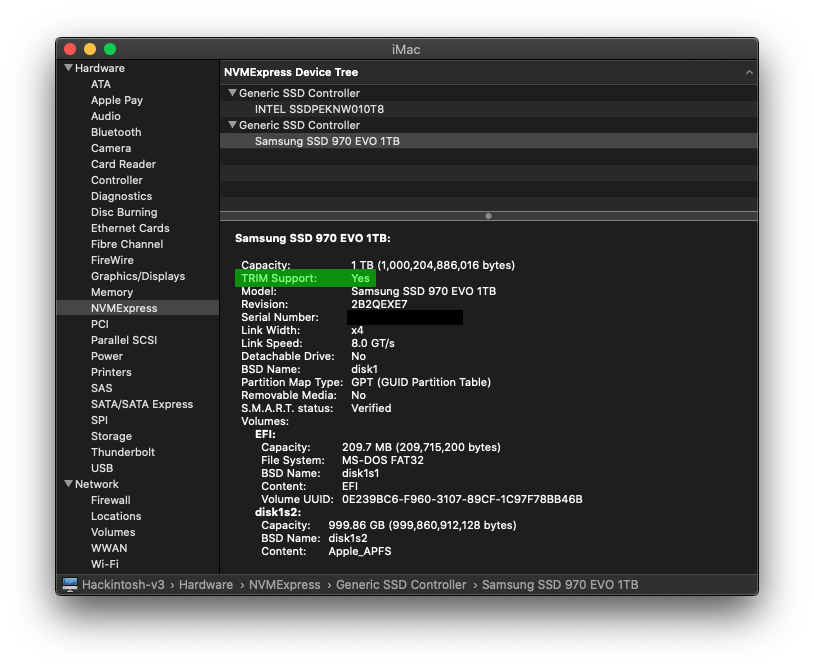
Open Terminal and enter the following command:
sudo trimforce enable -
Verify TRIM was enabled in System Report:

For some reason, If you are not using Core i9 and about This Mac and System Report do not properly identify as Intel Core i7 processor and list it as an 'Intel Core i9' instead of an 'Intel Core i7.' This can easily be fixed by using Clover Configurator to set the CPU Type to 0x0705 and rebooting.

The easiest way to download and install third-party Clover themes is using Clover Theme Manager.
- Launch the application and enter your password when prompted to mount the EFI partition of
Macintosh SSD. - Click the
Installbutton on the list of available themes to download the theme to yourEFI/CLOVER/themes/directory. 3. Select the theme to use during boot via the drop-down menu or manually entering the name in theThemefield on theGUIsection of Clover Configurator.

Windows 10 will be installed on the Intel 660p Series NVMe drive located in the M2M slot of the motherboard. This is necessary to avoid issues with Windows updates interferring with the Clover EFI partition because of drive enumeration ordering. The installation requires at least an 8 GB USB flash drive for creating the bootable Windows installer.
- Download the Windows 10 ISO
- Create the bootable Windows installer:
- If using macOS, launch Boot Camp Assistant and follow the process to create the
Windows 7 or later version install disk - If using Windows, use the Media Creation Tool or Rufus to flash the ISO
- If using macOS, launch Boot Camp Assistant and follow the process to create the
- Shut down the system and temporarily remove all other storage devices to avoid issues during installation.
- Restart the computer and select the installer USB drive as the default BIOS boot device.
- Follow the instructions to install Windows
- You may need to format the destination drive (Intel 660p Series) prior to installation
- Once installation is complete, shut down the computer, replace all the removed drives, and select the Clover EFI drive (Samsung 970 Evo) as the default BIOS boot device.
- You should now have a Hackintosh dual-booting macOS and Windows! Just select the desired operating system from the Clover bootloader.
- My configuration defaults to booting macOS after a short five-second delay
- If there is an extraneous
Boot Windows from EFIoption on the bootloader, check and uncheck the Legacy Scan option on the GUI section of Clover Configurator.

Follow these instructions to prevent the Windows drive from automatically mounting in macOS:
-
Open Terminal and enter the following command to get the
Volume UUID:diskutil info /Volumes/{YOUR_WINDOWS_DRIVE_NAME} -
Enter
sudo vifsto add the following line to/etc/fstab:UUID={YOUR_UUID} none ntfs rw,noauto -
Restart your system and the Windows partition will no longer automatically mount.
A sanitized version of my final config file can be found in EFI/CLOVER/. Each section of the configuration in Clover Configurator is also documented below.
ACPI


Boot

Boot Graphics

CPU

Devices


Disable Drivers

GUI

Graphics

Kernel and Kext Patches

Rt Varibles

SMBIOS

System Parameters

All values are the average of three runs
- Geekbench 5
- Single Core: 1313.7
- Multicore: 8055.3
- OpenCL: 43650.3
- Metal: 38985.0
- LuxMark LuxBall: 27424.3
- BruceX: 6.64 seconds
- Cinebench R20: 3934
- Blackmagic Disk Speed Test (Samsung 970 Evo)
- Read: 2990.4 MB/s
- Write: 2484.2 MB/s
See the GitHub repository issues tracker
- 2019-12-18: Upgraded to macOS 10.15.2 via Software Update
- 2019-12-17: Upgraded to Clover Configurator v5.9.0.0 and Clover v2.5k_r5100
- 2019-12-06: Upgraded kexts to AppleALC v1.4.4, Lilu 1.4.0, WhateverGreen 1.3.5
- 2019-11-21: Upgraded to Clover v2.5k_r5099
- u/corpnewt's r/Hackintosh Vanilla Desktop Guide
- An iDiot's Guide To Lilu and its Plug-ins
- [Guide] Intel Framebuffer patching using WhateverGreen
- Glasgood's macOS Mojave [SUCCESS][GUIDE] for Aorus Z390 Pro
- [SUCCESS] Gigabyte Designare Z390 (Thunderbolt 3) + i7-9700K + AMD RX 580
- General Z390 Catalina Guide, or why you should take the time to set things from scratch (bonus 5700 XT guide)
- How to fix USB 3 ports on a Hackintosh by generating your own SSDT or USBMap.kext
- FileVault2 boot issues with Clover under macOS Catalina
- Enabling FileVault - The Vanilla Laptop Guide
- [Solved] Clover shows two boot options for Windows EFI
- Prevent a volume from mounting at startup