![]()
Use Notion to configure your Twitch chatbot commands!
Features
Manage your Twitch Chatbot from Notion
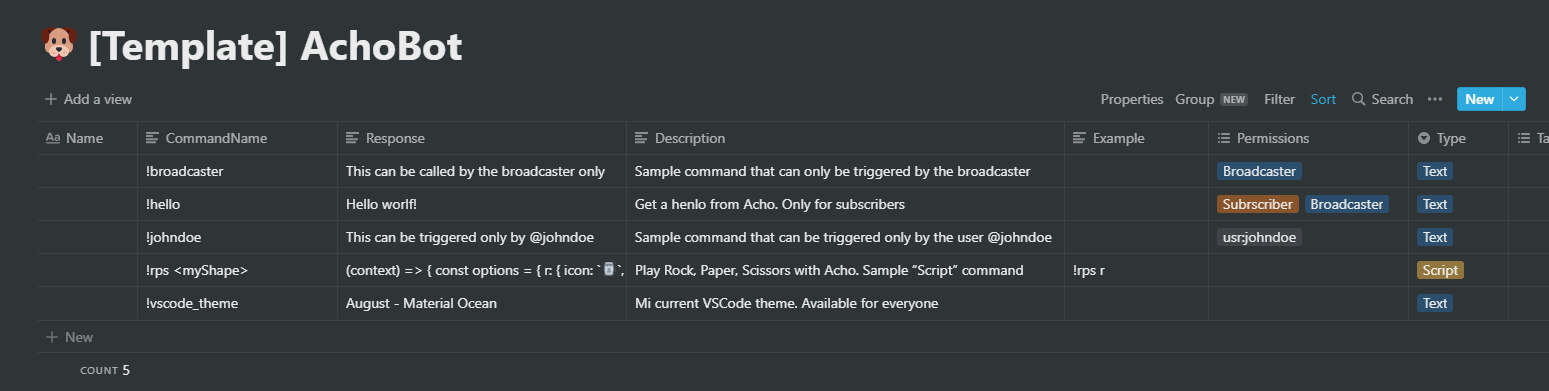
Add, update or delete commands in a Notion database. AchoBot will use the information from Notion to answer your viewers when they invoke a command.
Assign Permissions to each Command
The database includes a Permissions column where you can specify who can invoke each command. Leave it empty, and everyone will have access to it.
The column accepts one or more of the following values:
- Broadcaster
- Moderator
- Subscriber
- Viewer
Specific user permissions
You can also create commands that can only be invoked by a single specific user. To do that use the value usr:<username>, for example: usr:paulasantamaria
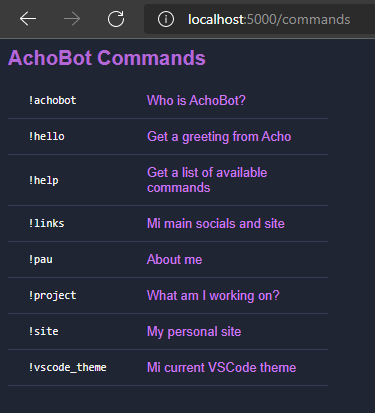
Commands view
Navigate to /commands to get a list of every public command. Your viewers can use it to see the available commands.
Also, you can navigate to /commands?mode=image to get a ready-to-download image you can add to your Twitch panels.
Scripted commands
You can specify the type of command in the "Type" column. Available options are:
- Text
- Script
Text commands return a plain text response. E.g: "Welcome to the stream".
Scripted commands can implement some logic (JavaScript) and receive parameters.
For example, imagine the following command !say <text>:
(context) => {
    const textToPrint = context.params.text;
    return `You said: ${textToPrint}`;
}
When a viewer invokes it: !say hello
Output: You said: hello
This feature is new and still has some limitations and issues. Writing code in a Notion DB cell is not ideal
😅 .
Single account
The chatbot service will work only for the accounts and channels specified in the environment variables. If any other account tries to log in using the chatbot authorization endpoints, it will get an authorization error.
The service is not currently designed to handle multiple accounts. This is a limitation, but it also makes the hosting and configuration of the service easier.
Status view
Use the status view to see if your bot's Twitch account is correctly authorized. You can use this view in OBS to get real-time feedback on your chatbot status (it auto-updates every minute).
Built-in commands
Built-in commands are defined in the codebase instead of Notion. They usually require more logic and access to resources unavailable to the Notion commands. There are currently two built-in commands that you can use:
!helpprints a list of available commands.!refreshinvalidates the command cache, so next time a command is triggered, the app needs to go to Notion to retrieve the commands, thus updating them to the latest version. Only available for Broadcaster and Moderators.
Placeholder commands
Some commands are triggered via code but defined in Notion. This allows AchoBot to react to certain events (like a user logging in or subscribing) while also allowing each user to specify what they want AchoBot to do in each case. Right now, the only placeholder command is:
!welcome: Executed when AchoBot joins the chat room immediately after a stream starts. If you define this command in Notion when the bot logs in, it can say hi and leave some relevant information in the chat. E.g., "Hi, I'm AchoBot! Type !help to see what I can do".
Quick start
Dependencies
To get a detailed step-by-step guide on how to setup the project including every dependency, check out AchoBot setup - Full guide
- Setup your Notion Database. Generate it using the following Notion template: [Template] AchoBot
Press "Duplicate" to copy the template in your Notion. The template comes with a few sample commands; feel free to delete them and add your own.
- Clone the repo
git clone https://github.com/pawap90/acho-bot
- Build the project
npm run build
You can find the transpiled code in the
_distfolder.
-
Make sure to set up all the Environment variables
-
Run it
npm start
- Open the site in your browser (e.g., http://localhost:5000 if you are running it locally) and press the link to log in with your bot's Twitch account. This will give the application permissions to use the chat on your bot's behalf, so it can start answering commands.
Once you start streaming, if the service is running and you authorized the bot (step 6), the bot will automatically log in to the chat. Give the bot's account moderator permissions so it can reply to commands without limitations. Type this in the chat:
/mod bot_username
Development
- Clone the repo
git clone https://github.com/pawap90/acho-bot
- Install dependencies: Run the following command from the project's root folder:
npm install-
Setup a
.envfile in the root as explained in the Environment variables section. -
Start the local development server:
npm run devTest
To run the available tests, use:
npm test
Extend it
The project is designed to be easily extensible. To know more: AchoBot wiki - Extend AchoBot
Environment variables
These are the environment variables required to run the project. Make sure to set the values with your own data.
TWITCH_BOT_CLIENTID=<your-twitch-clientid>
TWITCH_BOT_CLIENTSECRET=<your-twitch-secret>
TWITCH_BOT_USERNAME=<your-bots-username>
TWITCH_CHANNELS=<your-twitch-channel>
TMI_DEBUG=true
TMI_LOGLEVEL=info
PORT=5000
TWITCH_BOT_REDIRECTURI=http://localhost:5000/api/twitch/auth/token
SESSION_SECRET=<a-random-value>
NOTION_APIKEY=<your-notion-api-key>
NOTION_DATABASEID=<your-notion-database-id>
NOTION_VERSION=2021-08-16
When running the project locally using npm run dev, you should set the environment variables within a .env file in the root.