What is the BabySitter App all about
The Problem
So COVID came along and made Remote work possible. Yay!!!. Now we can work in our pyjamas, our bedrooms,sipping coffee from that large Mug we've always dreamt of.
I don't know about you, but to me, working like this is a dream come true.
But as the saying goes,
When you pray for the rain, you've got to deal with the mud too
Working from home ain't all sunshine and merry making.
Most of us are parents, and for some sweet reason, our kids always decide to show how much they love us, during zoom meetings or when we want to put some work in.
They're either banging on the closed door or creating some noise with stuff from outside, because there's nobody to sit and put them to order.
There has to be a solution to this 🤔. Yeahhhh... Get a nanny.But then,other issues come in.
-
Firstly, where or how do i get this nanny ?
-
Supposing you meet them ,are you comfortable leaving your kids with somebody you just met ?
-
How do you evaluate them to know if they are a good fit for your kids ?
-
How can you speak to other parents that have worked with them in the past ?
And a ton of other questions.
BUT!!!!!
What if there's an online website just for stuff like this.
- Where you can meet people willing to carryout nanny duties.
- You can post job offers
- See Nanny ratings based on previous jobs they've completed
- Book a nanny
- etc
That's the main purpose of this Project.
I don't intend to build the whole thing, but only to serve as a source of inspiration for some super ninja out there who's willing to go all in on building something similar
Proposed Solution
This REPO would contain all the code for the babysitter serverless GraphQL API.
ENTITIES
- User
- Job
- Application
- Ratings
User
-
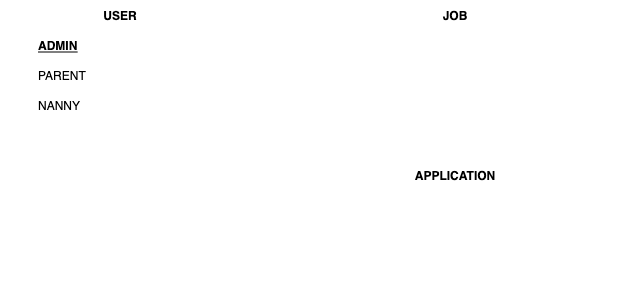
Starting off with a simple structure, i'll assume there are only 3 types of users
-
Admin
-
Parent(Single or Couple)
-
Nanny
Job
- Parents can put up a job posting like(We need somebody, aged between 21 and 40 to look after our son everyday from 8AM to 6PM.
- Job Type
- Schedule(Time and Date)
- Location
- Number of Kids
- Cost
- etc
Applications
- Somebody offering Nanny duties should be able to apply to a job posted by a Parent.
Rate/Feedback
- Rate/Leave feedback on a nanny after job completion by a parent.
- Rate/Leave Feedback on a parent after a job completion by a nanny.
User Profiles
Nanny attributes
- Full Names
- Date of Birth
- Gender
- Spoken languages
- Current Location
- Nationality
- Region of Origin
- National ID Card or Some Kind of identification
- Phone Number(Just of verification)
- Profile Picture
- Hourly Rate
- Level of Education
- Smoke/drink etc
- Any Disability
- Brief Description
- List of activities they can do
Parent attributes
- Full Names
- Location
- Date of Birth
- Phone Number(Just for Verification)
- List of Job postings
Admin
Ratings and Reviews
Nanny's
- Answer a set of questions based on their experience with a Parent.
- Leave a brief review
- Leave a rating
Parents
- Answer a set of questions based on their experience with a Nanny.
- Leave a brief review
- Leave a rating
Reviews/Ratings will be publicly visible on each users profile.
Chats
- Not implemented
Overview
This api is built as a serverless graphql api, using Serverless Application Module(SAM) for Infrastructure as Code, AWS AppSync for the serverless GraphQL, AWS Cognito for authentication,python 3.8 as the runtime language, AWS Lambda for direct lambda resolvers, Simple Queue Service(SQS) for executing requests asynchronously, AWS DynamoDB for storing data.
Access Patterns
- Create/Read/Update/Delete User account(Parent,Nanny)
- Update User Account Status(VERIFIED,UNVERIFIED,DEACTIVATED) by admin only
- Create Job(By Parent Only)
- Apply to Job(By Nanny Only)
- Book Nanny(By Parent Only)
- View all Open/Closed Jobs(By Nanny or Admins Only)
- View all jobs applied to (By Nanny or admins only)
- View all applications for a job(By Parent or Admin only)
- View All jobs per parent(Only Parents or admin). A Parent can only view their jobs
- View All Nannies/Parents
Solutions Architecture
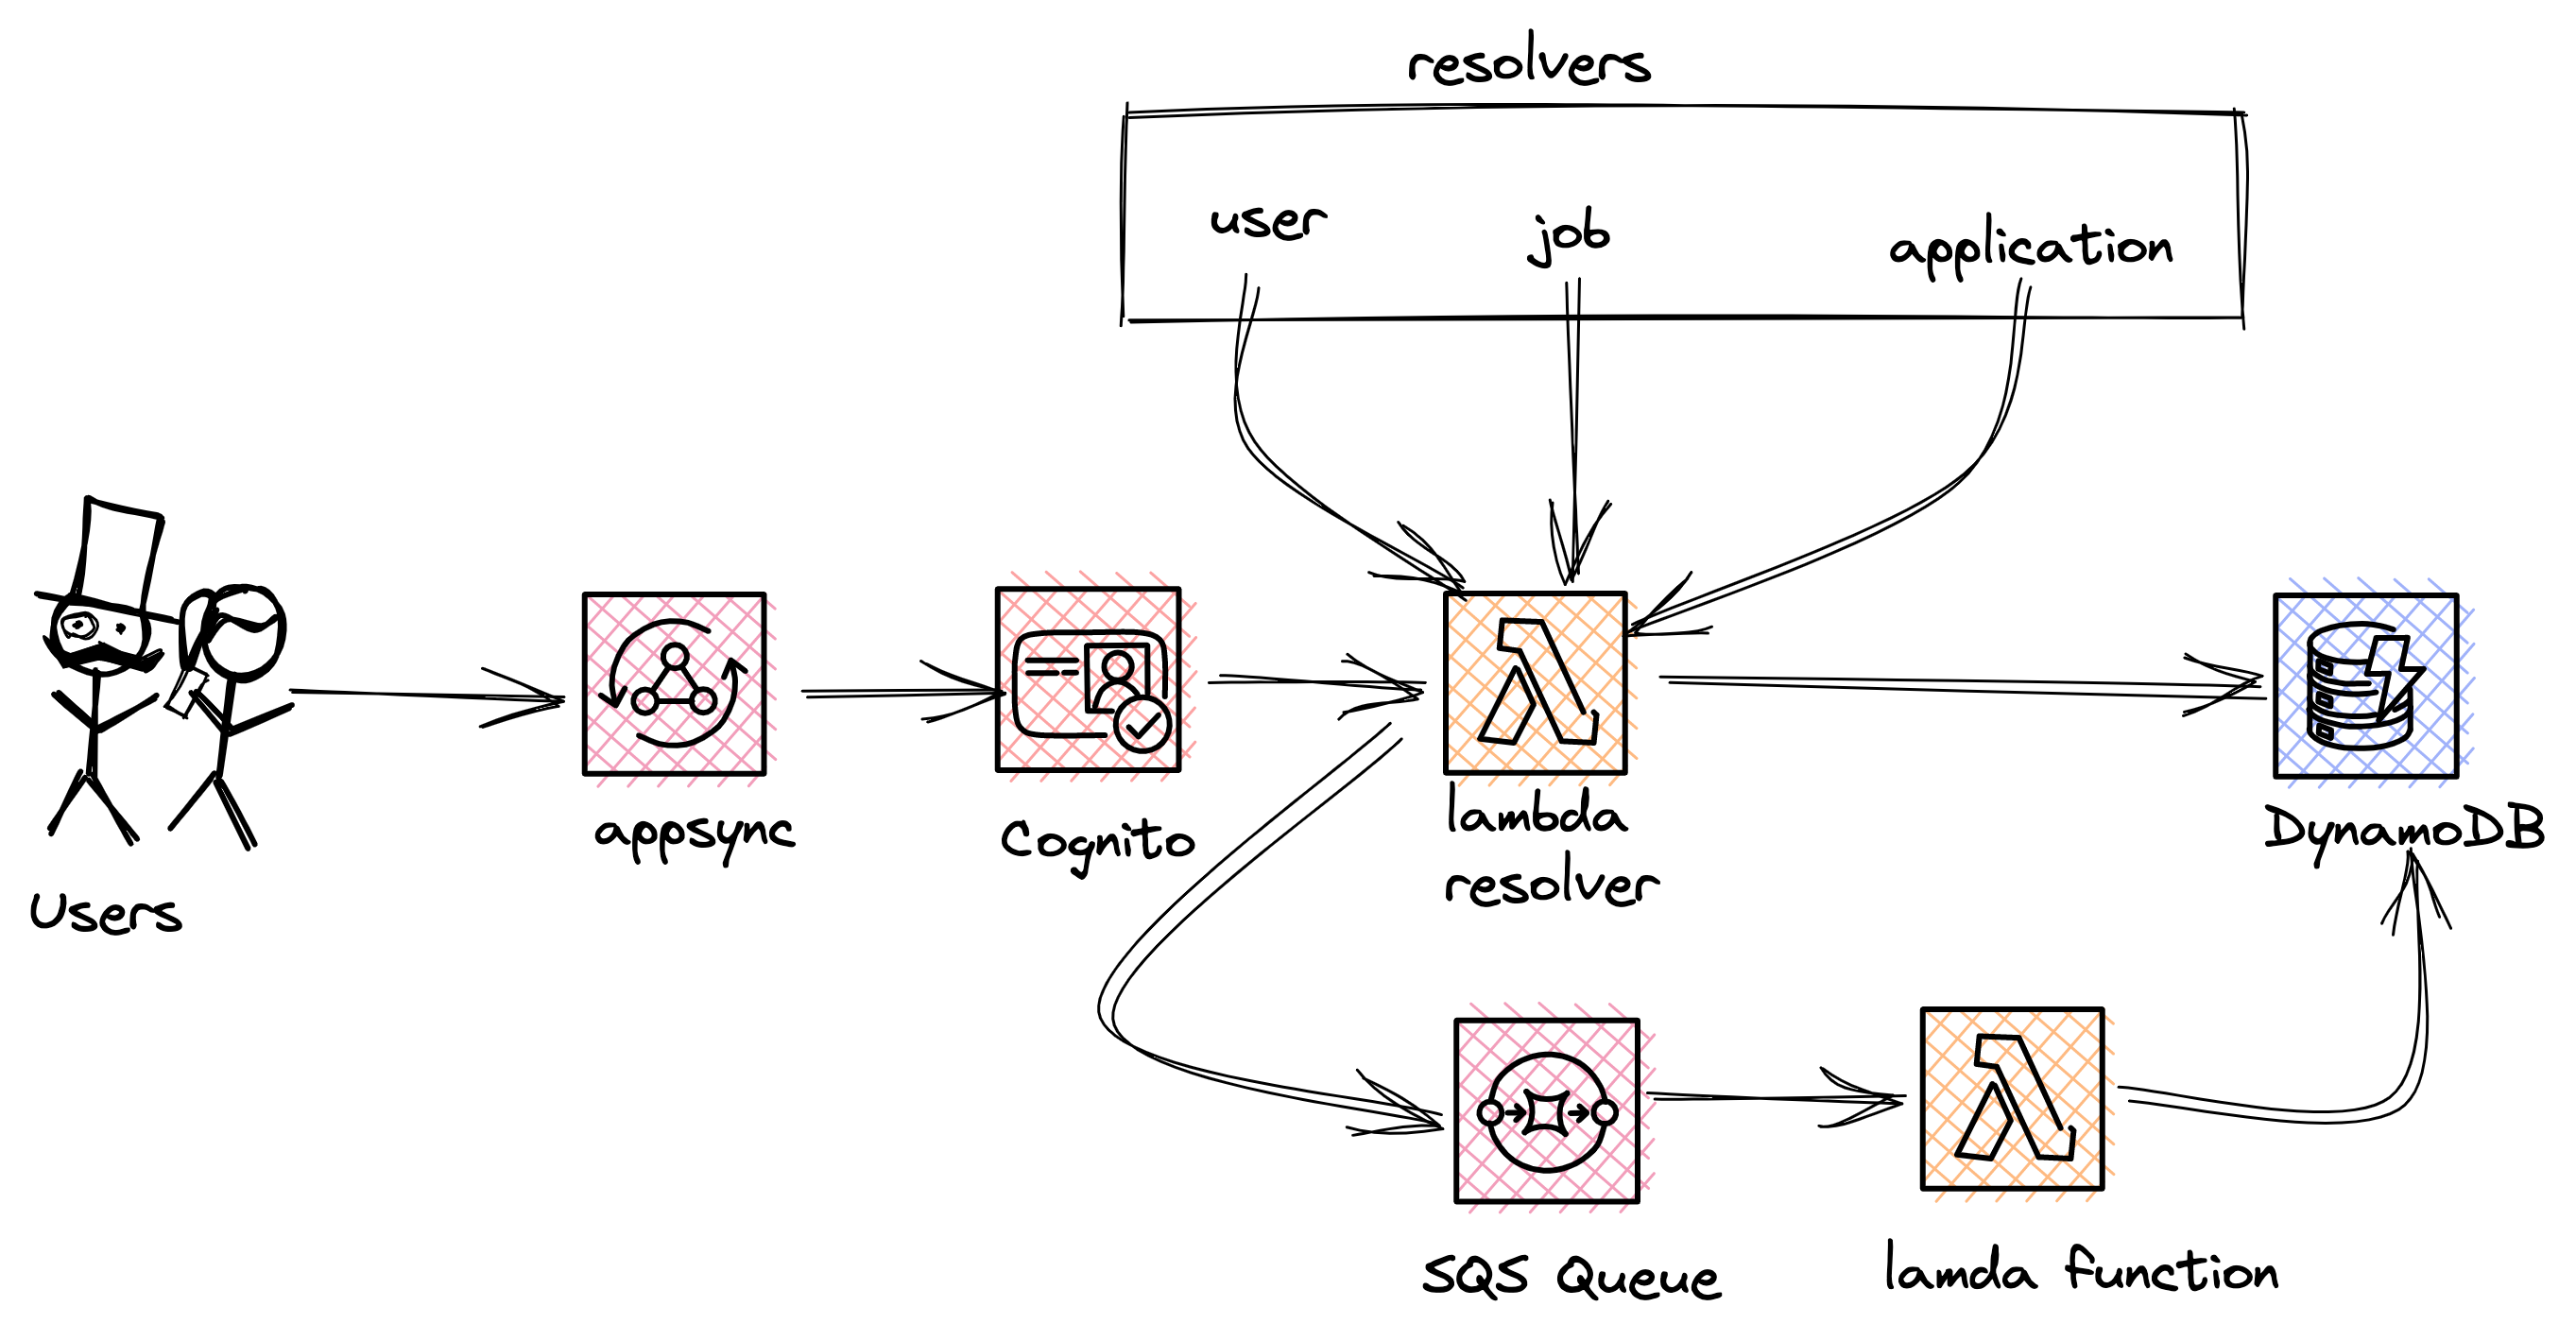
INTRODUCTION
We'll be using AWS AppSync to build out our api. AWS AppSync is a fully managed service allowing developers to deploy scalable GraphQL backends on AWS.
It's flexibility lets you utilize new or existing tables, using either a single-table design or a multi-table approach.
This api uses the single table design approach.In a single table design, all our entities would be stored
in the same DynamoDB table. This let's us perform multiple queries on different entities in
the same requests,that leads to a high efficiency as your app grows bigger.
This design approach has it's pros and cons, with one major con being the steep learning curve of modelling the
single table. It requires you to know and understand your access patterns properly beforehand.
Here are the concepts we'll be covering in this article.
- We'll use Appsync to improve security and incorporate different access patterns
- We'll Implement Single Table Design.
- We'll be using aws lambda powertools for tracing, structured logging, custom metrics and routing to properly route all Graphql endpoints.
- Build faster with the new SAM Cli (
sam sync --stack-name)
We already highlighted our use case above. Now, let's dive into our DynamoDB table.
DynamoDB Table
Our dynamodb table stores all data related to the application.
Since we already understand our access patterns, let's dive right into the
relationship between entities.
- There's a one to many relationship between User and Job. So a User(Parent) is allowed to create multiple job.
- There's also a one to many relationship between a Job and Application
Primary Key Design
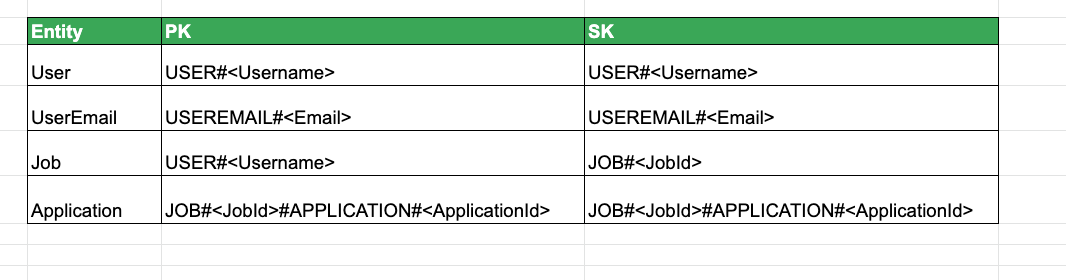
The User entity is actually unique on 2 attributes( username + email address)
That's why we have 2 PK and SK for User entity in the above table.
From this current design, here are the access patterns available
- Create/Read/Update/Delete User (Transaction Process)
PK=USER#<Username>SK=USER#<Username>PK=USEREMAIL#<Email>SK=USEREMAIL#<Email>
- Create/Update/Read/Delete Jobs
PK=USER#<Username>SK=JOB#<JobId>
- Create/Update Application
PK=JOB#<JobId>#APPLICATION#<ApplicationId>PK=JOB#<JobId>#APPLICATION#<ApplicationId>
- List all jobs per User
PK=USER#<Username>SK= BEGINS_WITH('JOB#')
- Book a Nanny (Transaction Process)
PK=USER#<Username>SK=JOB#<JobId>PK=JOB#<JobId>#APPLICATION#<ApplicationId>PK=JOB#<JobId>#APPLICATION#<ApplicationId>
Booking a nanny means, changing the status of an application from PENDING to ACCEPTED , while changing the
job status from OPEN to CLOSED
The current design has limitations, There are a couple of access patterns it doesn't support yet.
For example, currently, we can't get all applications for a particular job.We need a Global Secondary index(GSI) for that.
For this application, we'll create 3 GSI's for additional access patterns.
Global Secondary Indexes
jobApplications: Get applications for a job. Parents have to see all applications for the job they posted, in-order to book who they intend to work with.
PK = GS1PK AND SK=GSI1SK
jobsAppliedTo: A Nanny would definitely love to see all the jobs they applied to
PK = GSI2PK AND SK=GSI2SK
jobsByStatus: It's essential to display OPEN jobs to job seekers. The system admin would also love to see open /closed jobs.
PK = jobStatus AND SK=GSI1SK
These are the few access patterns we'll cover in this tutorial.There's still a lot to add. You can take up the challenge and push forward.
GraphQL Schema
I won't paste the complete GraphQl schema here, just the relevant parts that need attention.
Mutations
        type Mutation {
            createUser(user:CreateUserInput!):User!
            @aws_cognito_user_pools

            updateUserStatus(username:String!,status:UserAccountStatus!):User
            @aws_cognito_user_pools(cognito_groups: ["admin"])

            updateUser(user:UpdateUserInput!):User!
            @aws_cognito_user_pools

            deleteUser(username:String!):Boolean
            @aws_cognito_user_pools


            createJob(job:CreateJobInput!):Job!
            @aws_cognito_user_pools(cognito_groups: ["parent"])

            applyToJob(application:CreateJobApplicationInput!):JobApplication!
            @aws_cognito_user_pools(cognito_groups: ["nanny"])

            bookNanny(username:String!,jobId:String!,applicationId:String!, jobApplicationStatus:JobApplicationStatus!):Boolean
            @aws_cognito_user_pools(cognito_groups: ["parent"])
        }
A user has to be authenticated before carrying out any Mutation.
Users are seperated into 3 user groups
- Admin
- Parent
- Nanny Some Mutations can only be executed by Users of a particular group, while other Mutations can be executed by Users of any group.
For example, in the Mutation below, only an admin can change a User's account status. Maybe from `UNVERIFIED` TO `VERIFIED` or vice versa
Here's the account status enum ``` enum UserAccountStatus { VERIFIED UNVERIFIED DEACTIVATED } ``` . ``` updateUserStatus(username:String!,status:UserAccountStatus!):User @aws_cognito_user_pools(cognito_groups: ["admin"]) ``` Creating a job is reserved for Parent's only
  createJob(job:CreateJobInput!):Job!
  @aws_cognito_user_pools(cognito_groups: ["parent"])
Only Nanny's can apply to a job
 applyToJob(application:CreateJobApplicationInput!):JobApplication!
 @aws_cognito_user_pools(cognito_groups: ["nanny"])
Any User group can create an account
 createUser(user:CreateUserInput!):User!
 @aws_cognito_user_pools
Queries
Same User Group concept apply to queries.
        type Query {
            getUser(username: String!): User!  @aws_api_key @aws_cognito_user_pools

            listUser:[User]! @aws_cognito_user_pools(cognito_groups: ["admin","parent"])

            listAllJobs(jobStatus:String!):[Job]! @aws_cognito_user_pools(cognito_groups:["admin","nanny"])

            listJobsPerParent:User! @aws_cognito_user_pools(cognito_groups:["admin","parent"])

            listApplicationsPerJob(jobId:String!):Job!
            @aws_cognito_user_pools(cognito_groups:["admin","parent"])

            listJobsAppliedTo(username:String!):User!
            @aws_cognito_user_pools(cognito_groups:["admin","parent"])

        }
Here's the complete schema
AWS IAM (Identity and Access Management) Policies
When i started learning how to build serverless applications. I almost went nuts wrapping my head
head around AWS IAM.
A ton of serverless tutorials out there rarely talk about IAM and just dive into creating API's.
I think we should make a difference and cast some proper light on this concept.
What are IAM Policies
AWS services are born with zero permissions. You manage access in AWS by creating policies and attaching them to IAM identities (users, groups of users, or roles) or AWS resources.
A policy is an object in AWS that, when associated with an identity or resource, defines their permissions.
AWS evaluates these policies when an IAM principal (user or role) makes a request.
In simple terms,
policies define authorizations to AWS services and resources.
There are different types of Policies.
Let's take a look at an identity-based policy(IAM Policy) from the api we are about to build.
  DynamoDBReadPolicy:
    Type: "AWS::IAM::Policy"
    Properties:
      PolicyName: DynamoDBReadPolicy
      PolicyDocument:
        Version: "2012-10-17"
        Statement:
          -
            Effect: "Allow"
            Action: [
              "dynamodb:GetItem",
              "dynamodb:Scan",
              "dynamodb:Query",
              "dynamodb:BatchGetItem",
              "dynamodb:DescribeTable"
              ]
            Resource:
              - !GetAtt DynamoDBHelloWorldTable.Arn
              - !Join [ '/',[!GetAtt DynamoDBHelloWorldTable.Arn,"index/*"]]
      Roles:
        - !Ref AddUserJobRole
This policy grants specific permissions to an AWS identity, thus giving them access to perform operations on
an Amazon DynamoDB. Policies have a specific format.
Here's what you should take note of, in the above policy
- Type
AWS::IAM::Policy - PolicyName
DynamoDBReadPolicy - Statement Effect
Allowexplicitly allows the role access to the resource. - Action represent a set of functions a role can have on the resource.
- Resource represents the aws resource the above actions would be performed on. In this case, it's our DynamoDB table and all it's respective Global Secondary Indexes.
- Roles: Attaching the above policy to a role(AWS Identity), grants them access to perform operations on said Resource(DynamoDB)
`!Ref` is a cloud formation intrinsic function that returns the value of the specified resource.
We create an AssumeRolePolicyDocument and attach it to our lambda function that'll define all the permissions
it requires for it's execution.
Remember that, it's the same role we've attached the DynamoDB policy to.
Therefore once this role is attached to a lambda function, that function would have permissions to write to the dynamoDB table.
  AddUserJobRole:
    Type: AWS::IAM::Role
    Properties:
      AssumeRolePolicyDocument:
        Version: "2012-10-17"
        Statement:
          - Action:
            - "sts:AssumeRole"
            Effect: "Allow"
            Principal:
              Service:
                - "lambda.amazonaws.com"
Let's begin creating our api.
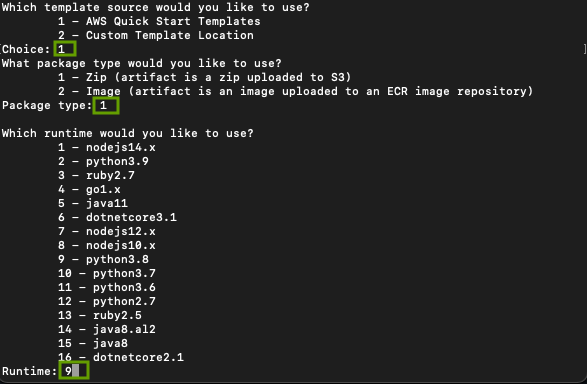
From your terminal, create a new SAM application by running the command sam init and following the prompts.
Take a look at the screenshots below

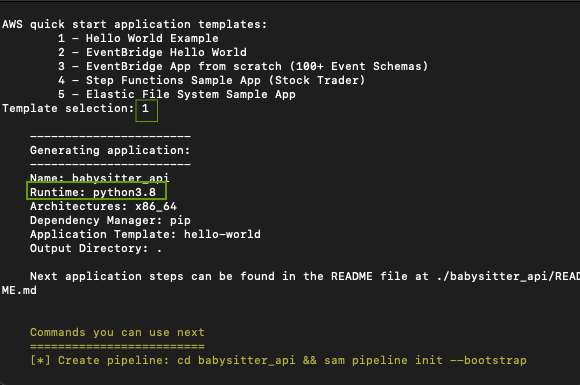
From your favorite IDE, open up the app you just created and let's get started.
You'll probably have a folder structure looking like this. Delete the events folder and rename the hello_world folder to
babysitter.
Add another folder called schema. This folder would contain our graphql schema.
Inside the babysitter folder, create 2 folders called entities and resolvers.

We'll start by installing and configuring AWS Lambda Powertools and the boto3 library.
AWS Lambda Powertools is a suite of utilities for AWS Lambda functions to ease adopting best practices such as tracing, structured logging, custom metrics, and more.
Open up the requirements.txt file located at babysitter_api/babysitter/ and paste these in it
aws-lambda-powertools==1.23.0
boto3
aws-lambda-powertools is a suite of utilities for AWS Lambda functions to ease adopting best practices such as tracing, structured logging, custom metrics, and more.
boto3 is th AWS SDK for python, which can be use to create,configure and manage AWS services.
Open up your terminal from that directory and run the below command to install the libraries.
pip install -r requirements.txt
Next,open up templates.yaml file and enable Tracer and Logger utilities.
Tracer is an opinionated thin wrapper for AWS X-Ray Python SDK.
Logger provides an opinionated logger with output structured as JSON
BEFORE
Globals:
  Function:
    Timeout: 3
AFTER
Globals:
  Function:
    Tracing: Active
    Timeout: 3
    Environment:
      Variables:
        TABLE_NAME: !Ref DynamoDBBabySitterTable
        LOG_LEVEL: DEBUG
        POWERTOOLS_LOGGER_SAMPLE_RATE: 0.1
        POWERTOOLS_LOGGER_LOG_EVENT: true
        POWERTOOLS_SERVICE_NAME: "babysitter_api_service"
        POWERTOOLS_METRICS_NAMESPACE: "babysitter_api"
Under Resources, let's create our cognito user pool and user pool client. We'll use AWS Cognito to authenticate and secure our Graphql endpoints
  ###################
  # COGNITO POOLS
  ##################
  CognitoUserPool:
    Type: AWS::Cognito::UserPool
    Properties:
      UserPoolName: !Sub ${AWS::StackName}-UserPool
      AutoVerifiedAttributes:
        - email
  UserPoolClient:
    Type: AWS::Cognito::UserPoolClient
    Properties:
      ClientName: babysitter_api
      GenerateSecret: false
      UserPoolId: !Ref CognitoUserPool
      ExplicitAuthFlows:
        - ADMIN_NO_SRP_AUTH
Next, add the GraphQL API, API_KEY and GraphQl Schema
  ###################
  # GRAPHQL API
  ##################

  BabySitterApi:
    Type: "AWS::AppSync::GraphQLApi"
    Properties:
      Name: BabySitterApi
      AuthenticationType: "API_KEY"
      AdditionalAuthenticationProviders:
        - AuthenticationType: AMAZON_COGNITO_USER_POOLS
          UserPoolConfig:
            AwsRegion: !Ref AWS::Region
            UserPoolId: !Ref CognitoUserPool
      XrayEnabled: true
      LogConfig:
        CloudWatchLogsRoleArn: !GetAtt RoleAppSyncCloudWatch.Arn
        ExcludeVerboseContent: FALSE
        FieldLogLevel: ALL

  BabySitterApiKey:
    Type: AWS::AppSync::ApiKey
    Properties:
      ApiId: !GetAtt BabySitterApi.ApiId

  BabySitterApiSchema:
    Type: "AWS::AppSync::GraphQLSchema"
    Properties:
      ApiId: !GetAtt BabySitterApi.ApiId
      DefinitionS3Location: 'schema/schema.graphql'
We've set the default authentication type for our api to API_KEY. In our application, we have
one public endpoint(list) and we definitely have to control throttling for that endpoint.
This API_KEY is valid for 7 days after which it has to be regenerated again.
The next authentication type is AMAZON_COGNITO_USER_POOLS which requires a user to be authenticated before accessing the endpoint.
Then we have our graphQL schema in a file called schema.graphql located in the schema folder.
Here's the content of the file.
schema {
            query:Query
            mutation: Mutation
        }

        type Query {
            getUser(username: String!): User!  @aws_api_key @aws_cognito_user_pools


        }

        type Mutation {
            createUser(user:CreateUserInput!):User!
            @aws_cognito_user_pools
            updateUserStatus(username:String!,status:UserAccountStatus!):User
            @aws_cognito_user_pools(cognito_groups: ["admin"])
            updateUser(user:UpdateUserInput!):User!
            @aws_cognito_user_pools
            deleteUser(username:String!):Boolean

        }

        type User @aws_cognito_user_pools {
            id: ID!
            username: String!
            email: AWSEmail!
            type:UserType!
            firstName:String!
            lastName:String!
            address:String!
            about:String!
            longitude:Float!
            latitude:Float!
            status:UserAccountStatus!
            postedJobs:[Job]
            createdOn:AWSTimestamp


        }


        input CreateUserInput {
            id: ID!
            username: String!
            email: AWSEmail!
            type:UserType!
            firstName:String!
            lastName:String!
            address:String!
            about:String!
            longitude:Float!
            latitude:Float!
            status:UserAccountStatus!
            createdOn:AWSTimestamp


        }
        input UpdateUserInput {
            id: ID!
            firstName:String!
            lastName:String!
            address:String!
            about:String!
            longitude:Int!
            latitude:Int!
            status:UserAccountStatus!


        }

        enum UserAccountStatus {
            VERIFIED
            UNVERIFIED
            DEACTIVATED
        }
        enum UserType{
            NANNY
            PARENT
        }
Delete the hello world function and type in this one
  BabySitterFunction:
    Type: AWS::Serverless::Function # More info about Function Resource: https://github.com/awslabs/serverless-application-model/blob/master/versions/2016-10-31.md#awsserverlessfunction
    DependsOn:
      - LambdaLoggingPolicy
    Properties:
      CodeUri: babysitter/
      Handler: app.lambda_handler
      Role: !GetAtt AddBabysitterRole.Arn
      Runtime: python3.8
      Description: Sample Lambda Powertools Direct Lambda Resolver
      Tags:
        SOLUTION: LambdaPowertoolsPython
This function is our direct lambda resolver. It'll serve a the gateway to all the endpoints of our app. We need permissions in-order to get tracer and logger functioning properly. That's why there's a
    DependsOn:
      - LambdaLoggingPolicy
Don't worry, we'll define the LambdaLoggingPolicy below.
This lambda function is called app.py and it's located in a folder called babysitter.
We also assign a role to the function, and this role has a set of policies attached to it. This gives our lambda function permission to carryout a set of actions.
Roles and Policies.
Still under Resource, add these roles and policies.
  ###################
  # IAM PERMISSIONS AND ROLES
  ##################
  AppSyncServiceRole:
    Type: "AWS::IAM::Role"
    Properties:
      AssumeRolePolicyDocument:
        Version: "2012-10-17"
        Statement:
          - Effect: "Allow"
            Principal:
              Service:
                - "appsync.amazonaws.com"
            Action:
              - "sts:AssumeRole"
  InvokeLambdaResolverPolicy:
    Type: "AWS::IAM::Policy"
    Properties:
      PolicyName: "DirectAppSyncLambda"
      PolicyDocument:
        Version: "2012-10-17"
        Statement:
          - Effect: "Allow"
            Action: "lambda:invokeFunction"
            Resource:
              - !GetAtt BabySitterFunction.Arn
      Roles:
        - !Ref AppSyncServiceRole
  LambdaLoggingPolicy:
    Type: "AWS::IAM::Policy"
    Properties:
      PolicyName: LambdaXRayPolicy
      PolicyDocument:
        Version: "2012-10-17"
        Statement:
          -
            Effect: "Allow"
            Action: [
              "xray:PutTraceSegments",
              "xray:PutTelemetryRecords",
              "logs:CreateLogGroup",
              "logs:CreateLogStream",
              "logs:PutLogEvents"
              ]
            Resource: "*"
      Roles:
        - !Ref AddBabysitterRole
  DynamoDBReadPolicy:
    Type: "AWS::IAM::Policy"
    Properties:
      PolicyName: DynamoDBReadPolicy
      PolicyDocument:
        Version: "2012-10-17"
        Statement:
          -
            Effect: "Allow"
            Action: [
              "dynamodb:GetItem",
              "dynamodb:Query",

              ]
            Resource:
              - !GetAtt DynamoDBBabySitterTable.Arn
              - !Join [ '/',[!GetAtt DynamoDBBabySitterTable.Arn,"index/*"]]
      Roles:
        - !Ref AddBabysitterRole

  DynamoDBWritePolicy:
    Type: "AWS::IAM::Policy"
    Properties:
      PolicyName: DynamoDBWritePolicy
      PolicyDocument:
        Version: "2012-10-17"
        Statement:
          -
            Effect: "Allow"
            Action: [
              "dynamodb:PutItem",
              "dynamodb:UpdateItem",
              "dynamodb:ConditionCheckItem",
              "dynamodb:DeleteItem",
            ]
            Resource:
              - !GetAtt DynamoDBBabySitterTable.Arn
              - !Join [ '/',[!GetAtt DynamoDBBabySitterTable.Arn,"index/*"]]
      Roles:
        - !Ref AddBabysitterRole


  AddBabysitterRole:
    Type: AWS::IAM::Role
    Properties:
      AssumeRolePolicyDocument:
        Version: "2012-10-17"
        Statement:
          - Action:
            - "sts:AssumeRole"
            Effect: "Allow"
            Principal:
              Service:
                - "lambda.amazonaws.com"

  RoleAppSyncCloudWatch:
    Type: AWS::IAM::Role
    Properties:
      ManagedPolicyArns:
        - "arn:aws:iam::aws:policy/service-role/AWSAppSyncPushToCloudWatchLogs"
      AssumeRolePolicyDocument:
        Version: 2012-10-17
        Statement:
          - Effect: Allow
            Action:
              - sts:AssumeRole
            Principal:
              Service:
                - appsync.amazonaws.com
####Datasource
The lambda function we created above would be used as our Datasource.Here's how we define it other Resources
  ###################
  # Lambda Direct Data Source and Resolver
  ##################
  BabySitterFunctionDataSource:
    Type: "AWS::AppSync::DataSource"
    Properties:
      ApiId: !GetAtt BabySitterApi.ApiId
      Name: "BabySitterLambdaDirectResolver"
      Type: "AWS_LAMBDA"
      ServiceRoleArn: !GetAtt AppSyncServiceRole.Arn
      LambdaConfig:
        LambdaFunctionArn: !GetAtt BabySitterFunction.Arn
The ServiceRoleArn: !GetAtt AppSyncServiceRole.Arn sets up a trust relationship between this datasource and appsync.
LambdaFunctionArn: !GetAtt BabySitterFunction.Arn points this datasource to the Lambda function we wish to use.
Before we begin creating our resolvers, let's create our DynamoDb table.Still under Resources
 DynamoDBBabySitterTable:
    Type: AWS::DynamoDB::Table
    Properties:
      AttributeDefinitions:
        - AttributeName: PK
          AttributeType: S
        - AttributeName: SK
          AttributeType: S
        - AttributeName: GSI1PK
          AttributeType: S
        - AttributeName: GSI1SK
          AttributeType: S
        - AttributeName: GSI2PK
          AttributeType: S
        - AttributeName: GSI2SK
          AttributeType: S
        - AttributeName: jobStatus
          AttributeType: S
      BillingMode: PAY_PER_REQUEST
      KeySchema:
        - AttributeName: PK
          KeyType: HASH
        - AttributeName: SK
          KeyType: RANGE
      GlobalSecondaryIndexes:
        - IndexName: jobApplications
          KeySchema:
            - AttributeName: GSI1PK
              KeyType: HASH
            - AttributeName: GSI1SK
              KeyType: RANGE
          Projection:
            ProjectionType: ALL
        - IndexName: jobsAppliedTo
          KeySchema:
            - AttributeName: GSI2PK
              KeyType: HASH
            - AttributeName: GSI2SK
              KeyType: RANGE
          Projection:
            ProjectionType: ALL
        - IndexName: getJobsByStatus
          KeySchema:
            - AttributeName: jobStatus
              KeyType: HASH
            - AttributeName: SK
              KeyType: RANGE
          Projection:
            ProjectionType: ALL
I already explained why we need Glabal Secondary Indexes, and why our table is structured this way. Short answer is,
access patterns
Resolvers
Create user
The first resolver we'll create for our api is create_user. It is the gateway into our app.
We want users to be able to create an account.
For a user account to be unique, we apply a unique constraint on 2 attributes
- username
- email No 2 users can have same username and email. We'll use a condition expression ensure uniqueness,then use 2 put request inside a dynamodb transaction api.
DynamoDb transactions provide developers with atomicity, consistency, isolation, and durability (ACID) across tables. It processes requests in batches. If one request in the batch
fails, the whole batch fails. The batch succeeds, when all requests succeed and that's exactly the use case we want.
Inside the resolvers function, create a folder called users and inside of users folder, create a file called create_user_account.py and type in the following code.
from aws_lambda_powertools import Logger, Tracer
import boto3
import os

from aws_lambda_powertools.utilities.data_classes.appsync import scalar_types_utils
from botocore.exceptions import ClientError


tracer = Tracer(service="create_user_resolver")
logger = Logger(service="create_user_resolver")

client = boto3.client('dynamodb')


@tracer.capture_method
def create_user_account(user=None):
    if user is None:
        user = {}
    logger.info(f'items:{user}')
    item: dict = {
        "id": scalar_types_utils.make_id(),
        "username": user['username'],
        "type": user['type'],
        "email": user['email'],
        "firstName": user["firstName"],
        "lastName": user["lastName"],
        "address": user["address"],
        "about": user["about"],
        "longitude": user["longitude"],
        "latitude": user["latitude"],
        "status": user["status"],

    }
    logger.debug(f'items:{item}')

    try:
        response = client.transact_write_items(
            TransactItems=[
                {
                    'Put': {
                        'Item': {
                            'PK': {
                                'S': f'USER#{item["username"]}'
                            },
                            'SK': {
                                'S': f'USER#{item["username"]}'
                            },
                            'GSI2PK': {
                                'S': f'USER#{item["username"]}'

                            },
                            'GSI2SK': {
                                'S': f'USER#{item["username"]}'

                            },
                            'id': {
                                'S': item["id"]
                            },
                            'username': {
                                'S': item["username"]
                            },
                            'type': {
                                'S': item["type"]
                            },
                            'email': {
                                'S': item['email']
                            },
                            'firstName': {
                                'S': item['firstName']
                            },
                            'lastName': {
                                'S': item['lastName']
                            },
                            'address': {
                                'S': item['address']
                            },
                            'about': {
                                'S': item['about']
                            },
                            'longitude': {
                                'N': f"{item['longitude']}"
                            },
                            'latitude': {
                                'N': f"{item['latitude']}"
                            },
                            'status': {
                                'S': item['status']
                            },
                            'createdOn': {
                                'N': f'{scalar_types_utils.aws_timestamp()}'
                            }

                        },
                        'TableName': os.environ["TABLE_NAME"],
                        'ConditionExpression': "attribute_not_exists(PK)"

                    },

                },
                {
                    'Put': {
                        'Item': {
                            'PK': {
                                'S': f'USEREMAIL#{item["email"]}'
                            },
                            'SK': {
                                'S': f'USEREMAIL#{item["email"]}'
                            },

                            'id': {
                                'S': item["id"]
                            },
                            'username': {
                                'S': item["username"]
                            },

                            'email': {
                                'S': item['email']
                            },

                        },
                        'TableName': os.environ["TABLE_NAME"],
                        'ConditionExpression': "attribute_not_exists(PK)"

                    }
                }
            ]
        )
        tracer.put_annotation("CREATE_USER_TRANSACTION", "SUCCESS")
        logger.debug(f'transaction response is {response}')
        return item
    except ClientError as err:
        logger.debug(f"Error occurred during transact write{err.response}")
        logger.debug(f"Error occurred during transact write{err.response['Error']}")
        if err.response['Error']['Code'] == 'TransactionCanceledException':
            if err.response['CancellationReasons'][0]['Code'] == 'ConditionalCheckFailed':
                # TODO make exception handling DRY
                errObj = Exception("Username already exist")
                raise errObj
            elif err.response['CancellationReasons'][1]['Code'] == 'ConditionalCheckFailed':
                # TODO make exception handling DRY
                errObj = Exception("Email already exist")

                raise errObj

        else:
            raise err
Firstly, we initiate tracer, logger and the boto3 client library.Then we annotate the function
with @tracer.capture_method to capture function metadata.
Next, we have the method transact_write_items which takes 2 put requests, one for username and the other for email.
This transaction is wrapped in a try except clause, so that we can catch relevant errors and send back to the client app.
Errors like
- username already exist
- email already exist
Next, create a file called user.py inside of resolvers folder and type in the following code
from aws_lambda_powertools import Logger, Tracer
from aws_lambda_powertools.event_handler.appsync import Router
from resolvers.users.create import createUser

logger = Logger(child=True)
router = Router()


@router.resolver(type_name="Mutation", field_name="createUser")
def create_user(user=None):
    if user is None:
        user = {}
    return createUser(user)
In the above code, we initialize the router and logger classes. Because our app has multiple resolvers, we use the router feature to
separate files and ease maintenance.
We use @router.resolver() decorator to make our functions match graphQL types and fields.
We now have to import this class(create.py) in app.py lambda function.
In app.py file, type in the following code
from aws_lambda_powertools import Logger, Tracer
from aws_lambda_powertools.logging import correlation_paths
from aws_lambda_powertools.event_handler import AppSyncResolver

from resolvers import  user

tracer = Tracer(service="lambda_function")
logger = Logger(service="lambda_function")

app = AppSyncResolver()
app.include_router(user.router)


@logger.inject_lambda_context(correlation_id_path=correlation_paths.APPSYNC_RESOLVER, log_event=True)
@tracer.capture_lambda_handler
def lambda_handler(event, context):
    logger.debug(f'event is {event}')
    return app.resolve(event, context)
Take note of the way we initialize AppSyncResolver and include the user.router we defined in the previous class.
Before running our app, we have to add a resolver resource, under Resource in template.yaml.
  CreateUserResolver:
    Type: "AWS::AppSync::Resolver"
    Properties:
      ApiId: !GetAtt BabySitterApi.ApiId
      TypeName: "Mutation"
      FieldName: "createUser"
      DataSourceName: !GetAtt BabySitterFunctionDataSource.Name
Take note of the TypeName and FieldName which corresponds to what we have in the GraphQl Schema.
Also, the DataSourceName that points to our Lambda Datasource.
In-order to run this app the SAM Accelerate way, we use the command
sam sync --stack-name babysitter_api
The sam sync command with no options deploys or updates all infrastructure and code like the sam deploy command.
However, unlike sam deploy, sam sync bypasses the AWS CloudFormation changeset process.
First, sam sync builds the code using the sam build command and then the application is synchronized to the cloud.
Once your application successfully deploys, log into the aws console, search and open up cognito from the search bar.
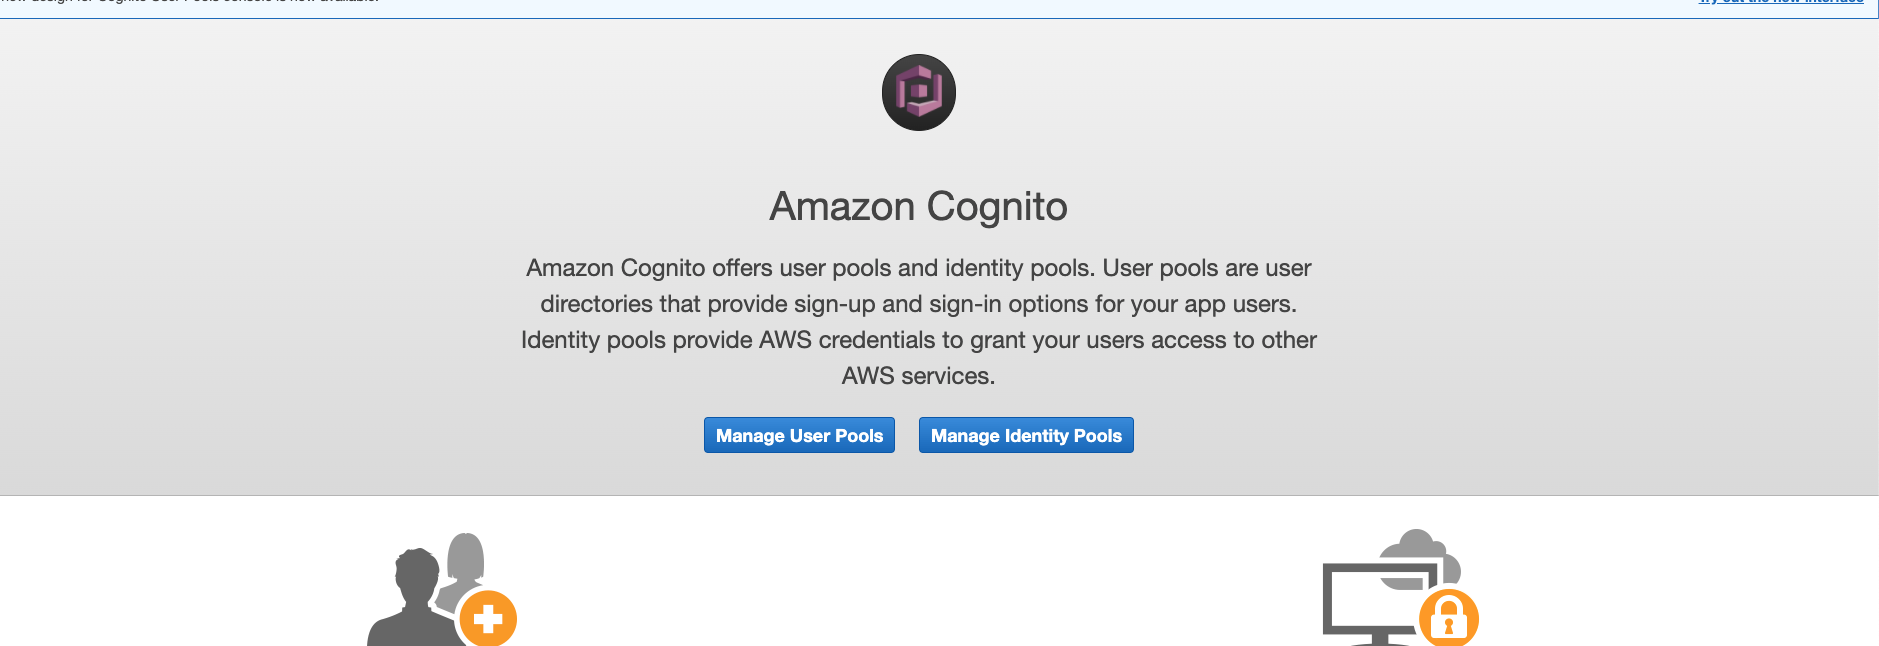
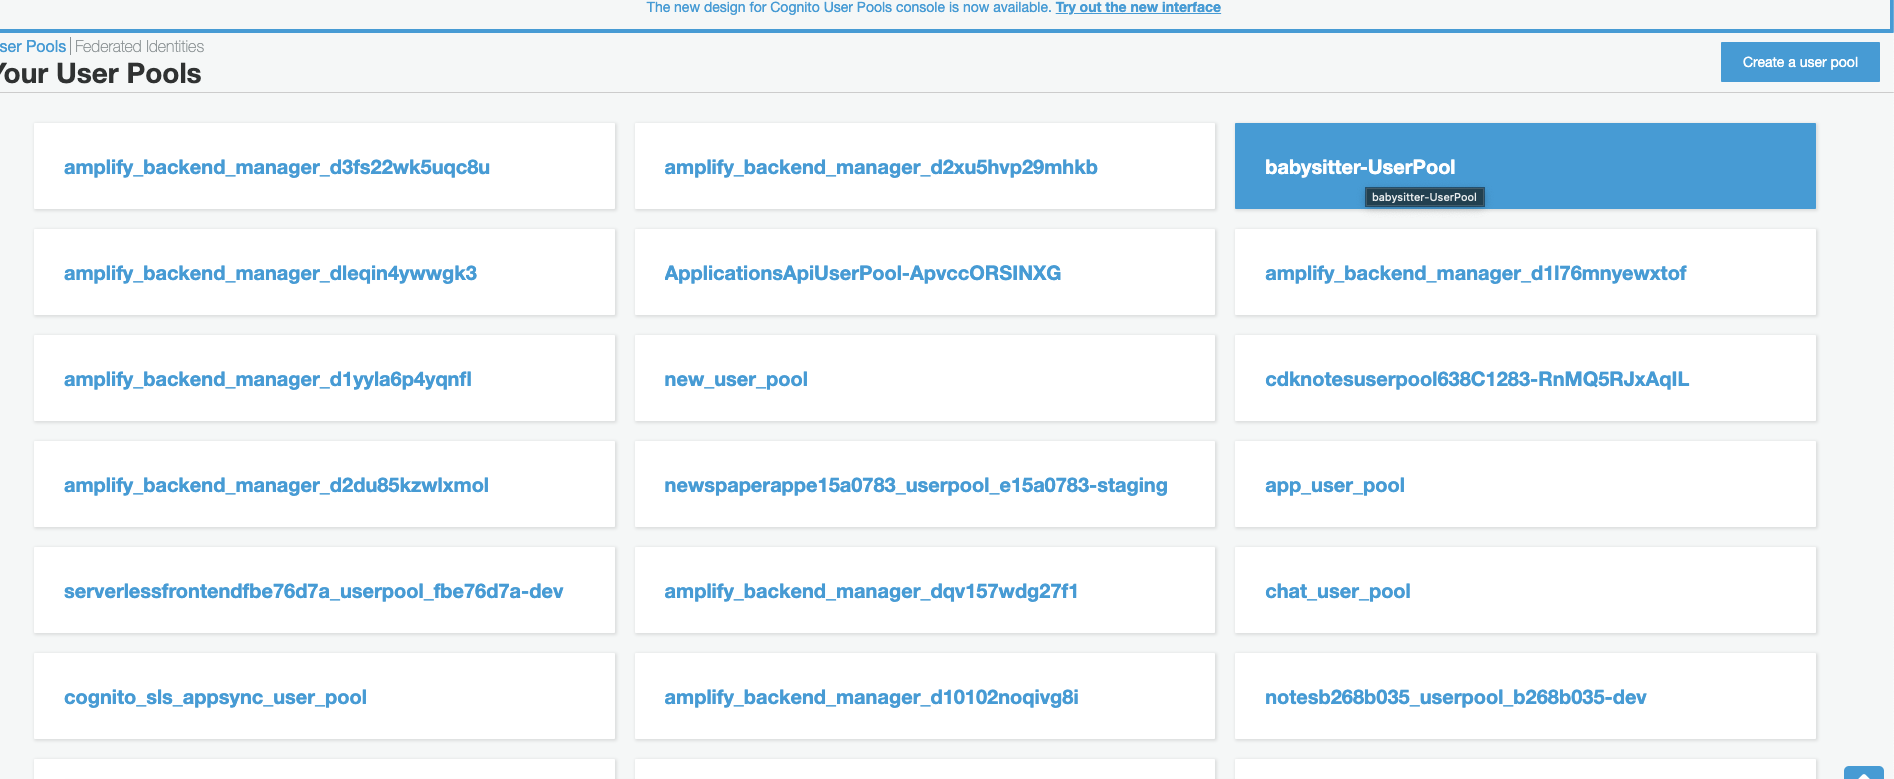
Click on Manage User Pools and then click on your app's user pool. Mine's babysitter-UserPool.
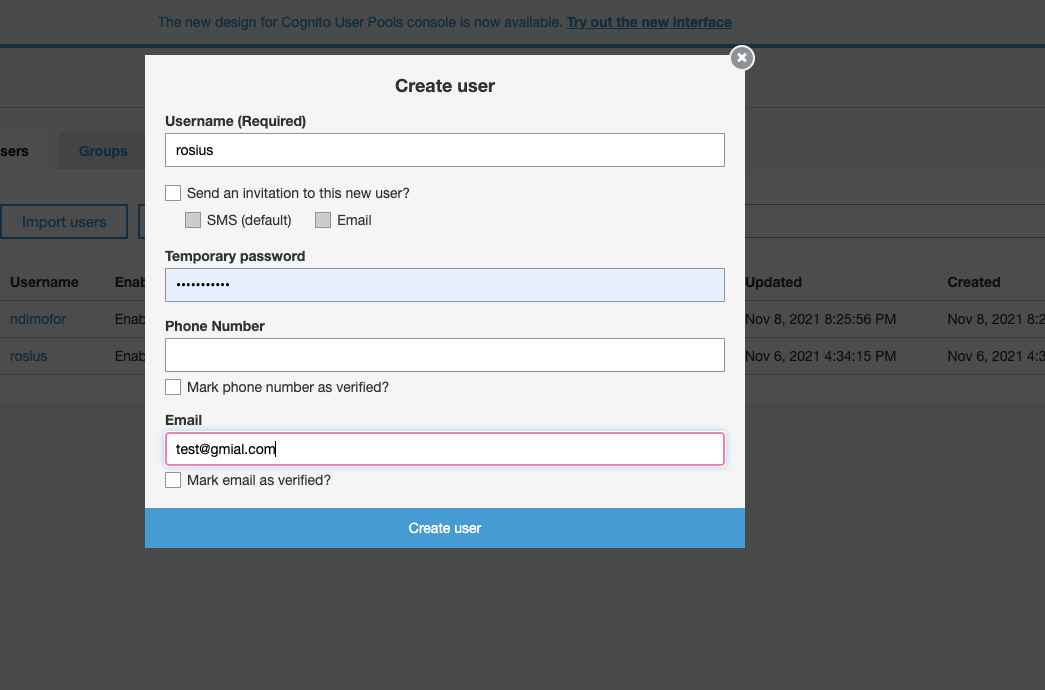
Click on Users and groups on the left, then create user.
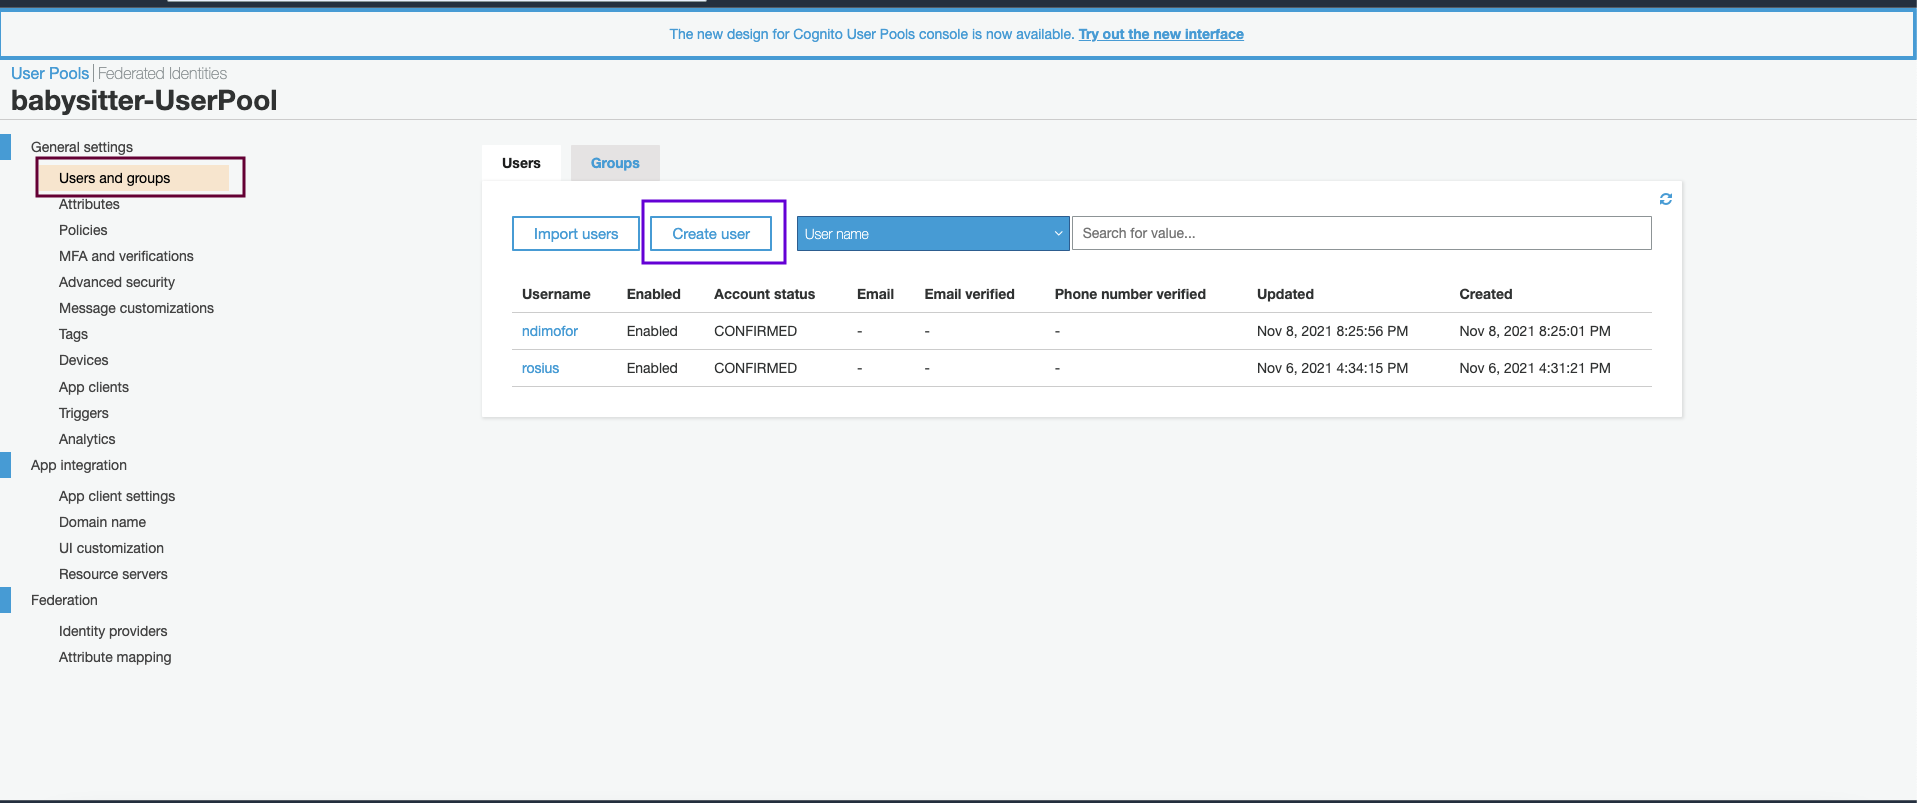
Fill in the fields, like i've done in the screenshot below and click create user.
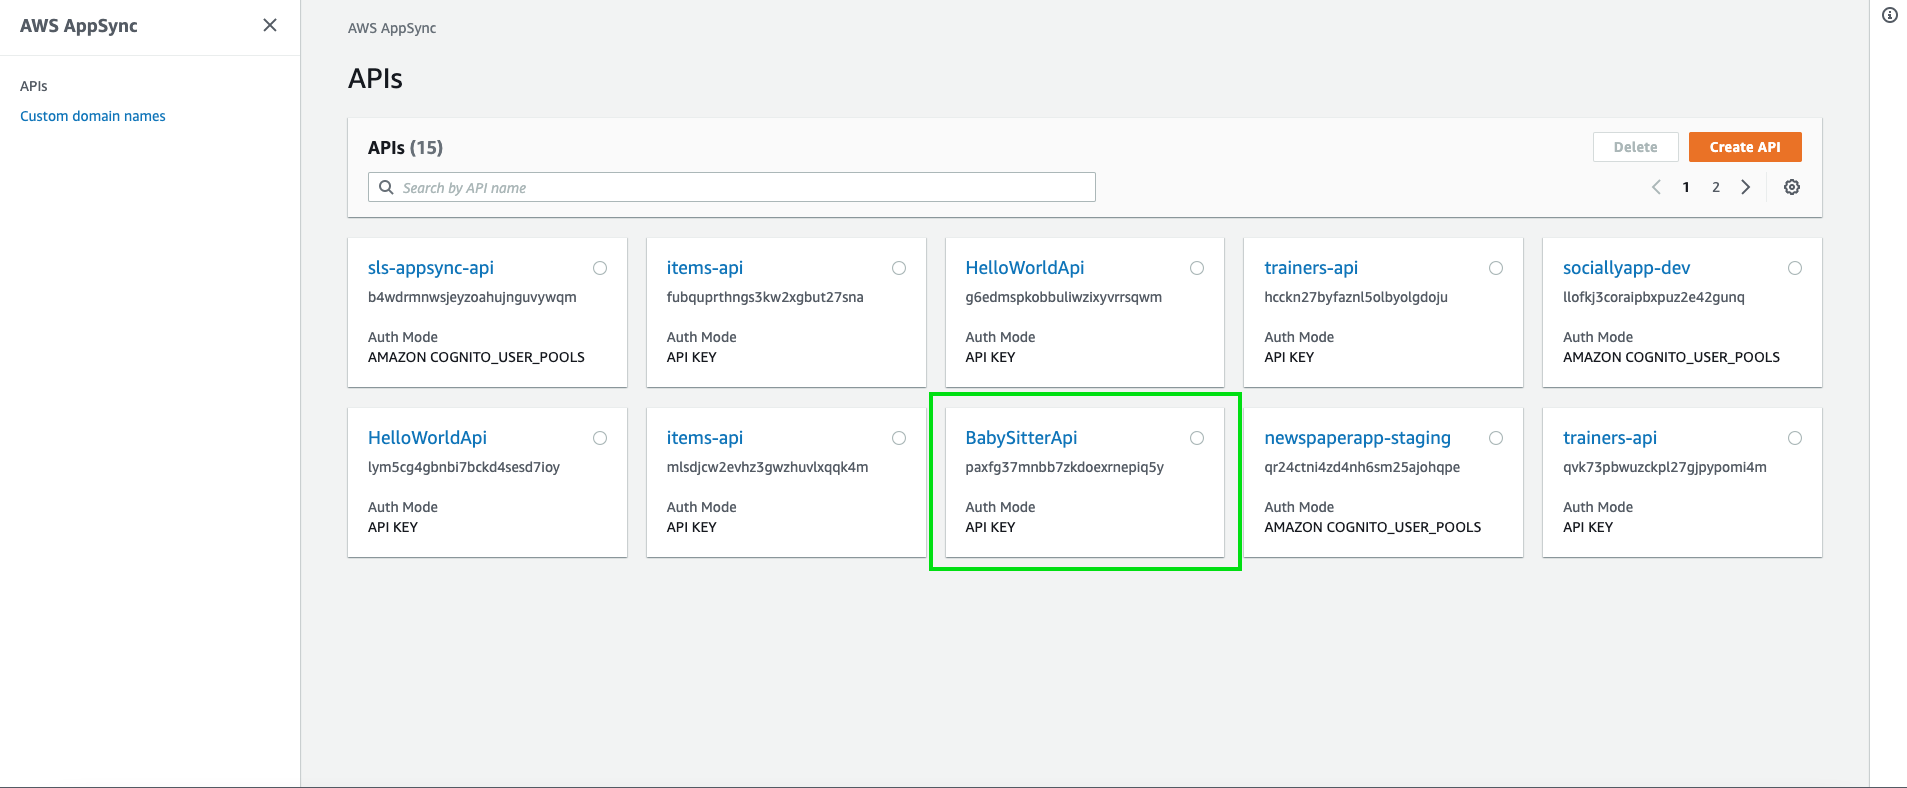
Search and open up appsync from the search bar.
Click and open up your api.
Click on queries on the left hand side menu, make sure API key is selected as the authorization provider,
fill in the createUser mutation and run it.
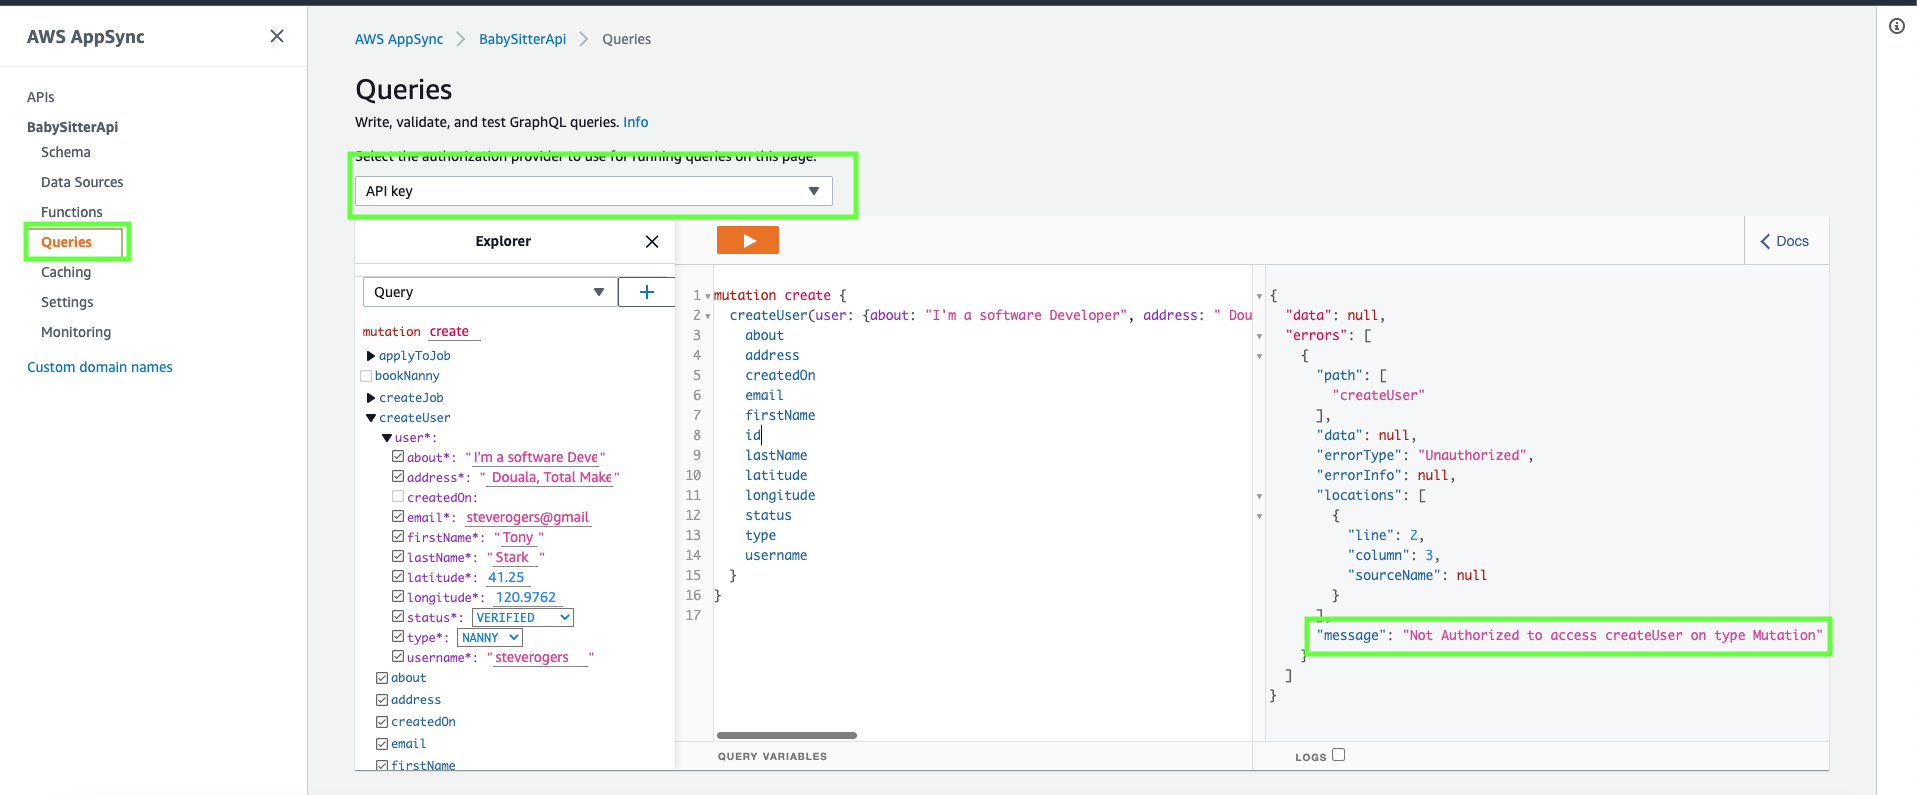
Because we restricted our endpoint to authenticated users only(by adding the @aws_cognito_user_pools decorator to the endpoint), you'll get an Unauthorized errorType when
you access the endpoint as an unauthenticated user.
Click on API key and select your cognito user pools ID.
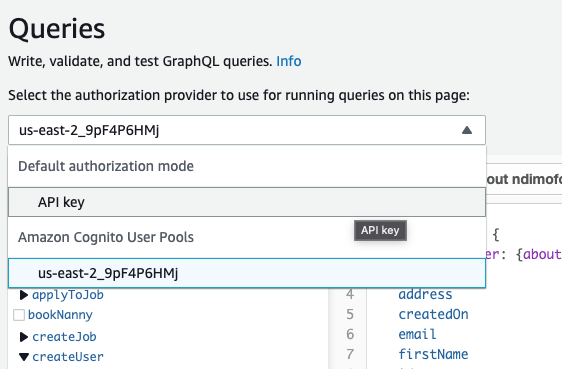
Sign in using the user credentials you created in the cognito screen above.
Now Run the Mutation again.
If everything goes successfully, you should see output similar to this.
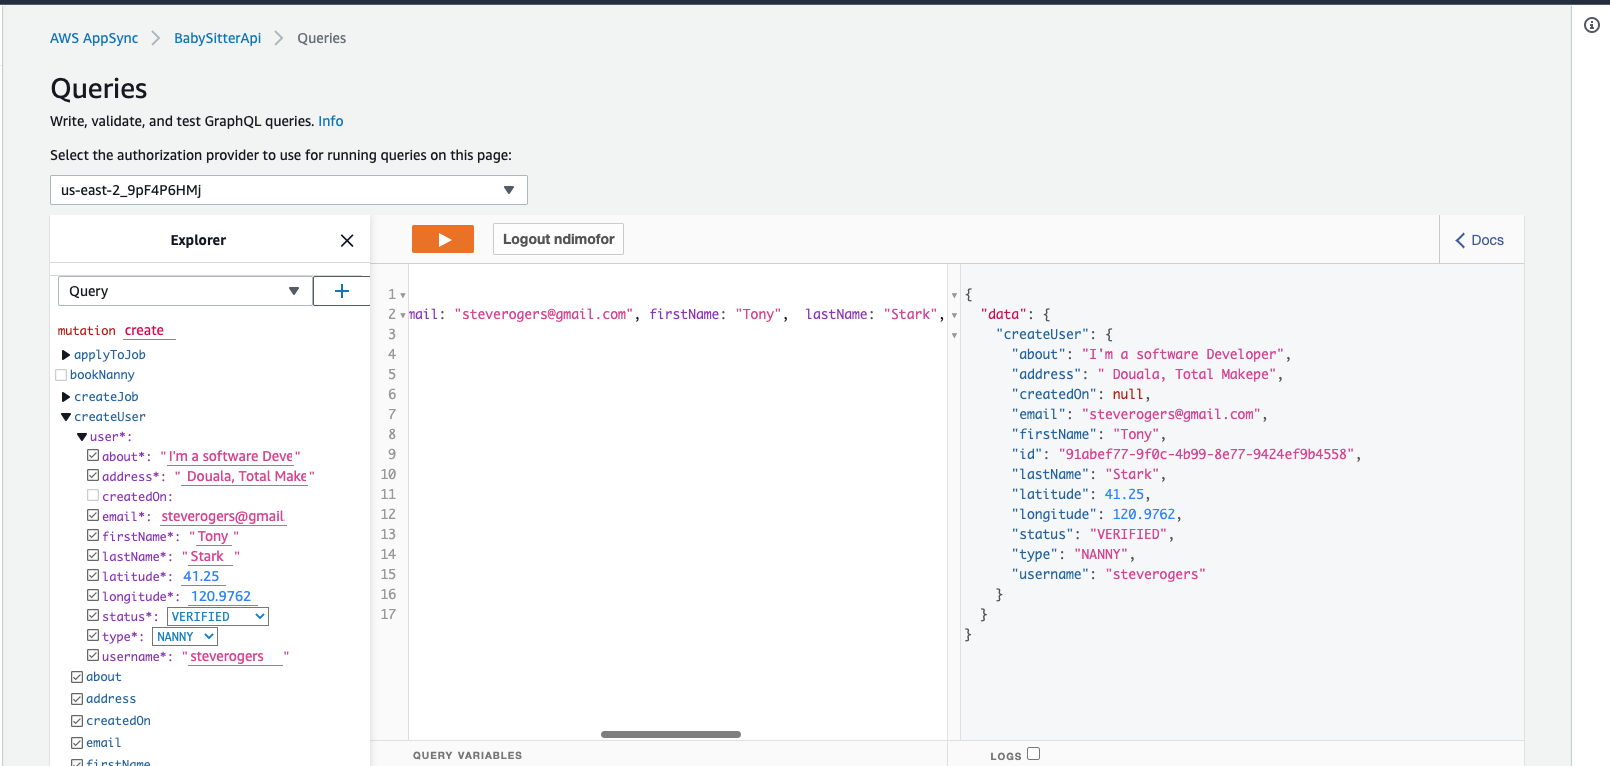
If you run the Mutation again, you should see this output
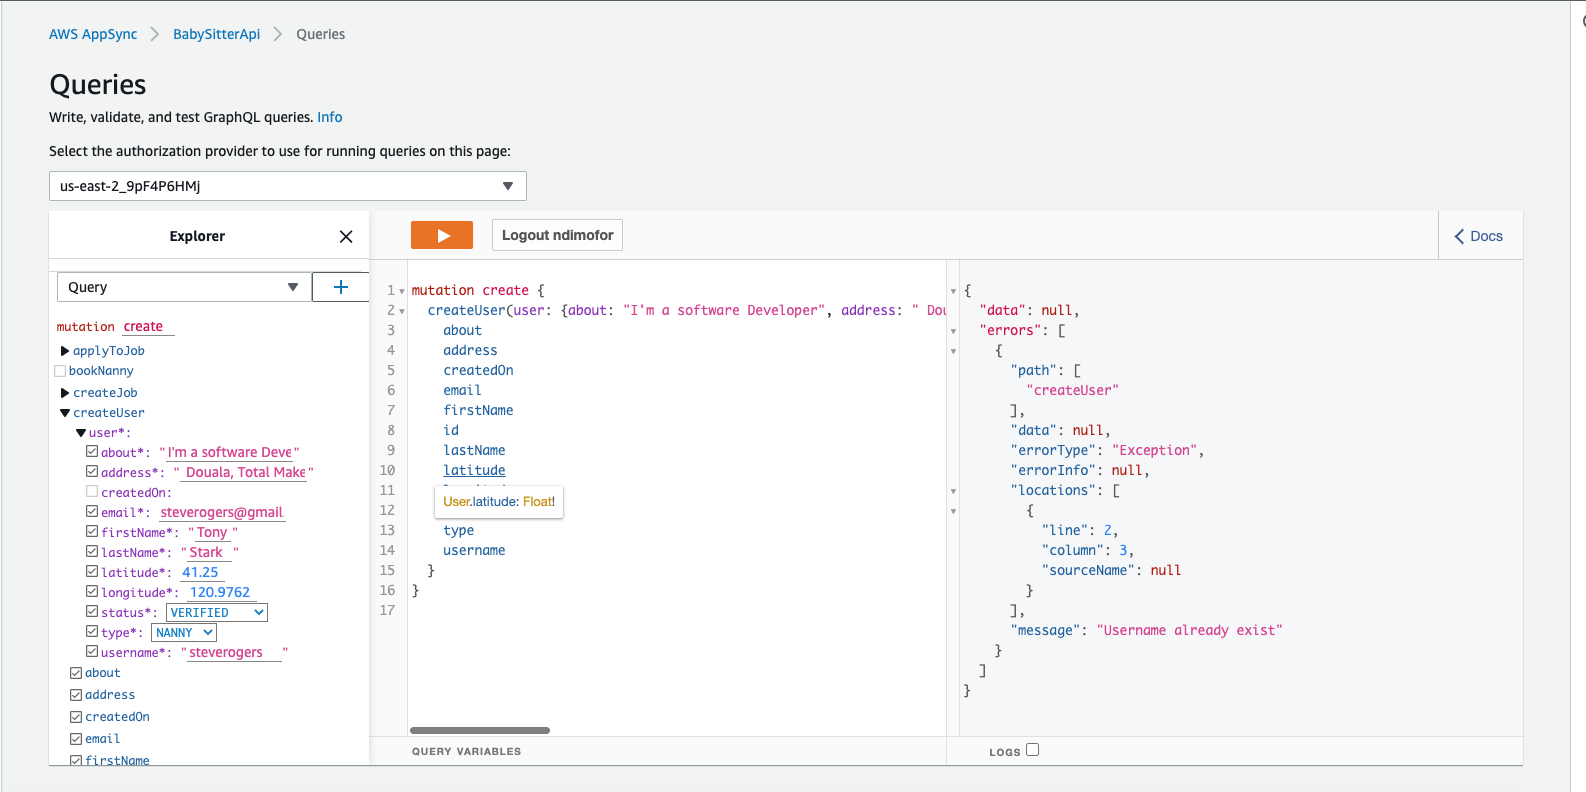
If you run into any issues, don't forget to open up cloudwatch and checkout the lambda logs. Remember we are using logger and tracer to debug our endpoints. Be sure to make good use of them.
Update User
- PK=
USER#<Username> - SK=
USER#<Username
One of the access patterns of our application, is to give the user the possibility to update their accounts.
There's just a couple of attributes they are allowed to update though.
        "firstName",
        "lastName",
        "address",
        "about",
        "longitude",
        "latitude",
They aren't allowed to update their account status. That access point would be reserved for the admin only.
Other attributes they can't update are Username, email, UserType.
An account can only be updated, if the primary key already exists. So we'll use
dynamoDB's ConditionExpression="attribute_exists(PK)" to ensure they account exists before updating.
Create a file called update_user_account.py inside resolvers/users/ directory and type in the following code.
from aws_lambda_powertools import Logger, Tracer
import boto3
import os


from botocore.exceptions import ClientError

dynamodb = boto3.resource("dynamodb")
tracer = Tracer(service="update_user")
logger = Logger(service="update_user")

table = dynamodb.Table(os.environ["TABLE_NAME"])


@tracer.capture_method
def updateUser(user=None):
    if user is None:
        user = {}
    logger.info(f'items:{user}')

    item: dict = {

        "username": user['username'],
        "email": user['email'],
        "firstName": user["firstName"],
        "lastName": user["lastName"],
        "address": user["address"],
        "about": user["about"],
        "longitude": user['longitude'],
        "latitude": user['latitude'],

    }
    logger.debug(f'items:{item}')

    try:
        response = table.update_item(
            Key={
                'PK': f'USER#{item["username"]}',
                'SK': f'USER#{item["username"]}'
            },
            ConditionExpression="attribute_exists(PK)",
            UpdateExpression="set firstName= :firstName,lastName= :lastName,address= :address,about= :about,"
                             "longitude= :longitude,latitude= :latitude",

            ExpressionAttributeValues={

                ":firstName": item['firstName'],
                ":lastName": item['lastName'],
                ":address": item['address'],
                ":about": item['about'],
                ":longitude": item['longitude'],
                ":latitude": item['latitude'],

            },
            ReturnValues="ALL_NEW"
        )

        logger.debug({' update response': response['Attributes']})
        return response['Attributes']

    except ClientError as err:
        logger.debug(f"Error occurred during user update{err.response['Error']}")
        raise err
Take note of the ConditionExpression, the UpdateExpression and the ExpressionAttributeValues.
Add the updateUser endpoint to the resolvers/user.py file.
@router.resolver(type_name="Mutation", field_name="updateUser")
def update_user(user=None):
    if user is None:
        user = {}
    return updateUser(user)
Then add the Resolver under Resources in template.yaml.
  UpdateUserResolver:
    Type: "AWS::AppSync::Resolver"
    Properties:
      ApiId: !GetAtt BabySitterApi.ApiId
      TypeName: "Mutation"
      FieldName: "updateUser"
      DataSourceName: !GetAtt BabySitterFunctionDataSource.Name
Run the command sam sync --stack-name babysitter and build and synchronize the application.
Let's test the endpoint. Same as above, navigate to appsync console, open up the babysitter app, click on Queries and run the
updateUser Mutation.
You'll hit an error like this.
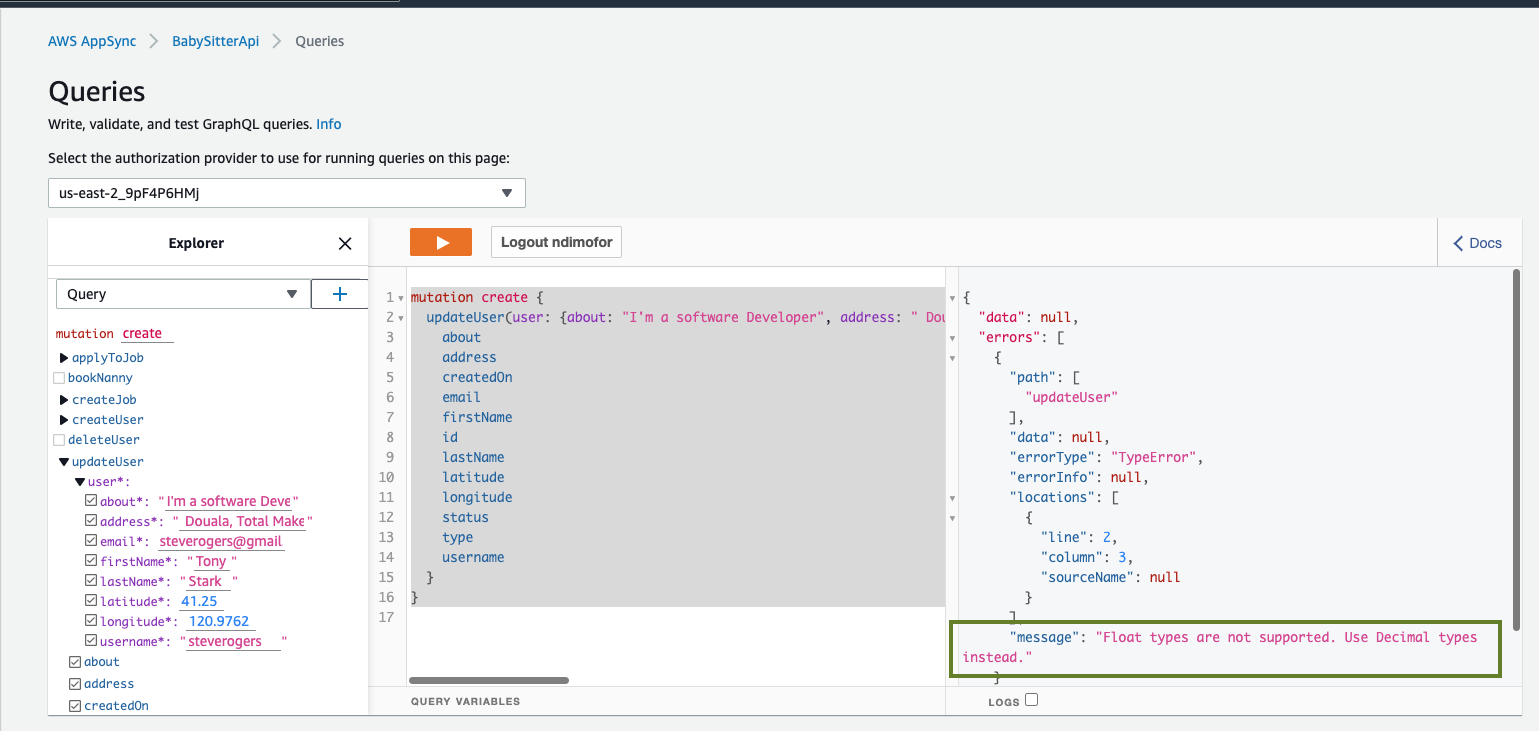
Float Types are not supported.Use Decimal types instead
This issue is related to the longitude and latitude values. They are float values and aren't supported by DynamoDB yet. So we have to convert them to Decimal types.
Navigate to update_user_account.py file and add the Decimal import
from decimal import Decimal
Next, convert this
"longitude": user['longitude'],
 "latitude": user['latitude'],
Into this
 "longitude": Decimal(f"{user['longitude']}"),
  "latitude": Decimal(f"{user['latitude']}"),
So your item dictionary now looks like this
   item: dict = {

        "username": user['username'],
        "email": user['email'],
        "firstName": user["firstName"],
        "lastName": user["lastName"],
        "address": user["address"],
        "about": user["about"],
        "longitude": Decimal(f"{user['longitude']}"),
        "latitude": Decimal(f"{user['latitude']}"),

    }
Here's where you'll witness the true power of SAM ACCELERATE.
When you update a function this way, you don't have to deploy the complete application using
sam sync --stack-name babysitter anymore.
Using the command sam sync --stack-name babysitter --code instructs AWS SAM to sync all the code resources in the stack
in about 7 seconds.
Please go ahead the try it out.
The SAM team went wild with this one.😁
So you can build and test out new features of your app real quick.
Another sweet command is Sam sync watch.
The sam sync --watch option tells AWS SAM to monitor for file changes and automatically synchronize when changes are detected.
If the changes include configuration changes, AWS SAM performs a standard synchronization equivalent to the sam sync command.
If the changes are code only, then AWS SAM synchronizes the code with the equivalent of the sam sync --code command.
The first time you run the sam sync command with the --watch flag, AWS SAM ensures that the latest code and infrastructure are in the cloud. It then monitors for file changes until you quit the command:
sam sync --stack-name babysitter --watch
After syncing your app, go ahead and test out the updateUser mutation once more and confirm that it works as expect.
Moving Forward
From this point on, we'll be looking at the code only and you'll be doing the testing in appsync and making sure everything works well.
Remember that the repo has code, which you can always jump back to, incase you missed something.
Get User Endpoint.
- PK=
USER#<Username> - SK=
USER#<Username>
- Create a file called
get_user.pyinsideresolver/usersand type in the following code.
from aws_lambda_powertools import Logger, Tracer
import boto3
import os

from botocore.exceptions import ClientError
from entities.User import User

dynamodb = boto3.resource("dynamodb")
tracer = Tracer(service="get_user")
logger = Logger(service="get_user")

table = dynamodb.Table(os.environ["TABLE_NAME"])


@tracer.capture_method
def getUser(username: str = ""):
    logger.debug(f'username is:{username}')

    try:
        response = table.get_item(
            Key={
                'PK': f'USER#{username}',
                'SK': f'USER#{username}'
            }
        )
        logger.debug("users dict {}".format(response))
        if response['Item'] is None:
            logger.debug("response is null")
            return {}
        else:
            logger.debug("response is not null")
            user = User(response['Item'])

            return user.user_dict()
We use DynamoDb's get_item function to get a particular user with identical PK and SK.
2) Add the endpoint to user.py file located at resolvers/user_resolver.py
@router.resolver(type_name="Query", field_name="getUser")
def get_user(username: str = ""):
    return getUser(username)
- Add Resolver to Resources in
template.yml
  GetUserResolver:
    Type: "AWS::AppSync::Resolver"
    Properties:
      ApiId: !GetAtt BabySitterApi.ApiId
      TypeName: "Query"
      FieldName: "getUser"
      DataSourceName: !GetAtt BabySitterFunctionDataSource.Name
Go ahead and deploy your app.
If you had sam sync --stack-name babysitter --watch running, once you hit save, the application synchronizes with the cloud.
Go ahead and test to make sure it works well.
Update User Status
While building this api, i assumed the system admin would at some point need a level of control over normal users(PARENT and NANNY) of the system.
So admins have the possibility to change a users account status to VERIFIED, UNVERIFIED OR DEACTIVATED.
If you plan on expanding this application, you can restrict a users access to the system,
based on the status of their account.That might be a good challenge for you.
As another challenge, try implementing this endpoint. I don't mean to disrespect a boss like you with this joke of a challenge.
I know you'll crush it with your left hand. 😤
Remember the solution is in the repo.
Update graphql schema
schema {
            query:Query
            mutation: Mutation
        }

        type Query {
            getUser(username: String!): User!  @aws_api_key @aws_cognito_user_pools
            listUser:[User]! @aws_cognito_user_pools(cognito_groups: ["admin","parent"])
            listAllJobs(jobStatus:String!):[Job]! @aws_cognito_user_pools(cognito_groups:["admin","nanny"])
            listJobsPerParent:User! @aws_cognito_user_pools(cognito_groups:["admin","parent"])
            listApplicationsPerJob(jobId:String!):Job!
            @aws_cognito_user_pools(cognito_groups:["admin","parent"])
            listJobsAppliedTo(username:String!):User!
            @aws_cognito_user_pools(cognito_groups:["admin","parent"])

        }

        type Mutation {
            createUser(user:CreateUserInput!):User!
            @aws_cognito_user_pools
            updateUserStatus(username:String!,status:UserAccountStatus!):User
            @aws_cognito_user_pools(cognito_groups: ["admin"])
            updateUser(user:UpdateUserInput!):User!
            @aws_cognito_user_pools
            deleteUser(username:String!):Boolean
            createJob(job:CreateJobInput!):Job!
            @aws_cognito_user_pools(cognito_groups: ["parent"])
            applyToJob(application:CreateJobApplicationInput!):JobApplication!
            @aws_cognito_user_pools(cognito_groups: ["nanny"])
            bookNanny(username:String!,jobId:String!,applicationId:String!, jobApplicationStatus:JobApplicationStatus!):Boolean
            @aws_cognito_user_pools(cognito_groups: ["parent"])
        }

        type User @aws_cognito_user_pools {
            id: ID!
            username: String!
            email: AWSEmail!
            type:UserType!
            firstName:String!
            lastName:String!
            address:String!
            about:String!
            longitude:Float!
            latitude:Float!
            status:UserAccountStatus!
            postedJobs:[Job]
            createdOn:AWSTimestamp


        }
       type Job @aws_cognito_user_pools{
            id:ID!
            jobType:JobType!
            username:String!
            startDate:AWSDate!
            endDate:AWSDate!
            startTime:AWSTime!
            endTime:AWSTime!
            longitude:Float!
            latitude:Float!
            address:String!
            city:String!
            cost:Int!
            jobStatus:JobStatus!
            applications:[JobApplication]

       }
       type JobApplication @aws_cognito_user_pools{
           id:ID!
           username:String!
           jobId:String!
           jobApplicationStatus:JobApplicationStatus!
           createdOn:AWSTimestamp!
       }

        input CreateJobApplicationInput{
            id:ID!
           username:String!
           jobId:String!
           jobApplicationStatus:JobApplicationStatus!
           createdOn:AWSTimestamp
        }

        input CreateJobInput{
            id:ID!
            jobType:JobType!
            startDate:AWSDate!
            endDate:AWSDate!
            startTime:AWSTime!
            endTime:AWSTime!
            longitude:Float!
            latitude:Float!
            jobStatus:JobStatus!
            address:String!
            city:String!
            cost:Int!
            username:String!

        }

        input CreateUserInput {
            username: String!
            email: AWSEmail!
            type:UserType!
            firstName:String!
            lastName:String!
            address:String!
            about:String!
            longitude:Float!
            latitude:Float!
            status:UserAccountStatus!
            createdOn:AWSTimestamp


        }
        input UpdateUserInput {
            username: String!
            email: AWSEmail!
            firstName:String!
            lastName:String!
            address:String!
            about:String!
           longitude:Float!
            latitude:Float!

        }

        enum UserAccountStatus {
            VERIFIED
            UNVERIFIED
            DEACTIVATED
        }
        enum UserType{
            NANNY
            PARENT
        }
        enum JobType{
            BABYSITTING
            CLEANING
            RUNNING_ERRANDS

        }
        enum JobStatus{
            OPEN
            CLOSED
        }
        enum JobApplicationStatus{
            PENDING
            DECLINED
            ACCEPTED

        }
Create Job Endpoint
This endpoint is reserved for PARENTS only.It allows parents to put up job offers, which can be applied to by nanny's. Here's how the schema looks like
            createJob(job:CreateJobInput!):Job!
            @aws_cognito_user_pools(cognito_groups: ["parent"])
It takes as input, a couple of attributes alongside, the start and end dates, the address and geographical location(longitude and latitude),
the cost, and also, if the job requires the nanny to come in daily, or stay in.
Endpoint
- PK=
USER#<Username> - SK=
JOB#<JobId>
- Create file called
create.pyin the directorybabysitter/resolvers/jobs/and type in the following code
from aws_lambda_powertools import Logger, Tracer
import boto3
import os

from decimal import *
from aws_lambda_powertools.utilities.data_classes.appsync import scalar_types_utils
from botocore.exceptions import ClientError

dynamodb = boto3.resource("dynamodb")

logger = Logger(service="create_job")
tracer = Tracer(service="create_job")

table = dynamodb.Table(os.environ["TABLE_NAME"])


# https://stackoverflow.com/questions/63026648/errormessage-class-decimal-inexact-class-decimal-rounded-while
@tracer.capture_method
def createJob(job=None):
    if job is None:
        job = {}
    item = {
        "id": scalar_types_utils.make_id(),
        "jobType": job['jobType'],
        "username": job['username'],
        "startDate": scalar_types_utils.aws_date(),
        "endDate": scalar_types_utils.aws_date(),
        "startTime": scalar_types_utils.aws_time(),
        "endTime": scalar_types_utils.aws_time(),
        "jobStatus": job['jobStatus'],
        "longitude": Decimal(f"{job['longitude']}"),
        "latitude": Decimal(f"{job['latitude']}"),
        "address": job['address'],
        "city": job["city"],
        "cost": job["cost"],

    }

    logger.debug(f'job input :{item}')

    try:

        response = table.put_item(
            Item={
                "PK": f"USER#{item['username']}",
                "SK": f"JOB#{item['id']}",
                "GSI1PK": f"JOB#{item['id']}",
                "GSI1SK": f"JOB#{item['id']}",
                "GSI2SK": f"JOB#{item['id']}",
                **item
            }
        )

        logger.info(" create job item response {}".format(response))
        return item


    except ClientError as err:
        logger.debug(f"Error occurred during job creation {err.response['Error']}")
        raise err
The create_job method receives a job dictionary, containing job attributes and puts them into our
dynamodb table.
- Create a file called
job.pyin the directorybabysitter/resolversand add the create job endpoint. This file would contain all job endpoints.
from decimal import Decimal
from typing import Dict

from aws_lambda_powertools import Logger, Tracer
from aws_lambda_powertools.event_handler.appsync import Router
from resolvers.jobs.create_job import create_job as createJob


logger = Logger(child=True)
router = Router()


@router.resolver(type_name="Mutation", field_name="createJob")
def create_job(job=None) -> Dict[str, Decimal]:
    if job is None:
        job = {}
    return createJob(job)
Take note of the resolvers type_name and field_name.
- Add
create_jobResolver to Resources in template.yml
  CreeateJobResolver:
    Type: "AWS::AppSync::Resolver"
    Properties:
      ApiId: !GetAtt BabySitterApi.ApiId
      TypeName: "Mutation"
      FieldName: "createJob"
      DataSourceName: !GetAtt BabySitterFunctionDataSource.Name
List All Jobs
As a nanny, you'll definitely wish to see all available jobs around you.And better still,
received notifications, when there's an available job around you.
In this section, we'll only implement the retrieval of all available jobs. In an updated version
of the api, i'll love to use the user's current location(longitude and latitude), alongside each
jobs current location and get only jobs which are in close proximity to the user.
We already get these attributes when creating both users and jobs. So all that's left is the calculation. For precision, maybe we won't use the user's saved current location and instead go with their location at that exact point in time.
We created a GSI called getJobByStatus to retrieve jobs based on it's status.
Here's how the code looks like
        response = table.query(
            IndexName="getJobsByStatus",
            KeyConditionExpression=Key('jobStatus').eq(jobStatus),
            ScanIndexForward=False

        )

        logger.info(f'response is {response["Items"]}')
        jobs = [Job(item).job_dict() for item in response['Items']]

        logger.debug({"jobs list is": jobs})
        return jobs
We've created a job entity class which maps the attributes from dynamodb to a dictionary in the class.
class Job:
    def __init__(self, item=None):
        if item is None:
            item = {}
        self.id = item["id"]
        self.jobType = item['jobType']
        self.username = item['username']
        self.startDate = item['startDate']
        self.endDate = item['endDate']
        self.startTime = item['startTime']
        self.endTime = item['endTime']
        self.longitude = item['longitude']
        self.latitude = item['longitude']
        self.address = item['address']
        self.city = item['city']
        self.cost = item['cost']
        self.jobStatus = item['jobStatus']

    def job_dict(self):
        return {
            "id": self.id,
            "jobType": self.jobType,
            "username": self.username,
            "startDate": self.startDate,
            "endDate": self.endDate,
            "startTime": self.startTime,
            "endTime": self.endTime,
            "longitude": self.longitude,
            "latitude": self.latitude,
            "address": self.address,
            "city": self.city,
            "cost": self.cost,
            "jobStatus": self.jobStatus

        }

    def all_jobs(self, jobs=None):
        if jobs is None:
            jobs = []
        return {
            "jobs": jobs
        }

    def job_application_dict(self, applications=None):
        if applications is None:
            applications = []
        return {
            "id": self.id,
            "jobType": self.jobType,
            "username": self.username,
            "startDate": self.startDate,
            "endDate": self.endDate,
            "startTime": self.startTime,
            "endTime": self.endTime,
            "longitude": self.longitude,
            "latitude": self.latitude,
            "address": self.address,
            "city": self.city,
            "cost": self.cost,
            "jobStatus": self.jobStatus,
            "applications": applications

        }
Please go ahead to add the list_job_by_status endpoint and test to see how it all comes together.
As always, the code is available for reference.
Apply to Job
After viewing a list of available jobs, the next step is applying to that job.This endpoint is reserved for nannies only.
applyToJob(application:CreateJobApplicationInput!):JobApplication!
@aws_cognito_user_pools(cognito_groups: ["nanny"])
The PK and SK for this endpoint are
PK= JOB#<JobId>#APPLICATION#<applicationId>
SK = JOB#<JobId>#APPLICATION#<applicationId>
Here's the complete code
from aws_lambda_powertools import Logger,Tracer
import boto3
import os
from decimal import *
from aws_lambda_powertools.utilities.data_classes.appsync import scalar_types_utils
from botocore.exceptions import ClientError

dynamodb = boto3.resource("dynamodb")

logger = Logger(service="apply_to_job")
tracer = Tracer()

table = dynamodb.Table(os.environ["TABLE_NAME"])


# https://stackoverflow.com/questions/63026648/errormessage-class-decimal-inexact-class-decimal-rounded-while
@tracer.capture_method
def applyToJob(application: dict = {}):
    item = {
        "id": scalar_types_utils.make_id(),
        "jobId": application['jobId'],
        "username": application['username'],
        "jobApplicationStatus":application['jobApplicationStatus'],
        "createdOn":scalar_types_utils.aws_timestamp()

    }

    logger.debug(f'job application input :{item}')

    try:

        table.put_item(
            Item={
                "PK": f"JOB#{item['jobId']}#APPLICATION#{item['id']}",
                "SK": f"JOB#{item['jobId']}#APPLICATION#{item['id']}",
                "GSI1PK": f"JOB#{item['jobId']}",
                "GSI1SK": f"APPLICATION#{item['id']}",
                "GSI2PK": f"USER#{item['username']}",
                "GSI2SK": f"JOB#{item['jobId']}",
                **item
            }
        )

        return item


    except ClientError as err:
        logger.debug(f"Error occured during job creation {err.response['Error']}")
        raise err
At this point, we are simply repeating steps over and over and over again and i know it's getting boring.
Let's look at one of the most important features of the app and close this series.
Booking a nanny
In this section, we'll be using Amazon Simple Queue Service (SQS) to decouple and scale our application.
Amazon Simple Queue Service (SQS) is a fully managed message queuing service that enables you to decouple and scale microservices, distributed systems, and serverless applications.
Using SQS, you can send, store, and receive messages between software components at any volume, without losing messages or requiring other services to be available
Read more about Amazon SQS from the official website above.
When a parent creates a job, nannies can apply for that job. The parent would then be able to accept the application for whoever they see fit for the job.
Booking a nanny entails, firstly, accepting the nanny's job application(changing application status), declining all other job applications, so that
the other applicants know they weren't selected, and then closing the job, so that it won't be available anymore for applying to.
Here's a breakdown of how our code would work
- Get all applications for a job.
- Update Job Status from OPEN to CLOSED and application status for accepted applicant from PENDING to ACCEPTED
- Put the rest of the job applications into an SQS queue, which would update the job application status from PENDING to DECLINED asynchronously.
For added functionality, it'll be good to send a push notification and an email to the applicant whose application was
accepted. But this functionality isn't within the scope of this tutorial.
Let's get started.
In Iac(Infrastructure as Code), the first step is to create/configure a SQS Queue and a Dead Letter queue like so
  ###################
   #   SQS
  ###################
  UpdateJobApplicationsSQSQueue:
    Type: AWS::SQS::Queue
    Properties:
      VisibilityTimeout: 20
      RedrivePolicy:
        deadLetterTargetArn:
          !GetAtt UpdateJobApplicationsSQSDLQ.Arn
        maxReceiveCount: 5
  UpdateJobApplicationsSQSDLQ:
    Type: AWS::SQS::Queue
The name of our SQS queue is UpdateJobApplicationsSQSQueue.
To prevent other consumers from processing the message again, Amazon SQS sets a visibility timeout, a period of time during which Amazon SQS prevents other consumers from receiving and processing the message
Here, we set the VisibilityTimeout to 20 seconds.
Dead Letter Queues (DLQ) are source queues for messages that couldn't be processed for some reason.
If you want to re-process all messages in DLQ, that's where the RedrivePolicy comes in.
We set maxReceiveCount to 5, to recieve 5 messages at a time.
Next, we have to write a function, based on the breakdown we outlined above,
Here's how the code looks like.
You can find it in resolvers/jobs/book_nanny.py
from aws_lambda_powertools import Logger, Tracer
import boto3
import os
import json

from boto3.dynamodb.conditions import Key

from decima_encoder import handle_decimal_type

from botocore.exceptions import ClientError

logger = Logger(service="book_nanny")
tracer = Tracer(service="book_nanny")
# client library
client = boto3.client('dynamodb')
# resource library
dynamodb = boto3.resource("dynamodb")
table = dynamodb.Table(os.environ["TABLE_NAME"])
sqs = boto3.resource("sqs")
queue = sqs.Queue(os.environ["UPDATE_JOB_APPLICATIONS_SQS_QUEUE"])


def book_nanny(username: str = "", jobId: str = "", applicationId: str = "", applicationStatus: str = ""):
    logger.info({f"Parameters {jobId, applicationId, applicationStatus}"})
    # first step involves getting all applications for  the said job
    response_items = table.query(
        IndexName="jobApplications",
        KeyConditionExpression=Key('GSI1PK').eq(f'JOB#{jobId}'),
        ScanIndexForward=False

    )
    logger.info(f'response is {response_items["Items"]}')

    logger.debug({"application response is": response_items['Items'][1:]})
    try:

        response = client.transact_write_items(
            TransactItems=[{
                'Update': {
                    'TableName': os.environ["TABLE_NAME"],
                    "Key": {
                        "PK": {
                            "S": f'USER#{username}'
                        },
                        "SK": {
                            "S": f'JOB#{jobId}'
                        },
                    },
                    "ConditionExpression": "username = :username",
                    "UpdateExpression": "SET jobStatus = :jobStatus",
                    "ExpressionAttributeValues": {
                        ":username": {'S': username},
                        ":jobStatus": {'S': 'CLOSED'}
                    },
                    'ReturnValuesOnConditionCheckFailure': 'ALL_OLD'
                }

            }, {
                'Update': {
                    'TableName': os.environ["TABLE_NAME"],
                    "Key": {
                        "PK": {
                            "S": f"JOB#{jobId}#APPLICATION#{applicationId}"
                        },
                        "SK": {
                            "S": f"JOB#{jobId}#APPLICATION#{applicationId}"
                        },
                    },
                    "UpdateExpression": "SET jobApplicationStatus= :jobApplicationStatus",
                    "ExpressionAttributeValues": {
                        ":jobApplicationStatus": {'S': applicationStatus},

                    },
                    'ReturnValuesOnConditionCheckFailure': 'ALL_OLD'
                }
            }],
            ReturnConsumedCapacity='TOTAL',
            ReturnItemCollectionMetrics='SIZE'
        )
        logger.debug(f'transaction response is {response}')
        '''
        create a for loop and send all queue messages
        '''
        for item in response_items['Items'][1:]:
            logger.debug('sending messages to sqs {}'.format(json.dumps(item, default=handle_decimal_type)))
            if item['id'] != applicationId:
                queue.send_message(MessageBody=json.dumps(item, default=handle_decimal_type))
            else:
                logger.info("Accepted applicationId. So we don't have to put it into SQS")
                # you can send a notification or an email to the accepted user here

        return True

    except ClientError as err:
        logger.debug(f"Error occurred during transact write{err.response}")
        logger.debug(f"Error occurred during transact write{err}")
        logger.debug(f"Error occurred during transact write{err.response['Error']}")
        if err.response['Error']['Code'] == 'TransactionCanceledException':
            if err.response['CancellationReasons'][0]['Code'] == 'ConditionalCheckFailed':
                errObj = Exception("You aren't authorized to make this update")

                raise errObj

        else:
            raise err
So, the code simply does this.
- Get all applications for a job.
- Update Job Status from OPEN to CLOSED and application status for accepted applicant from PENDING to ACCEPTED
- Put the rest of the job applications into an SQS queue, which would update the job application status from PENDING to DECLINED asynchronously.
We expect a function to receive all these messages from the SQS queue and process them.
Let's configure this function in template.yaml
  UpdateJobApplicationsFunction:
    Type: AWS::Serverless::Function
    DependsOn:
      - LambdaLoggingPolicy
    Properties:
      CodeUri: babysitter/
      Handler: update_job_application.lambda_handler
      Runtime: python3.8
      Description:  Lambda Powertools Direct Lambda Resolver
      Policies:
        - SQSPollerPolicy:
            QueueName:
              !GetAtt UpdateJobApplicationsSQSQueue.QueueName
        - Statement:

            - Effect: Allow
              Action:
                - "dynamodb:UpdateItem"
              Resource:

                - !GetAtt DynamoDBBabySitterTable.Arn

      Events:
        RetrieveFromSQS:
          Type: SQS
          Properties:
            Queue: !GetAtt UpdateJobApplicationsSQSQueue.Arn
            BatchSize: 5
            FunctionResponseTypes:
              - ReportBatchItemFailures
SQSPollerPolicy gives permission to UpdateJobApplicationsFunction to poll our SQS queue.
Since our function would be performing an update operation on dynamoDB items, it's just right we assign
dynamoDB update permissions to it.
Our function would poll SQS messages in batches of 5 (BatchSize: 5)
Since we are using SQS,we must configure our Lambda function event source to use ReportBatchItemFailures.
Remember that our lambda function is triggered with a batch of messages.
If our function fails to process any message from the batch, the entire batch returns to our queue. This same batch is then retried until either condition happens first: a) your Lambda function returns a successful response b) record reaches maximum retry attempts, or c) when records expire
We would use the `batch processing` utility of the `aws-lambda-powertools` to ensure that, batch records are processed individually – only messages that failed to be processed return to the queue for a further retry.
This works when two mechanisms are in place:
ReportBatchItemFailuresis set in your SQS event source properties- A specific response is returned so Lambda knows which records should not be deleted during partial responses.
Create a file called update_job_application.py in the /babysitter directory type in the following code
import json
import os
import boto3
from typing import Any, List, Literal, Union
from aws_lambda_powertools.utilities.batch import (BatchProcessor,
                                                   EventType,
                                                   FailureResponse,
                                                   SuccessResponse,
                                                   batch_processor)
from aws_lambda_powertools.utilities.data_classes.sqs_event import SQSRecord
from aws_lambda_powertools.utilities.typing import LambdaContext
from aws_lambda_powertools import Logger, Tracer

tracer = Tracer(service="update_job_application")
logger = Logger(service="update_job_application")


dynamodb = boto3.resource("dynamodb")
table = dynamodb.Table(os.environ["TABLE_NAME"])
processor = BatchProcessor(event_type=EventType.SQS)

@tracer.capture_method
def record_handler(record: SQSRecord):
    """
    Handle messages from SQS Queue containing job applications.
    Update each job application status to DECLINED
    """
    payload:str = record.body

    logger.info(f"payload has {len(payload)} records")

    if payload:
        logger.debug(" application item is {}".format(payload))
        item = json.loads(payload)
        response = table.update_item(
            Key={
                'PK': f"JOB#{item['jobId']}#APPLICATION#{item['id']}",
                'SK': f"JOB#{item['jobId']}#APPLICATION#{item['id']}"
            },
            ConditionExpression="attribute_exists(PK)",
            UpdateExpression="set jobApplicationStatus= :jobApplicationStatus",

            ExpressionAttributeValues={
                ':jobApplicationStatus': 'DECLINED'
            },
            ReturnValues="ALL_NEW"
        )

        logger.debug({' update response': response['Attributes']})


@logger.inject_lambda_context
@tracer.capture_lambda_handler
@batch_processor(record_handler=record_handler, processor=processor)
def lambda_handler(event, context: LambdaContext):
    batch = event["Records"]
    with processor(records=batch, processor=processor):
        processed_messages: List[Union[SuccessResponse, FailureResponse]] = processor.process()

    for messages in processed_messages:
        for message in messages:
            status: Union[Literal["success"], Literal["fail"]] = message[0]
            result: Any = message[1]
            record: SQSRecord = message[2]
            logger.debug("status is {}".format(status))
            logger.debug("result is {}".format(result))
            logger.debug("record is {}".format(record))
    return processor.response()
Here are the steps involved in processing messages from our SQS in the above code.
- Instantiate our dynamoDB resource, and also the BatchProcessor and choose EventType.SQS for the event type.
- Define the function to handle each batch record, and use SQSRecord type annotation for autocompletion.
In our case, we upadte each
jobApplicationStatustoDECLINED - We use
batch_processordecorator to kick off processing. - Return the appropriate response contract to Lambda via .response() processor method