© Copyright Kirk Rader 2024
All links on this page were working as of December 15, 2023.
This documentation assumes familiarity with both Z-Wave and Node-RED terminology, concepts and procedures such as Z-Wave value id's including command class (often abbreviated CC), node id, endpoint id and network id. The installation and configuration intructions assume you have a working Node-RED instance, a USB-based Z-Wave controller and at least one Z-Wave device that supports CC 37 (Z-Wave's binary switch protocol). There is an unfortunate overlap in Node-RED's and Z-Wave's terminology using the word "node" to mean different things. A Node-RED node is software component, a Z-Wave node is a physical device. A Z-Wave node id is an integer representing a particular device in a particular Z-Wave network, not to be confused with the node id of a particular instance of a given type of Node-RED node in a given flow.
This repository's contents demonstrate using node-red-contrib-zwave-js to control a Z-Wave-enabled binary switch using a USB-based Z-Wave controller.
-
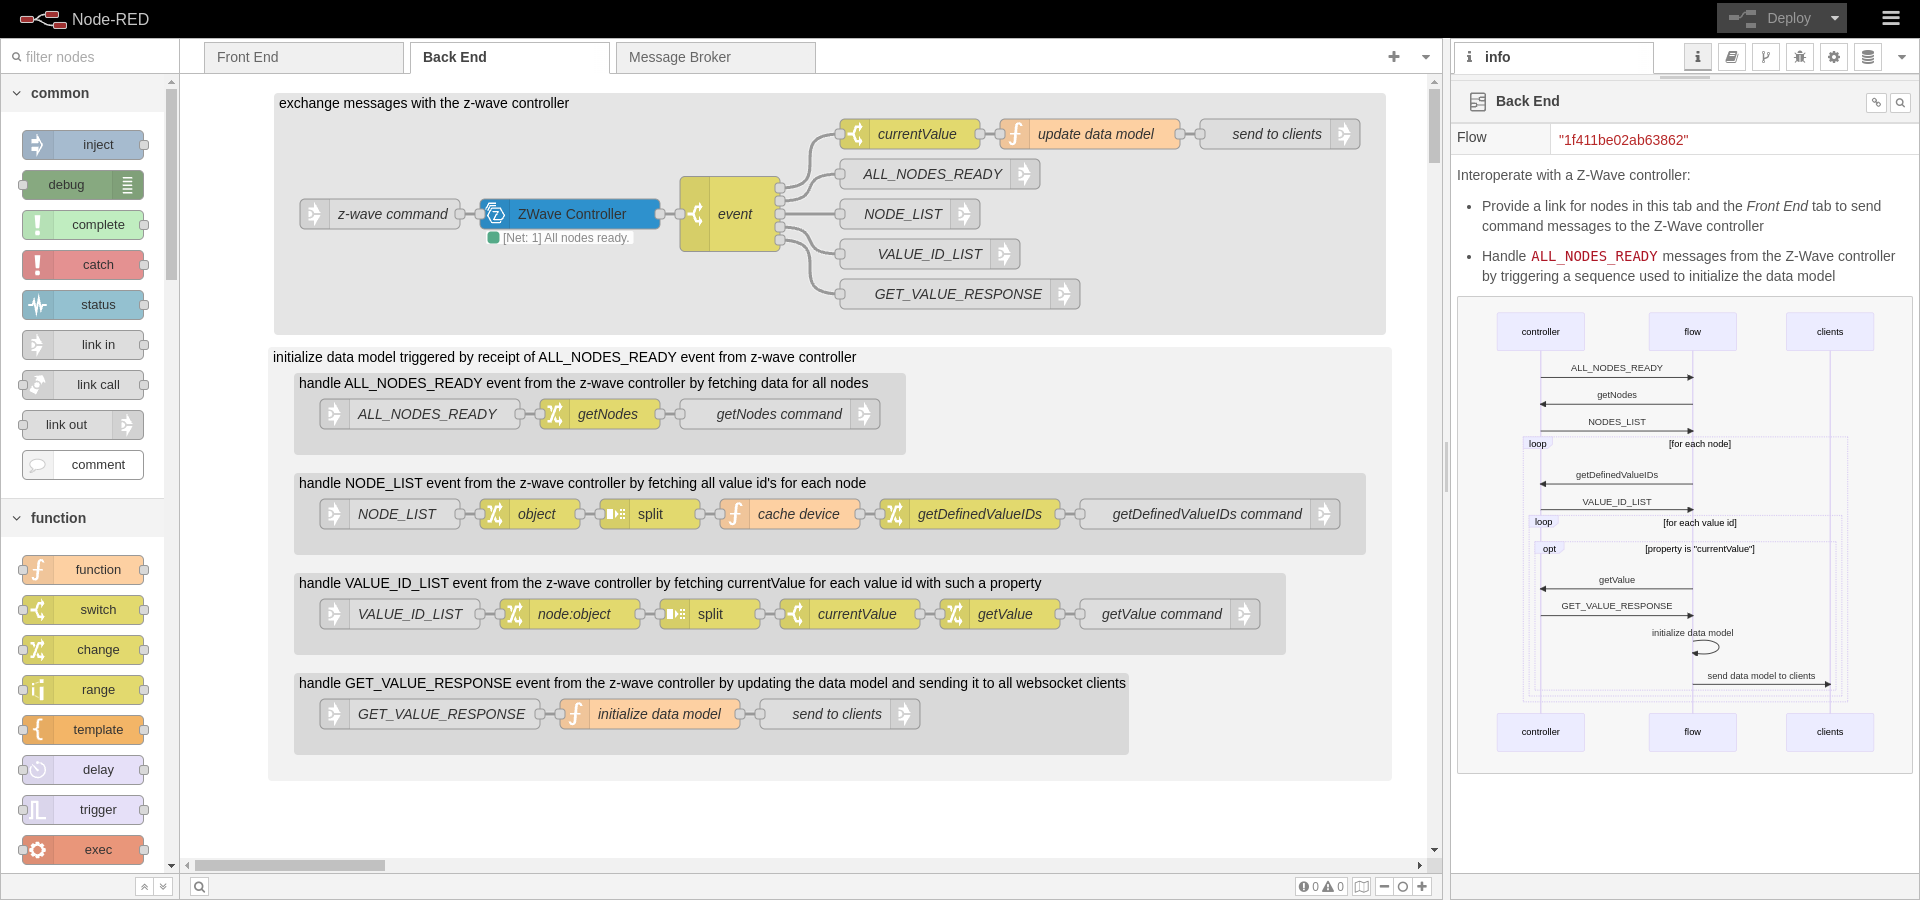
Connect to Z-Wave enabled hardware using a ZWave Controller node in Node-RED
graph LR switch[Binary Switch] subgraph Client browser[Web Browser] end subgraph Raspberry Pi dongle[USB Z-Wave Controller] subgraph Node-RED subgraph Flow Tabs broker[Message Broker] frontend[Front End] backend[Back End] end subgraph node-red-contrib-zwave-js controller[ZWave Controller] end dashboard[Dashboard] end end browser <-- WebSocket --> broker broker <--> frontend frontend <--> backend backend <--> controller controller <-- Serial --> dongle dongle <-- z-wave --> switch browser <-- HTTP + JavaScript --> dashboard -
Data-driven back-end that operates by "discovering" the set of supported devices in the Z-Wave network
-
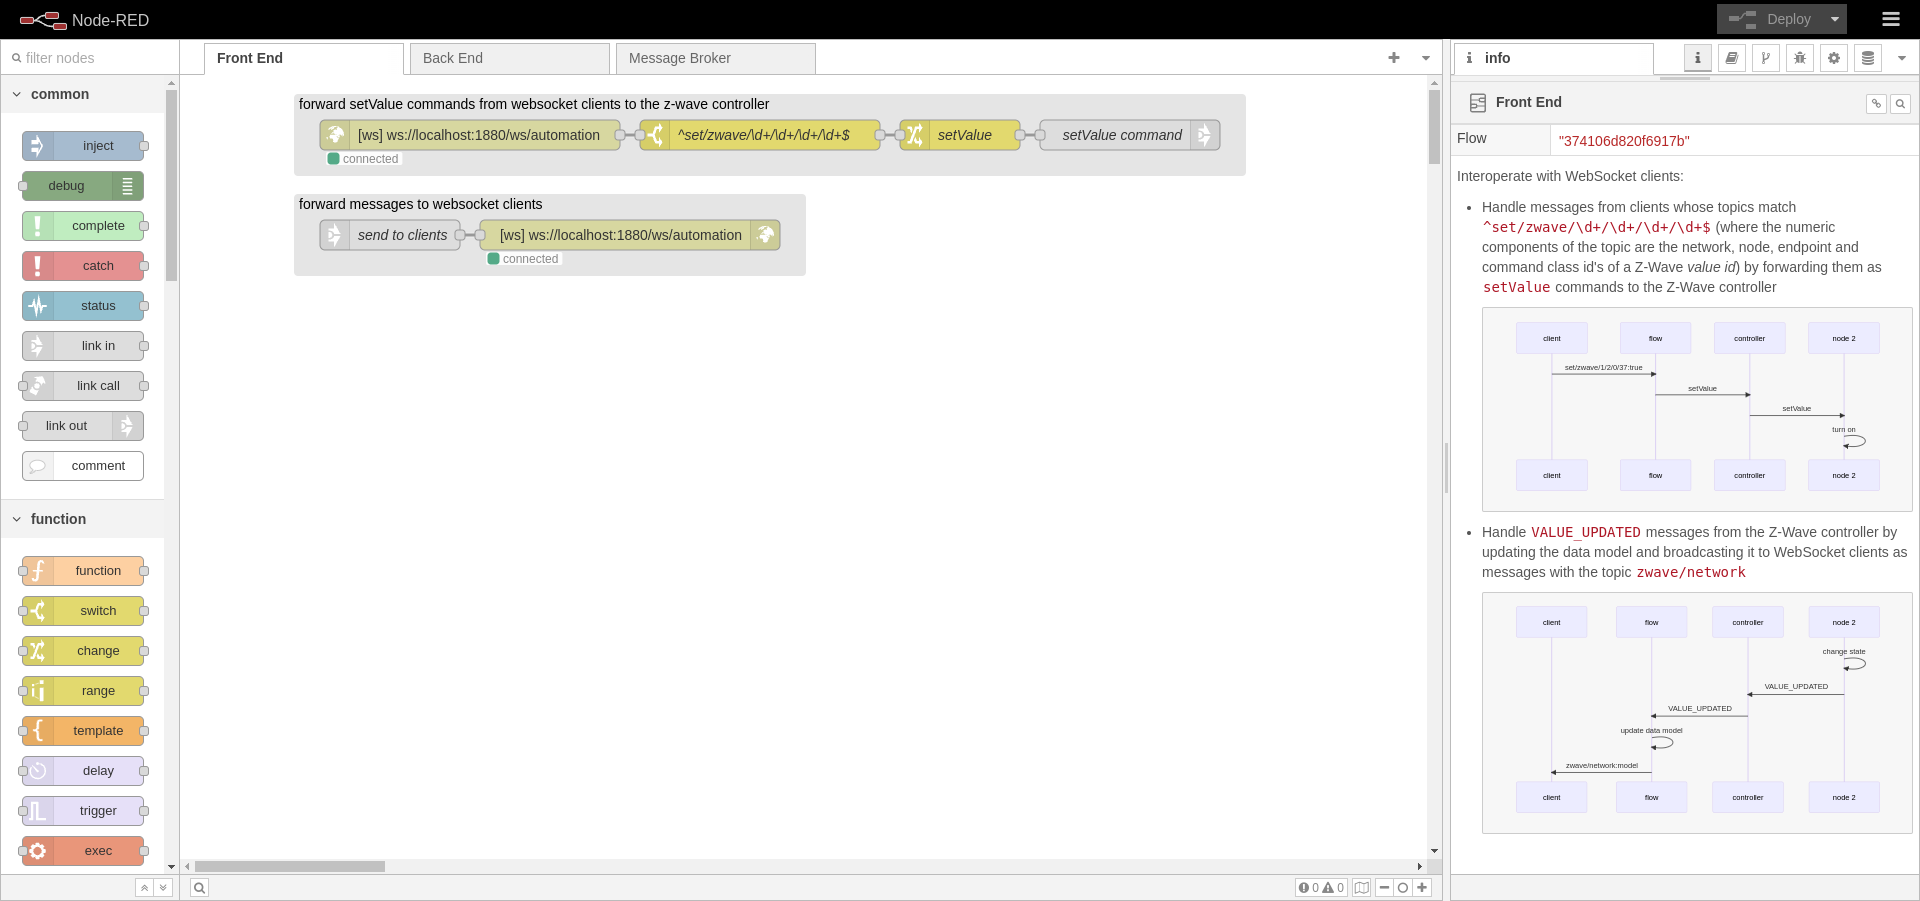
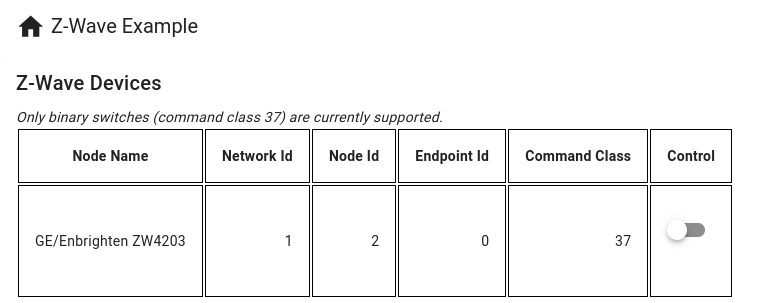
Data-driven front end using a component framework, Vuetify
-
Event-driven programming techniques using a WebSocket to communicate asynchronously between the front and back ends


A key feature of this flow is that one can add or remove devices in the Z-Wave network without having to modify the front or back end implementation, so long as the devices communicate using supported Z-Wave command classes (currently only Command Class (CC) 37 for this tutorial).
The implementation of this tutorial flow and associated front-end logic support
devices that provide Z-Wave's binary switch (command class
37) protocol using currentValue and targetValue properties in the messages
they exchange with Node-RED using the ZWave Controller type. This is done by
exploiting the similarity between the features and data models used by Z-Wave CC
37 devices and Vuetify's v-switch UI components. It would be reasonably
straightforward to extend this flow's approach to monitor and control additional
Z-Wave device types using corresponding types of Vuetify components, including
custom components designed to represent features of devices with more complex
behaviors.
This repository's contents is that of a standard Node-RED project such that it can be installed using the Node-RED UI for creating projects from Git repositories.
In addition, it contains a subdirectory named dashboard that contains a Vuetify based web application. You can use Node-RED's normal UI for loading projects from a GitHub repository. The process for also building and hosting the Vuetify based front end web application is described below.
The hardware with which this flow was tested:
At the time of writing (January 2024) there is a known issue with the latest version of Node and the underlying NPM package used to support serial devices in Node-RED. The result is that if you use the exact software versions shown below you will need to restart the Node-RED process each time you deploy changes to any flow that uses serial ports, including node-red-contrib-zwave-js's ZWave Controller node. If you have configured Node-RED to run as a service in Raspberry Pi OS this can be done using the command:
# do this after each deploy until and unless the serial port bug is fixed
sudo systemctl restart nodered.service
The versions of software with which this flow was tested:
- Raspberry Pi OS (bookworm)
- Node (20.10.0)
- Node-RED (3.1.3)
- node-red-contrib-zwave-js (9.0.3)
- Vuetify (3.0.0)
- Chromium (120.0.6099.102)
-
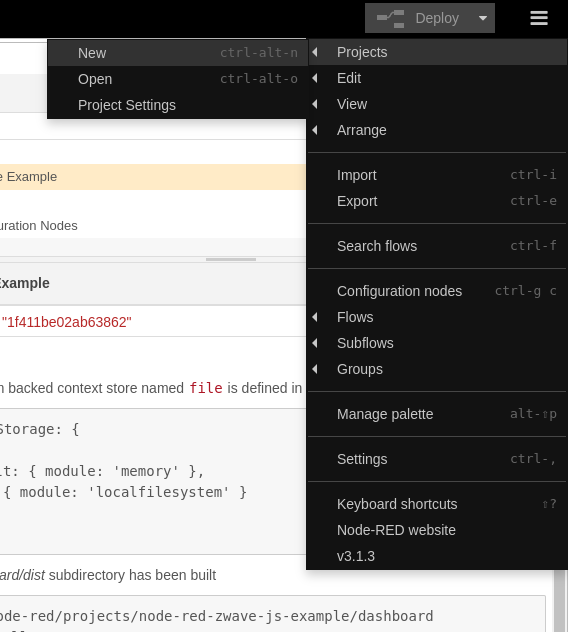
Make sure the projects feature is enabled in settings.js:
projects: {
    /** To enable the Projects feature, set this value to true */
    enabled: true,
-
Add a file-system backed context store named
filein settings.js:contextStorage: { default: { module: 'memory' }, file: { module: 'localfilesystem' } },
-
Add the dashboard path to the
httpStaticsection in settings.js:httpStatic: [ { path: '/home/<user>/.node-red/projects/node-red-zwave-js-example/dashboard/dist/', root: "/zwave/" } ]
where
<user>represents your user name -
Restart the Node-RED process after making changes to ~/.node-red/settings.js:
sudo systemctl restart nodered.service
-
Install node-red-contrib-zwave-js either through the palette manager UI in Node-RED or at the command line
cd ~/.node-red
npm install node-red-contrib-zwave-js
-
Create a new project by cloning this repository using the Node-RED user interface:
Ignore any warnings about encrypted credentials; you'll need to supply your own configuration in any event
-
Build the dashboard:
cd ~/.node-red/projects/node-red-zwave-js-example/dashboard
npm install
npm run build
-
Modify the configuration of the ZWave Controller node to match your Z-Wave controller's serial port

You can verify that everything is running correctly using the toggle switch on the dashboard web page. Toggling in the dashboard should turn on and off your physical switch. Manually turning on and off the phsical switch should cause the dashboard toggle to change state accordingly. You might notice some delay between physical state change events and updates in the dashboard. This is unavoidable due to network latencies and processing overhead.
The features demonstrated by this flow are:
-
The ability to communicate with Z-Wave nodes through a hard-coded reference to a particular controller node
-
The ability to discover, monitor and control Z-Wave binary switches (nodes that support command class 37) in a Node-RED based back end
-
The ability to provide a data-driven HTML5 based user interface using a WebSocket for communication between front and back ends that adapts automatically to the set of devices discovered by the back end
Note that Node-RED is used as the web server for the dashboard in order to make this tutorial project as self-contained as possible. The dashboard web application has no server side code nor any dependency on Node-RED other than as a web socket client. It could run in any web server with network access to the Node-RED server running this project's flow.
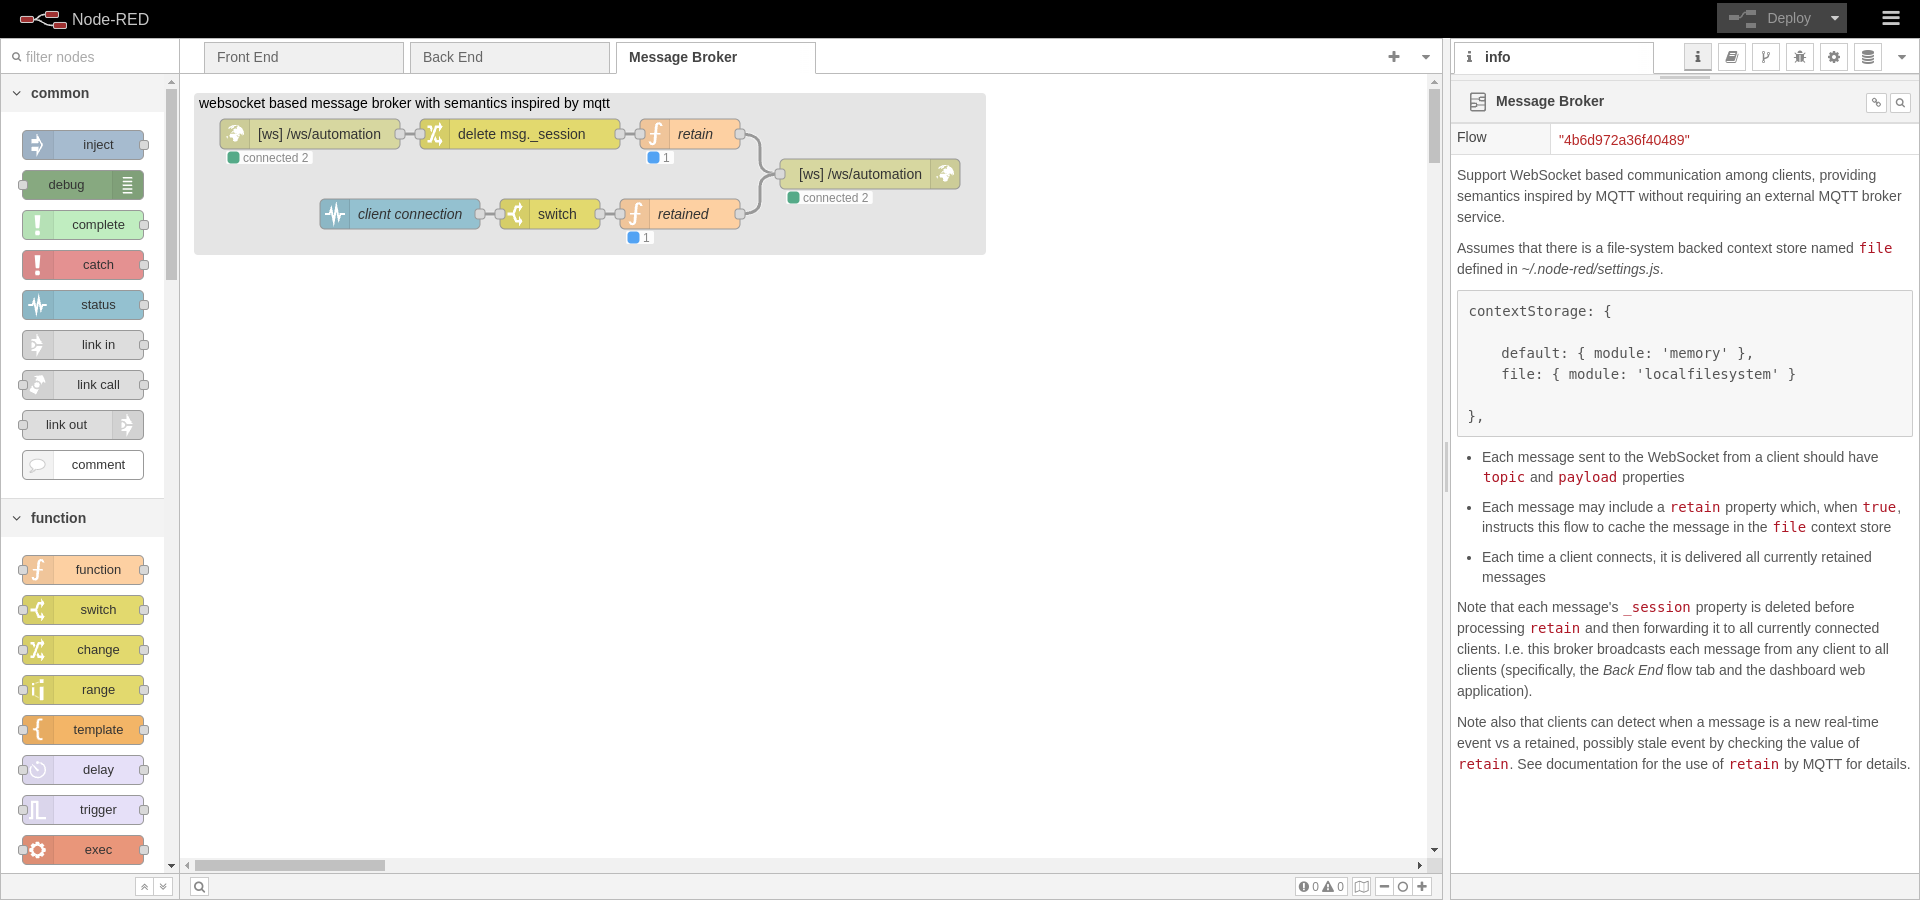
The overall approach used in this example is event-driven using a Z-Wave controller and a WebSocket. The Websocket protocol is used rather than MQTT both to make this example as entirely self-contained as possible and, more importantly, for compatibility with browser-based web applications e.g. the home automation user interface implemented as a part of this project.
The flow listens for commands arriving at a websocket in node and sends state change event messages to a corresponding websocket out node. Other components such as the home automation dashboard web application can connect to that web socket to exchange messages with the ZWave Controller as demonstrated by the very basic web application that is part of this tutorial project.
When a Z-Wave device changes state, whether as a result of receiving a command from this flow or by other operations within the Z-Wave network, it transmits a status message over the Z-Wave network which is received by the Z-Wave controller. That causes the controller to emit a message from the serial port to which the ZWave Controller node is listening in Node-RED. In this example, messages which report the current value of a binary switch (command class 37) used to update an in-memory data model of the current state of all Z-Wave devices, which is then forwarded to the websocket out node for processing by a client such as this project's dashboard web application.
Client applications can send command messages to the WebSocket to which the flow is listening, such as when a user toggles the v-switch representing a particular binary switch device. The flow handles such commands by tranforming them into the format required as input to the ZWave Controller node. The ZWave Controller node then sends the command message via the USB stick's serial interface to the Z-Wave network. If all goes well, the targeted device will respond to the command by reporting the change to its current state as a status message over the Z-Wave network, which closes the loop of keeping the data model in sync with the physical devices.
There is a slight but sometimes noticable delay between sending a command message and receiving one indicating the corresponding change of device state. This delay is caused by the overhead of the various processing steps and latency in both WebSocket and Z-Wave network communication. But it also means that external systems can be confident in the actual state of the devices in the Z-Wave network based on those devices' own reporting rather than relying on assumptions based on optimistically updating the data model to match the values in commands without waiting for confirmation that the asynchronous commands were properly executed.
---
title: Event processing in the dashboard
---
sequenceDiagram

  actor user as User
  participant dashboard as Dashboard
  participant flow as Node-RED flow
  participant controllernode as ZWave Controller node
  participant dongle as Z-Wave controller device
  participant device as Z-Wave CC 37 device

  user ->> dashboard: click toggle switch component

  rect rgba(255, 255, 0, 0.1)
    dashboard ->>+ flow: "set/zwave/2/37:value" via websocket
    flow ->>- controllernode: "setValue" message
    controllernode ->> dongle: "setValue" message via serial port
    dongle ->>+ device: "setValue" message via Z-Wave RF protocol
  end

  rect rgba(0, 255, 255, 0.1)

    note over user, device: the sequence from here on is the same no matter what causes the device to change state
    note over user, device: i.e. the flow operates asynchronously on status messages from Z-Wave nodes without regard to whether or not they occur as a direct result of a command previously sent by the flow

    device ->> device: change state
    device ->>- dongle: VALUE_UPDATED via Z-Wave RF protocol
    dongle ->>+ controllernode: VALUE_UPDATED via serial port
    controllernode ->>- flow: VALUE_UPDATED
    activate flow
    flow ->> flow: update data model
    flow ->> dashboard: send data model via websocket
    deactivate flow
    activate dashboard
    dashboard ->> dashboard: update UI components' states according to data model
    deactivate dashboard
  end
Other interactions between the front and back ends are variations on the preceding sequence. For example, as noted in the preceding sequence diagram, the flow sends the updated data model to connected clients each time it receives an asynchronous status change message from the Z-Wave network no matter what caused a given device's state to change.
The data model is initially created each time the flow starts by handling "all nodes ready" messages from the ZWave Controller node:
---
title: Initialize Data Model On Receipt of ALL_NODES_READY
---
sequenceDiagram

    participant controller as Z-Wave Controller
    participant flow as Flow
    participant client as Client(s)

    controller ->> flow: ALL_NODES_READY
    flow ->> controller: getNodes
    controller ->>+ flow: NODE_LIST

    loop for each z-wave node id

        flow ->> flow: add device to cached data model
        flow ->>- controller: getValueIds
        controller ->> flow: VALUE_ID_LIST

        loop for each value id

          opt property == currentValue
              flow ->> controller: getValue
              controller ->>+ flow: GET_VALUE_RESPONSE
              flow ->> flow: update cached data model for device
              flow ->>- client: send data model via websocket
          end
        end
    end
The user is not a participant in the immediately preceding flow since it is triggered by direct interactions between Node-RED nodes in the back end. This begs the question of how the data model is delivered to the dashboard when it might not even have yet been launched when the data model is first constructed?
The interactions labeled "send data model via websocket" in the preceding
sequences are actually quite oversimplified to keep the diagrams readable. This
tutorial flow uses Node-RED's context storage to implement a WebSocket-based
message broker with semantics inspired by MQTT. Each message sent via the broker
must include both topic and payload attributes. The topic strings are used
to classify and route messages while any data associated with a given topic is
contained in the payload. In addition, a retain attribute can optionally be
included. When retain is true, the broker stores the message in the flow's
context as well as forwarding it to all currently connected clients. When a
client subsequently connects, it is immediately sent all currently retained
messages. The general pattern in this flow is that messages containing the data
model sent from the back end have retain set to true while command messages
sent from the front end have retain omitted or set to false. That way, the
current state of the data model is shared among all clients, no matter when or
in what order they connect, while commands are only handled by currently
connected listeners in real time.