PaperWM is a Gnome Shell extension which provides scrollable tiling of windows and per monitor workspaces. It's inspired by paper notebooks and tiling window managers.
While technically an extension it's to a large extent built on top of the Gnome desktop rather than merely extending it.
PaperWM aims to continually support current stable Gnome shell versions (currently Gnome 45 & Gnome 46). Older versions of PaperWM can generally be installed on older Gnome Shell versions (see Install via Source for more information on targeting an older/EOL Gnome version).
New features and fixes aren't generally backported to older Gnome shell versions. Pull requests for fixes to older PaperWM versions (that run on previous Gnome versions) will be accepted if the submitter can help test and update related documentation.
Have questions or comments? Please ask on our Github Discussions board.
Install via extensions.gnome.org (recommended)

Clone the repo and check out the branch for the Gnome Shell version you're running:
- 45-46 (currently developed/supported): https://github.com/paperwm/PaperWM/tree/release
- 42-44 (EOL): https://github.com/paperwm/PaperWM/tree/gnome-44
- 40-41 (EOL): https://github.com/paperwm/PaperWM/tree/gnome-40
- 3.28-3.38 (EOL): https://github.com/paperwm/PaperWM/tree/gnome-3.38
then run the install.sh script
from the repository. The installer will create a link to the repo in
~/.local/share/gnome-shell/extensions. It will then ask if you want to enable PaperWM.
./install.sh # install, load and enable paperwm➡️ You'll need to restart Gnome shell after installing PaperWM, e.g. logout then login, or restart in place with an
alt-F2and enteringr(X11 only).After logging back in, you can then enable PaperWM via the
Extensionsapplication, or by running the following command from the command-line:/usr/bin/gnome-extensions enable paperwm@paperwm.github.com
if you have run into issues, delete any older
paperwm@...symlinks from~/.local/share/gnome-shell/extensionsand re-run theinstall.shscript.
To uninstall simply run ./uninstall.sh.
Running the extension will automatically install a user config file as described in User configuration & development.
Users are enouraged to submit issues and Pull Requests!
➡️ Please ensure pull requests are based off, and submitted to, develop branch.
Pull requests submitted to the
releasebranch will not be accepted (but don't worry, if you accidentally submit a PR to thereleasebranch, the target branch will automatically be changed todevelopbranch).
Most functionality is available using a mouse, eg. activating a window at the edge of the monitor by clicking on it. Wayland support gestures (See the Touchpad Gestures section). PaperWM is designed to work work well with keyboard + mouse, trackpads etc.
Most keybindings start with the Super modifier (by default), which is usually the Windows key, or on mac keyboards it's the Command key. It's possible to modify the keyboard layout so that Super is switched with Alt making all the keybindings easier to reach. This can be done through Gnome Tweaks under Keybard & Mouse ⟶ Additional Layout Options ⟶ Alt/Win key behavior ⟶ Left Alt is swapped with Left Win.
Most keybindings will grab the keyboard while Super is held down, only switching focus when Super is released. Escape will abort the navigation taking you back to the previously active window.
All PaperWM keybinds can be changed (and disabled) via PaperWM extension settings.
Window management and navigation is based around the three following concepts.

New windows are automatically tiled to the right of the active window (see here for dynamically changing the insertion position of new windows), taking up as much height as possible. SuperReturn will open a new window of the same type as the active window.
Activating a window will ensure it's fully visible, scrolling the tiling if necessary. By default, pressing Super. activates the window to the right. Super, activates the window to the left. On a US keyboard these keys are intuitively marked by < and >, they are also ordered the same way on almost all keyboard layouts. Navigating around windows brings up the minimap as can be seen in the above screenshot. The minimap will stay visible as long as Super is continually being pressed.
Pressing SuperI will move the window to the right below the active window, tiling them vertically in a column. SuperO will do the opposite, pushing the bottom window out of the current column.
Swiping the trackpad horizontally with three fingers (only available in Wayland) or swiping the panel horizontally on a touch screen will scroll the tiling.
AltTab is of course also available.
Default window Keybindings |
Can be changed in PaperWM extension settings |
|---|---|
| SuperReturn or SuperN | Open a new windows (of the current application) |
| SuperBackspace | Close the active window |
| Super. or Super, | Switch to the next or previous window |
| SuperLeft or SuperRight | Activate the window to the left or right |
| SuperUp or SuperDown | Activate the window above or below |
| SuperHome or SuperEnd | Activate the first or last window |
| Not set by default (set in extension settings) | Switch to the [second to eleventh] window |
| SuperTab or AltTab | Cycle through previously active windows |
| ShiftSuperTab or ShiftAltTab | Cycle through previously active windows (backward order) |
| CtrlAltTab | Cycle through previously active scratch windows |
| ShiftCtrlAltTab | Cycle through previously active scratch windows (backward order) |
| ShiftSuperC | Switch between window focus modes |
| ShiftSuperW | Switch between positions for creating new windows |
| Not set by default (set in extension settings) | Create new windows to the right of current window |
| Not set by default (set in extension settings) | Create new windows to the left of current window |
| Not set by default (set in extension settings) | Create new windows in vertical stack (down) |
| Not set by default (set in extension settings) | Create new windows in vertical stack (up) |
| Not set by default (set in extension settings) | Create new windows at start position |
| Not set by default (set in extension settings) | Create new windows at end position |
| SuperCtrl, or SuperCtrl. | Move the current window to the left or right |
| ShiftSuper, or ShiftSuper. | Move the current window to the left or right |
| SuperCtrlLeft or SuperCtrlRight | Move the current window to the left or right |
| SuperCtrlUp or SuperCtrlDown | Move the current window up or down |
| SuperI | Absorb window into the active column |
| SuperO | Expel the bottom window from vertically tiled windows |
| ShiftSuperO | Expel the active window from vertically tiled windows |
| SuperC | Center windows horizontally |
| ShiftSuperF | Toggle fullscreen |
| SuperF | Maximize the width of a window |
| ShiftSuper+ | Increment window height (scratch or vertically tiled windows) |
| ShiftSuper- | Decrement window height (scratch or vertically tiled windows) |
| Super+ | Increment window width |
| Super- | Decrement window width |
| SuperR | Resize the window (cycles through useful widths) |
| SuperAltR | Resize the window (cycles backwards through useful widths) |
| SuperShiftR | Resize the window (cycles through useful heights) |
| SuperShiftAltR | Resize the window (cycles backwards through useful heights) |
| Supert | Take window(s) dropping when finished navigating |
| Not set by default (set in extension settings) | Activate the window under mouse cursor |
Pressing SuperAbove_Tab will slide the active workspace down revealing the stack as shown in the above screenshot. You can then flip through the most recently used workspaces with repeated Above_Tab presses while holding Super down. Above_Tab is the key above Tab (` in a US qwerty layout). Like alt-tab Shift is added to move in reverse order:

Pressing SuperPage_Down and SuperPage_Up will slide between workspaces sequentially:

By default SuperPage_Down and SuperPage_Down are bound to the keybindings "Switch to workspace below/above (ws from current monitor)". That means using the keybindings you can select all workspaces that were previously shown on the current monitor and all empty once.
Alternatively you can change these keybindings to "Switch to workspace below/above (ws from all monitors)" in the settings. That way you can switch to all workspaces (that are not currently shown on another monitor). Depending on your workflow this might feel more natural.
The workspace name is shown in the top left corner replacing the Activities button adding a few enhancements. Scrolling on the name will let you browse the workspace stack just like SuperAbove_Tab. Left clicking on the name opens Gnome overview, while right clicking the name lets you access and change the workspace name.
If you prefer to use Gnome workspace "pill", you can replace the workspace name element, and enable the Gnome pill from the
Generalsection of PaperWM preferences: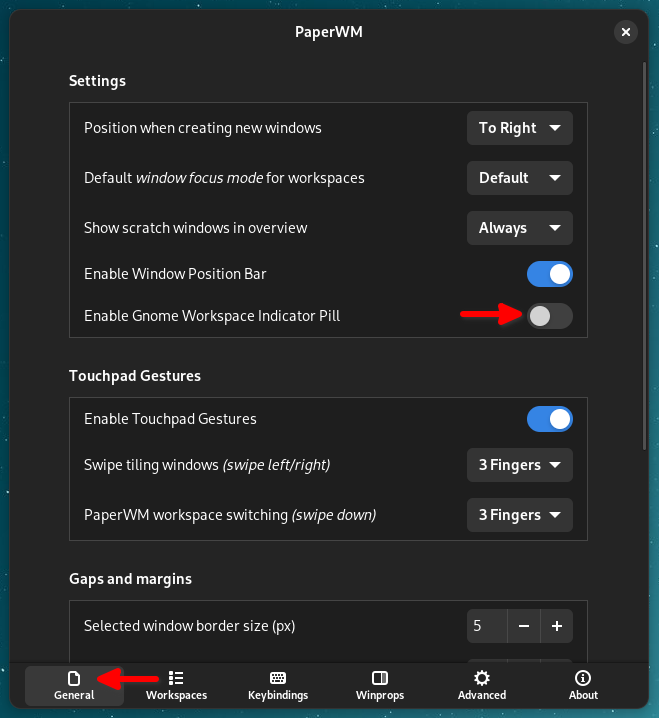

Swiping down on the trackpad vertically with three fingers will initiate the workspace stack, and then allow you navigate the workspace stack with 3-finger vertical swipes (only available in Wayland). See the Touchpad Gestures section for more information on gesture support in PaperWM.
There's a single scrollable tiling per workspace. Adding another monitor simply makes it possible to have another workspace visible. The workspace stack is shared among all the monitors, windows being resized vertically as necessary when workspace is displayed on another monitor.
workspace keybindings |
Can be changed in PaperWM extension settings |
|---|---|
| Super` | Switch to previously active workspace |
| ShiftSuper` | Switch to previously active workspace (backwards order) |
| CtrlSuper` | Move active window to previously active workspace |
| ShiftCtrlSuper` | Move active window to previously active workspace (backwards order) |
| SuperPageUp | Switch to workspace above |
| SuperPageDown | Switch to workspace below |
| CtrlSuperPageUp | Move active window one workspace up |
| CtrlSuperPageDown | Move active window one workspace down |
| CtrlSuperB | Toggle show/hide (GNOME) TopBar and Window Position Bar |
| Not set by default (set in extension settings) | Toggle show/hide (GNOME) TopBar |
| Not set by default (set in extension settings) | Toggle show/hide Window Position Bar |
monitor keybindings |
Can be changed in PaperWM extension settings |
|---|---|
| SuperShiftRight | Switch to the right monitor |
| SuperShiftLeft | Switch to the left monitor |
| SuperShiftUp | Switch to the above monitor |
| SuperShiftDown | Switch to the below monitor |
| ShiftCtrlAltRight | Move workspace to monitor on the right |
| ShiftCtrlAltLeft | Move workspace to monitor on the left |
| ShiftCtrlAltUp | Move workspace to monitor above |
| ShiftCtrlAltDown | Move workspace to monitor below |
| SuperAltRight | Swap workspace with monitor to the right |
| SuperAltLeft | Swap workspace with monitor to the left |
| SuperAltUp | Swap workspace with monitor above |
| SuperAltDown | Swap workspace with monitor below |
| ShiftCtrlSuperRight | Move active window to the right monitor |
| ShiftCtrlSuperLeft | Move active window to the left monitor |
| ShiftCtrlSuperUp | Move active window to the above monitor |
| ShiftCtrlSuperDown | Move active window to the below monitor |

The scratch layer is an escape hatch to a familiar floating layout. This layer is intended to store windows that are globally useful like chat applications and in general serve as the kitchen sink. When the scratch layer is active it will float above the tiled windows, when hidden the windows will be minimized.
Pressing SuperEscape toggles between showing and hiding the windows in the scratch layer. Activating windows in the scratch layer is done using SuperTab, the floating windows having priority in the list while active. When the tiling is active SuperShiftTab selects the most recently used scratch window.
SuperCtrlEscape will move a tiled window into the scratch layer or alternatively tile an already floating window. This functionality can also be accessed through the window context menu (AltSpace).
scratch keybindings |
Can be changed in PaperWM extension settings |
|---|---|
| ShiftSuperEscape | Toggles the floating scratch layer |
| CtrlSuperEscape | Attach/detach active window into scratch layer |
| SuperEscape | Toggle the most recent scratch window |
PaperWM implements the following touchpad gestures by default:
| Gesture | Action |
|---|---|
| three-finger swipe up | Gnome Overview |
| three-finger swipe down | PaperWM workspace stack view (see here) |
| three-finger swipe left/right | Moves tiling viewport (windows) left / right |
PaperWM touchpad gesture behaviour can be modified via the General tab in PaperWM settings:

#476 added a coloured window position bar to the Gnome Top Bar. This allows users to visually identify the current selected window position of the scrollable viewport in the current workspace. This is demonstrated in the following video:
paperwm-window-position-bar.mp4
The window position bar can be disabled from PaperWM extension settings:

You can style both the coloured position bar and the dimmed "position bar backdrop" by overriding the paperwm-window-position-bar and paperwm-window-position-bar-backdrop CSS classes respectively (see user.css in User configuration & development section for more information). The paperwm-window-position-bar will also inherit the selection color (same as window borders) from tile-preview.
Note: PaperWM overrides the default Gnome Top Bar style to be completely transparent so that the dimmed window-position-bar-backdrop and window-position-bar elements are visible.
#482 added the concept of window focus modes to PaperWM. A focus mode controls how windows are "focused". The following modes are currently available:
- the
DEFAULTfocus mode is the traditional PaperWM behaviour (no snapping, just free scrolling) - the
CENTERfocus mode causes all windows to be centered horizontally on selection - the
EDGEfocus mode causes windows to snap to the closest edge horizontally on selection (but while there is only one window, it is centered)
Focus modes can be toggled by user-settable keybinding (default is Super+Shift+c), or by clicking the new focus-mode button in the Top Bar:

The default focus mode is the standard PaperWM focus mode (i.e. not centered). This can be changed according to preference by changing the Default focus mode setting PaperWM settings.

Note: changing this setting during a PaperWM session will set all spaces to the new default focus mode.
Users may also prefer to hide the focus mode icon. You can do so from the Avanced tab in PaperWM extension settings:
![]()
It's possible to set window properties using simple rules that will be applied when placing new windows. Properties can applied to windows identified by their wm_class or title. The following properties are currently supported:
| Property | Input type | Input example | Description |
|---|---|---|---|
scratch_layer |
Boolean | true, false |
if true window will be placed on the scratch layer. |
preferredWidth |
String value with % or px unit |
"50%", "450px" |
resizes the window width to the preferred width when it's created. Note1: property not applicable to windows on scratch layer. |
Window properties can be added using the Winprops tab of the PaperWM extension settings:
paperwm-winprops-settings.mp4
The wm_class or title of a window can be found by using looking glass: AltF2 lg Return Go to the "Windows" section at the top right and find the window. X11 users can also use the xprop command line tool (title is referred as WM_NAME in xprop). The match of wm_class and title are with an OR condition; and in addition to a plain string matching, a constructed RegExp() can be used to utilise regex matching. For example, e.g. /.*terminal.*/i would match on any value that contains the word "terminal" (case-insensitive).
You can use the functionality defined in the setting window specific properities section to define a default window property rule that will be applied to all windows NOT matched by a more specific window property rule.
You do this by using the special "match all" operator * as an input for wm_class or title. The below image shows setting a default Preferred width value of 50%.

This special operator is at a lower precedence, so more specific properties that match a window will always take precedence and be applied.
By default PaperWM inserts new windows to the right of the currently active window. This behaviour can be changed via PaperWM settings, or with the Open Window Position button/icon (which is to the right of the focus mode icon):

There are several positions available for selection. Namely, right, left, start, end. The latter two will insert windows at the start or end of tiled windows container.
Options for these settings, as well as settings to enable/disable specific positions in the Open Window Position buttons, are provided in PaperWM settings:
Screencast.from.2024-04-19.08-06-43.webm
PaperWM provides functionality to move, reorder, and close multiple windows at once. These "multi-window" operations are initialised with the Take the window, dropping it when finished navigating keybind (default SuperT).
This allows you to take multiple windows and temporarily store them in the bottom-right corner of the workspace. The following operations are available while there are one or more windows "taken":
Selectively take/drop windows (pressing spacebar to drop the latest taken window):
paperwm-selective-take-drop.mp4
Selecting all windows across spaces to close at once (pressing q):
paperwm-closing-all-windows-across-spaces.mp4
Reordring "taken" windows and selectively dropping them:
paperwm-take-window-cycling.1.mp4
You can supply a custom user.css in ~/.config/paperwm/. This user stylesheet can override the default styles of paperwm (e.g. from ~/.local/share/gnome-shell/extensions/paperwm@paperwm.github.com/user.css or /usr/share/gnome-shell/extensions/paperwm@paperwm.github.com/user.css), gnome or even other extensions. The same rules as for CSS in the browser apply (i.e. CSS rules are additive).
You can reload the user.css by disabling (turning off) PaperWM and then re-enabling PaperWM (turning on), e.g via Extensions app, or by running Main.loadTheme() in looking glass (i.e. AltF2 lg Return). Note that the latter approach will reload all other .css files (e.g. from other extensions) and user.css needs to already be loaded for this to work. So after initially creating the file you'll need to disable then enable PaperWM (or restart Gnome).
PaperWM provides an extension settings UI to modify many of PaperWM's more prevalent settings. This is available in the gnome-extensions application.
You can also use dconf-editor to view and modify all PaperWM user settings. You can view all settings by executing the following command from a terminal:
GSETTINGS_SCHEMA_DIR=::$HOME/.local/share/gnome-shell/extensions/paperwm@paperwm.github.com/schemas dconf-editor /org/gnome/shell/extensions/paperwm/ &>/dev/nullBelow is a list of user-configurable settings that are not exposed in the PaperWM settings UI. These can be modified via dconf-editor.
| Setting | Description | Input Type | Default value |
|---|---|---|---|
default‑background |
Sets the (default) background used for PaperWM workspaces. If set will use this background instead of colors defined in workspace-colors. |
absolute path | empty |
Note: you can override this for individual workspaces in the settings UI.
Example:
dconf write /org/gnome/shell/extensions/paperwm/default-background '"/home/user/Wallpaper/mars-sunset-2k.jpg"'
| Setting | Description | Input Type | Default value |
|---|---|---|---|
workspace‑colors |
Sets the workspace background color palette. | String array of colors | ['#314E6C', '#565248', '#445632', '#663822', '#494066', '#826647', '#4B6983', '#807D74', '#5D7555', '#884631', '#625B81', '#B39169', '#7590AE', '#BAB5AB', '#83A67F', '#C1665A', '#887FA3', '#E0C39E'] |
PaperWM by default changes the opacity of the Gnome Top Bar. This styling is used for certain PaperWM features. However, this styling may conflict with the Top Bar styling of other extensions (that you may prefer have style the Top Bar instead).
Users can disable PaperWM's ability to change GNOME Top Bar styling from PaperWM settings:

Note: several PaperWM specific features are dependent on changing the Gnome Top Bar to function correctly. If you choose to disable PaperWM's ability to change the Top Bar styles (with the setting above), you may also want to disable the Window Position Bar.
There's a few Gnome Shell settings which works poorly with PaperWM. Namely
workspaces-only-on-primary: Multi monitor support require workspaces spanning all monitorsedge-tiling: We don't support the native half tiled windowsattach-modal-dialogs: Attached modal dialogs can cause visual glitching
PaperWM manages these settings (disables them) during runtime. It will then restore these settings to their prior values when PaperWM is disabled.
These extensions are good complements to PaperWM:
- Switcher - combined window switcher and launcher
- Dash to Dock - a great dock
In most cases it should be enough to disable these extensions.
- DING (Desktop Icons NG) (shipped by default with Ubuntu) or similar extensions that add desktop icons. Creates invisible windows and does not properly show icons. See #784, #266
- Fedoras builtin desktop watermark (shipped with Fedora) See #706
- Rounded Window Corners or similar extensions that change the window shape. See #763, #431
- Space Bar or similar extensions that modify workspace names etc. See #720
- Dash to Panel or similar panels. Works in some configurations and in some not. Is incompatible with PaperWMs window position bar. See #170, #199, #646, #382, #166, #258
See issues tagged with the extension-conflict label for current and closed issues related to extension conflicts.
In general extensions that do one of the following are problematic when used together with PaperWM (although they might partially work):
- Modify the desktop
- Modify window "shapes" (e.g. rounded corners)
- Modify workspaces
- Modify touch gestures
PaperWM will attempt to disable keybindings of some known extensions if they clash. E.g. the Ubuntu Tiling Assistant from Ubuntu 23.10.
More projects are embracing the scrollable tiling concept! The following projects may be of interest to others (especially if PaperWM doesn't quite work for you):
- Niri: https://github.com/YaLTeR/niri
- Karousel (for KDE): https://github.com/peterfajdiga/karousel
- papersway (for i3/sway): https://spwhitton.name/tech/code/papersway/
A similar idea was apparently tried out a while back: 10/GUI.