As a react developer you are probably familiar with CRA (Create React App) and how easy it is to spin up a react app and to get going writing react apps. However CRA does come with some drawbacks. Here are a few:
-
It becomes difficult to have multiple build outputs for multiple environments. For example, you can add env files that allow you to access an environment in your app code, but if you want to control it in the build flow you basically need to eject the app or start leveraging config override depedencies.
-
CRA uses older versions of many packages and doesn’t stay up to date with new versions as quickly as they become production ready (as of writing this, CRA is still on webpack 4.41.2 despite version 5 having been out for 10+ months.)
-
You can't use import aliases for paths, like
import { ITruck, ICar, IVehicle } from '@models'easily. It's possible to use a tsconfig's paths section combined with an eslint plugin and a webpack plugin to use them in all 3 contexts (type script design time, webpack compile time, and eslint design time.) Thus enabling all contexts to use your path aliases. Having this kind of control over the configs and plugins needs an ejected react app. -
Developers using CRA are relying on CRA and don't necessarily know how to fix anything should they ever be forced to eject a CRA based app. There is a lot of value in understanding the tools CRA uses to allow you to write react apps. For example, you can leverage yarn to temporarily apply a patch if you encounter a bug in a depedency allowing you to continue on while the bug is fixed by plugin authors.
It is worth noting here that webpack 5 has breaking changes with webpack 4, which is likely holding CRA back from upgrading to WebPack 5, which is another supporting reason to roll your own if you want to take advantage of the latest features in the most recent webpack. If you want to know what's new in Webpack 5 and why you might care to be using it you can refer to the release notes from webpack.js.org here: https://webpack.js.org/blog/2020-10-10-webpack-5-release/
Aside from the drawbacks to using CRA, maybe you just want to better understand the tools you are using and how they work. In this article I’m going to show you how to start from an empty command line, using VSCode, and Node.js to create a Hello World React app in Typescript while having configured it from scratch. I will also link you to resources covering each depedency.
I'm going to go ahead and assume you already have vscode and node.js installed and know how to operate VSCode.
I'm also going to assume you have the latest version of npm installed, if not, upgrade it withnpm install -g npm@latestas this can cause issues if you are running on a really old version of npm despite having installed a new node.
You can clone the git repository here to already have all these steps: https://github.com/rmannjbs/WP5ReactTSFromScratch.git
cd somePath
git clone https://github.com/rmannjbs/WP5ReactTSFromScratch.git ./
If you want to just examine the repo you can install yarn globally and just run "yarn install" on the project to install all the depedencies.
To walk through it from scratch with this guide continue on.
The first command we'll run is:
npm init This command initializes your project so it'll have a package.json with some defaults setup. You can walk through the prompt and choose whatever you feel is appropriate for settings, just take the defaults if you want.
Now let's install yarn, as we'll be using it for all farther package depedency installs from this point forward. If you're curious about yarn you can check out the documentation here: https://classic.yarnpkg.com/en/docs
Note: when using yarn it is important that you don't use NPM anymore (except for global packages) as it will create a package.lock.json that conflcits with yarn.lock.json. So you need to either only use NPM or only use Yarn. For this turotiral I'll be using yarn from here on.
Run the following command:
npm install -g yarn We'll setup SCSS and post css with auto prefixer in this tutorial to illustrate how. First we need to install some depedencies...
Run the following command:
yarn add -D postcss sass@1.32 postcss-preset-env autoprefixerNote, I'm using sass@1.32 here because the latest version of sass has deprecated warnings to prep scss authors for breaking changes in sass@2.0.0 and some libraries like font-awesome haven't updated their use of the / (division) operator to the new math library yet. So to not get spammed with deprecation warnings in this project I have stopped at the last sass version before the warnings were added. If you don't need SASS this is irrelevant. If none of your depedencies use / operator for division in their scss files then you can use the latest version without getting spammed with deperecated warnings from the libraries.
Add the postcss.config.js file to the root of your project:
module.exports = {
    plugins: [
        [
            "postcss-preset-env",
            {
                // Options
            },
        ],
        require('autoprefixer'),
    ],
};
note this tells postcss to use autoprefixer for the last 2 major browser versions, you might want to edit your browser targets to suit your needs.
For more details check out the post css documentation: https://github.com/postcss/postcss
Now let's start diving into the first depedencies for building a react app with WebPack version 5+. For a reference to webpack you can visit their website: https://webpack.js.org/concepts/
yarn add -D webpack@"^5.0.0" webpack-cli| Plugin Name | Usage |
|---|---|
| eslint-webpack-plugin | used to enable eslint in the webpack build process and Hot Module Replacement |
| tsconfig-paths-webpack-plugin | used to resolve imports from tsconfig path aliases |
| sass-loader | used to process Syntactically Awesome Style Sheets |
| postcss-loader | used to post process css files to apply auto prefixer |
| css-loader | used to process css to be output |
| style-loader | used to inject css to the page |
| terser-webpack-plugin | used to minify assets |
| html-webpack-plugin | used to tell webpack to generate an index.html for our project from a template html file |
| webpack-dev-server | used to run our react app locally with hot module reloading |
| source-map-loader | lets webpack load source maps for files |
Next: install the plugins by running following command:
yarn add -D eslint-webpack-plugin tsconfig-paths-webpack-plugin sass-loader postcss-loader css-loader style-loader terser-webpack-plugin html-webpack-plugin webpack-dev-server source-map-loaderNext we're going to add all the babel depedencies, we are going to write our webpack config file using babel. We are going to use babel 7. You can checkout babel at their website: https://babeljs.io/docs/en/ For a short explanation of babel: It is a javascript transpiler that will compile our typescript for us and handle polyfilling for browser targets and making sure compiled JS is compatible with those browser targets.
Run the following command to install the babel depedencies:
yarn add -D @babel/core@"^7.0.0" babel-loader@"^8.0.0" @babel/register@"^7.0.0" @babel/preset-env@"^7.0.0" @babel/preset-typescript@"^7.0.0" @babel/preset-react@"^7.0.0" core-js@"^3.0.0"So what is all this stuff?
...
Babel is a transpiler for JS, so you just installed the core of babel, babel register, preset-env, and core-js version 3+. Babel Register allows babel to hook into node's require resolution allowing you to load babel scripts with the .babel.js extension inside of node scripts that will get transpiled by babel. This enables you to do exports/imports etc in npm scripts. Preset-env is a set of defaults for how to transpile JS through babel using the latest core-js. Core-JS contains a slew of polyfills and other standards to ensure your JS will run on your target browsers. I.e. if you target IE11 and write Javascript that doesn't support IE11 Preset-env will handle pulling in the appropriate poly fills from core-js for you and transpiling your Javascript in a way where it will work on Internet Explorer 11.
Now add babel config to your package.json (this prevents throwing another file in your source):
  "babel": {
    "presets": [
      [
        "@babel/preset-env",
        {
          "targets": {
            "node": "current"
          },
          "corejs": "3",
          "useBuiltIns": "usage"
        }
      ]
    ]
  }
note, this is mainly to tell babel how to be used in node.js scripts like our build files, we'll redefine how babel should be used on the typescript loader in the webpack config when we get there.
Next lets install typescript Run the following command:
yarn add -D typescript@"^4.0.0"Now let's create a tsconfig.json in the root of the project and setup some compiler options... we'll use the following contents for tsconfig.json:
{
    "compilerOptions": {
        "target": "ES2019",
        "lib": [
            "dom",
            "dom.iterable",
            "esnext"
        ],
        "allowJs": true,
        "allowSyntheticDefaultImports": true,
        "skipLibCheck": true,
        "esModuleInterop": true,
        "strict": true,
        "baseUrl": "./src",
        "rootDir": "./src",
        "alwaysStrict": true,
        "forceConsistentCasingInFileNames": true,
        "moduleResolution": "node",
        "resolveJsonModule": true,
        "isolatedModules": true,
        "noEmit": true,
        "jsx": "react",
        "paths": {
            "@routes/*": [
                "routes/*"
            ]

        }
    },
    "include": [
        "src"
    ]
}
The tsconfig.js configures how typescript will behave in the project, you can make it as strict as you want it to be. For a full list of options check the documentation here: https://www.typescriptlang.org/tsconfig...
For now I've told it to use ES2019 for a target, allowJs is true which allows you to write js... But most important here is that noEmit is true. So we're not going to have type script output anything here. Instead we're using typescript as a middle man in the babel pipeline, and babel will transpile our typescript for us. Additionally I've set the root directory and baseUrl to ./src and setup a path alias for @routes which I'll get to later in this documentaiton.
Now let's install eslint for the linter and typescript and the react plugin for eslint run the following command
yarn add -D eslint eslint-plugin-import typescript-eslint @typescript-eslint/parser @typescript-eslint/eslint-plugin eslint-import-resolver-typescript eslint-plugin-react eslint-plugin-react-hooksNote* We went ahead and grabbed the typescript stuff we need to make eslint work with typescript and a plugin for react for eslint in this step, we'll set them up later.
ESLint Documentation: https://eslint.org/docs/user-guide/configuring/
Next we'll set up the configuration file for eslint to use typescript and add a rule. You can add as many rules as you want, there's an entire list of available rules for ESLint here: https://eslint.org/docs/rules/
The purpose of the linter is to give you helpful warnings and or errors about your typescript and javascript as you write it. You can use eslint to enforce code standards and writing code a specific way.
Edit your package json and add the following section to your package.json (this prevents having to have it as a root file in the project .. i.e. eslintrc.json)
  "eslintConfig": {
    "env": {
      "browser": true,
      "node": true
    },
    "globals": {
      "fetch": true
    },
    "root": true,
    "parser": "@typescript-eslint/parser",
    "parserOptions": {
      "ecmaVersion": 2019,
      "sourceType": "module",
      "ecmaFeatures": {
        "jsx": true
      }
    },
    "plugins": [
      "@typescript-eslint",
      "react",
      "react-hooks",
      "import"
    ],
    "extends": [
      "eslint:recommended",
      "plugin:@typescript-eslint/eslint-recommended",
      "plugin:@typescript-eslint/recommended",
      "plugin:react/recommended",
      "plugin:react-hooks/recommended"
    ],
    "rules": {
      "@typescript-eslint/no-unused-vars": [
        "warn"
      ],
      "react/prop-types": "warn",
      "import/no-unresolved": "warn",
      "react-hooks/rules-of-hooks": "error",
      "react-hooks/exhaustive-deps": "warn"
    },
    "settings": {
      "react": {
        "pragma": "React",
        "version": "detect"
      },
      "import/parsers": {
        "@typescript-eslint/parser": [
          ".ts",
          ".tsx"
        ]
      },
      "import/resolver": {
        "node": {
          "extensions": [
            ".ts",
            ".tsx"
          ]
        },
        "typescript": {
          "extensions": [
            ".ts",
            ".tsx",
            ".js",
            ".jsx"
          ],
          "alwaysTryTypes": true
        }
      }
    }
  }
Notes on ESLint Json: We've added plugins for react and react rules of hooks here so you get linting on react and will get errors if you use hooks incorrectly in your source code. You can add more rules for react if you'd like, they are found here: https://github.com/yannickcr/eslint-plugin-react
Now let's create a folder structure in our project to support the webpack build we're getting ready to make. I have used a very basic example here, but one of the points of this is your folder structure can be whatever you want it to be.
Add the following folders and files:
Note: React Component file names should start with a capital letter because react jsx components have to start with a capital letter. So in this example I start all their filenames with a capital letter to be consistent with the component being exported in the file.
- build
- config
- paths.js
- webpack
- baseWebPackConfig.js
- local.webpack.config.babel.js
- htmlTemplates
- local.index.html
- config
- dst
- src
- assets
- scss
- themes
- _metroTheme.scss
- variables
- _vendorVariables.scss
- app.scss
- vendor.scss
- themes
- scss
- components
- routes
- home
- HomeRoute.tsx
- index.tsx
- index.tsx
- home
- App.tsx
- routes
- assets
- index.tsx
To start with, let's create a helper for calculating our paths in the build\config\paths.js file. It should look like this:
FileName: build\config\paths.js:
import path from 'path'; //path library from node.js

function paths() {
    this.root = path.resolve(path.join(__dirname), '../../');
    this.src = path.join(this.root, 'src');
    this.srcIndexEntry = path.join(this.src, 'index.tsx');
    this.srcScss = path.join(this.src, 'assets', 'scss');
    this.srcScssEntry = path.join(this.srcScss, 'app.scss');
    this.srcScssVendorEntry = path.join(this.srcScss, 'vendor.scss');

    this.dst = path.join(this.root, 'dist');

    this.build = path.join(this.root, 'build');
    this.buildHtmlTemplates = path.join(this.build, 'htmlTemplates');
    this.buildHtmlTemplatesLocalIndex = path.join(this.buildHtmlTemplates, 'local.index.html');

    this.nodemodules = path.join(this.root, 'node_modules');
}

export default new paths();
note: you can add more as you need to the paths.js file. The goal is that you should edit all your paths here and not put them in your main webpack config files which will make it easier to change paths used through the config files if you move file or folder structures around later. (something you can't easily do with CRA).
Now let's start creating our webpack configuration.... You can refer to the documentation here to understand this file more: https://webpack.js.org/configuration/#options but basically the webpack.config is what tells webpack what to do. It's where you define your entry point (index.js for example) for your application and how it should be output. You can also add a slew of plugins like the HtmlWebpackPlugin which can generate your index.html with your bundles in it for you so you never have to update your script links manually. We will be installing some more plugins for webpack as we proceed.
Create a file in the build/webpack folder called baseWebPackConfig.js:
We'll put the bulk of the logic for webpack here so it can be used in specific environment based builds, and we'll start with just doing one for our local environment.
In your baseWebPackConfig.js go ahead and add the following contents:
import paths from '../config/paths'; //*our helper paths config so we don't do path calcs in here*
//plugins for webpack
import HtmlWebpackPlugin from 'html-webpack-plugin'; //docs -> https://webpack.js.org/plugins/html-webpack-plugin/
import tsConfigPathPlugin from 'tsconfig-paths-webpack-plugin'; //docs -> https://www.npmjs.com/package/tsconfig-paths-webpack-plugin
import TerserPlugin from 'terser-webpack-plugin'; //docs -> https://github.com/webpack-contrib/terser-webpack-plugin
import sass from 'sass'; //docs -> https://sass-lang.com/install
import ESLintPlugin from 'eslint-webpack-plugin';


//separate so we can call it differently pending on build environment
function getPlugins(env) {
    const htmlWebPackPlugin = new HtmlWebpackPlugin({
        title: 'Your App Name Here',
        fileName: 'index.html', //you can set whatever filename you want here, i.e. index.php if you wanted to generate a php file that will be served by an existing php app.
        template: paths.buildHtmlTemplatesLocalIndex,
        inject: 'body', //tell html webpack plugin where to inject scripts, body places them at end of body
        publicPath: '/',
        scriptLoading: 'blocking', //this is an SPA so we'll block, but you might want to defer for your use case
        hash: true,
        cache: true,
        showErrors: true
    })

    return [
        htmlWebPackPlugin,
        new ESLintPlugin({
            context: paths.root,
            extensions: ["js", "jsx", "ts", "tsx"],
        })
    ]
}

//separate function to get the config so we can call it from environment based config files.
export function getBaseWebPackConfig(env, argv) {
    let config = {};
    config.mode = 'development'; //we'll set the mode here, you could set this differently pending on the value of env or argv being passed in from command line
    const isLocalDev = argv.env.localdev ? true : false;

    //get the plugins from our getPlugins helper
    config.plugins = getPlugins(env);

    //read up on code splitting, you can use this entry object to define your app as separate entry chunks that depend on each other to optimize
    //how webpack generates your bundle.
    config.entry = {
        //here we are defining two entries which will be separate chunks and we are telling webpack
        //that the app entry depends on the vendor entry.
        //we'll configure our vendor styles (bootstrap/overrides etc to be output in a separate chunk)
        vendor: {
            import: paths.srcScssVendorEntry
        },
        app: {
            import: paths.srcIndexEntry,
            dependOn: 'vendor'
        }
    }

    config.output = {
        filename: '[name].[contenthash].js', //we have more than one chunk, so we want webpack to output based on the chunks name (app or vendor) and it's content hash
        //the content hash will change when the files content changes
        path: paths.dst, //this tells webpack where to output the files, here we're using the path we calculating in our config paths helper
        clean: true, //this tells webpack to clean the output path first, so if the files exist they'll be cleaned up first.
        assetModuleFilename: 'assets/[name][ext]' //make assets have friendly names
    }


    config.resolve = {
        extensions: [".scss", ".js", ".jsx", ".tsx", ".ts"],
        plugins: [
            new tsConfigPathPlugin() //this is the third final piece to using tsConfig as a source of truth for path aliases, it tells webpack to use it to resolve aliases in our actual code during compilation.
        ]
    }


    //rules tell webpack what to do on specific tests, so
    //we need to tell webpack what to do when it's processing a type script file
    //or a scss file or an image, etc etc etc.
    config.module = {
        rules: [
            {
                test: /\.(js|ts)x?$/i, //here we define a regex that will run on all ts or js files with tsx or jsx.
                exclude: /[\\/]node_modules[\\/]/, //we tell the loader to ignore node_modules, we will split all node modules out in the vendor chunk
                use: [
                    {
                        loader: 'babel-loader', //use the babel loader
                        options: {
                            presets: [
                                '@babel/preset-env', //use presets for env, react, and typescript
                                '@babel/preset-react',
                                '@babel/preset-typescript'
                            ]
                        }
                    },
                    {
                        loader: 'source-map-loader',
                        options: {

                        }
                    }
                ]
            },
            {
                //this is another webpack 5 feature you don't get with CRA on webpack 4.  It can automatically pull any
                //files we reference and spit them out as assets in the output folder.  In webpack 4 you had to use file loader, url loader, and so on
                //no more with webpack 5, much simpler.
                test: /\.(woff(2)?|ttf|eot|svg|jpg|jpeg|png|gif|pdf)(\?v=\d+\.\d+\.\d+)?$/, //here we tell webpack that all fonts, images, pdfs are are asset/resource
                type: 'asset/resource'
            },
            {
                test: /\.(scss|sass)$/, //tell webpack how to process scss and sass files
                include: [
                    paths.src,
                    paths.nodemodules //our vendor files etc will resolve files from node_modules so we need to tell webpack sass to include node_modules
                ],
                use: [ //use tells this rule what loaders to use, loaders are used in a last to first order.  So the last loader is processed first, then the loader above it, till the first loader.
                    {
                        //note, in production you should use a css extractor here instead but extracting css is slow so using style-loader is much faster in development
                        loader: 'style-loader', // docs -> https://webpack.js.org/loaders/style-loader/
                        options: {
                            esModule: false,
                            insert: 'head'
                        }
                    },
                    {
                        loader: 'css-loader', //docs -> https://www.npmjs.com/package/css-loader
                        options: {
                            modules: false, //disable modules, this build isn't using styled components in react
                            esModule: false,  //disable es module syntax
                            sourceMap: true //Enables/Disables generation of source maps
                        }
                    },
                    {
                        loader: 'postcss-loader', //docs -> https://github.com/webpack-contrib/postcss-loader
                        options: {
                            sourceMap: true
                        }
                    },
                    {
                        loader: 'sass-loader',
                        options: {
                            sourceMap: true,
                            implementation: sass
                        }
                    }
                ]
            }
        ]
    }

    //you have control over optimization here, i.e. you can tell webpack
    //how to split chunks and can create test functions for say CSS so css get's extracted to it's own chunk.
    config.optimization = { // these are the defaults from  //docs -> https://webpack.js.org/plugins/split-chunks-plugin/#defaults
        splitChunks: {
            chunks: 'async',
            minSize: 20000,
            minRemainingSize: 0,
            minChunks: 1,
            maxAsyncRequests: 30,
            maxInitialRequests: 30,
            enforceSizeThreshold: 50000,
            cacheGroups: {
                defaultVendors: {
                    test: /[\\/]node_modules[\\/]/,
                    priority: -10,
                    reuseExistingChunk: true,
                },
                default: {
                    minChunks: 2,
                    priority: -20,
                    reuseExistingChunk: true,
                },
            },
        },
    }


    //only run the dev server if we're in local dev passed in from command line args.
    if (isLocalDev) {
        console.log('DEV SERVER');
        config.devtool = 'eval-source-map';
        config.devServer = {
            historyApiFallback: true,
            hot: true, //turns on hot module reloading capability so when we change src it reloads the module we changed, thus causing a react rerender!
            port: 9000,
            client: {
                progress: true,
                overlay: true,
                logging: 'info' //give us all info logged to client when in local dev mode
            },
            static: {
                publicPath: '/',
                directory: paths.dst
            }
        }
    } else {
        config.devtool = 'source-map';
    }

    return config;
}Now we'll add the actual file that will be our entry point for webpack, for running locally. We'll call it local.webpack.config.babel.js
Note the .babel.js extension here, this get's picked up by @babel/register mentioned earlier on when installing babel. This enable ES6 import/export etc to work in our webpack config build files and processes the webpack config with babel.
Go ahead and create a file in build/webpack called local.webpack.config.babel.js with the following contents:
import { getBaseWebPackConfig } from './baseWebPackConfig';

function getLocalWebPackConfig(env, argv) {
    const webPackConfig = getBaseWebPackConfig(env, argv);
    //here you can make changes to or override things in the config object passed
    //back from getBaseWebPackConfig before returning it.  We've simply wrapped the base function
    //i.e you could change the webPackDev Server, or change paths config, etc w/e you need to
    //be different.
    return webPackConfig;
}

module.exports = getLocalWebPackConfig
Edit the file build/htmlTemplates/local.index.html and add the following content:
<!DOCTYPE html>
<html>
<head>
  <meta charset="utf-8" />
  <meta name="viewport" content="width=device-width, initial-scale=1">
  <meta http-equiv="Cache-control" content="no-cache, no-store, must-revalidate">
  <meta http-equiv="Pragma" content="no-cache">
  <link rel="shortcut icon" href="data:image/x-icon;," type="image/x-icon">
</head>
<body >
  <div id="appMainBody"></div>
</body>
</html>We'll setup some basic SCSS here just as a rough example, a more in depth scss tutorial for setting up bootstrap 5 will have to come in a follow up blog.
- Edit the file src/assets/scss/themes/_metroTheme.scss and add the following contents:
/* this isn't a complete theme just an example */
$spacer: 1rem;
$enable-rounded: false;
$enable-shadows: false;
$enable-gradients: false;
$enable-transitions: false;
$enable-prefers-reduced-motion-media-query: true;
$enable-responsive-font-sizes: true;
- Edit the file src/assets/variables/_vendorVariables.scss and add the following contents:
@import '../themes/metroTheme';
- Edit the file src/assets/scss/app.scss and add the following contents:
/* reimport variables so we have them in app scss */
@import './themes/metroTheme';
@import '~/bootstrap/scss/_variables';
- Edit the file src/assets/scss/vendor.scss and add the following contents:
$fa-font-path: '~font-awesome/fonts';
@import './variables/vendorVariables';
@import '~bootstrap/scss/bootstrap';
@import '~font-awesome/scss/font-awesome';
Add the following contents to src/components/routes/home/HomeRoute.tsx:
import React, { useState } from 'react';
import { Container, Col, Row } from 'react-bootstrap';

export const HomeRoute = () : React.ReactElement => {
    const [testState] = useState<boolean>(true);
    if (testState) {
        const [oppsState] = useState<boolean>(false); //broken on purpose to show linting errors.
    }
    return (
        <Container fluid className="gx-0">
            <Row>
                <Col xs={12}>
                    <h1 className="bg-primary text-center">Hello World!</h1>
                </Col>
            </Row>
        </Container>
    )
}
Add the following contents to src/components/routes/home/index.tsx
export * from './HomeRoute'; //exports all things exported by HomeRoute.tsxAdd the following contents to src/components/routes/index.tsx
export * as Home from './home'; //exports all things exports by index.tsx under /home** Add the following contents to src/components/app.tsx**
import React from 'react';
import { BrowserRouter, Routes, Route, Outlet, Navigate } from 'react-router-dom';
import { HomeRoute } from '@routes/home'; //earlier I talked about the @routes path alias in the TSConfig, this is an example of using it.  It's a short cut so you don't have to folder drill with ../../ etc all over your app.

export const App = () => {
    return (
        <BrowserRouter>
            <Routes>
                <Route path="/home" element={<Outlet />}>
                    <Route path="/" element={(<HomeRoute />)} />
                </Route>
                <Route path="*" element={<Navigate to="/home" /> } />
            </Routes>
        </BrowserRouter>
    )
}
In case you are confused what the index files are for... Imports in es6/typescript automatically look for a file called index with various extensions like .js or .ts or .jsx or .tsx. So when you do
import thing from 'somepath'the import resolver will either look for something at the root called "somepath" and import that, or look for something in the 'somepath' folder called index and load that. So by exporting everything from inside an index it lets you import many things from one path which saves boiler plate on import statements so you can do something like the following:
import { Animal, Dog, Cat, Cow, Horse, Pig } from '@models' //where @models is a type alias in the paths section of your
//tsconfig.json were @models points to a folder with an index file exporting all of your models. for i.e.
Under src, create/edit a file called index.tsx (this will be our main entry point) and add the following contents:
import React from 'react';
import { render } from 'react-dom';
import { App } from './components/App';

function index() {
    return (
        <React.StrictMode>
            <App />
        </React.StrictMode>
    )
}

render(index(), document.getElementById('appMainBody'));
We're about done setting up an initial hello world app from scratch but first we need to install all our run time depedencies like React, React-Router, @types, Luxon, Bootstrap, etc (or anything else you want in your application)
Run the following yarn commands in terminal:
//install the main depdencies

//note - using beta versions of react-router and react-bootstrap
yarn add @popperjs/core bootstrap@"^5.0.0" font-awesome history react@"^17.0.0" react-dom@"^17.0.0" react-bootstrap@"^2.0.0-beta.5" react-router-dom@"^6.0.0-beta.2" react-router@"^6.0.0-beta.2"

//Install typescript types for depedencies
yarn add @types/react @types/react-bootstrap @types/react-dom @types/react-router @types/react-router-domAdd the following scripts section to your package.json:
  "scripts": {
    "build": "webpack --config ./build/webpack/local.webpack.config.babel.js --env=localdev",
    "start": "webpack serve --open --config ./build/webpack/local.webpack.config.babel.js --env=localdev"
  }
Note: the --env flag is how you pass environment flags to the webpack config, here we're passing an environment flag called localdev (which is made up right here)
Let's test the output of the build now and see if it runs and generates lint errors as expected:
yarn build
Your output should resemble:
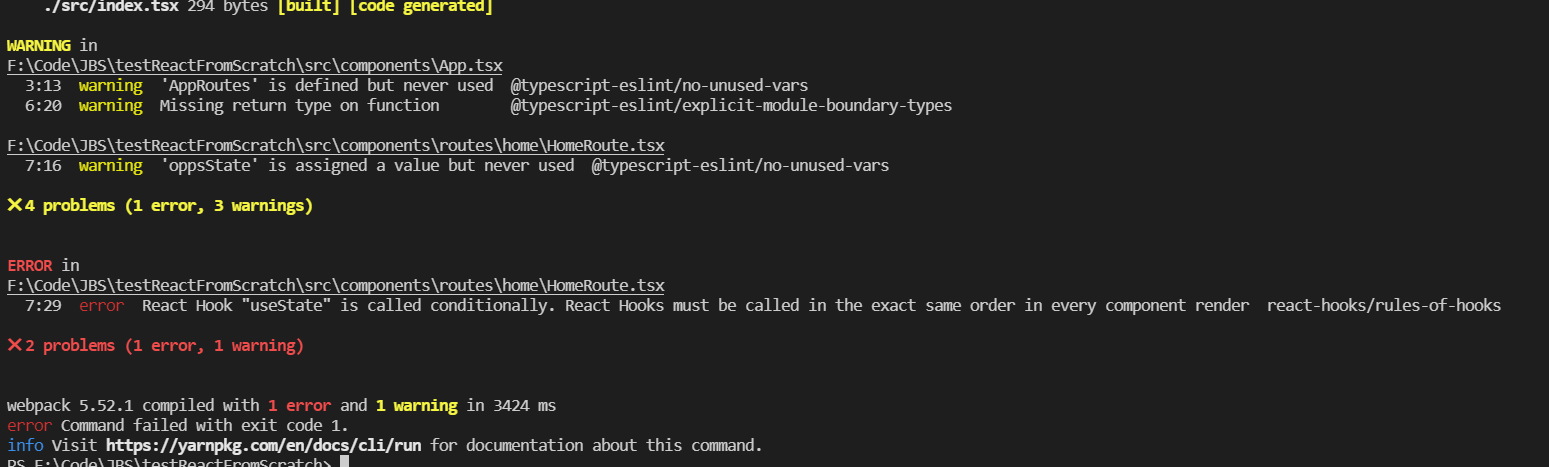
Let's fix the lint errors:
Change App.tsx to the following:
import React from 'react';
import { BrowserRouter, Routes, Route, Outlet, Navigate } from 'react-router-dom';
import { HomeRoute } from '@routes/home'; //earlier I talked about the @routes path alias in the TSConfig, this is an example of using it.  It's a short cut so you don't have to folder drill with ../../ etc all over your app.

export const App = (): React.ReactElement => {
    return (
        <BrowserRouter>
            <Routes>
                <Route path="/home" element={<Outlet />}>
                    <Route path="/" element={(<HomeRoute />)} />
                </Route>
                <Route path="*" element={<Navigate to="/home" /> } />
            </Routes>
        </BrowserRouter>
    )
}
Change HomeRoute.tsx to the following
import React from 'react';
import { Container, Col, Row } from 'react-bootstrap';

export const HomeRoute = () : React.ReactElement => {
    return (
        <Container fluid className="gx-0">
            <Row>
                <Col xs={12}>
                    <h1 className="bg-primary text-center">Hello World!</h1>
                </Col>
            </Row>
        </Container>
    )
}
re-run yarn build and your lint errors should go away and you should have a dist folder with output files in it
Run the following command:
yarn start
Your webserver should be spinning up and the app should load on port 9000.
You have now walked through installing yarn and many depedencies needed for a react/typescript/scss project. You should have full eslint running. If you are not getting linting in VSCode you are likely missing the ESLint plugin or you need to configure your user settings in VS Code to enable the file extensions:
"eslint.validate": [ "javascript", "javascriptreact", "html", "typescriptreact" ]You have setup a local webpack config with an environment flag. If you want to add web pack config's for specific environments you can add them to the build/webpack folder and add new script entries for them in package json.
In part #2 of this blog, I'll cover debugging your build scripts in node.js in VS Code enabling you to breakpoint and walk through your build files in the VS Code debugger.
Part #3 will likely cover adding a testing layer, like Jest and or a Mock API layer like Json-Server