
Table of Contents
- Real-time monitoring of key Apache Kafka metrics
- Producer creation and message generation for cluster throughput testing
- Authentication through Google and GitHub OAuth
- Modern, responsive, and accessibility-conscious UI scaled for desktop and mobile devices
- Customizeable to suit a wide range of Kafka deployment configurations
Whether you want to run our already containerized version of kafkaPRAAG in a demo setup or use the application with a custom cluster, you will need the following to get started:
- A clone of this repository to your local machine
- Jolokia JVM Agent
- Docker or Docker Desktop
- Docker Compose
- Google or GitHub OAuth app registration
- MongoDB instance/cluster
If you want to get up an running with a test cluster, you can use our pre-made cluster in the /demo directory. This setup includes one Zookeeper node, one broker, one consumer, kafkaPRAAG, and producer creation (via kafkaPRAAG) using KafkaJS. Here's how to get started:
- Clone this repository to your local machine
- Download the latest Jolokia JVM agent from here. The filename will be in the format
jolokia-jvm-<version>.jar - Rename the file to
jolokia.jar. (Alternatively, you can skip this step and instead change thedocker-compose.ymlfile in a later step to reflect the current filename.) - Place the .jar file in the
/demo/jolokiadirectory (overwriting the original file if necessary). - Install Docker or Docker Desktop if necessary.
- Install Docker Compose if necessary (
NOTE:Docker Compose is included in Docker Desktop). - Add authentication via NextAuth.js. See the section on adding authentication for detailed setup instructions for authentication and setting up your .env, and return here when done.
- If you chose not to rename
jolokia-jvm-<version>.jar, you must edit thedocker-compose.ymlfile in the/demodirectory.- Open up
docker-compose.ymlin an editor. Underkafka-broker-1, find theenvironmentproperty. You will see the following line:Change- KAFKA_JMX_OPTS=-javaagent:/usr/src/app/jolokia.jar=port=8778,host=0.0.0.0jolokia.jarto the filename of Jolokia JVM agent you downloaded.
- Open up
- In the terminal, navigate to the
/demofolder. Run the commanddocker-compose up. - In your web-browser, navigate to http://localhost:3000 to open the application.
To run kafkaPRAAG with your own custom cluster, you'll need to set up Jolokia with each node to export node-specific JMX data. Here are the steps you'll need to follow:
- Pull the latest version of kafkaPRAAG from Docker Hub by running:
docker pull kafkapraag/kafkapraag:latest - Download the latest Jolokia JVM agent from here. The filename will be in the format
jolokia-jvm-<version>.jar - Copy the Jolokia JVM agent to the same system where the Kafka node will be running. The UID for Jolokia and the Kafka node must match in order for the agent to successfully attach to the running Kafka process.
- If you're running a non-containerized Kafka node on your local machine, then ensure you have the agent on the same machine.
- If you're running the Kafka node in a container, then ensure that the Jolokia JVM agent is either copied over when building the image for the Kafka node, or that you use a bind mount to add the agent to a target volume in the container when the node is spun up. For example, after putting the agent into an empty directory on the host filesystem, you would run the following command from that directory in the terminal:
This spins up a container named
docker run \
--name kafka-broker \
-v ./:/app/jolokia:z \
your/image:latest
kafka-brokerusing the imageyour/image:latest, bind-mounting the current directory in the host filesystem to the container at/app/jolokia. Thejolokia-jvm-<version>.jarfile is now available inside the container. You may also set the bind mount in adocker-compose.ymlfile if you intend to orchestrate your nodes using Docker Compose:kafka-broker-1: container_name: kafka-broker-1 image: ubuntu/kafka:latest ports: - 9092:9092 - 8778:8778 depends_on: - kafka-zookeeper-1 environment: - KAFKA_JMX_OPTS= -javaagent:/usr/src/app/jolokia.jar=port=8778,host=0.0.0.0 -Dcom.sun.management.jmxremote=true -Dcom.sun.management.jmxremote.authenticate=false -Dcom.sun.management.jmxremote.ssl=false -Djava.rmi.server.hostname=localhost -Dcom.sun.management.jmxremote.host=localhost -Dcom.sun.management.jmxremote.port=9999 -Dcom.sun.management.jmxremote.rmi.port=9999 -Djava.net.preferIPv4Stack=true volumes: - ./jolokia:/usr/src/app
- Configure the environmental variables of your shell session to allow your Kafka process to run the Jolokia JVM agent on starting.
- If you're running a non-containerized Kafka node, set the environmental variables in the shell session from which you intend to start the Kafka process:
Note that in the second line,
export KAFKA_JMX_OPTS="
-javaagent:jolokia.jar=port=8778,host=0.0.0.0 \
-Djolokia.updateInterval=500 \
-Dcom.sun.management.jmxremote=true \
-Dcom.sun.management.jmxremote.authenticate=false \
-Dcom.sun.management.jmxremote.ssl=false \
-Djava.rmi.server.hostname=localhost \
-Dcom.sun.management.jmxremote.host=localhost \
-Dcom.sun.management.jmxremote.port=9999 \
-Dcom.sun.management.jmxremote.rmi.port=9999 \
-Djava.net.preferIPv4Stack=true"
jolokia.jarwill need to be changed to the path and filename of the agent on your host filesystem. You can change the host from0.0.0.0tolocalhostif you do not want Jolokia to listen on all network interfaces. - If you're running the Kafka node in a container, you can either set the environmental variable (using the
ENVstatement in your Dockerfile) when building your Kafka node, or add it to yourdocker runcommand like this:You can achieve the same result with Docker compose, by setting an entry under thedocker run --env KAFKA_JMX_OPTS=" \ -javaagent:jolokia.jar=port=8778,host=0.0.0.0 \ -Djolokia.updateInterval=500 \ -Dcom.sun.management.jmxremote=true \ -Dcom.sun.management.jmxremote.authenticate=false \ -Dcom.sun.management.jmxremote.ssl=false \ -Djava.rmi.server.hostname=localhost \ -Dcom.sun.management.jmxremote.host=localhost \ -Dcom.sun.management.jmxremote.port=9999 \ -Dcom.sun.management.jmxremote.rmi.port=9999 \ -Djava.net.preferIPv4Stack=true" \ --name my-kafka-broker \ your/image:latest
environmentproperty of the container you defined for your Kafka node:kafka-broker-1: container_name: kafka-broker-1 image: ubuntu/kafka:latest ports: - 9092:9092 - 8778:8778 depends_on: - kafka-zookeeper-1 environment: - KAFKA_JMX_OPTS= -javaagent:/usr/src/app/jolokia.jar=port=8778,host=0.0.0.0 -Dcom.sun.management.jmxremote=true -Dcom.sun.management.jmxremote.authenticate=false -Dcom.sun.management.jmxremote.ssl=false -Djava.rmi.server.hostname=localhost -Dcom.sun.management.jmxremote.host=localhost -Dcom.sun.management.jmxremote.port=9999 -Dcom.sun.management.jmxremote.rmi.port=9999 -Djava.net.preferIPv4Stack=true volumes: - ./jolokia:/usr/src/app
- If you're running a non-containerized Kafka node, set the environmental variables in the shell session from which you intend to start the Kafka process:
IMPORTANT NOTE: NextAuth.js (now Auth.js) is built with a security-first emphasis. As a result, you CANNOT use multiple accounts for the same user(for example, once you register as a user with your Github account, you won't be able to sign in or out with your Gmail account). Pick your means of authorization carefully!
kafkaPRAAG uses NextAuth (https://github.com/nextauthjs/next-auth) to allow JWT-based user authentication. Before running your application, you'll have to add a few environment variables:
In the same directory as your docker-compose.yml file (i.e. the demo folder when running the demo setup), add your own Google and/or Github authentication secrets to the .env file provided (which we have provided for you), along with a NextAuth secret you generate via the command line:
GitHub OAuth Information
GITHUB_ID=""
GITHUB_SECRET=""

Google OAuth Information
GOOGLE_CLIENT_ID=""
GOOGLE_CLIENT_SECRET=""

NextAuth (Auth.js) Information
NEXTAUTH_URL=http://localhost:3000/

Generate your own secret via the command line: openssl rand -base64 32
NEXTAUTH_SECRET=""

MongoDB Connection URI
MONGODB_URI=""
To get your environment variables for NextAuth, follow directions below:
NOTE: when registering for OAuth, make sure you add the following Authorized redirect URI, including the name of the selected provider at the end. For example, if using Google: http://localhost:3000/api/auth/callback/google
Register for Google OAuth (if link leads to a blank screen, try refreshing the page): https://console.developers.google.com/apis/credentials
Register for Github OAuth: https://developer.github.com/apps/building-oauth-apps/authorizing-oauth-apps
For more OAuth providers, check out NextAuth's documentation here: https://next-auth.js.org/providers/
NOTE: The syntax will be a bit different on their site from our product, as NextAuth's documentation still uses Next12 syntax.
Optional: add MongoDB data collection to your application
To add MongoDB to your application, navigate to src/app/api/models/mongoDB/route.tsx and follow the directions there before moving on in this tutorial. Make sure you follow the directions that lead you to src/app/api/auth/[...nextauth]/route.ts afterwards!
Register your application with MongoDB to verify user sessions: https://www.mongodb.com/basics/create-database
- Create a new organization
- Inside your organization, create a new project ("users" here refers to your team).
- When prompted, click "Build a Database."
- After creation of your database, you will be prompted to create a Username and a Password. These are important values! Store them for later.
- After clicking "create user", connect via "My Local Environment" (your current IP address will be added automatically).
- Click "Finish and Close" - you will then be prompted to "Go to Databases" - hit this button.
- Click "Connect" and choose the "Drivers" option.
- Copy and paste the code below into your DOTENV file (replacing the default values with your values from step 4):
mongodb+srv://<username>:<password>@cluster0.c4twmob.mongodb.net/?retryWrites=true&w=majority
- After successfully running your application, you'll now be able to see your unique users in your "users" collection.
While adding MongoDB to your application is not required for it to run, we recommend setting up a database so that you can a) better track your users and b) add an additional level of security to your Kafka cluster data.
Enter a bootstrap address of the Kafka cluster you want to connect to:
Enter a name for the producer and a messages per second value, then click start to connect the producer and have it begin sending messages to your cluster.
Select a producer from the dropdown menu and click stop to terminate it.
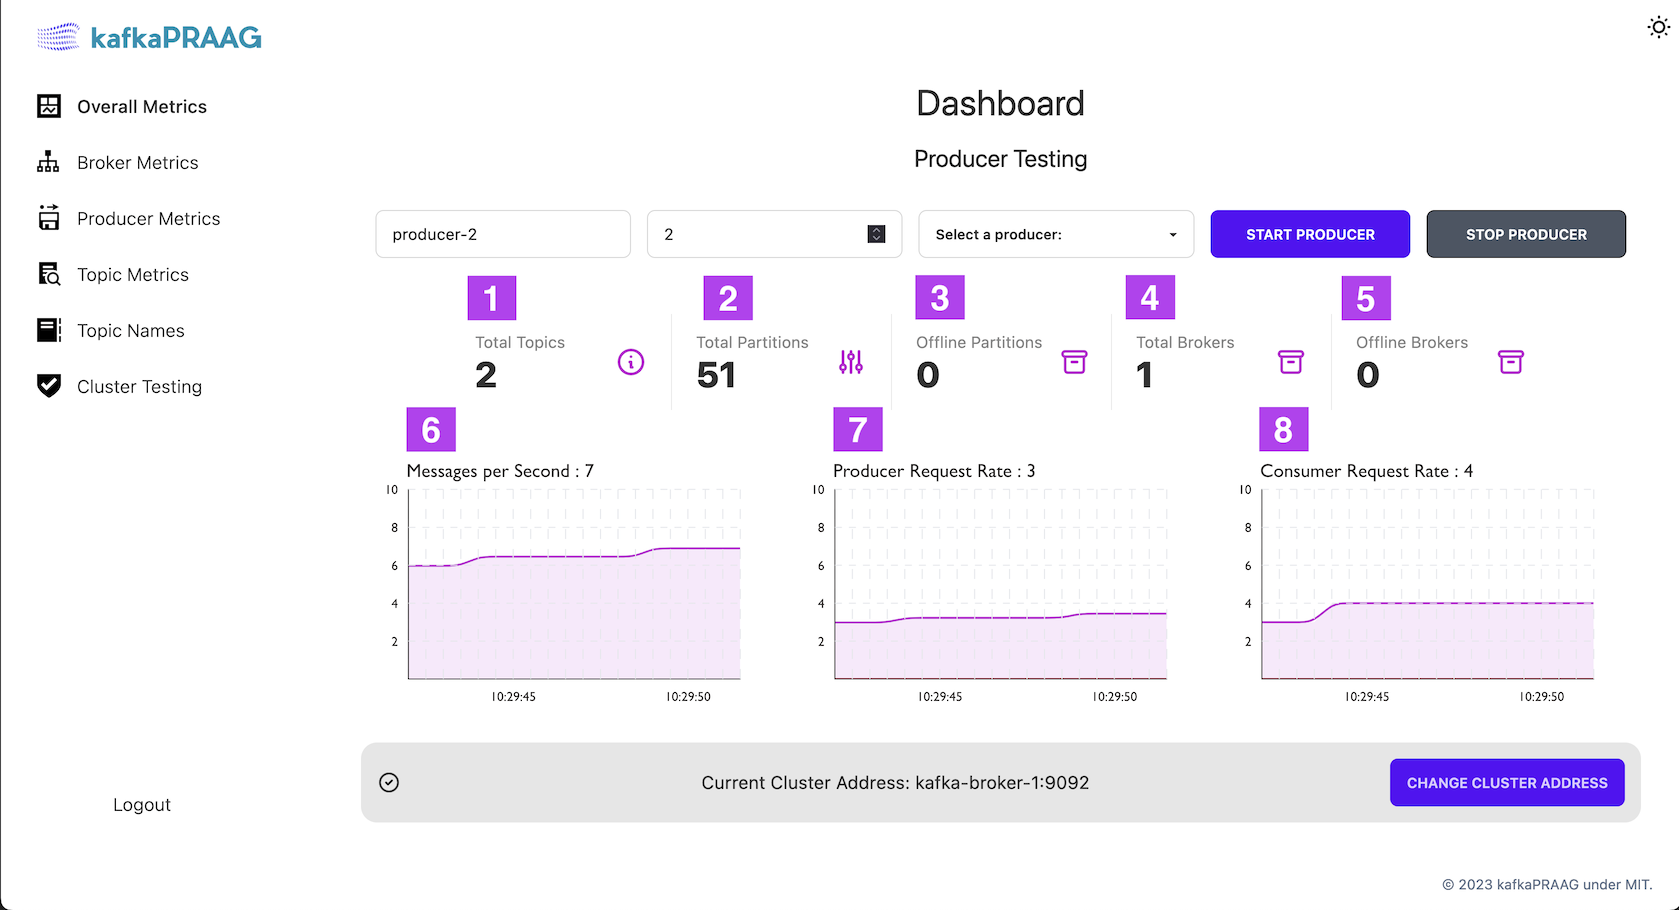
- Total number of topics in the cluster
- Total number of partitions in the cluster
- Number of partitions offline
- Total number of brokers in the cluster
- Number of offline (fenced) brokers
- One-minute average of messages in per second
- One-minute average of producer requests per second
- One-minute average of consumer requests per second
| Name | GitHub | |
|---|---|---|
| Cat Kim | ||
| Hank McGill | ||
| Richard Wu | ||
| Sherry Lu |