Why do that instead of a local Jupyter, which is even simpler to install and run ?
- Because you can access a powerful machine, with big CPU/GPU, RAM, disk space, etc.
- Typical use case: Machine learning.
- You need internet access.
- The cloud machine is Linux.
- Less than 5mn the first time, the longest part is required only once.
- Less than 1mn if you install Miniconda and have all the bash scripts ready.
- The longest part is the Anaconda installation itself.
- Less than 30s from the second time if you have created a disk snapshot from the first installation.
- It depends on the type of machine (VM) you use, and how long.
- See Google Cloud Compute Engine pricing.
- IMPORTANT: Do not forget to stop your VM after you're done to avoid paying for nothing.
You need:
- Internet access
- a Google identity - you have one with a gmail account for example
- See gcould install guide
- First authenticate (doc):
gcloud auth login- Then set up your environment (doc):
gcloud init- Finally check your status (doc):
gcloud config listMy recommendation is to it from the the gcloud console the first time:
- Go to gcloud console
- Create a new project e.g. remotejupyterserver

- Enable billing for this project, if necessary
- See Google help page
- Check out Google Platform Free Tier

Next time you can simply the gcloud command line (doc), for example:
gcloud projects create "myuniqueeprojectname" --name "my project human readable name"My recommendation is to it from the the gcloud console the first time:
- Go to Compute Engine / VM instances
- Create a VM. There is a lot of choice. You are asked about the following main characteristics
- name
- zone (choose your area, obviously - this cannot be changed later)
- machine type, CPU and memory
- Boot disk
- firewall rules
One you have customized your machine to your taste, you can get the equivalent REST of command line instructions, at the bottom of the creation page.
Example for the command line, with main options only:
gcloud compute instances create myserver \
    --image-project "ubuntu-os-cloud" \
    --image "ubuntu-1404-trusty-v20170831" \
    --zone "europe-west3-b" \
--machine-type "n1-highmem-4"- From the gcloud console in Compute Engine / VM instances
- Or command line:
gcloud compute instances list-
In terminal run
gcloud compute config-ssh. This will check if an RSA Pub-Prv key pair exists or create one if not. -
Check result in
~/.ssh
cat config # human readable info
cat google_compute_engine # RSA private key
cat google_compute_engine.pub # RSA public key
cat google_compute_known_hosts # Google remote machines confirmed as known by user- For more info about gcloud ssh instructions: see the doc
- For more info about ssh independently of gcloud see the github help page for example.
Using the ssh keys created in previous step.
- Terminal:
ssh myserver.europe-west3-b.remotejupyter- Alternative syntax:
gcloud compute --project "remotejupyter" ssh --zone "europe-west3-b" "myserver"The ssh keys are not necessary if you log in the VM from the SSH / Open in browser window drop down menu.
- from gcloud console / Compute Engine / VM instances, click on the SSH button for your VM

The followings instructions must be run on your remote RM.
You can install the Anaconda or Miniconda distributions or both.
You can have any number of Anaconda2/3 or Miniconda2/3 distributions installed side by side.
# update package manager
sudo apt-get update

# install utilities
sudo apt-get -y install bzip2 wget git

# ANACONDA
# download Anaconda linux version (link from page https://www.continuum.io/downloads)
anaconda="Anaconda3-4.4.0-Linux-x86_64.sh" # update if necessary
wget -P Downloads/ https://repo.continuum.io/archive/${anaconda}
# install anaconda - accept default options except yes to prepend anaconda path to PATH
bash ~/Downloads/${anaconda}

# MINICONDA
# download Miniconda linux version (link from page https://www.continuum.io/downloads)
miniconda="Miniconda3-4.3.14-MacOSX-x86_64.sh" # update if necessary
wget -P Downloads/ https://repo.continuum.io/miniconda/${miniconda}
# install miniconda - accept default options except yes to prepend anaconda path to PATH
bash ~/Downloads/${miniconda}

# run .bashrc to update path
. ~/.bashrc

# update python packages - using conda - example
conda update -y conda jupyter jupyter_client jupyter_console jupyter_core \
                ipython scipy numpy matplotlib pandas

# update python packages - using conda - example
pip install ezhc ezvis3d
The VM is all set.
- Forward a local port (8888) to the server’s port (8888) where jupyter server is running:
ssh myserver.europe-west3-b.remotejupyter -NL 8888:localhost:8888- Alternative syntax:
gcloud compute ssh --project "remotejupyter" --zone "europe-west3-b" "myserver" -NL 8888:localhost:8888- For more info on ssh tunnels see this article
- Create a directory to contain your notebooks and launch jupyter from there:
mkdir notebooks
cd notebooks
jupyter notebook --no-browser --port=8888- The terminal will show something along these lines:
Olivier@myserver:~/notebooks$ jupyter notebook --no-browser --port=8888
[I 11:42:10.851 NotebookApp] Serving notebooks from local directory: /home/Olivier/notebooks
[I 11:42:10.851 NotebookApp] 0 active kernels
[I 11:42:10.851 NotebookApp] The Jupyter Notebook is running at: http://localhost:8888/?token=31913c18411cf0fe2593bfb8e0136631c7f5fadac3b62f4a
[I 11:42:10.851 NotebookApp] Use Control-C to stop this server and shut down all kernels (twice to skip confirmation).
[C 11:42:10.851 NotebookApp]

    Copy/paste this URL into your browser when you connect for the first time,
    to login with a token:
http://localhost:8888/?token=31913c18411cf0fe2593bfb8e0136631c7f5fadac3b62f4a- Copy the token
- Open web browser to
localhost:8888 - Paste the token from the jupyter server as requested
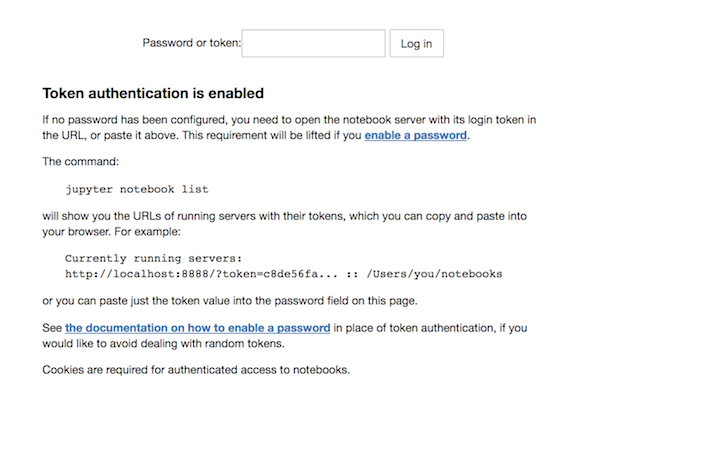

All good.
You can start working !
Be careful it is all too easy to forget !

Stopping a VM does not delete is completely and consequently carries residual costs.
See Google doc
Before deleting a VM, you might want to take a snapshot of the VM persistent disk to quickly back up the disk so you can recover lost data, transfer contents to a new disk.
Several ways to do that from gcloud console / Compute Engine:
- In menu Snapshots, take a snapshot of the VM disk. You must stop the VM to do so
- In the VM dashboard, untick Delete boot disk when instance is deleted to make sure you will not lose anything
- You can then create a new instance by choosing as boot disk this snapshot
- You may also create an image from a snapshot and create an instance from an image
- For more info about images and snapshots, see the doc. Essentially snapshots are faster and cheaper
The following pages describe more specific Jupyter installations:
- Running Jupyter notebooks on GPU on Google Cloud with main packages tensorflow and keras
- Containerized Jupyter notebooks on GPU on Google Cloud - follow up from previous article: easier way with Docker containers
- Google Cloud Platform for data scientists: using Jupyter Notebooks with Apache Spark on Google Cloud - from Google Cloud Platform blob
- Google Cloud tutorial for Convolutional Neural Networks for Visual Recognition course - for Stanford course CS231n
- How to install and run a Jupyter notebook in a Cloud Dataproc cluster - from Google Cloud documentation
- Launch a GPU-backed Google Compute Engine instance and setup Tensorflow, Keras and Jupyter - for Udacity course Self-Driving Car Nanodegree
The following pages describe JupyterHub installations: