todomvc-angular
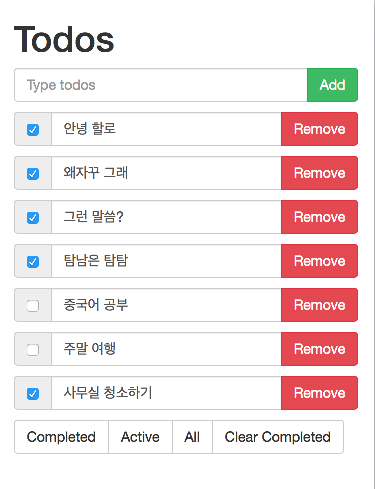
0. 우리가 만들 Todo 앱 미리보기
- 투두(Todo) 목록을 웹페이지에 보여줌
- 투두의 조회, 추가, 편비, 삭제, 완료 처리할 수 있음 (CRUD)
- 투두의 상태에 따라 completed, active로 필터링 할 수 있음
- 투두 데이터는 서버에서 관리함
프로젝트 구조
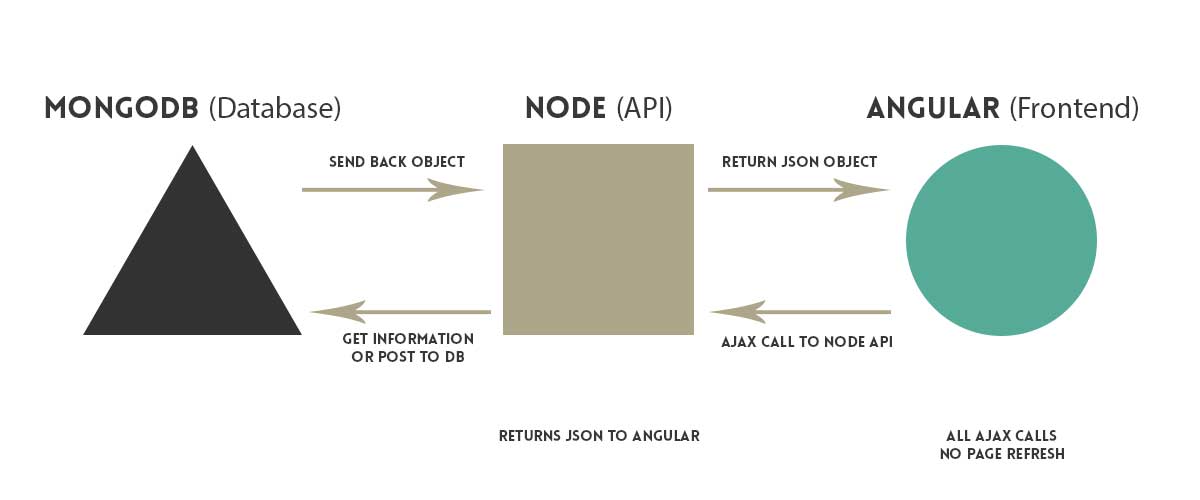
- 서버는 Node.js기반의 Express.js 웹프레임웍을 사용함
- 서버는 1) html, css, javascript 등의 정적 파일을 제공하고 2) ajax 기능을 수행할 api를 제공함
- 웹페이지는 Angular.js를 사용한 하나의 페이지(index.html)로 구성됨
- 앵귤러 컨트롤러로 웹페이지를 조작하고 앵귤러 서비스를 통해 백엔드 api와 통신함
출처: https://scotch.io/tutorials/creating-a-single-page-todo-app-with-node-and-angular
1. 노드 설치
- https://nodejs.org/en/에서 다운로드 후 설치
- 설치 확인:
$ node --version
$ which node
- 간단한 노드 스크립트 확인:
> console.log('hello world!')
hello world!

> var name = 'Chris'
> name
'Chris'
> const name = 'Chris'
> name
'Chris'

> name = 'Mars'
'Mars'

> name
'Chris'
NPM
- Node Package Manager
- 노드 패키지를 프로젝트에 추가, 삭제하거나 만든 패키지를 배포할 때 사용함.
- 본 프로젝트에서는
- angularjs등 외부 라이브러리를 설치하고
- 노드 서버를 구동하는데 사용함
- 노드를 설치하면 자동으로 NPM도 설치됨
- 설치확인:
$ npm --version
$ which npm
- NPM으로 프로젝트 생성:
$ npm init
2. 앵귤러 로딩
- index.html 페이지 생성:
$ touch index.html
- index.html:
<!DOCTYPE html>
<html lang="en">
<head>
  <meta charset="UTF-8">
  <meta name="viewport"
        content="width=device-width, initial-scale=1, user-scalable=yes">
  <title>Angular | TodoMVC</title>
</head>
<body>
</body>
</html>- NPM으로 앵귤러 설치:
$ npm install angular --save
- index.html에 앵귤러 로딩
<!-- ng-app으로 todomvc 앵귤러 모듈 사용을 브라우저에게 알린다 -->
<body ng-app="todomvc">

<!-- 앵귤러 로딩 -->
<script src="node_modules/angular/angular.js"></script>

<script src="js/app.js"></script>
</body>- 앵귤러 모듈 정의 (js/app.js):
angular.module('todoapp', []);- 브라우져로 로딩하면 앵귤러 라이브러리와 우리가 만든 파일 두 개 (index.html, app.js)가 다운로드 됨
3. 컨트롤러
- html로 작성된 템플릿과 연결되어 데이터를 출력하고 사용자 입력을 처리하는 것이 컨트롤러의 역할
angular.module().controller()함수로 컨트롤러 정의- js/controllers/TodomvcCtrl.js:
angular.module('todomvc')
    .controller('TodomvcCtrl', function ($scope) {

      $scope.message = 'Hello world!';

});- 컨트롤러스 생성과 동시에 스코프변수(
$scope)가 자동으로 생서됨 - 스코프 변수의 역할: 템플릿과 컨트롤러간의 데이터 연결
- index.html에 스코프 변수 출력하기 (인터폴레이션 문법)
<body ng-controller="TodomvcCtrl">
  <p>
    {{ message }} <!-- "Hello world!" -->
  </p>
</body>
4. 투두 목록 출력하기
- 컨트롤러에 배열 데이터
todos만들기 - js/controllers/TodomvcCtrl.js:
angular.module('todomvc')
    .controller('TodomvcCtrl', function ($scope) {

      $scope.todos = [{
        id: 1,
        title: '요가 수행하기',
        completed: false
      }, {
        id: 2,
        title: '어머니 용돈 드리기',
        completed: true
      }];

});- ngRepeat으로 배열 출력하기
- index.html:
<ul ng-repeat="todo in todos track by $index">
  <li>
      <input type="checkbox" ng-model="todo.completed">
      <input type="text" ng-model="todo.title">
      <button type="button">Remove</button>
  </li>
</ul>- ngClick으로 삭제 기능 만들기
- index.html:
<!-- ng-click 디렉티브로 컨트롤러의 remove() 함수와 연결했다. -->
<button type="button" ng-click="remove(todo.id)">Remove</button>- js/controllers/TodomvcCtrl.js:
angular.module('todomvc')
    .controller('TodomvcCtrl', function ($scope) {

      $scope.remove = function (id) {
        if (!id) return;

        // 배열에서 제거할 인덱스를 검색
        var deleltedTodoIdx = $scope.todos.findIndex(function (todo) {
          return todo.id === id;
        });

        if (deleltedTodoIdx === -1) return;

        // 배열에서 제거
        $scope.todos.splice(deleltedTodoIdx, 1);
      }

    });
5. 새로운 투두 추가하기
- 앵귤러로 폼 작성하기
- index.html:
<form ng-submit="addTodo(newTodo)">
  <input type="text" ng-model="newTodo" placeholder="Type todos" autofocus>
  <button type="submit">Add</button>
</form>-
폼 입력 필드를 입력한 뒤 엔터를 입력하면
ng-submit에 바인딩된 컨트롤러 함수(addTodo())가 동작함 -
투두를 추가하는 컨트롤러함수 작성하기
angular.module('todomvc')
    .controller('TodomvcCtrl', function ($scope) {

      $scope.addTodo = function (todoTitle) {
        todoTitle = todoTitle.trim();
        if (!todoTitle) return;

        // 새로 추가할 아이디 계산
        var newId = !$scope.todos.length ?
            1 : $scope.todos[$scope.todos.length - 1].id + 1;

        // 새로운 투두 객체
        var newTodo = {
          id: newId,
          title: todoTitle,
          completed: false
        };

        // todos 배열에 새로운 투두 추가
        $scope.todos.push(newTodo);
      };
    });
6. 부트스트랩으로 꾸미기
- NPM으로 부트스트랩 설치
$ npm instsall bootstrap --save
- index.html에 라이브러리 로딩
<link rel="stylesheet" href="node_modules/bootstrap/dist/css/bootstrap.css">- 부트스트랩 클래스 적용하기
<!DOCTYPE html>
<html lang="en">
<head>
  <meta charset="UTF-8">
  <meta name="viewport"
        content="width=device-width, initial-scale=1, user-scalable=yes">
  <title>Angular | TodoMVC</title>
  <link rel="stylesheet"
        href="node_modules/bootstrap/dist/css/bootstrap.min.css">
</head>
<body ng-app="todomvc">
<div ng-controller="TodomvcCtrl" class="container">
  <h1>Todos</h1>

  <ul class="list-unstyled">
    <li>
      <form ng-submit="addTodo(newTodo)">
        <div class="input-group">
          <input type="text" ng-model="newTodo" class="form-control"
                 placeholder="Type todos" autofocus>
          <span class="input-group-btn">
            <button class="btn btn-success" type="submit">Add</button>
          </span>
        </div>
      </form>
    </li>
  </ul>

  <ul ng-repeat="todo in todos" class="list-unstyled">
    <li class="todo-item">
      <div class="input-group">
        <span class="input-group-addon">
          <input type="checkbox" aria-label="..." ng-model="todo.completed">
        </span>
        <input type="text" class="form-control" aria-label="..." ng-model="todo.title">
        <div class="input-group-btn">
          <button class="btn btn-danger" ng-click="remove(todo.id)">Remove</button>
        </div>
      </div>
    </li>
  </ul>

  <pre>{{todos | json}}</pre>

</div>

<script src="node_modules/angular/angular.js"></script>
<script src="js/app.js"></script>
<script src="js/controllers/TodomvcCtrl.js"></script>

</body>
</html>
7. 투두 목록 필터링
-
출력된 투두목록을 아래 기준으로 필터링해 보자
completed: 완료된 투두 리스트active: 미완료된 투두 리스트all: 모든 투두 리스트
-
ngRepeat의 필터링 기능 -
index.html:
<ul ng-repeat="todo in todos | filter: {completed: true}">- 필터 버튼 만들기
- index.html:
<div class="btn-group" role="group" aria-label="...">
  <button type="button" ng-click="status='completed'">Completed</button>
  <button type="button" ng-click="status='active'">Active</button>
  <button type="button" ng-click="status=''">All</button>
</div>- 버튼을 클릭할때 마다
$scope.status변수의 값이 변경됨 - 이 변수의 값에 따라
$scope.statusFilter에 ngRepeat을 위한 필터 객체를 할당함 - index.html:
<ul ng-repeat="todo in todos | filter:statusFilter">$scope.status를 어떻게 변경 감지할까?$watch()함수를 사용- 필터버튼을 클릭하고
status값이 변경되면$watch()에 등록한 함수가 동작함 - js/controllers/TodomvcCtrl.js:
$scope.$watch('status', function () {
  if ($scope.status === 'completed') {        // if Completed 클릭시
    $scope.statusFilter = {completed: true};  //   필터를 설정한다.
  } else if ($scope.status === 'active') {    // if Active 클릭시
    $scope.statusFilter = {completed: false}; //   필터를 설정한다.
  } else {                                    // if All 클릭시
    $scope.statusFilter = {};                 //   필터를 해제한다.
  }
});
[DIY] Clear All 버튼 추가하기
8. 디렉티브
- 디렉티브는 html과 자바스크립트 코드로 이뤄지 마크업
- 디렉티브를 잘 읽기 쉬운 코드를 만들 수 있고 재사용 가능함
- 투두 템플릿을 디렉티브로 분리하자!
- index.html:
<ul ng-repeat="todo in todos | filter:statusFilter" class="list-unstyled">
  <li class="todo-item">

    <!-- 한 줄로 바꿔보자 ! -->
    <todo-item></todo-item>
  </li>
</ul>angular.module().directive()함수로 디렉티브 정의- js/directives/todoItem.js:
angular.module('todomvc')
    .directive('todoItem', function () {
      return {
        restrict: 'E',
        template: '<div>todoItem</div>'
      };
});- 컨트롤러 스코프 데이터를 디렉티브에 연결
<todo-item todo="todo" remove="remove(todo.id)"></todo-item>- 연결된 데이터를 디렉티브에서 출력
angular.module('todomvc')
    .directive('todoItem', function (){
      return {
        restrict: 'E',
        scope: {        // 디렉티브 스코프 설정
          todo: '=',    // 양방향 바인딩
          remove: '&'   // 참고 바인딩. 함수 설정시 사용함
        },
        template:
        '<div class="input-group">' +
          '<span class="input-group-addon">' +
            '<input type="checkbox" aria-label="..." ng-model="todo.completed" ng-click="update(todo)">' +
          '</span>' +
          '<input type="text" class="form-control" aria-label="..."' +
            'ng-model="todo.title" ng-blur="update(todo)">' +
          '<div class="input-group-btn">' +
            '<button class="btn btn-danger" ng-click="remove(todo)">Remove</button>' +
          '</div>' +
        '</div>'
      }
    });
[DIY] 필터버튼을 디렉티브로 분리해 보자!
9. 서비스
- 기존 컨트롤러에는 두개 기능이 섞여 있음
- 사용자 이벤트를 감지하고 템플릿에 데이터를 보내주는 역할, 즉 템플릿과 직접 연결되는 부분
- 그리고 todos 배열에서 투두를 제거하거나 추가하는 역할, 즉 데이터를 핸들링 하는 부분 (-> 서비스로 분리)
angular.module().factory()함수로 서비스 정의- js/services/todoStorage.js:
angular.module('todomvc')
    .factory('todomvcStorage', function () {

      var storage = {
        todos: [{
          id: 1,
          title: '요가 수행하기',
          completed: false
        }, {
          id: 2,
          title: '어머니 용돈 드리기',
          completed: true
        }],

        get: function () {
          return storage.todos;
        },

      return storage;
});- 정의한 서비스를 컨트롤러에 주입하여 사용
- js/controllers/TodomvcCtrl.js:
angular.module('todomvc')
    .controller('TodomvcCtrl', function ($scope, todomvcStorage) {

      $scope.todos = todomvcStorage.get();

    });
[DIY] 추가, 삭제, Clear Completed 도 서비스로 옮겨보자!
10. Express.js로 웹서버 만들기
- 웹서버의 기능
- 정적파일 호스팅
- API 기능
- express 모듈 설치:
$ npm install express --save
- express 공식 사이트의 hello world 코드 사용
- npm으로 서버 구동하기
- package.json:
{
  "scripts": {
    "start": "node server/app"
  }
}
$ npm start
11. Static Files
- index.html 등 정적파일을 웹서버에서 호스팅해야함.
- server.js
app.use('/', express.static(path.join(__dirname, '../client')));- 홈페이지 라우팅 설정
app.get('/', function (req, res) {
  res.sendfile('index.html');
});- 라이브러리 파일도 호스팅 설정
app.use('/node_modules', express.static(path.join(__dirname, '../node_modules')));12. APIs
- 클라이언트와 서버간의 데이터 교환을 위한 프로토콜 필요
- 클라이언트는 Ajax를 이용해 서버로 데이터를 요청함
- 이것이 APIs
- 앵귤러 서비스는 ajax를 통해 서버로 데이터를 요청함
REST API
- 서버 자원단위로 설계된 API
- 명사와 동사의 분리 (
GET /usersv.s/get_users) - 우리가 만들 api 목록
| method | url | function |
|---|---|---|
| POST | /api/todos | todo 생성 |
| GET | /api/todos | todo 목록 조회 |
| PUT | /api/todos/:id | todo 갱신 |
| DELETE | /api/todos/:id | todo 삭제 |
GET /api/todos 만들기
- server/app.js:
// 앵귤러 서비스쪽에 있던 배열을 노드 코드로 옮겼다.
var todos = [{
  id: 1,
  title: 'todo 1',
  completed: false
}, {
  id: 2,
  title: 'todo 2',
  completed: false
}, {
  id: 3,
  title: 'todo 3',
  completed: true
}];

// GET /api/todos 라우팅 설정
app.get('/api/todos', function (req, res) {
  res.json(todos);
});
Postman
- 다운로드
- REST API 개발 필수품
BodyParser
- post 메쏘드는 데이터를 보낼때 http 바디에 그 정보를 저장함
- express에서 리퀘스트 바디에 접속하기 위한 미들웨어
- body-parser 설치:
$ npm isntall bady-parser --save
$ server/app.js:
var bodyParser = require('body-parser');

// body parser
app.use(bodyParser.json());
app.use(bodyParser.urlencoded({ extended: true }));
POST /api/todos 만들기
- server/app.js
app.post('/api/todos', function (req, res) {
  if (!req.body.title) {
    return res.status(400).send();
  }

  var newId = !todos.length ?
      1 : todos[todos.length - 1].id + 1;

  var newTodo = {
    id: newId,
    title: req.body.title,
    completed: false
  };

  todos.push(newTodo);

  res.json(newTodo);
});
[DIY] Delete와 PUT은 직접 작성해보자!
- 이것으로 서버의 두 가지 기능을 모두 구현했다.
- Static File
- APIs
13. $http로 앵귤러 서비스 개선하기
- 앵귤러 서비스에서 api 호출을 위해
$http서비스 사용 - js/services/todomvcStorage.js:
angular.module('todomvc')
    .factory('todomvcStorage', function ($http) {
      var storage = {

        todos: [],

        get: function (callback) {
          $http.get('/api/todos')                 // GET /api/todos 요청
              .then(function success(response) {  // 성공
                console.log(response);
                callback(null, angular.copy(response.data, storage.todos));
              }, function error(err) {            // 실패
                console.error(err);
                callback(err);
              });
        },
      };
});- 컨트롤러 코드 살짝 변경
- js/controllers/TodomvcCtrl.js:
angular.module('todomvc')
    .controller('TodomvcCtrl', function ($scope, todomvcStorage) {

      // 비동기 함수이미로 콜백 함수를 파라매터로 넘겼다.
      todomvcStorage.get(function (err, todos) {
        if (err) return;
        $scope.todos = todos;
      });

}); 
