 Kubernetes Mastery: Hands-On Lessons From A Docker Captain, Bret Fisher
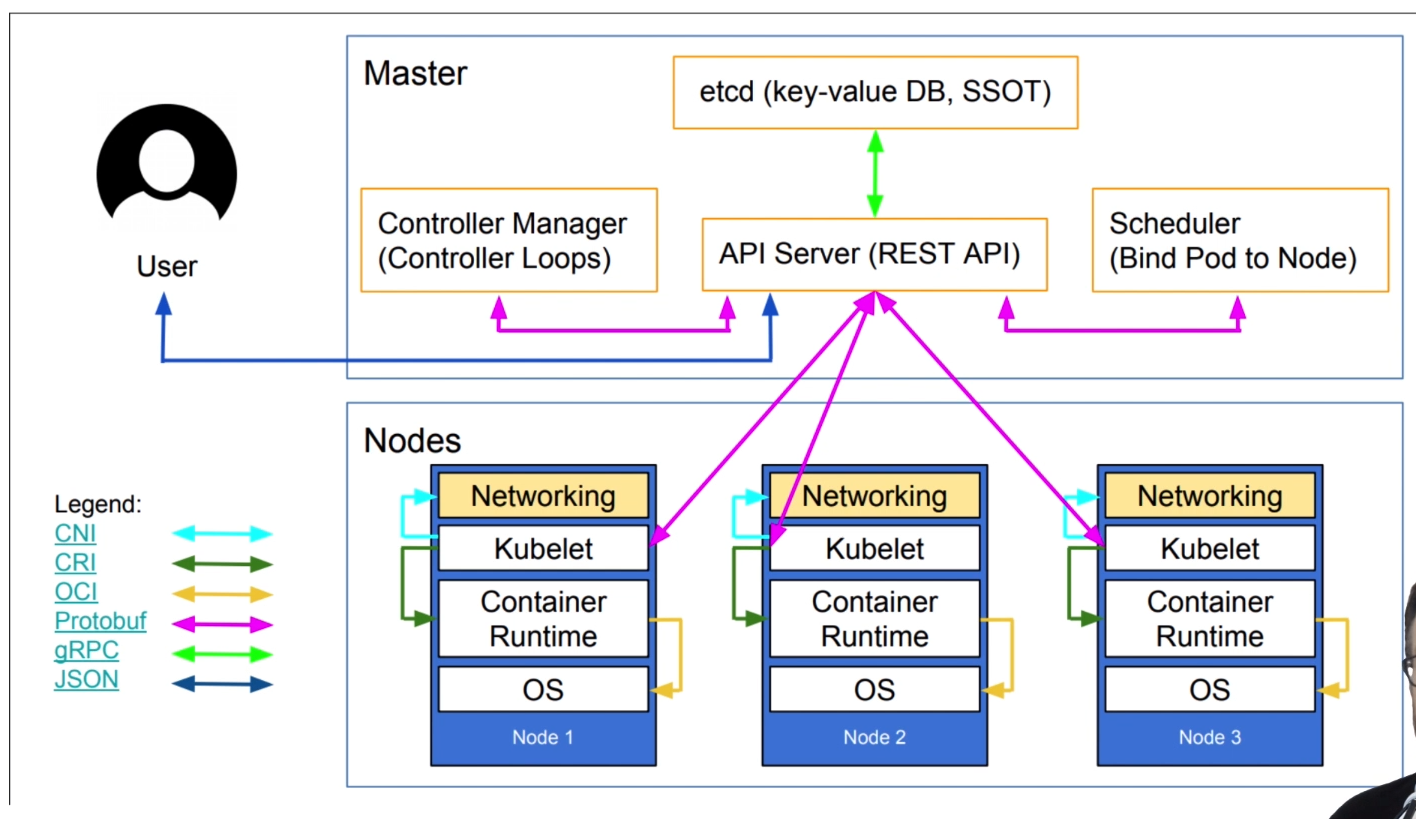
Kubernetes Architecture
Be sure to come back to this lecture later if you have shpod issues, as I've thrown in common hiccups as you use it throughout the course!
-
Tip 1: Namespaces matter!
Once you learn about namespaces, you know that running kubectl commands often only affects the current namespace. Shpod runs in the shpod namespace, so if you mean to do something with the default namesapce, you need to either ensure that shpod config is set to use the default namespace (which it is by default) oradd -n defaulto your commands. Sokubectl get podswould turn intokubectl get -n default pods. We've setup the shpod pod to set it's namespace to default though, so this shouldn't be a big issue. -
Tip 2: DNS matters with Namespaces!
The above shpod namespace affects DNS as well. If you need to curl or ping a Service name (which you'll learn later), remember that Kubernetes Service DNS names are namespace-sensitive from inside the cluster. Doing aping myservicefrom a pod in one namespace only works if that Service is in the same namespace. In the Shpod, you would need toping mypod.defaultif that Service was in the default namespace. -
Tip 3: Attach shows you the console (tty) output, even from multiple terminals. You can use exec for additional terminal shells
Anattachcommand will show the virtual console of a pod (like a tty), so multipleattachcommands in multiple terminal windows will show the same thing because they are both looking at the console output. For your 2nd terminal, you can use anexeccommand that will start a new shell process in the existing container. This works exactly the same way as Docker attach and exec commands:
1st window, attach:
kubectl attach --namespace=shpod -ti shpod
2nd window, create a new bash shell:
kubectl exec --namespace=shpod -ti shpod -- bash -l
First Contact with Kubectl
The below command returns an abtracted information about the list of nodes
kubectl get noorkubectl get nodeorkubectl get nodes
Note: Kubectl get can output JSON, YAML, or be directly formatted
- Give us more info about the nodes:
kubectl get nodes -o wideorkubectl get nodes node1 -o wide - Let's have some YAML
kubectl get nodes -o yaml
- Show the capcity of all our nodes as a stream of JSON objects:
kubectl get nodes -o json | jq ".items[] | {name:.metadata.name} + .status.capacity"
Note: Kindly observe that this follows the pattern:
kubectl describe resource-type-name/resource-name or kubectl describe resource-type-name resource-name
kubectl describe node/node1orkubectl describe node node1
- We can list all available resource types by running:
kubectl api-resources(in Kubernetes 1.10 and prior, this command used to bekubectl get) - We can list one or more resources in the cluster:
kubectl get resource-type(this resources can be Pods, Services, Deployments etc) prkubectl get resource-type resource-name(resource-name is optional and specifies the name of the particular resource) - We can view the dfefinition for a resource type with:
kubectl explain type - we can view the definition for a field in a resource, for instance:
kubectl explain node.spec - Or get the list of all fields and subfields"
kubectl explain node --recursive
- We can access the same information by reading the API documentation
- The API documentation is usually easier to read but
- it wont show custom types (like Custom Resource Definitions)
- we need to make sure that we look at the correct version
kubectl api-resourcesandkubectl explainperforms introspection (they communicate with the API server and obtain the exact type definition)
- The most common resource names have three forms:
- singular (e.g.
node,service,deployment) - plural (e.g.
nodes,services,deployments) - short (e.g.
no,svc,deploy)
- singular (e.g.
- Some resources do not have a short name
Endpointsonly have a plural form (because even a singleEndpointsresource is actually a list of endpoints)
Namespaces allows us to segregate resources.
kubect get namespaceskubect get namespacekubect get ns
- By default,
kubectluses thedefaultnamespace - We can see resources in all namespaces with
--all-namespaces(since kubernetes 1.14, we can also use-Aas a shorter version)
etcdis our etcd serverkube-apiserveris the API serverkube-controller-managerandkube-schedulerare other control plane componentscorednsprovides DNS-based service discovery (replacingkube-dnsas of 1.11)kube-proxyis the (per-node) component managing the network port mappings and such<net name>is the optional (per node) component managing the network overlay- the
READYcolumn indicates the number of containers in each pod
Note: - this only shows containers, you won't see host svcs (e.g. mcirok8s)
- you may see different namespaces depending on setup
kube-public is created by our installer & used for security bootstrapping
example: list the pods in kube-public namespace
kubectl-n kube-public get pods
The only interesting object in kube-public is a ConfigMap named cluster-info
Example:
- List ConfigMap objects:
  kubct -n kube-public get ConfigMap

- Inpect cluster-info
  kubectl -n kube-public get ConfigMap cluster-info -o yaml
Note the selfLink URL: /api/v1/namespaces/kube-public/configmaps/clusterinfo we can use that (later in kubectl context lectures)

