React is a JavaScript library for building user interfaces
리액트는 SPA 프레임워크가 아닌, 뷰 라이브러리(View Library)입니다. 여기서 뷰(View)란 MVC 패턴(Model–View–Controller Pattern)의 'V'를 말합니다. 뷰는 브라우저 내 특정 컴포넌트를 보여주는 역할을 하기 때문에, 리액트로 단일 페이지 애플리케이션을 개발할 수 있는 것입니다.
https://github.com/facebook/create-react-app
Boilerplate for react (babel, webpack, eslint, react, HMR, webpack-dev-server, build for production...)
npx create-react-app my-app
cd my-app
npm startJavaScript 에서 markup(xml)을 사용할 수 있는 JavaScript 의 문법적 확장
react 의 element를 생성(React.crateElement())
const element = <h1 className="greeting">Hello, world!</h1>;
// by babel
const element = React.createElement(
  'h1',
  { className: 'greeting' },
  'Hello, world!',
);class App extends Component {
render() {
return (
<div>
<input type="text"> // <input type="text" />
</div>
);
}
}감싸져 있는 엘리먼트 (Fragment)
class App extends Component {
  render() {
    return (
      // <Fragment>
      <div>
        Hello
      </div>
      <div>
        Bye
      </div>
      // </Fragment>
    );
  }
}class App extends Component {
render() {
const name = 'react';
return <div>hello {name}!</div>;
}
}style
class App extends Component {
  render() {
    const style = {
      backgroundColor: 'black',
      padding: '16px',
      color: 'white',
      fontSize: '12px',
    };

    return <div style={style}>hi there</div>;
  }
}
className
.App {
  background: black;
  color: aqua;
  font-size: 36px;
  padding: 1rem;
  font-weight: 600;
}
import './App.css';
class App extends Component {
render() {
return <div className="App">리액트</div>;
}
}class App extends Component {
render() {
return (
<div>
{/* 주석은 이렇게 */}
<h1
// 태그 사이에
>
리액트
</h1>
</div>
);
}
}An element describes what you want to see on the screen
Unlike browser DOM elements, React elements are plain objects, and are cheap to create. React DOM takes care of updating the DOM to match the React elements.
<div id="root"></div>const element = <h1>Hello, world</h1>;
ReactDOM.render(element, document.getElementById('root'));React elements are immutable.
React DOM compares the element and its children to the previous one, and
only applies the DOM updates necessaryto bring the DOM to the desired state.
function tick() {
  const element = (
    <div>
      <h1>Hello, world!</h1>
      <h2>It is {new Date().toLocaleTimeString()}.</h2>
    </div>
  );
  ReactDOM.render(element, document.getElementById('root'));
}

setInterval(tick, 1000);Components let you split the UI into independent, reusable pieces, and think about each piece in isolation
Conceptually, components are like JavaScript functions. They accept arbitrary inputs (called
“props”) andreturn React elementsdescribing what should appear on the screen.
props
When React sees an element representing a user-defined component, it passes
JSX attributesto this component as a single object. We call this object“props”.
function Welcome(props) {
  return <h1>Hello, {props.name}</h1>;
}class Welcome extends React.Component {
render() {
return <h1>Hello, {this.props.name}</h1>;
}
}function Welcome(props) {
return <h1>Hello, {props.name}</h1>;
}
const element = <Welcome name="Sara" />; // user-defined component
ReactDOM.render(
element, // <Welcome name="Sara" />
document.getElementById('root'),
);
- We call
ReactDOM.render()with the<Welcome name="Sara"/>element.- React calls the
Welcomecomponent with{name: 'Sara'}as the props.- Our
Welcomecomponent returns a<h1>Hello, Sara</h1>element as the result.- React DOM efficiently updates the DOM to match
<h1>Hello, Sara</h1>.
* Component 이름은 항상 대문자로 시작해야 한다.
function Welcome(props) {
  return <h1>Hello, {props.name}</h1>;
}

function App() {
  return (
    <div>
      <Welcome name="Sara" />
      <Welcome name="Cahal" />
      <Welcome name="Edite" />
    </div>
  );
}

ReactDOM.render(<App />, document.getElementById('root'));AS-IS
function Comment(props) {
  return (
    <div className="Comment">
      <div className="UserInfo">
        <img
          className="Avatar"
          src={props.author.avatarUrl}
          alt={props.author.name}
        />
        <div className="UserInfo-name">{props.author.name}</div>
      </div>
      <div className="Comment-text">{props.text}</div>
      <div className="Comment-date">{formatDate(props.date)}</div>
    </div>
  );
}
To-BE
function Avatar(props) {
  return (
    <img className="Avatar" src={props.user.avatarUrl} alt={props.user.name} />
  );
}
function UserInfo(props) {
return (
<div className="UserInfo">
<Avatar user={props.user} />
<div className="UserInfo-name">{props.user.name}</div>
</div>
);
}function Comment(props) {
return (
<div className="Comment">
<UserInfo user={props.author} />
<div classNmae="Comment-text">{props.text}</div>
<div>{formatDate(props.date)}</div>
</div>
);
}All React components must act like pure functions with respect to their props.
Pure function
- Its return value is the same for the same arguments (no variation with local static variables, non-local variables, mutable reference arguments or input streams from I/O devices).
- Its evaluation has no side effects (no mutation of local static variables, non-local variables, mutable reference arguments or I/O streams).
State is similar to props, but it is private and fully controlled by the component. (a feature available only to classes.)
Mount - Rendered to the DOM for the first time. (render())
Unmount - DOM produced by the component is removed.
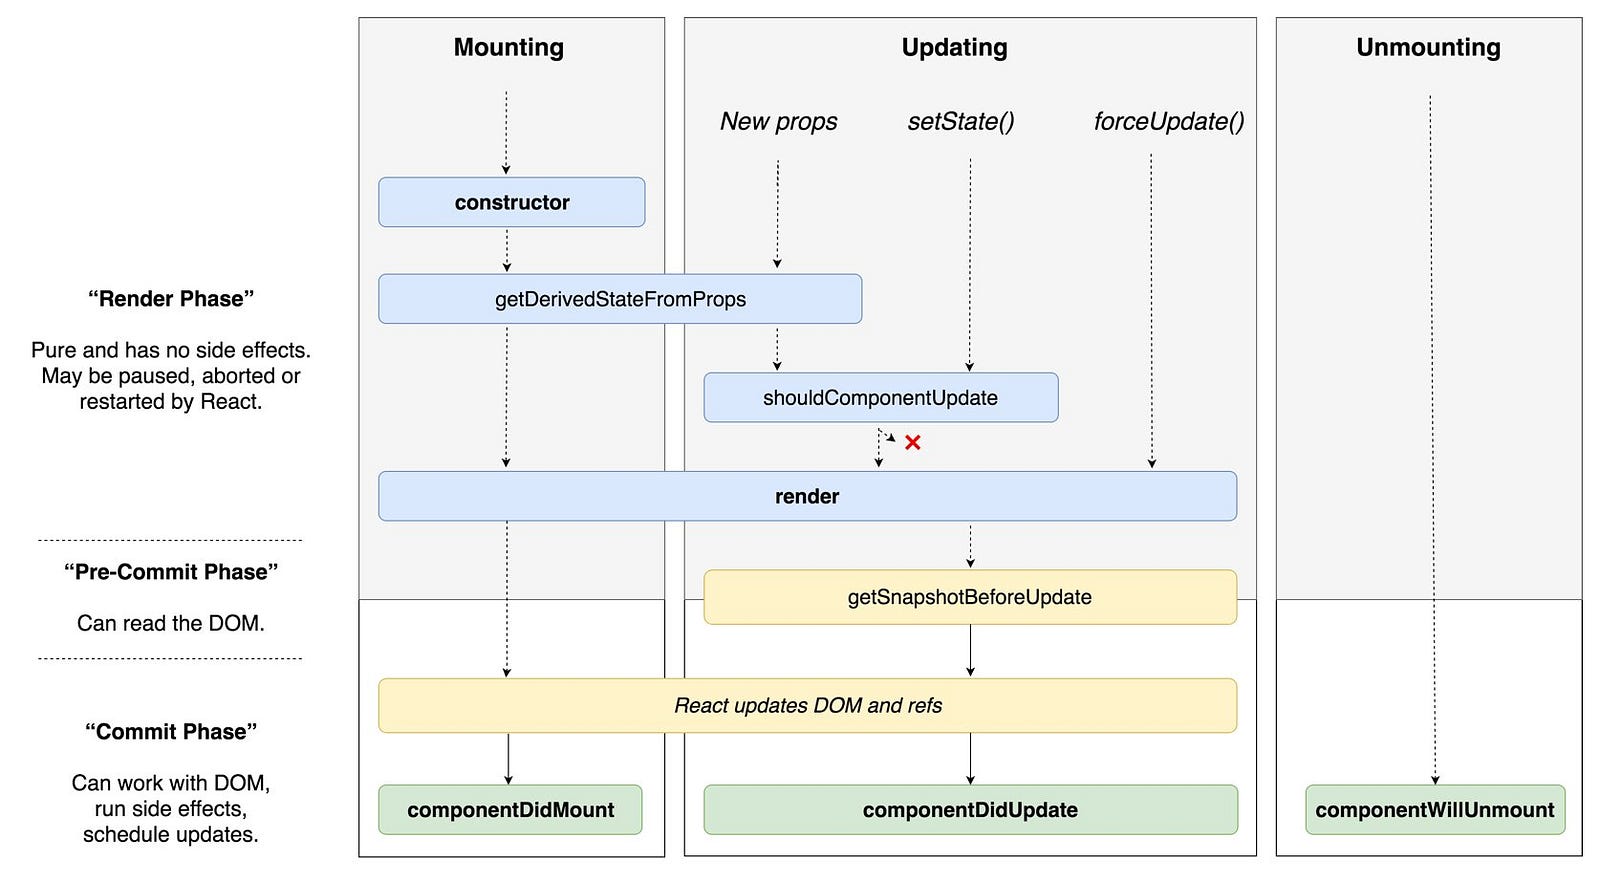
constructor(props)- component 가 새로 만들어질 때 마다 호출componentWillMount()- deprecated (UNSAFE_componentWillMount)componentDidMount()- 외부 라이브러리 연동, ajax 요청, DOM 접근(읽기, 변경...)componentWillReceiveProps(nextProps)- deprecated (UNSAFE_componentWillReceiveProps)getDerivedStateFromProps(nextProps, prevState)- props 로 state 를 동기화 하는 작업, props 가 바뀔 때 설정하고 싶은 state 값을 리턴 (없으면 null)shouldComponentUpdate(nextProps, nextState)- component 최적화, Virtual DOM에 rendering 여부를 반환)componentWillUpdate(nextProps, nextState)- deprecatedgetSnapshotBeforeUpdate(prevProps, prevState)- DOM 변화가 일어나기 직전의 DOM 상태를 가져오고, 리턴값은 componentDidUpdate 에서 3 번째 파라미터로 전달componentDidUpdate(prevProps, prevState, snapshot)- this.props, this.state 가 바뀐 상태componentWillUnmount()
We want: Clock update itself
ReactDOM.render(<Clock />, document.getElementById('root'));class Clock extends React.Component {
render() {
return (
<div>
<h1>Hello, world!</h1>
<h2>It is {this.props.date.toLocaleTimeString()}.</h2>
</div>
);
}
}class Clock extends React.Component {
constructor(props) {
super(props);
this.state = { date: new Date() };
}
render() {
return (
<div>
<h1>Hello, world!</h1>
<h2>It is {this.state.date.toLocaleTimeString()}.</h2>
</div>
);
}
}
ReactDOM.render(<Clock />, document.getElementById('root'));class Clock extends React.Component {
constructor(props) {
super(props);
this.state = { date: new Date() };
}
componentDidMount() {
this.timerID = setInterval(() => this.tick(), 1000);
}
componentWillUnmount() {
clearInterval(this.timerID);
}
tick() {
this.setState({
date: new Date(),
});
}
render() {
return (
<div>
<h1>Hello, world!</h1>
<h2>It is {this.state.date.toLocaleTimeString()}.</h2>
</div>
);
}
}
ReactDOM.render(<Clock />, document.getElementById('root'));
- When
<Clock />is passed toReactDOM.render(), React calls the constructor of theClockcomponent. SinceClockneeds to display the current time, it initializesthis.statewith an object including the current time. We will later update this state.- React then calls the
Clockcomponent’srender()method. This is how React learns what should be displayed on the screen. React then updates the DOM to match theClock’s render output.- When the
Clockoutput is inserted in the DOM, React calls thecomponentDidMount()lifecycle method. Inside it, theClockcomponent asks the browser to set up a timer to call the component’stick()method once a second.- Every second the browser calls the
tick()method. Inside it, theClockcomponent schedules a UI update by callingsetState()with an object containing the current time. Thanks to thesetState()call, React knows the state has changed, and calls therender()method again to learn what should be on the screen. This time,this.state.datein therender()method will be different, and so the render output will include the updated time. React updates the DOM accordingly.- If the
Clockcomponent is ever removed from the DOM, React calls thecomponentWillUnmount()lifecycle method so the timer is stopped.
Do Not Modify State Directly
// Wrong, not re-render a component
this.state.comment = 'Hello';
// Correct
this.setState({ comment: 'Hello' });
State Updates May Be Asynchronous
Because this.props and this.state may be updated asynchronously, you should not rely on their values for calculating the next state.
// Wrong
this.setState({
  counter: this.state.counter + this.props.increment,
});
// Correct
this.setState((state, props) => ({
  counter: state.counter + props.increment,
}));
State Updates are Merged
componentDidMount() {
    fetchPosts().then(response => {
      this.setState({
        posts: response.posts
      });
    });

    fetchComments().then(response => {
      this.setState({
        comments: response.comments
      });
    });
}Neither parent nor child components can know if a certain component is stateful or stateless, and they shouldn’t care whether it is defined as a function or a class.
// in Clock
<h2>It is {this.state.date.toLocaleTimeString()}.</h2>
// user-defined component
function FormattedDate(props) {
return <h2>It is {props.date.toLocaleTimeString()}.</h2>;
}
<FormattedDate date={this.state.date} />;FormattedDate wouldn’t know whether it came from the Clock’s state, from the Clock’s props, or was typed by hand
- lowercase > camelCase
- string > function
- return false > preventDefault()
Your event handlers will be passed instances of
SyntheticEvent, a cross-browser wrapper around the browser’s native event. It has the same interface as the browser’s native event, includingstopPropagation()andpreventDefault(), except the events work identically across all browsers.
<a href="#" onclick="console.log('The link was clicked.'); return false">
  Click me
</a>
function ActionLink() {
function handleClick(e) {
e.preventDefault();
console.log('The link was clicked.');
}
return (
<a href="#" onClick={handleClick}>
Click me
</a>
);
}class Toggle extends React.Component {
constructor(props) {
super(props);
this.state = { isToggleOn: true };
// This binding is necessary to make `this` work in the callback
this.handleClick = this.handleClick.bind(this);
}
handleClick() {
this.setState(state => ({
isToggleOn: !state.isToggleOn,
}));
}
render() {
return (
<button onClick={this.handleClick}>
{this.state.isToggleOn ? 'ON' : 'OFF'}
</button>
);
}
}
ReactDOM.render(<Toggle />, document.getElementById('root'));class LoggingButton extends React.Component {
handleClick = () => {
console.log('this is:', this);
};
render() {
return <button onClick={this.handleClick}>Click me</button>;
}
}<button onClick={(e) => this.deleteRow(id, e)}>Delete Row</button>
<button onClick={this.deleteRow.bind(this, id)}>Delete Row</button>function Mailbox(props) {
const unreadMessages = props.unreadMessages;
return (
<div>
<h1>Hello!</h1>
{unreadMessages.length > 0 && (
<h2>You have {unreadMessages.length} unread messages.</h2>
)}
</div>
);
}
const messages = ['React', 'Re: React', 'Re:Re: React'];
ReactDOM.render(
<Mailbox unreadMessages={messages} />,
document.getElementById('root'),
);render() {
const isLoggedIn = this.state.isLoggedIn;
return (
<div>
{isLoggedIn ? (
<LogoutButton onClick={this.handleLogoutClick} />
) : (
<LoginButton onClick={this.handleLoginClick} />
)}
</div>
);
}function WarningBanner(props) {
if (!props.warn) {
return null;
}
return <div className="warning">Warning!</div>;
}* lifecycle methods will still be called.
function NumberList(props) {
  const numbers = props.numbers;
  const listItems = numbers.map(number => <li>{number}</li>);
  return <ul>{listItems}</ul>;
}

const numbers = [1, 2, 3, 4, 5];
ReactDOM.render(
  <NumberList numbers={numbers} />,
  document.getElementById('root'),
);const todoItems = todos.map(todo => <li key={todo.id}>{todo.text}</li>);
- Keys help React identify which items have changed, are added, or are removed. Keys should be given to the elements inside the array to give the elements a stable identity
- The best way to pick a key is to use a string that
uniquely identifies a list item among its siblings. Most often you would use IDs from your data as keys- If you choose not to assign an explicit key to list items then
React will default to using indexes as keys- Keys only make sense in the context of the surrounding array
map() in JSX
function NumberList(props) {
  const numbers = props.numbers;
  return (
    <ul>
      {numbers.map(number => (
        <ListItem key={number.toString()} value={number} />
      ))}
    </ul>
  );
}In a
controlled component, form data is handled by a React component. The alternative isuncontrolled components, where form data is handled by the DOM itself.
class NameForm extends React.Component {
  constructor(props) {
    super(props);
    this.state = { value: '' };

    this.handleChange = this.handleChange.bind(this);
    this.handleSubmit = this.handleSubmit.bind(this);
  }

  handleChange(event) {
    this.setState({ value: event.target.value });
  }

  handleSubmit(event) {
    alert('A name was submitted: ' + this.state.value);
    event.preventDefault();
  }

  render() {
    return (
      <form onSubmit={this.handleSubmit}>
        <label>
          Name:
          <input
            type="text"
            value={this.state.value}
            onChange={this.handleChange}
          />
        </label>
        <input type="submit" value="Submit" />
      </form>
    );
  }
}<textarea> uses a value attribute.
<textarea value={this.state.value} onChange={this.handleChange} />instead of using this selected attribute, uses a value attribute on the root select tag.
<select value={this.state.value} onChange={this.handleChange}>
  <option value="grapefruit">Grapefruit</option>
  <option value="lime">Lime</option>
  <option value="coconut">Coconut</option>
  <option value="mango">Mango</option>
</select>When you need to handle multiple controlled input elements, you can add a
nameattribute to each element and let the handler function choose what to do based on the value ofevent.target.name.
lass Reservation extends React.Component {
  constructor(props) {
    super(props);
    this.state = {
      isGoing: true,
      numberOfGuests: 2
    };

    this.handleInputChange = this.handleInputChange.bind(this);
  }

  handleInputChange(event) {
    const target = event.target;
    const value = target.type === 'checkbox' ? target.checked : target.value;
    const name = target.name;

    this.setState({
      [name]: value // computed property name
    });
  }

  render() {
    return (
      <form>
        <label>
          Is going:
          <input
            name="isGoing"
            type="checkbox"
            checked={this.state.isGoing}
            onChange={this.handleInputChange} />
        </label>
        <br />
        <label>
          Number of guests:
          <input
            name="numberOfGuests"
            type="number"
            value={this.state.numberOfGuests}
            onChange={this.handleInputChange} />
        </label>
      </form>
    );
  }
}Specifying the value prop on a controlled component prevents the user from changing the input unless you desire so. If you’ve specified a value but the input is still editable, you may have accidentally set
valuetoundefinedornull.
Managing focus, text selection, or media playback. Triggering imperative animations. Integrating with third-party DOM libraries.
DOM Element
class CustomTextInput extends React.Component {
  constructor(props) {
    super(props);
    // create a ref to store the textInput DOM element
    this.textInput = React.createRef();
    this.focusTextInput = this.focusTextInput.bind(this);
  }

  focusTextInput() {
    // Explicitly focus the text input using the raw DOM API
    // Note: we're accessing "current" to get the DOM node
    this.textInput.current.focus();
  }

  render() {
    // tell React that we want to associate the <input> ref
    // with the `textInput` that we created in the constructor
    return (
      <div>
        <input type="text" ref={this.textInput} />

        <input
          type="button"
          value="Focus the text input"
          onClick={this.focusTextInput}
        />
      </div>
    );
  }
}
Class Component
class AutoFocusTextInput extends React.Component {
  constructor(props) {
    super(props);
    this.textInput = React.createRef();
  }

  componentDidMount() {
    this.textInput.current.focusTextInput();
  }

  render() {
    return <CustomTextInput ref={this.textInput} />;
  }
}
Do not use ref attribute on function components
function MyFunctionComponent() {
  return <input />;
}

class Parent extends React.Component {
  constructor(props) {
    super(props);
    this.textInput = React.createRef();
  }
  render() {
    // This will *not* work!
    return <MyFunctionComponent ref={this.textInput} />;
  }
}
Default Values
render() {
  return (
    <form onSubmit={this.handleSubmit}>
      <label>
        Name:
        <input
          defaultValue="Bob"
          type="text"
          ref={this.input} />
      </label>
      <input type="submit" value="Submit" />
    </form>
  );
}Often, several components need to reflect the same changing data. We recommend lifting the shared state up to their closest common ancestor. Let’s see how this works in action.
child 의 state 를 common parent 의 state 로 옮기고, props 를 통해 child 로 전달.
child 의 변화는 props 에 callback 을 전달해서 child 에서 호출시 parameter 로 전달.
React has a powerful composition model, and we recommend using composition instead of inheritance to reuse code between components.
function FancyBorder(props) {
  return (
    <div className={'FancyBorder FancyBorder-' + props.color}>
      {props.children}
    </div>
  );
}

function WelcomeDialog() {
  return (
    <FancyBorder color="blue">
      <h1 className="Dialog-title">Welcome</h1>
      <p className="Dialog-message">Thank you for visiting our spacecraft!</p>
    </FancyBorder>
  );
}function Dialog(props) {
return (
<FancyBorder color="blue">
<h1 className="Dialog-title">{props.title}</h1>
<p className="Dialog-message">{props.message}</p>
</FancyBorder>
);
}
function WelcomeDialog() {
return (
<Dialog title="Welcome" message="Thank you for visiting our spacecraft!" />
);
}single responsibility principle
props are a way of passing data from parent to child. If you’re familiar with the concept of state, don’t use state at all to build this static version.
- Is it passed in from a parent via props? If so, it probably isn’t state.
- Does it remain unchanged over time? If so, it probably isn’t state.
- Can you compute it based on any other state or props in your component? If so, it isn’t state.
- Identify every component that renders something based on that state.
- Find a common owner component (a single component above all the components that need the state in the hierarchy).
- Either the common owner or another component higher up in the hierarchy should own the state.
- If you can’t find a component where it makes sense to own the state, create a new component simply for holding the state and add it somewhere in the hierarchy above the common owner component.
- React Docs
- Glossary of React Terms
- create-react-app
- Creating a React App... From Scratch
- 누구든지 하는 리액트 5 편: LifeCycle API
- [번역] 리액트에 대해서 그 누구도 제대로 설명하기 어려운 것 – 왜 Virtual DOM 인가?
- List of top 222 ReactJS Interview Questions & Answers
- 깊이 있는 리액트 개발 환경 구축하기
- The the Road to learn React
- Getting Started with React – An Overview and Walkthrough
- codesandbox
- codepdn