不知道你们有没有看过 
Travis-CI 是一个开源的持续构建项目,能够测试和部署;Travis-CI 会同步你在 GitHub 上托管的项目,每当你 Commit Push 之后,就会在几分钟内开始按照你的要求测试部署你的项目。
目前 Travis-CI 分 http://travis-ci.org/ (GitHub 公开项目进这个)和 http://travis-ci.com/ (私有付费项目)
官方文档:https://docs.travis-ci.com/ tarvis-ci 会越来越好,具体请以官方为准。
1:用你的 GitHub 账号登录 Travis-CI,确认接受访问 GitHub 的权限。
2:登录之后,Travis-CI 就会同步你 GitHub 账号的仓库。然后打开个人页面并给你想要构建的项目启用 Travis-CI。
就像这样:
3:添加 .travis.yml 文件到你项目根目录下,Travis-CI 会按照 .travis.yml 里的内容进行构建。
如下是一个 Android 项目配置例子:
language: android
android:
  components:
    # Uncomment the lines below if you want to
    # use the latest revision of Android SDK Tools
    # - platform-tools
    # - tools

    # The BuildTools version used by your project
    - build-tools-19.1.0

    # The SDK version used to compile your project
    - android-19

    # Additional components
    - extra-google-google_play_services
    - extra-google-m2repository
    - extra-android-m2repository
    - addon-google_apis-google-19

    # Specify at least one system image,
    # if you need to run emulator(s) during your tests
    - sys-img-armeabi-v7a-android-19
    - sys-img-x86-android-17
4:把 .travis.yml push 到你的 GitHub 上以触发 Travis-CI 进行构建。
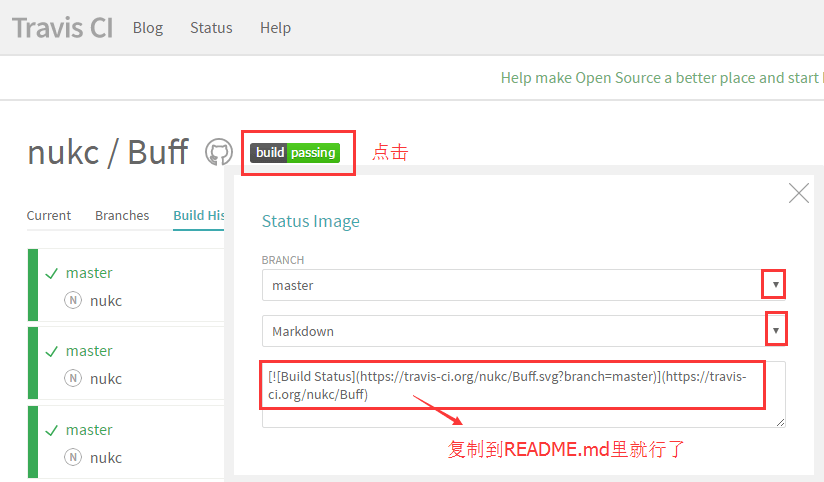
5:最后你就可以到构建状态页面来查看你的项目是否构建成功。

由于我也是刚入门不久,所以我只能讲解一些基础用法,如果有其他需求,大家可以自己慢慢探索。
先来看看下面这个我使用过的配置:
language: android # 声明构建语言环境
notifications: # 每次构建的时候是否通知,如果不想收到通知邮箱(个人感觉邮件贼烦),那就设置 false 吧
email: false
sudo: false # sudo 权限
android: # 配置信息
components:
- tools
- build-tools-23.0.2
- android-23
- extra-android-m2repository # Android Support Repository
- extra-android-support # Support Library
before_install:
- chmod +x gradlew # 改变 gradlew 的访问权限
script: # 执行:下面的命令
- ./gradlew assembleRelease
before_deploy: # 部署之前
# 使用 mv 命令进行修改 apk 文件的名字
- mv app/build/outputs/apk/app-release.apk app/build/outputs/apk/buff.apk
deploy: # 部署
provider: releases # 部署到 GitHub Release,除此之外,Travis CI 还支持发布到 fir.im、AWS、Google App Engine 等
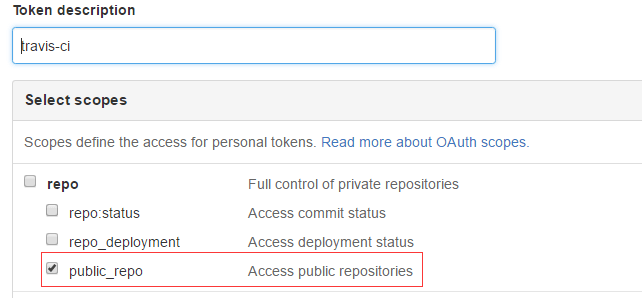
api_key: # 填写 GitHub 的 token (Settings -> Personal access tokens -> Generate new token)
secure: 7f4dc45a19f742dce39cbe4d1e5852xxxxxxxxx
file: app/build/outputs/apk/buff.apk # 部署文件路径
skip_cleanup: true # 设置为 true 以跳过清理,不然 apk 文件就会被清理
on: # 发布时机
tags: true # tags 设置为 true 表示只有在有 tag 的情况下才部署除了上面这些命令外,还有很多,比如:branches: (指定持续集成的分支), install:(安装软件包)等待,
如果想进一步了解请到 Customizing Your Build
自动发布到 GitHub Release:
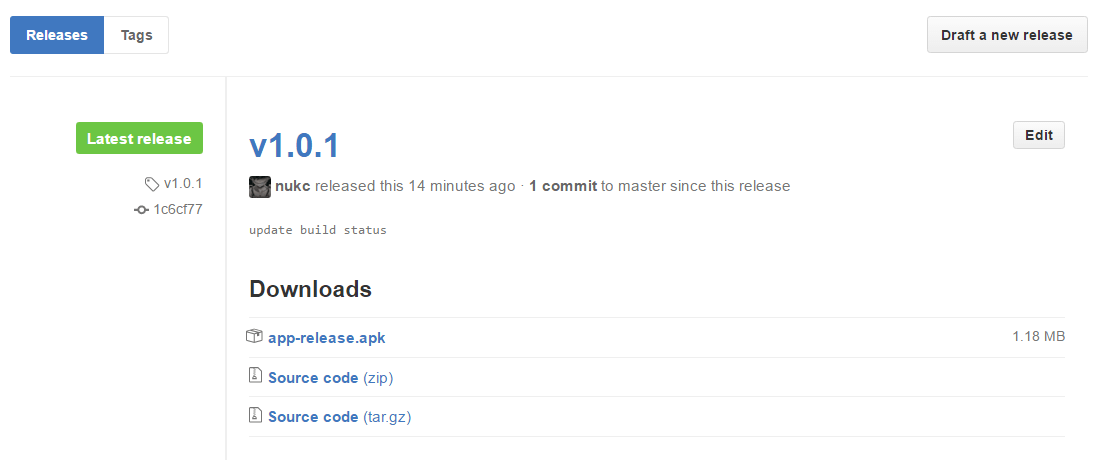
对于密码等敏感信息,Travis CI 提供了 2 种解决方案:
- 对密码等敏感信息进行加密,然后再构建环境时解密。
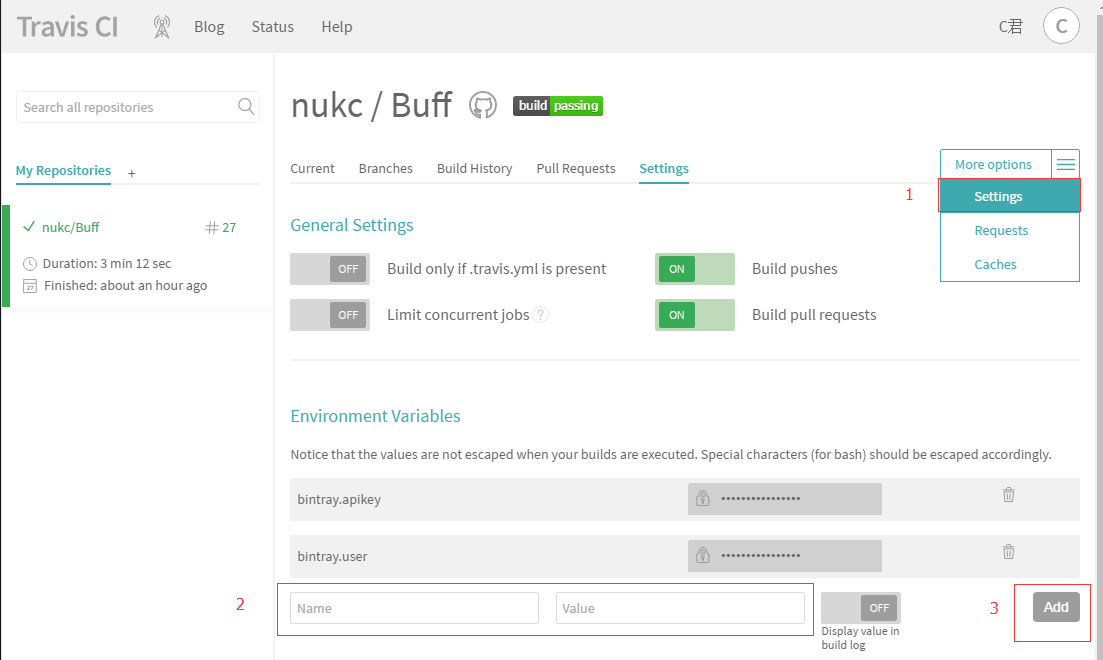
- 在 Travis CI 控制台设置环境变量,然后使用
System.getenv()获取值。
考虑到安全问题,我们的签名设置可能是这样的:
release {
    try {
        storeFile file("nukc.jks")
        storePassword KEYSTORE_PASSWORD
        keyAlias "C"
        keyPassword KEY_PASSWORD
    } catch (ex) {
        throw new Exception("You should define KEYSTORE_PASSWORD and KEY_PASSWORD in gradle.properties.")
    }
}
KEYSTORE_PASSWORD 和 KEY_PASSWORD 环境变量放在了 gradle.properties 文件,可以直接在 build.gradle中 使用 如果不知道是否能获取到 gradle.properties 里的环境变量,那就加个判断吧。(设置了会获取不到?比如 .gitignore 设置了忽略没有上传,判断一下也好) 然后最终就变成这样:
release {
    try {
        storeFile file("nukc.jks")
        storePassword project.hasProperty("KEYSTORE_PASSWORD") ? KEYSTORE_PASSWORD : System.getenv("KEYSTORE_PASSWORD")
        keyAlias "C"
        keyPassword project.hasProperty("KEY_PASSWORD") ? KEY_PASSWORD : System.getenv("KEY_PASSWORD")
    } catch (ex) {
        throw new Exception("You should define KEYSTORE_PASSWORD and KEY_PASSWORD in gradle.properties.")
    }
}
对于文件加密,Travis CI 提供了一个基于 ruby 的 CLI 命令行工具,可以直接使用 gem 安装:
gem install travis安装后进入安卓项目根目录,尝试对证书文件加密:
travis encrypt-file nukc.jks --add如果首次运行,travis 会提示需要登录,运行 travis login --org 并输入 Github 用户名密码即可。(付费版则为 travis login --pro)
travis encrypt-file 指令会做几件事情:
- 在 Travis CI 控制台自动生成一对密钥: encrypted_e6c55137b621_key 和 encrypted_e6c55137b621_iv
- 基于密钥通过 openssl对 文件进行加密,上例中会项目根目录生成 xx.jks.enc 文件
- 在 .travis.yml 中自动生成 Travis CI 环境下解密文件的配置,上例运行后可以看到 .travis.yml 中多了几行:
before_install:
    - gem install fir-cli
    - openssl aes-256-cbc -K $encrypted_e6c55137b621_key -iv $encrypted_e6c55137b621_iv
      -in nukc.jks.enc -out nukc.jks -d
最后在 .gitignore 中忽略 xx.jks 以及 gradle.properties
目前我的开源项目用不到证书签名,我还是比较关心 Bintray apikey 的安全,上传到 JCenter 还是比较实用的。
本来我把 bintray.apikey 和 bintray.user 设置在了local.properties中,但由于 local.properties 不会被上传,
Travis CI 无法获取到,那肯定是会 build failing 的。
之前:(报错,没有 local.properties 这样的文件)
Properties properties = new Properties()
properties.load(project.rootProject.file('local.properties').newDataInputStream())
bintray {
    user = properties.getProperty("bintray.user")
    key = properties.getProperty("bintray.apikey")
    configurations = ['archives']
    pkg {
        repo = "maven"
        name = "Buff"
        websiteUrl = siteUrl
        vcsUrl = gitUrl
        licenses = ["MIT"]
        publish = true
    }
}
然后我把这 2 个变量添加到了 Travis CI 控制台,最后改一下。
Properties properties = new Properties()
boolean isHasFile = false
if (project.rootProject.findProject('local.properties') != null){
    isHasFile = true
    properties.load(project.rootProject.file('local.properties').newDataInputStream())
}
bintray {
    user = isHasFile ? properties.getProperty("bintray.user") : System.getenv("bintray.user")
    key = isHasFile ? properties.getProperty("bintray.apikey") : System.getenv("bintray.apikey")
    configurations = ['archives']
    pkg {
        repo = "maven"
        name = "Buff"
        websiteUrl = siteUrl
        vcsUrl = gitUrl
        licenses = ["MIT"]
        publish = true
    }
}
如果 commit 不想让 travis ci 构建,那么就在 commit message 里加上 [ci skip] 就行了。
git commit -m "[ci skip] commit message"如果你遇到了其他的问题,可以尝试到 travis-ci/issues里找找,或者 Google / StackOverflow
/home/travis/build.sh: line 45: ./gradlew: Permission denied
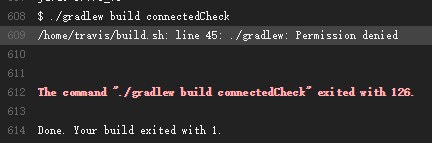
gradlew 的权限问题,修改 gradlew 的权限,在 .travis.yml 里加上:
before_install:
 - chmod +x gradlew
failed to find Build Tools revision 23.0.2

我是加上 - tools 解决的:
android:
  components:
    - tools
failed to deploy

设置一下这个 token 的权限就好了
A problem occurred evaluating project ':app'. java.lang.UnsupportedClassVersionError: com/android/build/gradle/AppPlugin : Unsupported major.minor version 52.0
在 .travis.yml 里加上:
jdk:
  - oraclejdk8
- What went wrong: A problem occurred evaluating project ':app'.
Failed to apply plugin [id 'com.android.application'] Could not create plugin of type 'AppPlugin'.
更新 gradle 版本就可以了
最后,希望大家都能顺顺利利的 build passing。