- Introduction
- How It Works
- Tech Stack and Decisions
- Getting Started
- Testing
- Code Structure
- Future Enhancements
Decision Engine is a robust and user-friendly system designed to empower non-technical individuals to create and deploy decision-making algorithms. The primary aim is to democratize the process of algorithmic decision-making by providing an intuitive drag-and-drop interface for defining decision policies. These policies can then be saved and executed, all without requiring any coding skills.
The architecture comprises four key components:
-
ConfigFrontend: A frontend developed in React, providing the graphical user interface where users can design decision policies through a series of blocks.
-
ConfigBackend: A FastAPI-based backend that handles CRUD operations for the policy configurations. Given that only one policy type is allowed, only Read and Update operations are enabled.
-
ExecutionEngine: Another FastAPI-based backend that runs the decision-making policy and returns the result as a JSON object with a boolean field indicating the decision.
-
PolicyDB: A MongoDB database that stores the policy configurations.
The decision policies can operate on arbitrary variables passed in a JSON format, making it highly adaptable and versatile. For example, a typical input may look like:
{
  "age": 23,
  "income": 3000
}
And the output from the ExecutionEngine will be:
{
  "decision": true
}The Decision Engine operates by interconnecting four main components, each with its specific role in the decision-making process.
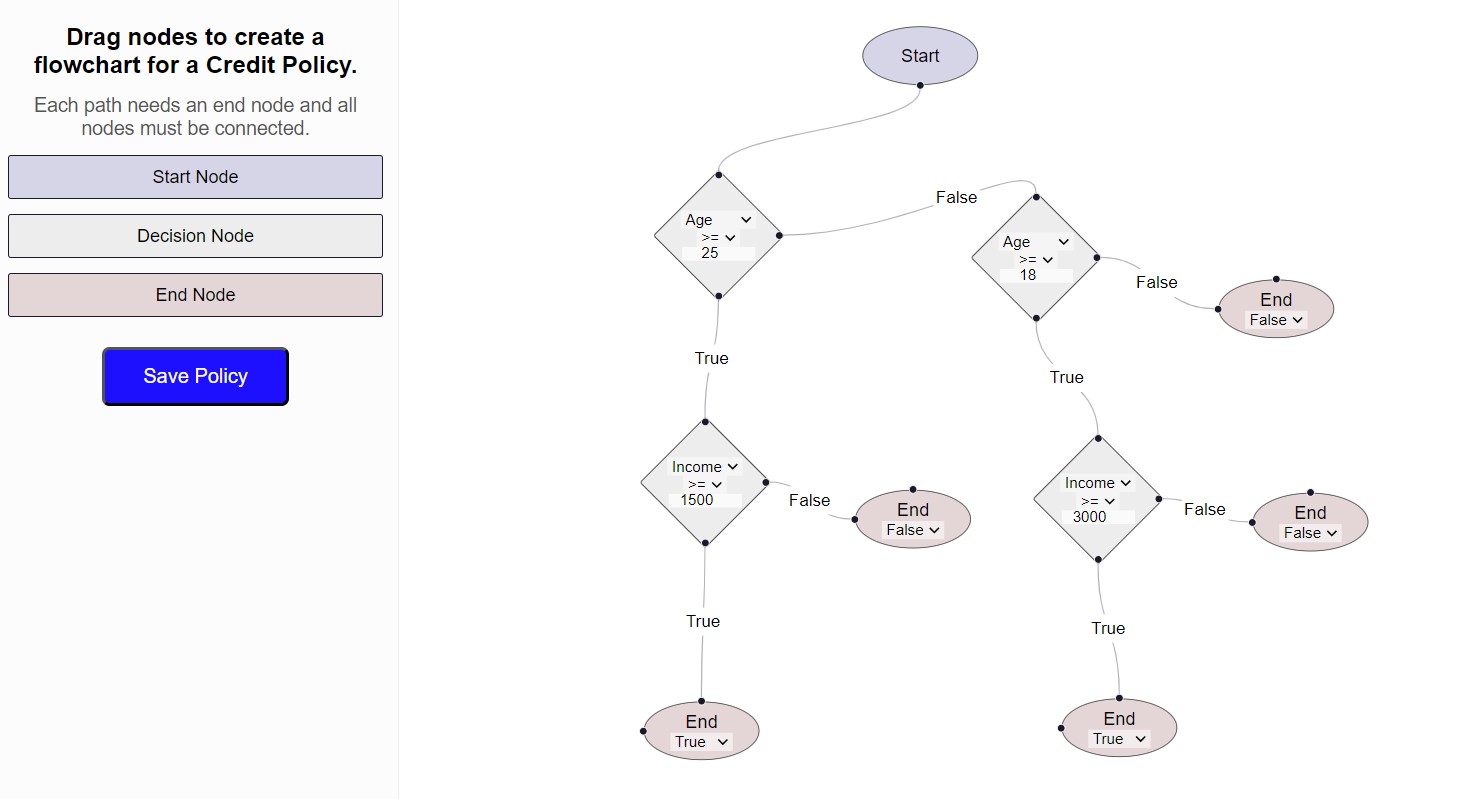
When a user accesses the ConfigFrontend, they are presented with a graphical interface where they can design a decision-making policy. Using a series of drag-and-drop blocks, users can build a policy by configuring conditions based on the input variables. For example, a policy could be designed to evaluate if age > 18 and income > 1000.
Once the user saves a policy on the frontend, the ConfigBackend stores this configuration in PolicyDB. The backend supports only reading and updating the policy, as only one type of policy is allowed in the current system setup.
This MongoDB database stores the nodes-structured policy configurations. The data model is structured to hold the policy logic as well as any meta-information required for execution.
When a request is received from a client system (CustomerBackend), the ExecutionEngine fetches the current policy from PolicyDB. It then executes this policy using the input variables supplied in the JSON payload. After the decision-making process is complete, it returns a JSON object with a boolean decision field.

-
Access ConfigFrontend: A user accesses the frontend interface to design or update a decision-making policy.
-
Drag and Drop Nodes: The user drags
Decision NodesandEnd Nodesonto the canvas.-
Decision Nodes: These have three configurables:
Attribute Dropdown: Users select an attribute like 'Age' or 'Income'.Operator Dropdown: Users select an operator like '>', '<=', etc.Value Input: Users input a numerical value for comparison.
-
End Nodes: These have a single configurable dropdown to select either
TrueorFalseas the decision outcome.
-
-
Connect Nodes: Users can then connect the
Decision NodesandEnd Nodesusing edges. EachDecision Nodehas two outs:TrueandFalse. Users link these outs to the next node in the flowchart, determining the decision path. -
Save Policy: After completing the design, the user hits the 'Save' button. The frontend performs validation to ensure all nodes are properly connected and configured. Upon successful validation, it patches the existing policy via a call to ConfigBackend, which then stores the updated policy in PolicyDB.

- CustomerBackend Request: A JSON object with arbitrary fields is sent to the ExecutionEngine.
It can be accessed athttp://localhost:8000/docs/to use the FastAPI UI to run the execution.

{
  "age": 21,
  "income": 4000
}- Fetch and Transform Policy: ExecutionEngine makes a call to ConfigBackend to fetch the latest policy. It then transforms the nodes structure into a decision tree.
An example of decision tree would be:
{
    "attribute": "age",
    "operator": ">=",
    "value": "25",
    "true": {
        "attribute": "income",
        "operator": ">=",
        "value": "600",
        "true": True,
        "false": False
    },
    "false": {
        "attribute": "age",
        "operator": ">=",
        "value": "18",
        "true": {
            "attribute": "income",
            "operator": ">=",
            "value": "2500",
            "true": True,
            "false": False
        },
        "false": False
    }
}-
Policy Evaluation: The decision tree is evaluated using the input variables from the CustomerBackend's JSON payload.
-
Decision Output: A JSON object with the decision is returned.
{
  "decision": true
}This project leverages various technologies, each carefully chosen to meet specific requirements and functionalities.
The language of choice for this project is Python for several reasons:
-
Project Requirement: One of the project's specifications was a strong preference for Python.
-
Rapid Development: Python's straightforward syntax and extensive libraries enable quick development, a key factor in meeting project deadlines.
-
Prior Experience: My background in Python significantly influenced this choice, allowing me to focus more on the logic and features rather than the language specifics.
FastAPI was selected over alternatives like Django and Flask for multiple reasons:
-
Microservices: The decision to separate ConfigBackend from ExecutionEngine is rooted in the microservices architecture, which allows for easier scaling and maintenance. FastAPI is particularly well-suited for quickly developing such microservices.
-
Lightweight: FastAPI is lighter than most other frameworks, making it faster and more efficient to run.
-
Performance: Being built on Starlette and Pydantic, FastAPI offers high performance, crucial for user experience, especially in Execution Engine requirements.
-
Type Checking: FastAPI's use of Pydantic ensures automatic model validation, which simplifies data validation and consistency.
-
Automatic Documentation: Unlike Django and Flask, FastAPI provides auto-generated Swagger and ReDoc interfaces out-of-the-box, a pivotal feature for serving as the UI for the ExecutionEngine.
The frontend uses React for the following reasons:
-
Prior Familiarity: My previous experience with React made it a natural choice for this project.
-
Drag-and-Drop Libraries: React's extensive ecosystem includes several libraries that facilitate implementing drag-and-drop features.
-
Community and Ecosystem: The large community and numerous third-party libraries in React speed up the development process.
MongoDB's JSON-like document handling, schema flexibility, and scalability make it ideal for our PolicyDB:
-
Schema Flexibility: MongoDB's lack of a fixed schema is beneficial for accommodating evolving policy structures.
-
Scalability: MongoDB is horizontally scalable, future-proofing it against increased policy complexity or user numbers.
Docker was integrated into this project not as a strict requirement, but as a means to fulfill the project's emphasis on ease of setup and management:
-
Ease of Setup and Distribution: Docker containers package up everything an application needs to run, streamlining distribution and eliminating inconsistencies across various runtime environments.
-
Microservices Management: In a microservices architecture like ours, Docker-compose simplifies the orchestration of all services (
backend-config,frontend-config,execution-engine), allowing you to control the entire application stack through simple commands. -
Users's Convenience: The usage of Docker ensures that any other user can effortlessly set up the entire system and run tests, without having to manually manage the setup and dependencies for each individual service.
This section provides a quick start guide on how to get the project up and running on your local machine.
-
Clone this project.
-
Navigate to each of the
backend-config,execution-engine, andfrontend-configfolders. -
Make a copy of the
.env.examplefile in each folder and rename it to.env.cp .env.example .env -
The only incomplete variable in the
.env.examplefile isDB_URL. You'll need to set up a MongoDB instance on Atlas and use the connection URL to populate this field. Alternatively, you can reach out to me for a test database URL.
Disclaimer: The setup described here is not optimized for ease of use. The best option would be to use the test database URL provided upon request. If you opt to proceed with the following steps, you will need to create a policy and manually update its ID in the project's configuration. These limitations are acknowledged, and potential improvements are discussed in the Local MongoDB Management section.
- Go to MongoDB Atlas and create an account if you don't have one.
- Create a new cluster and retrieve the connection URL.
- Create a database called
PolicyDBand a collection calledpolicies - Replace the
DB_URLin the.envfiles with the URL you've just obtained. - Create a random entry in collections with the policy_id set in the project, just to be able to patch using the frontend later.
-
Make sure you have Docker and Docker Compose installed on your machine.
-
Open a terminal and navigate to the root directory containing the
docker-compose.ymlfile. -
Run the following command to start all the services defined in
docker-compose.yml:docker-compose up -
Once the services are up and running, you can access the frontend at
http://localhost:3000(this is thePORTdefined in the.envfile for the frontend-config service).
This section provides instructions on how to run tests for each component of the project inside their respective Docker containers. This ensures consistency in the testing environment.
To find the container name for each service, you can run the following command.
docker-compose psLook for the column that says 'Name' and copy the name of the container corresponding to the service you want to test.
Backend-Config uses Python's pytest for testing. Here are the types of tests you might encounter:
- HTTP Endpoint integration tests: These tests use an async HTTP client to perform GET and PATCH requests.
- Service unit tests: These tests check the logic of services within the backend.
To run tests for backend-config service in a single command, if the container name is the default one, execute:
docker exec -it credit-decision-backend-config-1 /bin/sh -c "cd app && pytest"Execution-Engine also uses pytest along with pytest-asyncio for asynchronous tests. The types of tests are similar to Backend-Config but may include mocking external HTTP calls.
For the execution-engine service, you can run the tests in a single command as follows:
docker exec -it credit-decision-execution-engine-1 /bin/sh -c "cd app && pytest"Frontend-Config uses Jest for its testing framework. The tests cover UI components like nodes and also interaction with APIs. To run, you can execute tests using Jest in one step with:
docker exec -it credit-decision-frontend-config-1 /bin/sh -c "npm test"This will run all the available tests and provide an output for each one, showing if they have passed or failed.
app/controllers: Contains the policy controller responsible for handling API routes related to policies.app/dal: Data Access Layer for the policy, communicates directly with the MongoDB database.app/deps: Contains dependencies used across the application.app/models: Houses the data models for policies.app/services: Contains the logic for policy services.app/tests: Contains both unit and integration tests for the backend-config.app/utils: Houses settings and utility functions.app/main.py: Main entry point for the FastAPI application.
app/controllers: Contains the execution controller responsible for decision execution.app/dal: Data Access Layer that communicates with the backend-config to fetch policies.app/deps: Contains dependencies used across the application.app/models: Houses the data models for customer information.app/services: Contains the logic for execution services.app/tests: Contains both unit and integration tests for the execution-engine.app/utils: Houses settings and utility functions.app/main.py: Main entry point for the FastAPI application.
src/api: Contains API calls related to policies.src/components: Houses the React components including custom nodes and sidebar.src/utils: Contains utility constants.src/App.js: Main React component for the application.src/Flow.js: Contains the main logic for the flow chart.src/index.js: Entry point for the React application.
The following sections outline potential enhancements for the Decision Engine. These are suggestions that could make the system more versatile, secure, and user-friendly.
Implementing an authentication system could add an extra layer of security, limiting unauthorized access to decision-making policies.
Currently, the system is designed to support a single, hardcoded policy. Future adaptations could allow for the creation and management of multiple policies.
The current attributes available for decision nodes are limited to 'Age' and 'Income'. Enabling users to add custom attributes would make the system more flexible. These attributes could be saved and fetched directly from the backend.
Creating a separate database to track the history of executed policies could improve system accountability. This would allow for better auditing of decisions by capturing the payload, the policy applied, and the resulting decision.
Instead of transforming node structures into decision trees each time a decision is made, these trees could be pre-computed and stored in the ConfigBackend. This would reduce computational overhead in the Execution Engine.
Improving the UI with a more modern, aesthetic, and professional design can offer a more engaging user experience.
An intuitive system could be developed to allow nodes to connect by being dragged close to each other, removing the need to manually draw edges between them.
Introducing 'Undo' functionality, accessible via Ctrl+Z, would allow users to easily reverse any mistakes or changes.
The interface could permit users to select multiple nodes for batch deletion or other operations, making the UI more convenient to use.
Implementing dynamic coloring for the End Node based on its true or false state could provide immediate, visual feedback to the user. This helps in quickly understanding the outcome of a decision path.
For larger policies that include multiple nodes, an auto-layout feature could automatically arrange all the nodes in an organized manner. This makes it easier to visualize the entire decision-making process and could be toggled on or off as needed.
A locally-managed MongoDB could make the initial setup more straightforward, negating the need to share a DB_URL.
A new MongoDB collection could be automatically created the first time the system is run, eliminating manual setup.
Instead of hardcoded IDs, the system could dynamically fetch the latest or specified ID, offering greater flexibility in managing policy configurations.