A tutorial is available within the application.
The application will take user code and execute it to transform it into a visualization of the involved data structures and expressions.
The functionality can be broken down into high level steps.
- Accept user code
- Transform it into something that can be read
- Run the code safely and create a set of declarative instructions that can be used to reproduce the values and data structures from the code
- Return the instructions and use them to create a visualization
This was rather simple. I opted for Microsoft's Monaco Editor for its smooth feel, versatility, and familiarity with most developers. The code can be written in the editor and submitted to be run.
"Something that can be read" is quite vague. What we really need is to transform your code into code that will allow the values inside it to be extracted from the code. How do we do that?
Babel is a JS to JS transpiler that gives us the power to do exactly this. It is most popularly used with Webpack in front-end JavaScript to transform code from more recent ECMAScript standards to be compatible with older standards.
For our purposes, we need to be able to interact with it programatically, in Node.js. Luckily, it is quite straightforward to use Babel this way.
In particular, we need to interact with Babel's Abstract Syntax Tree(AST). Babel will parse the code into an AST for us, and then we will pass a function to it that makes use of the AST to create, modify, and delete nodes on the tree. For more reading on Babel's AST, see this helful article and Babels plugin handbook.
Algo-viz's plugin wraps every expression in an external function call. These calls will take the values and metadata from the code. Of course, the values will be passed back into the code. I will spare you the gory details of that. If you like, see the transpiler here
Here is an example of the output:
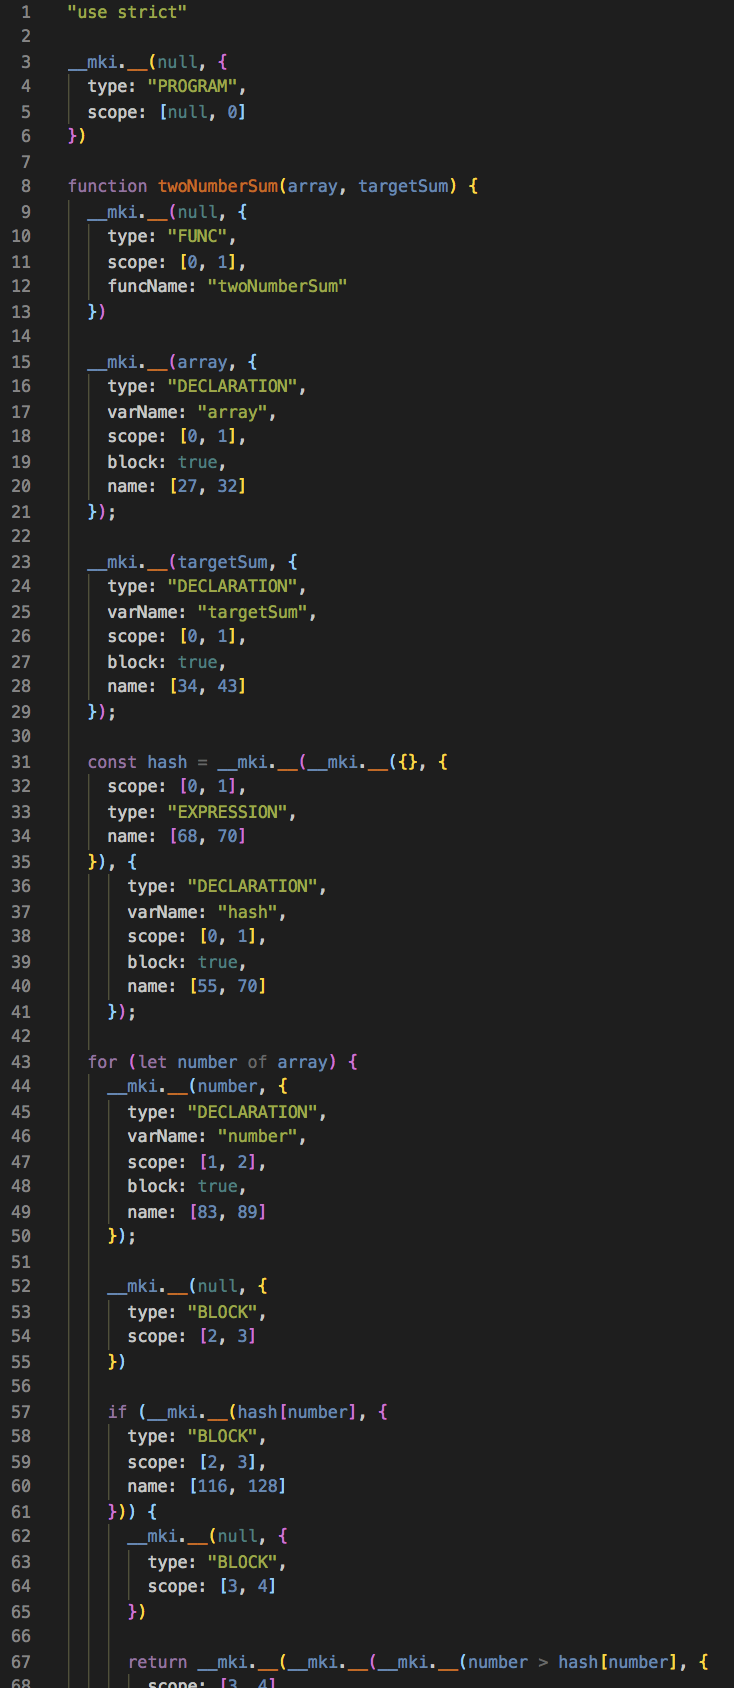
Running the transpiled code is quite straighforward. An object with the aforementioned function is instantiated in the global scope and extracts the metadata and values as the code executes.
There is just one problem. What do we do about data structures?
First of all, they can have nesting and circularity, which is not possible to convert to JSON to send to the client. So we traverse the structure recursively and normalize it, generating unique ids for each object. The code that does this can be found here
They are also mutable and the code that mutates them may not be visible in the user code (The Array.prototype.sort() for example. We could make the runner aware that this function was executed, but we can't know what is actually happening).
I came up with three viable approaches to tackle this problem:
- Make copies of objects and store them everytime they get passed through the runner
- Use the transpiler to keep track of user written gets, sets, and deletes and then rewrite all native mutative methods
- Find a way to observe changes to properties on objects.
Option 1 would have been quite clean, as each copy would represent the objects state at a given point, but it would take up an unacceptable amount of space. After all, this data will eventually be sent to the front end to create a visualization.
I almost went with option 2. Catching things in the transpiler actually worked quite nicely, although it introduced some other interesting problems, like handling computed property accesses. I did write the code that does that, and I got to the point where I was rewriting all of the Array.prototype methods. Something felt wrong about that. My versions were executing quite fine, but it didnt make sense that I was rewriting code when the whole point of this thing was to see how Node executes the code. I had to find a different way.
Option 3 turned out very nicely. At first, while traversing and normalizing objects, I used Object.defineProperty() to define getters and setters on every property. This introduced some other issues, particularly with Arrays(empty array indices and also length mutative methods). For some time, this was the implementation of object observation in the runner, I even finished a large part of the front-end with this in place. And it worked pefectly fine. However, I wasn't satisfied with the dirty things I had to do to make it work, like creating an "empty" symbol value for empty array values.
After using Mobx extensively on the front end, I decided to borrow its observable creation pattern, using ES6 proxies, to do it in a cleaner way. Now the code is very clean. Essentially, it works by intercepting all objects and returning their virtualized versions back into the user code. The user code cannot know the difference without using some particular function in the Node inspect utility API. The code for that can be found here
The data, which includes the steps, objects, and types from the user's code, is returned to the client side. Now, creating a visualization is a matter of performant state management and view rendering. To that end, I chose to treat the view layer as just a wrapper over the underlying state system that just reacts to state changes. React was perfect for this purpose.
For state management, I chose Mobx for the following reasons:
- It allows for deeply nested state
- Its observable pattern, which allows for mutations of state, works perfectly with the reactive programming paradigm. This made state management just a matter of writing the underlying algorithm.
- It allows for the use of data structures. Not only does the state management make extensive use of JavaScript's builtin Map and Set, but it also uses a heap based algorithm for structure management as well. It was easy to bake the heap directly into state without much configuration.
The entire client side code is also written in TypeScript. I wanted this project to be maintainable. This was a great choice because frequent changes are made easy by a strict typing system.
Lastly, I imported parts of Bulma CSS for responsive layout because it is flexible, has good browser compatibility, and why reinvent the wheel?
This turned out to be extremely complex. In fact, there is more code related to state management than actually rendering the elements related to the visualization. The most important pieces of state are:
- The iterator
- Scope chain, identifiers and callstack management. (just called state in the code itself)
- Structures (objects) management
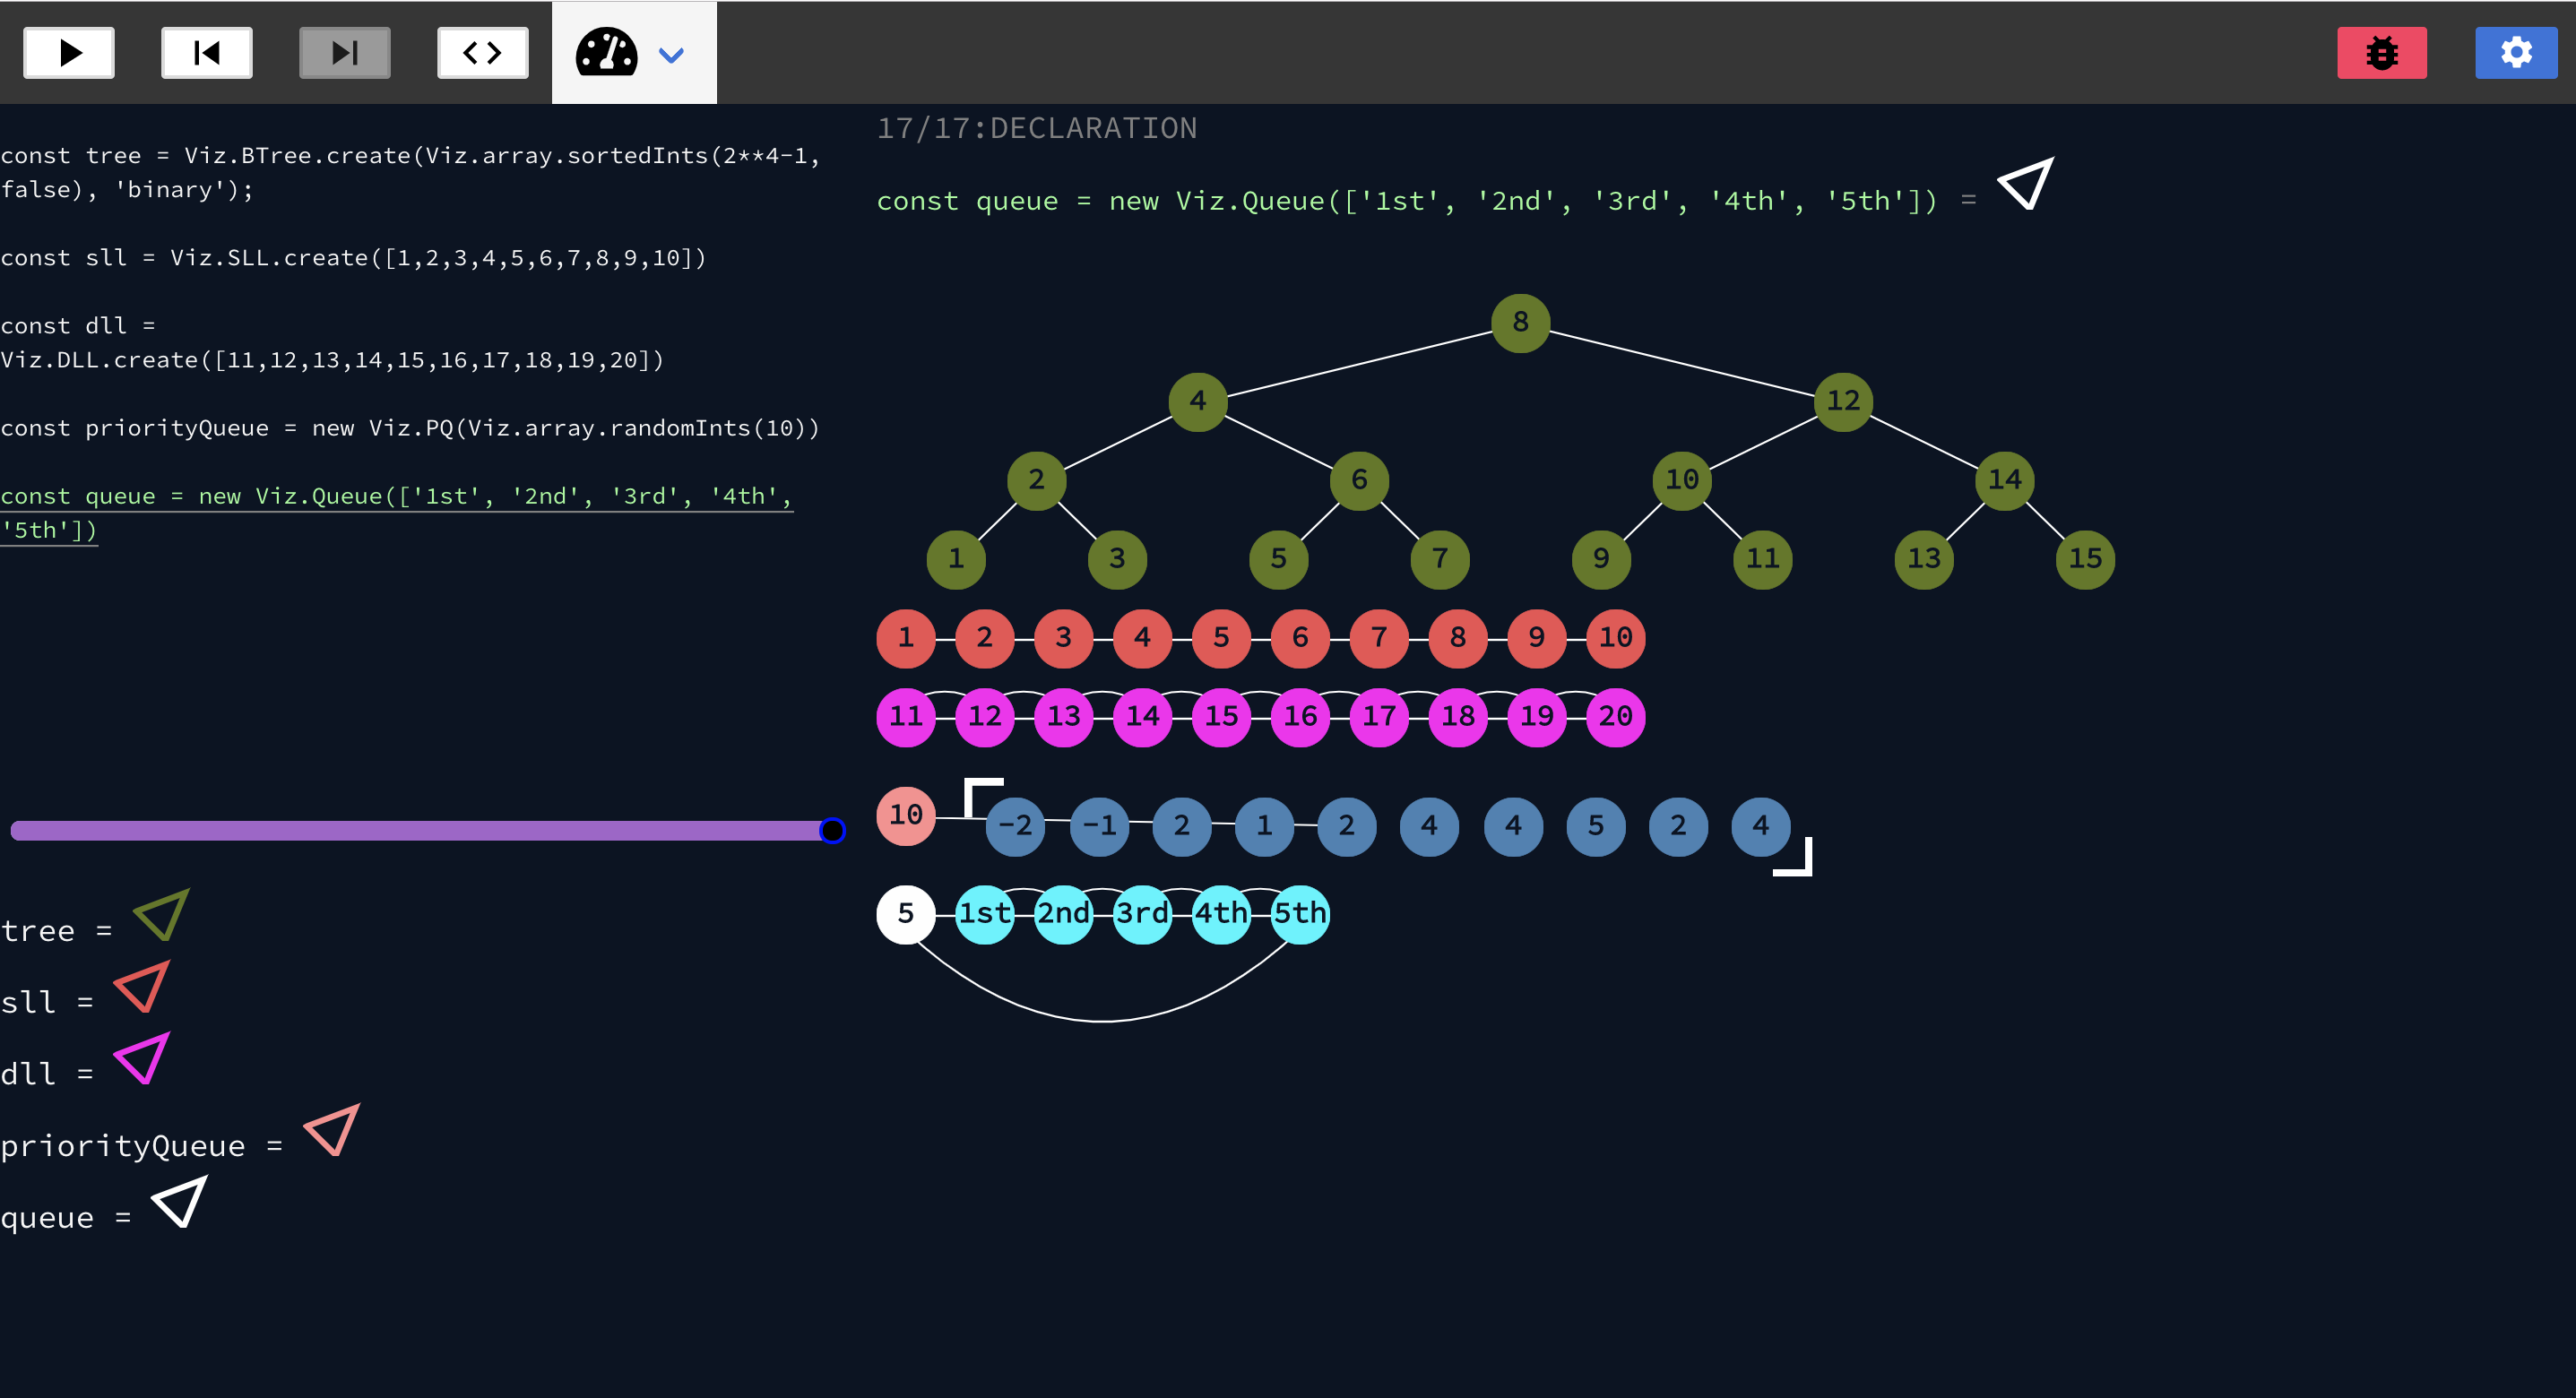
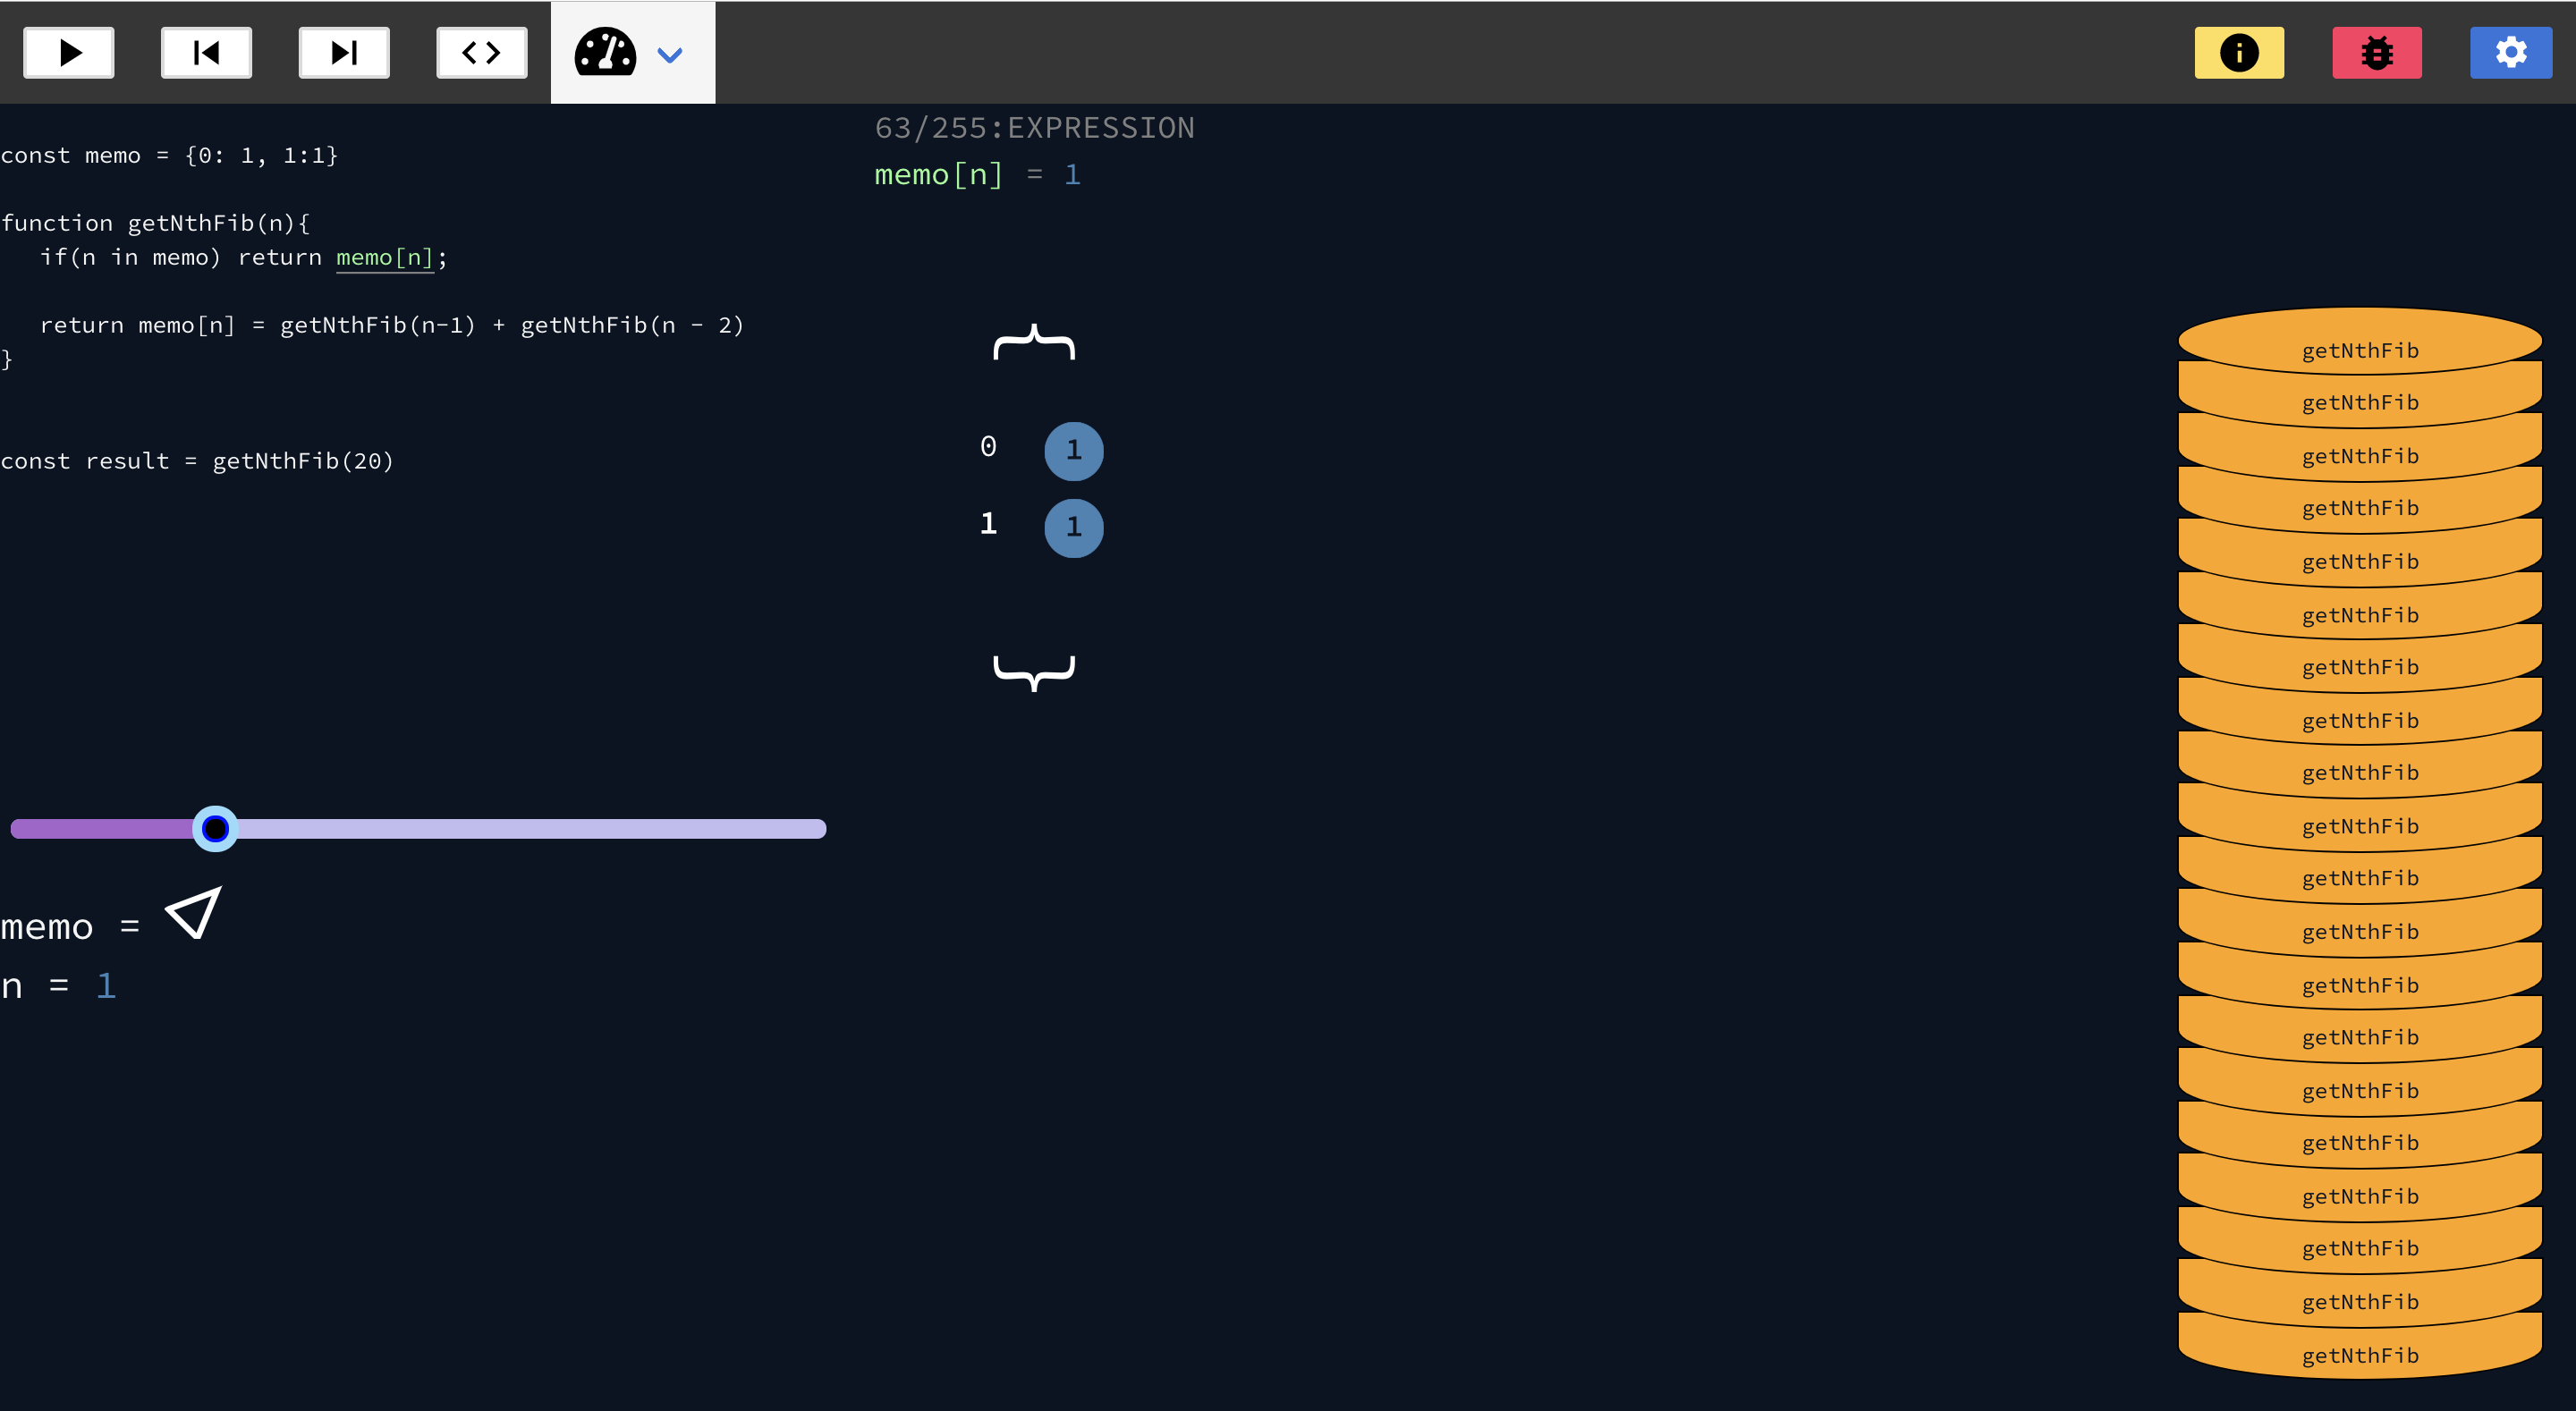
The iterator controls what step in the visualization the state is currently on. This is where the user(developer!) has control. Users can play and pause the code. Doing this will make the iterator begin iterating through the steps at a set interval. The iterator also makes sure that rendering is complete for a particular step before executing the next one. The speed of the iterator can be customized. Even the speeds of individual step types (CALL, DECLARATION, GET, etc.) can be customized. When paused, the iterator can be controlled one step at a time (next or previous). That means that, yes, the execution CAN be viewed in reverse. The iterator passes the details of the current step to the 'state' management(#2 above) and the structures management.
It was difficult to come up with a name for something that encompasses so many things. You might ask "Well, why didn't you break those things out into different pieces of state?" To answer that, this piece of state is esentially responsible for the callstack and which scopes are active, and thereby which variables are visualized for that particular step. This is important not only for displaying the exact values of variables, but for determining which objects show up on the screen (only objects with variable bindings accessible by the currently executing scope will be visible). The callstack, scope chain, and active identifiers are deeply connected and inseparable. To manage them, 'state' uses a simple stack-based algorithm that can be executed in reverse. A stack-based algorithm was perfect for, well, managing a bunch of stacks...
This is responsible for executing changes to objects. The step types GET, SET, and DELETE, are managed by this piece of state. The premise is simple, execute those steps on those objects, and let mobx-react react to the changes. The difficulty, and probably the most difficult thing on the client side, was figuring out how to manage object to object relations. From a UX perspective, it would be nice, for example, if a Binary Tree's child nodes were rendered as they were actually its children, instead of just pointers. Or, its nice when matrices actually look like such, instead of an array of pointers.
For that part of the algorithm, I used a modified priority queue algorithm to keep track of which object has which children. It takes into account assignment precendence (which parent was the first parent of a particular object), and an affinity which determines how strong certain parent-child relationships are. For example, the affinity between a BST and another BST is higher than a BST to a Linked List. In the future, this may be user defined. That algorithm can be found here.
This piece of state is also responsible for keeping track of the locations of all objects on the screen. This is used primarily to render pointers.
Because view rendering is so dynamic, I largely opted for inline styling. Still, there are globally applied styles. In the near future, I may remove the CSS file altogether for uniformity and clarity. Animations are primarily done with simple CSS transitions. While I love the power and flexibility offered by JS animations, they often hinder performance by blocking the event loop. Most of the colors on the screen, such as that of your code, the callstack, structures, value types, etc. are all customizeable. In addition, users can toggle most parts of the screen on/off.
Regarding rendering custom structures (Binary Tree, Linked List, anything under the sun), users must be explicit about how structures are rendered. The interface that handles this allows one to define children, pointers, display key, and specify exactly how many children a structure has. The tutorial goes into detail on this.
The current security configuration relies on containerization. When code is send to be run, the server spins up a container (with Docker). The container has limited access to memory and CPU and privileges. Inside the container is where both the transpilation and execution processes happen. The container writes the result or errors to a data volume that is shared with the host. For JavaScript specifically, the transpiled code runs in an instance Node's Virtual Machine module. Efforts will be made to use a similar configuration with other languages.
This configuration is secure to a great extent. However, nothing is ever totally secure. Upon scaling, greater security can be acheived by opting to make the code running function a dedicated microservice. That way, the code can be run on entirely different machines.
To be done