React Native Push Notifications com suporte de integração OneSignal.


- React Native OneSignal
- Mudanças impactantes
- Nota a respeito de suporte para 0.39 <= React Native >= 0.40
- Executando o exemplo do projeto
- Instalação
- Instalação do Android
- Instalação do IOS
- Uso
- API
- Manipulando Notificações
- Enviando e obtendo tags OneSignal
- Obtendo ID e Token para Push
- Definir email para um melhor targeting
- Habilitar Vibração
- Habilitar Som
- Definir comportamento da notificação em relação ao celular
- Mudar inscrição do status do usuário
- Checar Push Notification e inscrição do status do usuário
- Enviar Notificação (Peer-to-Peer Notificação)
- Prompt Location
- Limpar Notificações (Somente Android)
- Cancelar Notificações (Somente Android)
- Checar Permissões de Notificação (Somente iOS)
- Pedir Permissões de Notificação (Somente iOS)
- Registro para Notificação (Somente iOS)
- FAQ / Repeating Issues
- CREDITS
- TODO
Certifique-se de ler atentamente esta documentação, pois as instruções de uso foram alteradas desde react-native-onesignal v3.0.2.
TL;DR - Não importa qual é versão do React Native está, instale a última versão da bilioteca do OneSignal.
Desde a versão 3.0.2, esse módulo suporta compatibilidade com versões anteriores do React Native 0.39 e ou abaixo, instalando uma versão customizada. Todos devem agora atualizar para a última versão disponibilizada para esse módulo.
Para sua conveniencia, nós criamos um projeto de exemplo baseado no React Native 0.41.2. Você pode executar o projeto para testar as configurações, debugar e desenvolver seu aplicativo sobre o exemplo.
git clone https://github.com/geektimecoil/react-native-onesignalcd react-native-onesignal && cd examples && cd RNOneSignalyarn && cd ios && pod update && cd ..- Executando o aplicativo de exemplo no iOS:
react-native run-ios - Executando o aplicativo de exemplo no Android:
react-native run-android
- Para adicionar a biblioteca no projeto
yarn add react-native-onesignal- Ou
npm install --save react-native-onesignal
- Linkar a biblioteca no projeto
react-native link react-native-onesignal
- Siga as instruções do Onesginal para gerar a chave da API para o Google Server: https://documentation.onesignal.com/docs/generate-a-google-server-api-key
Em AndroidManifest.xml
.....

<!-- Opcional - Adicione as permissões necessárias (Escolha um desses) -->

<uses-permission android:name="android.permission.ACCESS_COARSE_LOCATION"/> <!-- Aproximação da localização -  Se você quer usar o promptLocation para deixar o OneSignal saber sua localização.-->
<uses-permission android:name="android.permission.ACCESS_FINE_LOCATION"/> <!--  Localização precisa, se você quer usar promptLocation para deixar o OneSignal saber sua localização. -->

<!-- Final das permissões opcionais-->

<application ....>
    <activity
        android:launchMode="singleTop"> <!-- Adicione o parametro -->
    .....
Em android/gradle/wrapper/gradle-wrapper.properties
...

distributionBase=GRADLE_USER_HOME
distributionPath=wrapper/dists
zipStoreBase=GRADLE_USER_HOME
zipStorePath=wrapper/dists
distributionUrl=https://services.gradle.org/distributions/gradle-2.14.1-all.zip
Em android/build.gradle
...

dependencies {
    classpath 'com.android.tools.build:gradle:2.2.2' // Upgrade gradle

    // NOTE: Do not place your application dependencies here; they belong
    // in the individual module build.gradle files
}
Em android/app/build.gradle
...

android {
    ...
    buildToolsVersion "23.0.2" // NÃO É REQUIRIDO, MAS RECOMENDADO
    ...
    defaultConfig {
        ...
        manifestPlaceholders = [onesignal_app_id: "YOUR_ONESIGNAL_ID",
                                onesignal_google_project_number: "REMOTE"]
    }
}- Abra a conta do OneSignal aqui: https://onesignal.com/
- Siga as instruções do OneSignal para gerar Certificado de Push no iOS: https://documentation.onesignal.com/docs/generate-an-ios-push-certificate
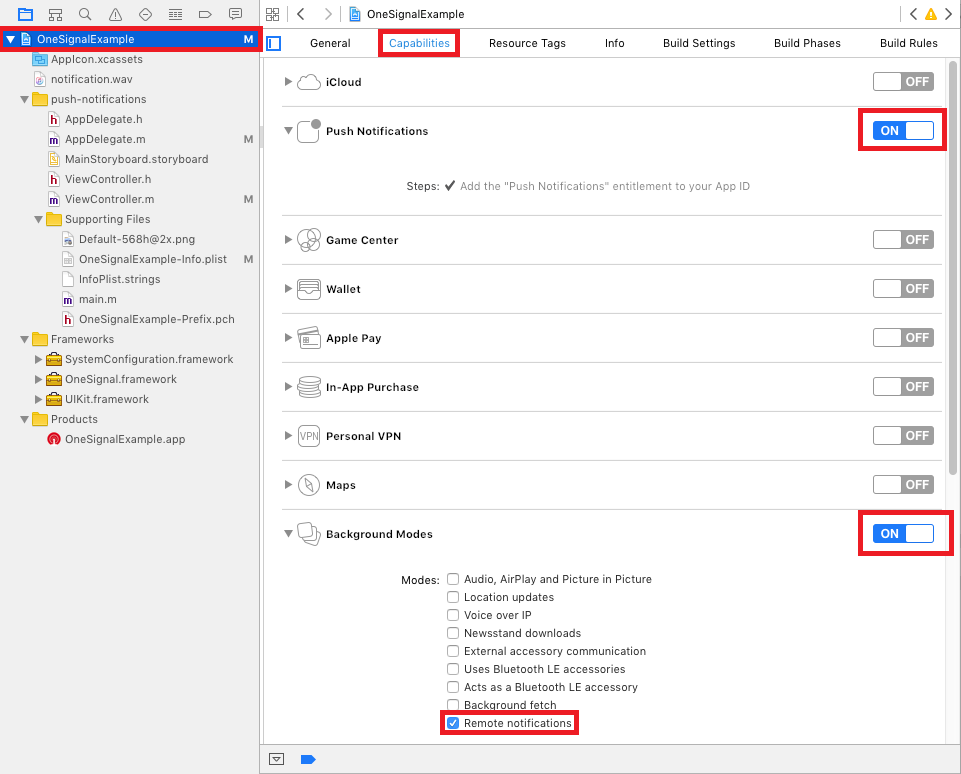
- Selecionar o projeto raiz e em capacidades habilitar "Push Notifications".
- Próximo a habilitar é "Background Modes" e checar "Remote notifications".
- Selecionar o projeto raiz e ir para
Build Settings. - Procurar por
Header Search Paths. - Adicionar
$(SRCROOT)/../node_modules/react-native-onesignal/iose definir isso comorecursive.
-
Em
AppDelegate.h:-
Importar
RCTOneSignal.h:#import <RCTOneSignal.h>
-
Declarar a propriedade
RCTOneSignal:@property (strong, nonatomic) RCTOneSignal* oneSignal;
-
-
Em
AppDelegate.m:-
Sintetizar
oneSignaldepois@implementation AppDelegate@synthesize oneSignal = _oneSignal;
-
* No método application didFinishLaunchingWithOptions, inserir o seguinte código (trocar YOUR_ONESIGNAL_APP_ID com seu ID da aplicação OneSignal):
    ```objc
    self.oneSignal = [[RCTOneSignal alloc] initWithLaunchOptions:launchOptions
                                                           appId:@"YOUR_ONESIGNAL_APP_ID"];
    ```

    ```objc
    // For requiring push notification permissions manually.
    self.oneSignal = [[RCTOneSignal alloc] initWithLaunchOptions:launchOptions
                                                           appId:@"YOUR_ONESIGNAL_APP_ID"
                             settings:@{kOSSettingsKeyAutoPrompt: @false}];
    ```
- You're All Set!
No seu index.android.js ou index.ios.js:
import React, { Component } from 'react';
import OneSignal from 'react-native-onesignal'; // Import package from node modules
...

export default class App extends Component {

    componentWillMount() {
        OneSignal.addEventListener('recebendo notificação', this.onReceived);
        OneSignal.addEventListener('abrindo notificação', this.onOpened);
        OneSignal.addEventListener('registrando notificação', this.onRegistered);
        OneSignal.addEventListener('id do celular', this.onIds);
    }

    componentWillUnmount() {
        OneSignal.removeEventListener('recebendo notificação', this.onReceived);
        OneSignal.removeEventListener('abrindo notificação', this.onOpened);
        OneSignal.removeEventListener('registrando notificação', this.onRegistered);
        OneSignal.removeEventListener('id do celular', this.onIds);
    }

    onReceived(notification) {
        console.log("Notificação recebida: ", notification);
    }

    onOpened(openResult) {
      console.log('Mensagem: ', openResult.notification.payload.body);
      console.log('Informações: ', openResult.notification.payload.additionalData);
      console.log('Está ativo: ', openResult.notification.isAppInFocus);
      console.log('Resultado: ', openResult);
    }

    onRegistered(notifData) {
        console.log("O celular foi registrado para receber notificações", notifData);
    }

    onIds(device) {
		console.log('Informações do celular: ', device);
    }
    ...
}Quando quaisquer notificações é aberta ou recebida o aberta e recebida são ativos e chamam a função de callback deles, que foram definidos nos "addEventListener". Passando um OSNotificationOpenResult ou um objeto OSNotification encapsulando o data no evento.
componentWillMount() {
    OneSignal.addEventListener('recebida', this.onReceived);
    OneSignal.addEventListener('aberta', this.onOpened);
}

componentWillUnmount() {
    OneSignal.removeEventListener('recebida', this.onReceived);
    OneSignal.removeEventListener('aberta', this.onOpened);
}

onReceived(notification) {
    console.log("Notificação recebida: ", notification);
}

onOpened(openResult) {
    console.log('Mensagem: ', openResult.notification.payload.body);
    console.log('Informações: ', openResult.notification.payload.additionalData);
    console.log('Está ativo: ', openResult.notification.isAppInFocus);
    console.log('Resultado: ', openResult);
}
Exemplo de objeto da notificação que foi recebida:
{
    shown: true, // Boleano: Se a notificação foi visualizada ou não pelo usuario.
    payload: {notificationID : "", contentAvailable : false, badge : 1, sound : "default", title : "Hello!", body : "World", launchURL : "", }, // Objeto; A informação passada pelo server para o aplicativo.
    displayType: 1, //O método de visualização da notificação recebida.
    silentNotification: false // Boleano : Se a notificação recebida é silenciosa
}Nós abrimos a api com as tags do OneSignal para você segmentar seus usuários com as notifições mais tarde.
// Enviando uma tag
OneSignal.sendTag("key", "value");

// Enviando multiplas tags
OneSignal.sendTags({key: "value", key2: "value2"});

// Recebendo as tags enviadas pelo server e usar o objeto recebido.
OneSignal.getTags((receivedTags) => {
    console.log(receivedTags);
});

// Deletar a tag
OneSignal.deleteTag("key");Sync hashed email if you have a login system or collect it. Will be used to reach the user at the most optimal time of day.
OneSignal.syncHashedEmail("test@domain.com");We exposed the idsAvailable API of OneSignal (both Android & iOS) as an event.
Listen for ids event and define a callback to handle the returned object.
componentWillMount() {
    OneSignal.addEventListener('ids', this.onIds);
}

componentWillUnmount() {
    OneSignal.removeEventListener('ids', this.onIds);
}

onIds(device) {
    console.log('Device info: ', device);
}We exposed the enableVibrate API of OneSignal (Android only).
You can call this from your UI from a button press for example to give your user's options for your notifications. By default OneSignal always vibrates the device when a notification is displayed unless the device is in a total silent mode. Passing false means that the device will only vibrate lightly when the device is in it's vibrate only mode.
// Setting enableVibrate
OneSignal.enableVibrate(true);We exposed the enableSound API of OneSignal (Android only).
You can call this from your UI from a button press for example to give your user's options for your notifications. By default OneSignal plays the system's default notification sound when the device's notification system volume is turned on. Passing false means that the device will only vibrate unless the device is set to a total silent mode.
// Setting enableSound
OneSignal.enableSound(true);We exposed the inFocusDisplaying API of OneSignal.
0=None- Will not display a notification, instead onlyonNotificationReceivedwill fire where you can display your own in app messages.1=InAppAlert- (Default) Will display an Android AlertDialog with the message contains.2=Notification- Notification will display in the Notification Shade. Same as when the app is not in focus.
// Example, always display notification in shade.
OneSignal.inFocusDisplaying(2);On the init function in AppDelegate.m, add the settings parameter to specify custom settings. In this case, it would be the kOSSettingsKeyInFocusDisplayOption which can be set to 3 options:
OSNotificationDisplayTypeNotification- Display the native notification display.OSNotificationDisplayTypeInAppAlert- Display an alert with the notification. Default value.OSNotificationDisplayTypeNone- Silent. Do not display any notification when the app is in focus.
self.oneSignal = [[RCTOneSignal alloc] initWithLaunchOptions:launchOptions
                     appId:@"YOUR APP ID"
settings:@{kOSSettingsKeyInFocusDisplayOption : @(OSNotificationDisplayTypeNone), kOSSettingsKeyAutoPrompt : @YES}];We exposed the setSubscription API of OneSignal (both Android & iOS).
You can call this method with false to opt users out of receiving all notifications through OneSignal. You can pass true later to opt users back into notifications
// Setting setSubscription
OneSignal.setSubscription(true);We exposed the getPermissionSubscriptionState API of OneSignal (both Android & iOS).
Allows you to check whether notifications are enabled for the app, whether user is subscribed to notifications through OneSignal, and what the user's in-app subscription preference is. It also provides access to pushToken and userId
// Check push notification and OneSignal subscription statuses
OneSignal.getPermissionSubscriptionState((status) => {
    console.log(status);
});We exposed the postNotification API of OneSignal, currently supports one Player ID to send a notification to. We call it internally P2P Notification, and therefore there is a special attribute to listen to while receiving the notification.
Allows you to send notifications from user to user or schedule ones in the future to be delivered to the current device.
The OneSignal documentation shows how to pass the parameters as here:
// Calling postNotification
let data = arr // some array as payload
let contents = {
	'en': 'You got notification from user'
}
OneSignal.postNotification(contents, data, playerId);

// Listening to postNotification using OneSignal.Configure:
onNotificationOpened: function(message, data, isActive) {
	if (data.p2p_notification) {
		for (var num in data.p2p_notification) {
			// console.log(data.p2p_notification[num]);
		}
	}
}We exposed the promptLocation API of OneSignal.
Prompts the user for location permissions. This allows for geotagging so you can send notifications to users based on location. Note: Make sure you also have the required location permission in your AndroidManifest.xml. For iOS, make sure you set the NSLocationWhenInUseUsageDescription or the NSLocationAlwaysUsageDescription in your info.plist. (Location Always also requires the location background mode capability)
// Calling promptLocation
OneSignal.promptLocation();We exposed the clearOneSignalNotifications API of OneSignal (currently supported only on Android).
Removes all OneSignal notifications from the Notification Shade.
// Calling clearOneSignalNotifications
OneSignal.clearOneSignalNotifications();We exposed the cancelNotification API of OneSignal (currently supported only on Android).
Cancels a single OneSignal notification based on its Android notification integer id. You can get the notification Id when invoking OneSignal.onNotificationOpened while receiving a notification.
// Calling cancelNotification
OneSignal.cancelNotification(id);See what push permissions are currently enabled. callback will be invoked with a permissions object (currently supported only on iOS).
// Requesting permissions
OneSignal.checkPermissions((permissions) => {
	console.log(permissions);
});We exposed the requestPermissions method (currently supported only on iOS).
// Setting requestPermissions
permissions = {
    alert: true,
    badge: true,
    sound: true
};
OneSignal.requestPermissions(permissions);We exposed the registerForPushNotifications API of OneSignal (currently supported only on iOS).
*Call when you want to prompt the user to accept push notifications. Only call once and only if you passed @NO to kOSSettingsKeyAutoPrompt on init.
// Calling registerForPushNotifications
OneSignal.registerForPushNotifications();
The following example is from our own App and needs to be customized in order to work.
Example:
_syncOneSignal = () => {
	var allTags = {};
	var missingTags = {};

	OneSignal.getTags((receivedTags) => {
		// Find missing tags
		for (var i = this.categories.length * 1; i >= 0; i--) {
			var category = this.categories[i];
			if (!(category.slug in receivedTags)) {
				missingTags[category.slug] = category.is_push_default;
			}
			// Hash all tags for performance later on deletion
			allTags[category.slug] = category.is_push_default;
		};

		// Send missing tags if there are any
		if (Object.keys(missingTags).length > 0) {
			OneSignal.sendTags(missingTags);
		}

		// Delete tags that doesn't show up in the categories
		Object.keys(receivedTags).forEach(function(key,index) {
		    if (!(key in allTags)) {
		    	OneSignal.deleteTag(key);
		    }
		});
	});
};The following issues has been marked as repeating, therefore we decided to devote them a separate section.
> com.android.build.api.transform.TransformException: com.android.ide.common.process.ProcessException: java.util.concurrent.ExecutionException: com.android.dex.DexException: Multiple dex files define Lcom/google/android/gms/internal/zzr;Solution: Update all your Google Play Services dependencies to the latest version rather than to a specific version.
From the Google Play Services documentation: Be sure you update this version number each time Google Play services is updated https://developers.google.com/android/guides/setup#add_google_play_services_to_your_project
In android/app/build.gradle
...
dependencies {
    ...
    compile "com.google.android.gms:play-services-base:+"
    compile "com.google.android.gms:play-services-location:+"
    compile "com.google.android.gms:play-services-ads:+"
}:app:dexRelease
Unknown source file : UNEXPECTED TOP-LEVEL EXCEPTION:
Unknown source file : com.android.dex.DexException: Multiple dex files define Landroid/support/v7/appcompat/R$anim;Solution: Upgrade your gradle to properly handle the dex tasks:
In android/build.gradle
...
dependencies {
    classpath 'com.android.tools.build:gradle:2.2.3'

    // NOTE: Do not place your application dependencies here; they belong
    // in the individual module build.gradle files
}
In android/gradle/wrapper/gradle-wrapper.properties
distributionBase=GRADLE_USER_HOME
distributionPath=wrapper/dists
zipStoreBase=GRADLE_USER_HOME
zipStorePath=wrapper/dists
distributionUrl=https://services.gradle.org/distributions/gradle-2.14.1-all.zipPlease double check the iOS Installation section as missing a step or entering an incorrect path will create these errors.
If you have both react native maps and react-native-onesignal make sure you compile react-native-maps in the following way (android/app/build.gradle).
compile(project(':react-native-maps')){
    exclude group: 'com.google.android.gms', module: 'play-services-base'
    exclude group: 'com.google.android.gms', module: 'play-services-maps'
  }
  compile 'com.google.android.gms:play-services-base:+'
compile 'com.google.android.gms:play-services-maps:+'Quando você instala o react-native-onesignal será incluído automaticamente uma versão especifica do SDK IOS nativo do OneSignal que é conhecido para trabalhar com ele. Somente siga as instruções abaixo se houver uma correção nativa do OneSignal SDK que você precisa, que não está incluída na última atualização do react-native-onesignal.
- Download the latest OneSignal iOS native release.
- In XCode, delete
OneSignalNativeSDKunderLibraries/RCTOneSignal.xcodeproj - Press "Move to trash"
- Create a new
OneSignalNativeSDKfolder undernode_modules/react-native-onesignal/ios/. - From the downloaded iOS native release, copy all .h and .m files from the
iOS_SDKfolder and put them in toOneSignalNativeSDK. - Drop and drag this new
OneSignalNativeSDKfolder under theRCTOneSignal.xcodeprojin Xccode. - Select "Create groups" and check RCTOneSignal and press Finish.
Obrigado por todos os incríveis companheiros que contribuiram para esse repositório! @danpe, @lunchieapp, @gaykov, @williamrijksen, @adrienbrault, @kennym, @dunghuynh, @holmesal, @joshuapinter, @jkasten2, @JKalash
- Tell us?