Mooni Expense Tracking
CMSC389L Final Project
Overview
Mooni is an expense tracking web application.
Users can log in (currently only with GitHub authentication) and input their expenses into a database. Users will provide the vendor name, expense date, dollar amount, and tags when submitting an expense to be saved. Expenses are recovered through sessions and viewable when logged in.
Future Plans to be Implemented:
The goal is to implement viewing filters based on tags that each user has submitted and date ranges of expenses. This will allow easier monitoring and highlighting of each expense.
Demo it here Link
Video Demo
The video demo of Mooni can be found here Link
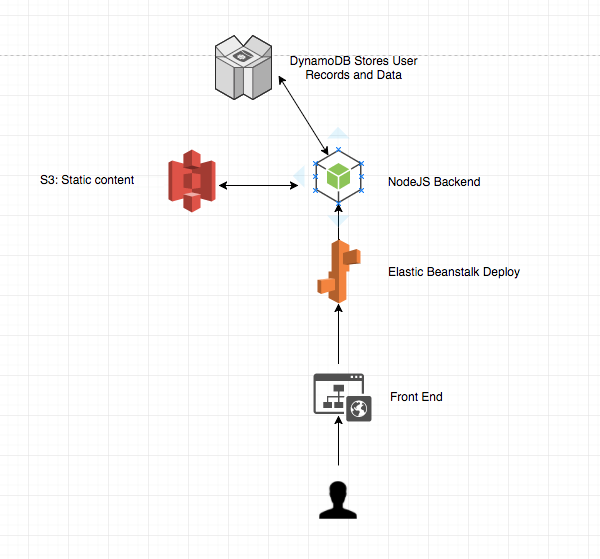
Architecture Diagram
Setup
After npm install make sure to create a config.json in the main directory with your AWS credentials like so:
{
  "region": "us-west-2",
  "endpoint": "http://localhost:8000",
  "accessKeyId": "<INSERT_HERE>",
  "secretAccessKey": "<INSERT_HERE>"
}
Next, set up your GitHub Strategy credentials for Authenticating User in index.js
passport.use(new GithubStrategy({
    clientID: "<INSERT_HERE>",
    clientSecret: "<INSERT_HERE>",
    callbackURL: "http://localhost:3000/auth/github/callback"
  },
  function(accessToken, refreshToken, profile, done) {
    return done(null, profile);
  }
));
Running locally
npm start runs index.js
npm run watch runs development version using nodemon to update on changes in the directory
npm run watch-css runs a sass precompiler to update public/css/main.css when changes are seen in scss/main.scss
Also make sure to run DynamoDB locally using Amazon's guide: Link
Deploy on Elastic Beanstalk
These are the steps necessary to deploy this on Elastic Beanstalk
-
npm uninstall --save nodemon underscore node-sass -
Remove from
package.jsonthe scripts forwatchandwatch-cssandtest. The package.json should look like below:
{
  "name": "expense-aws",
  "version": "1.0.0",
  "description": "",
  "main": "index.js",
  "scripts": {
    "start": "node index.js"
  },
  "repository": {
    "type": "git",
    "url": "git+https://github.com/ng-david/expense-aws.git"
  },
  "author": "",
  "license": "ISC",
  "bugs": {
    "url": "https://github.com/ng-david/expense-aws/issues"
  },
  "homepage": "https://github.com/ng-david/expense-aws#readme",
  "dependencies": {
    "aws-sdk": "^2.154.0",
    "body-parser": "^1.18.2",
    "express": "^4.16.2",
    "express-handlebars": "^3.0.0",
    "express-session": "^1.15.6",
    "morgan": "^1.9.0",
    "passport": "^0.4.0",
    "passport-github": "^1.1.0"
  }
}
- Update the passport GitHub strategy's callbackURL in
index.jsto be where your Elastic Beanstalk App's URL will be:
passport.use(new GithubStrategy({
    clientID: "secret",
    clientSecret: "secret",
    callbackURL: "<UPDATE ME>"
  },
  function(accessToken, refreshToken, profile, done) {
    return done(null, profile);
  }
));
-
Remove the folders
uploadandscssfrom the directory -
Select all the contents of this directory and zip them up.
-
The zip file should now successfully deploy on AWS Elastic Beanstalk