A pedagogical web based code editor for creative netizens in training. You can play with a live demo here (check out + create different themes here)
The netitor is the core editor used in our online hypermedia creative coding educational platform netnet.studio, but you can use a much simpler version of the editor in the online demo hosted on this repo. What makes the netitor unique to other code editors is that it's made specifically for beginners learning/experimenting with web code (HTML, CSS and JavaScript). For this reason (in addition to the usual code editor features like syntax highlighting and code hinting) it has some extra features designed to help beginners like friendly error messages (not only for JavaScript, but for HTML and CSS as well) and built-in edu info (you can double click on any piece of code in the editor to learn more about it). As an online + realtime editor it's purpose is not so much to replace professional code editors used to create larger projects, but rather quickly experiment, demonstrate concepts and share ideas (we're not trying to recreate the wheel, but create "training wheels" instead).
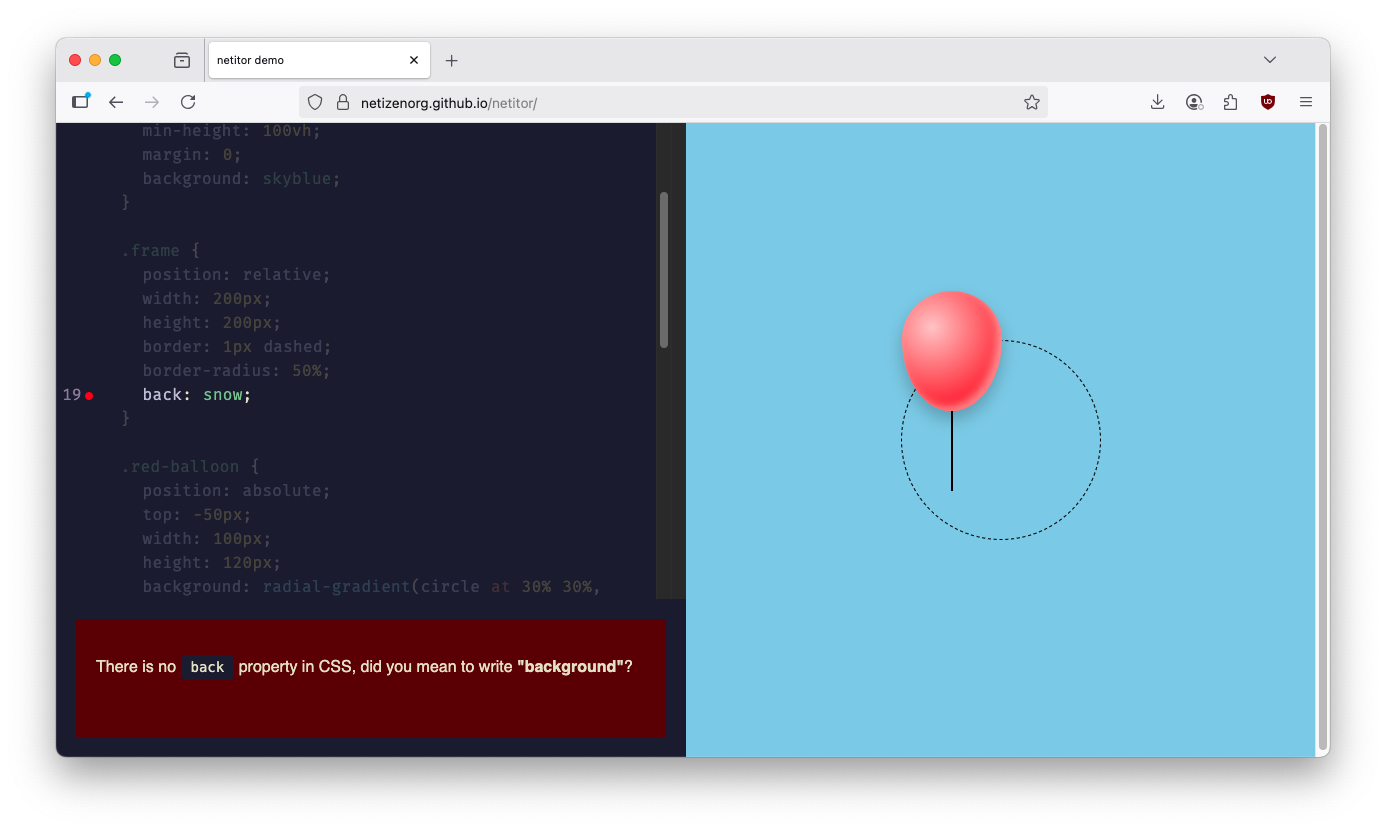
You can double click any pieces of code in the online demo to view it's edu-info. Anytime there are errors or potential issues in your code, the editor will add a little dot on the line the issue appears, you can click on that dot to view the issue written in beginner friendly language. You can press Ctrl+S (or Cmd+S on Mac) to "save" anything you make in the online editor. This will encode everything you currently have in the editor into your browser's address bar. You can then copy+paste the updated URL from the address bar to share your code sketch with anyone else.
There are a few ways you can contribute to this project and support our development:
- netizen.org is a 501(c)3 tax deductible organization, so you might consider making a donation! Your support helps ensure our tools and workshops remain accessible to folks from all backgrounds.
- want to create your own netitor theme? check out our custom theme creator
- did you find a potential bug in our code? please let us know by creating an issue (or sending us an email hi@netizen.org)
- would you like to fix that bug yourself? Please feel free to "Fork" this project and submit a PR (Pull Request). Check out Development Notes in the Wiki section of this repo for more info.
If you'd like to include it into your own online project (maybe to share interactive beginner friendly examples on your own personal website?) you can download minified and unminified versions of the library from the build folder of this repo and import it in your own HTML file as one does, for example: <script src="netitor.min.js"></script>
The index.html in the root of the directory is a working example of how to implement the netitor. The first thing you need to do is instantiate a new instance of Netitor. The constructor requires an options object with query selector string of an element in your HTML page, like:
// assuming there's something like a <div id="editor"></div> on your page
const ne = new Netitor({
  ele: '#editor'
})
there are a series of additional optional arguments you can pass.
const ne = new Netitor({
  ele: '#editor',
  render: '#output',
  code: '<h1> example code here </h1>',
  theme: 'dark',
  background: true,
  wrap: false,
  language: 'html',
  lint: true,
  hint: true,
  readOnly: false,
  displayTitle: false,
  autoUpdate: true,
  updateDelay: 500,
  friendlyErr: true,
  renderWithErrors: false
})| property | default | description |
|---|---|---|
| render | none | query selector string of an element to display the realtime code output in |
| code | none | initial code to include in the editor |
| theme | dark | syntax highlight theme to use |
| background | true | if false, background will be transparent |
| wrap | false | whether long lines should wrap or scroll |
| language | html | can be html, css, javascript or markdown |
| lint | true | whether or not to check for errors in realtime |
| hint | true | whether or not to display autocomplete menus |
| readOnly | false | whether the code is editable or read-only |
| displayTitle | false | whether or not to apply content of title element to the browser tab |
| autoUpdate | true | whether or not to update the render preview when code changes |
| updateDelay | 500 | how many milliseconds to wait after code changes before preview updates |
| friendlyErr | true | whether or not to translate default error messages into beginner friendly vernacular (when available) |
| renderWithErrors | false | whether or not the output should render if there is an error in the editor |
all of these options can be changed at any point by reassigning the property of the same name:
ne.code = '<h1> some other code </h1>'
ne.theme = 'monokai' // or 'light' or 'dark'
ne.background = false
ne.wrap = true
ne.language = 'css'
ne.lint = false
ne.hint = false
ne.displayTitle = true
ne.autoUpdate = false
ne.updateDelay = 2000
ne.friendlyErr = false
ne.renderWithErrors = true
There are also read-only properites
ne.hasCodeInHash
ne.isTidyhasCodeInHash: Netitor is a fully static web-based editor, as such it allows you to save and load code sketches to the URL (no database or back-end needed to save/share/remix/etc), in order to check if the current URL has a hash with code/data in it you can use ne.hasCodeInHash, this read-only property returns either true or false
isTidy: You can check to see if the code in the editor is "tidy" (aka property formatted/indented) by calling ne.isTidy.
methods for saving, loading or otherwise modifying code in the neditor
ne.generateHash()
ne.saveToHash()
ne.loadFromHash()

ne.loadFromURL()
ne.tidy()generateHash(): this method will take the code currently in the editor and generate an encoded/compressed version of it that can be added to URL as a hash (similar to saveToHash except it returns the hash rather than updating the URL).
saveToHash(): this method will take all the code currently in the editor and save an encoded/compressed version of it to the current site's URL hash.
loadFromHash(): if the current site's URL hash has encoded/compressed code in it (which you can check for using ne.hasCodeInHash) this will decode the URL and load the data into the editor.
loadFromURL(url): if you have some example code saved online somewhere (with CORS enabled) this method will send a fetch request for that code and load it up in the editor.
tidy(): calling this method will clean-up (aka format) the code in the editor (fix spacing, indentation, etc).
methods for calling attention to specific lines of code in the netitor
ne.scrollTo(line, callback)
ne.marker(line, color, cb)
ne.spotlight(lines, transition)
ne.highlight(line, color)
// or...
ne.highlight({
  startLine: 2, // the line to start highlighting
  startCol: 4, // the column on that line to start at
  endLine: 4, // the line to end highlighting
  endCol: 4, // the column on that line to end at
  color: 'green' // the highlight color
})
scrollTo(lineNumber, callback): will smoothly scroll to a given line in the editor, the optional callback function will fire after the editor is finished scrolling.
marker(lineNumber, color, callback): this method will add a marker (a circle) in the gutter (where the line numbers are) in the specified line (default color is red). The optional callback function will fire when the marker is clicked. To remove all the markers run ne.marker(null) or ne.marker() with no arguments.
spotlight(lineNumbers, transition): this method will spotlight a line (or lines if passed an array of line numbers) of code in the editor. This means all other lines will fade their opacity while the spotlighted lines remain visible. You can change the transition of the spotlighting speed and ease by passing an optional transition string, the default is 'opacity 500ms cubic-bezier(0.165, 0.84, 0.44, 1)'. To remove a spotlight run ne.spotlight(null) or ne.spotlight().
highlight(lineNumber, color): this method will highlight a line of code in the editor. It requires a number as it's first argument (the line you want to highlight) with a CSS color string as an optional second argument (the default color is a translucent red), for example ne.highlight(3, 'green') will highlight the third line in the netitor with the color green. Alternatively, you can pass an options argument (as seen above). To remove all the highlights run ne.highlight(null) or ne.highlight() with no arguments.
methods for getting specific information from the netitor
ne.getLine(num)
ne.getVisibleRange()getLine(num): takes a number and returns the code on that particular line.
getVisibleRange(): returns an object with the visible line numbers, for ex: { top: 254, bottom: 280 }
methods for customizing the netitor's educational system
ne.addCustomElements(obj)
ne.addCustomAttributes(obj)addCustomElements(obj): the linting process (ie. generating error objects) includes flagging non-standard elements. This means if you're using any custom elements it will return errors when it spots them. This method is used to add exceptions for any custom elements you'd like to use in the editor. Additionally, when a user double-clicks on an custom element which has been added, the editor will fire an edu-info event for that element. The obj passed into this method should be a "dictionary" object with all the custom elements you'd like to add, it should look similar to this.
addCustomAttributes(obj): assuming the custom element objects passed into addCustomElements() include 'attributes' arrays, it will use them to create very generic edu-info data for those attributes, but you could alternatively pass this method your own attribute "dictionary" object, similar to this.
methods for customizing the netitor's friendly error system
ne.addErrorException(obj, specific)
ne.removeErrorException(obj, specific)
ne.clearErrorExceptions()
addErrorException(obj, specific): error objects returned in the event array passed into the lint-error callback function have a type property which returns either 'error' or 'warning' which can be used to filter out less consequential errors, but if there is a specific errors you want to suppress rather than doing that filtering yourself you can add it to the list of exceptions by passing the error object into this method. The second argument is an optional boolean which determines whether or not you want to ignore this specific error (the default is false, which ignores every instance of that general error). For example, using an made-up HTML tag like <fart> will throw an "standard-elements" error, adding an ErrorException for this error specifically will avoid erroring on that particular tag, adding a general exception will prevent all future "standard-elements" errors.
removeErrorException(obj, specific): very similar to addErrorException() except it removes an error exception (assuming it had previously been added).
clearErrorExceptions(): calling this method clears all the exceptions added using the .addErrorException(obj) method.
methods for customizing aspects of the update process (the "rendering" of the code into the render iframe)
const ne = new Netitor({
  ele: '#editor',
  render: '#output',
  autoUpdate: false,
})

// manually call update when (ne.autoUpdate === false)
ne.update()
// or ....................................
// create a template to pass the code into,
// for example, something like this...
const ne = new Netitor({
ele: '#editor',
render: '#output',
autoUpdate: false,
language: 'javascript',
code: `
function setup() {
createCanvas(400, 400);
}
function draw() {
background(220);
ellipse(50,50,80,80);
}
`
})
ne.update(`
<script src="https://cdn.jsdelivr.net/npm/p5@1.5.0/lib/p5.js"><\/script>
<script>{{code}}<\/script>
`)// you can also give all the paths written in the netitor's
// code a custom <base> URL, here's the simple way...
ne.addCustomRoot('https://mysite.com/project/')
// or add both a custom base URL and a proxy URL
// (for reasons explained below)
ne.addCustomRoot({
base: 'https://mysite.com/project/',
proxy: 'https://proxy-server.com/mysite.com/project/'
})
// then, to remove the custom root URL (reset back to default)
ne.addCustomRoot(null)// for even more control over the rendering logic
// you can create a customRender
// this gets called by the netitor if autoUpdate === true,
// if not, this gets called when you run ne.update()
ne.customRenderer = function (event) {
event.iframe.srcdoc = event.code
}
// here's a more complex example
// below is what it would look like to implement
// the custom base/proxy logic yourself.
const ne = new Netitor({
ele: '#editor',
render: '#output'
})
ne.customRender = function (event) {
const base = '<base href="https://mysite.com/project/">'
let newCode = base + event.code
const proxy = 'https://proxy-server.com/mysite.com/project/'
newCode = ne.prependProxyURL(newCode, proxy)
// this update function is similar to:
// event.iframe.srcdoc = event.code
// but also includes fallback logic for browsers
// without srcdoc support.
event.update(newCode)
}update(code): if the autoUpdate is set to false you can control when you want the preview window to update yourself by calling: ne.update(). This method can also be used to pass alternative code to render, for example (where {{code}} is the code currently in the editor):
addCustomRoot(root): netitor is a single page editor for simple HTML sketches, which means sketches with code linking to other files/assets (via the src and href HTML attributes as well as the url() CSS function) will need to be absolute paths (as there is no 'relative' context). To get around this you can use this method to set a custom 'root' path. This should be a public URL to a directory with any of the files you want to reference in the editor as though they were relative paths. You can also pass this method null to reset it.
In some cases you may notice these errors in your console The resource from “YOUR_CUSTOM_ROOT” was blocked due to MIME type mismatch (X-Content-Type-Options: nosniff)., this is due to the server's response HTTP headers. This is most likely to happen when importing JS and CSS assets via <script> and <link>. If you don't have access to the server's code/config (and thus can't change the response headers to avoid this error) you can alternatively use a proxy URL (as explained here) to get around the error. In order to add a custom proxy URL for these cases, you can alternatively pass an object with both a base URL and proxy URL property to this method.
prependProxyURL(code, proxyURL): This is what addCustomRoot() uses internally when a poxy has been set in addition to a base URL, it can be used independently as seen in the example above.
customRenderer: If you need to completely take over the update/rendering process you can define and assign your own function to the ne.customRender property. You get access to an event object which includes event.code, the code being sent to the iframe (not just the code in the netitor, but also any template code when passing a {{code}} string into the update method), an event.update(code) method, this is an internal update method which can be used to update the iframe, and event.iframe, a reference to the iframe the netitor is rendering into, in case you want to update it directly your own way.
function example (event) {
  // do something when some event happens
}

ne.on('event-name', example) // register a function
ne.remove('event-name', example) // remove a registered function
You can attach (and remove) functions which you'd like to fire on any of the netitor's various events (listed below).
code-update: This fires every time the code in the netitor changes. The callback function is passed two arguments, the first is a string containing all the code currently in the editor (essentially the same as ne.code) the second is an object containing information about what whas just updated { from, to, text, removed, origin }
render-update: This fires every time the render output iframe is updated.
cursor-activity: This fires every time the users's cursor changes positions. It returns an event object which looks like this:
{
  language: "html",
  line: 1,
  col: 2,
  selection: '<h1>hello'
  data: {
    type: "tag",
    token: "h1",
    tokenColStart: 1,
    tokenColEnd: 3,
    line: "<h1>hello world!</h1>"
  }
}
In the example above the user would have clicked (and thus placed their cursor) right in between the "h" and "1" on a line of code that looked like <h1>hello world!</h1>.
lint-error: Assuming you have lint set to true, if/when there are any errors in the netitor this callback will fire. The callback gets passed an array of error objects. These error objects vary a bit between languages but will all have at the very least the following properties:
{
  type: "error", // or "warning"
  language: "html",
  message: "traditional error message in programmer lingo",
  friendly: "beginner friendly error message",
  line: 6, // line where the error was found
  col: 3 // column where the error was found
  // may contain other properties depending on the language
}edu-info: Anytime you double-click on a piece of code in the netitor this callback will fire. The data object passed into the callback function will at the very least look this:
{
  language: "html",
  data: "class",
  type: "attribute",
  line: 20,
  nfo: {…}
}
The nfo property will contain an object with educational/reference information as well as links to further resources on that particular piece of code. This may not always be available, it depends on whether the particular piece of code selected has additional info. This info is initially generated from our eduscraper (you can take a look at that repo to get a sense of the structure of the data) and later augmented by our "educustom" sript.
hint-select: This fires every time the user tabs up or down in the autocomplete hinting menu with the up/down arrow keys. The data object passed into the callback function contains the language of and the autocomplete option currently selected, an example might look like this:
{
  language: "css",
  data: "color"
}