In this workshop, we will be programming a Raspberry Pi using Node.js, Johnny-Five, and Raspi IO to make Johnny-Five work on the Raspberry Pi. When using Raspi-IO, be sure to pay attention to the pin naming scheme as it can be a little confusing.
Connect to your Raspberry Pi using password raspi. If you're running Windows, you'll need to install an SSH client if you haven't already. You can use Git BASH, PuTTY, or Windows Subsystems for Linux.
ssh pi@rpi##.local
cd nodebot && npm install johnny-five raspi-io
Replace ## with the number printed on top of the Ethernet port on your Raspberry Pi.
The Raspberry Pi's provided come with Linux and Node.js preinstalled.
- Navigate to the
/home/pi/nodebotfolder. - Create an empty Node.js project with
npm init. You can leave all values as their defaults. - Install Johnny-Five and Raspi IO with
npm install johnny-five raspi-io - Mount the source folder from your Raspberry Pi on your laptop by connecting over SMB.
- If you're on Windows, enter
\\rpi##.local\nodebotin the address bar in Windows Explorer. - If you're in macOS, open Finder, hit cmd+k, and enter
smb://rpi##.local/nodebotin theServer Addressfield and clickConenct - If you're on Linux, you'll need to check the documentation for your distro.
- If you're on Windows, enter
- Open the mounted folder using VS Code.
- Let's get to editing!
If this all looks intimidating to you, don't worry! We will go through these steps together.
For the this part of the workshop, we will build the "Hello World" of hardware: getting an LED to blink! For this part of the workshop we will build hello world together using the following schematic:
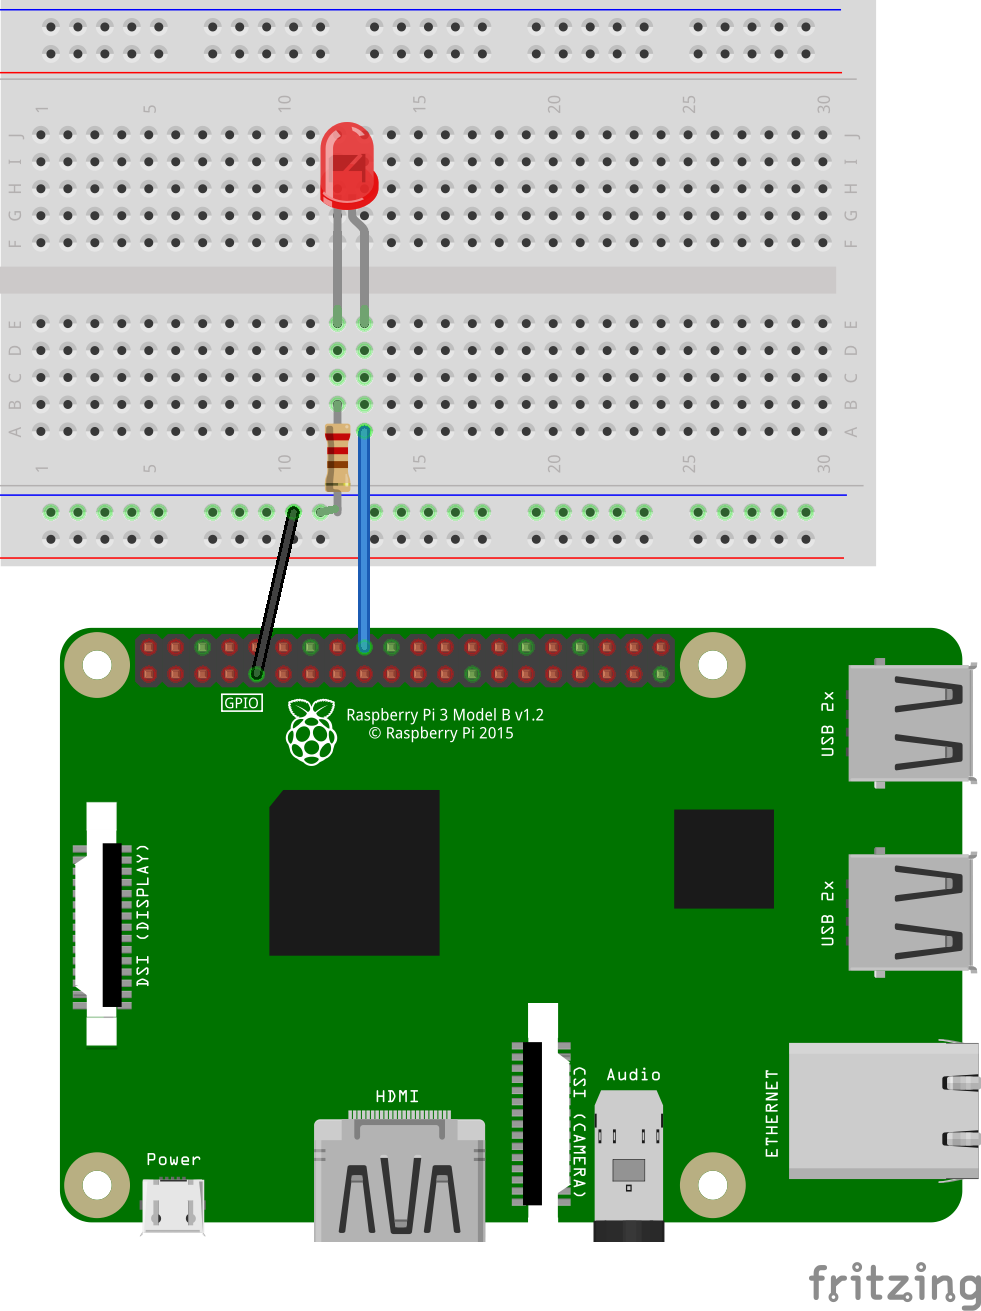
The objective is to make the LED blink once per second. Take a look at the Led class in Johnny-Five. Remember to check the pin naming scheme to see what the pin number should be!
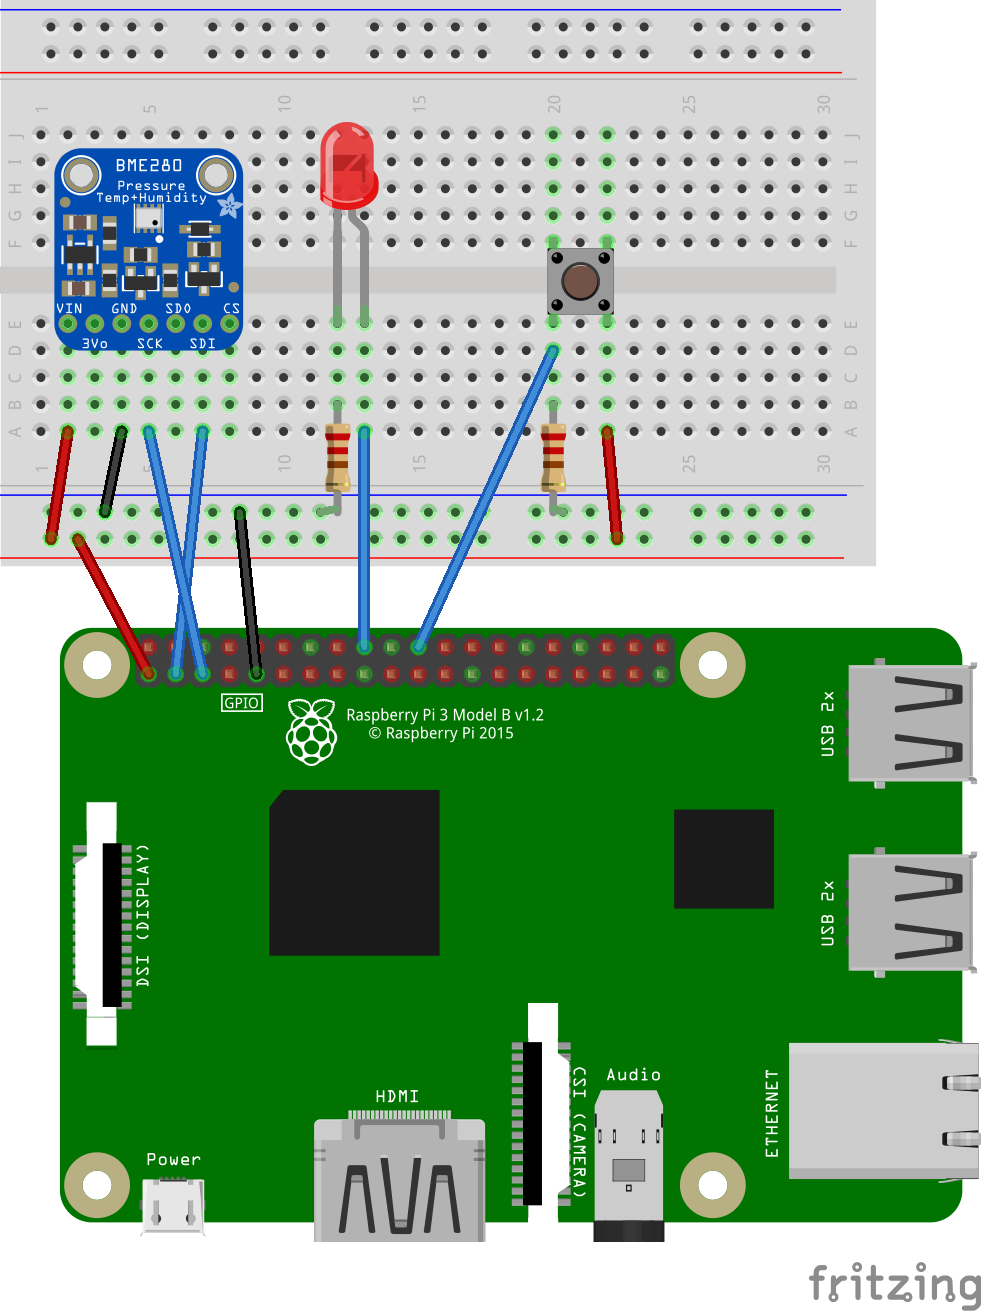
For this part of the workshop, we will build a distributed environmental sensing system. For this part of the workshop, use the following schematic:
For this part of the workshop, we will build two parts: the client and a server.
In this case, the "client" is the Raspberry Pi itself. The client needs to do the following:
- Read the temperature, pressure, and humidity from the BME280 sensor provided in the kit.
- If the temperature gets too high or too low, then trigger an alarm
- Set the low threshold to 3 degrees below room temperature, and the high threshold to 3 degrees above room temperature. This way, you can make it warmer or cooler by blowing on it.
- When an alarm is triggered, flash the LED four times per second
- Write some code so that it turns the alarm off when the button is pressed.
- Send the sensor data and the alarm status to the server
In this case, the "server" will be a Node.js process running on your local laptop. The server needs to do the following:
- Listen for clients that send sensor data to it and store it in memory
- Serve a basic web page that displays the current sensor data from all connected Raspberry Pis to the user
- Shows when a temperature alarm is triggered
- Provides a button in the web page for a user to turn the alarm off
I recommend using socket.io to handle the connection to make it easier for the server to tell the client to turn an alarm off. This can, however, be done with REST calls if you prefer.
For bonus points, team up with a neighbor and make sure that connecting two or more Raspberry Pi's to the same server works.
MIT License
Copyright (c) 2018 Bryan Hughes bryan@nebri.us
Permission is hereby granted, free of charge, to any person obtaining a copy of this software and associated documentation files (the "Software"), to deal in the Software without restriction, including without limitation the rights to use, copy, modify, merge, publish, distribute, sublicense, and/or sell copies of the Software, and to permit persons to whom the Software is furnished to do so, subject to the following conditions:
The above copyright notice and this permission notice shall be included in all copies or substantial portions of the Software.
THE SOFTWARE IS PROVIDED "AS IS", WITHOUT WARRANTY OF ANY KIND, EXPRESS OR IMPLIED, INCLUDING BUT NOT LIMITED TO THE WARRANTIES OF MERCHANTABILITY, FITNESS FOR A PARTICULAR PURPOSE AND NONINFRINGEMENT. IN NO EVENT SHALL THE AUTHORS OR COPYRIGHT HOLDERS BE LIABLE FOR ANY CLAIM, DAMAGES OR OTHER LIABILITY, WHETHER IN AN ACTION OF CONTRACT, TORT OR OTHERWISE, ARISING FROM, OUT OF OR IN CONNECTION WITH THE SOFTWARE OR THE USE OR OTHER DEALINGS IN THE SOFTWARE.
THE SOFTWARE IS PROVIDED "AS IS", WITHOUT WARRANTY OF ANY KIND, EXPRESS OR IMPLIED, INCLUDING BUT NOT LIMITED TO THE WARRANTIES OF MERCHANTABILITY, FITNESS FOR A PARTICULAR PURPOSE AND NONINFRINGEMENT. IN NO EVENT SHALL THE AUTHORS OR COPYRIGHT HOLDERS BE LIABLE FOR ANY CLAIM, DAMAGES OR OTHER LIABILITY, WHETHER IN AN ACTION OF CONTRACT, TORT OR OTHERWISE, ARISING FROM, OUT OF OR IN CONNECTION WITH THE SOFTWARE OR THE USE OR OTHER DEALINGS IN THE SOFTWARE.