springboot-keycloak-openldap
The goal of this project is to create a simple Spring Boot REST API, called simple-service, and secure it with Keycloak. Furthermore, the API users will be loaded into Keycloak from OpenLDAP server.
Note 1: In
springboot-react-keycloakrepository, we have implemented amovies-appusingKeycloak(withPKCE). This application consists of two services: the backend that was implemented usingSpring Bootand the frontend implemented withReactJS.
Note 2: In
docker-swarm-environmentrepository, it's shown how to deploy this project into a cluster of Docker Engines in swarm mode. Besides, we will be running a Keycloak cluster with more than one instance.
Project diagram

Application
-
simple-service
Spring BootWeb Java application that exposes the following endpoints:GET /api/public: it's a not secured endpoint, everybody can access it;GET /api/private: it's a secured endpoint, only accessible by users that provide aJWTaccess token issued byKeycloakand the token must contain the roleUSER;GET /actuator/*: they are not secured endpoint, used to expose operational information about the application.
Prerequisites
Start Environment
-
Open a terminal and inside
springboot-keycloak-openldaproot folder rundocker-compose up -d -
Wait for Docker containers to be up and running. To check it, run
docker-compose ps
Import OpenLDAP Users
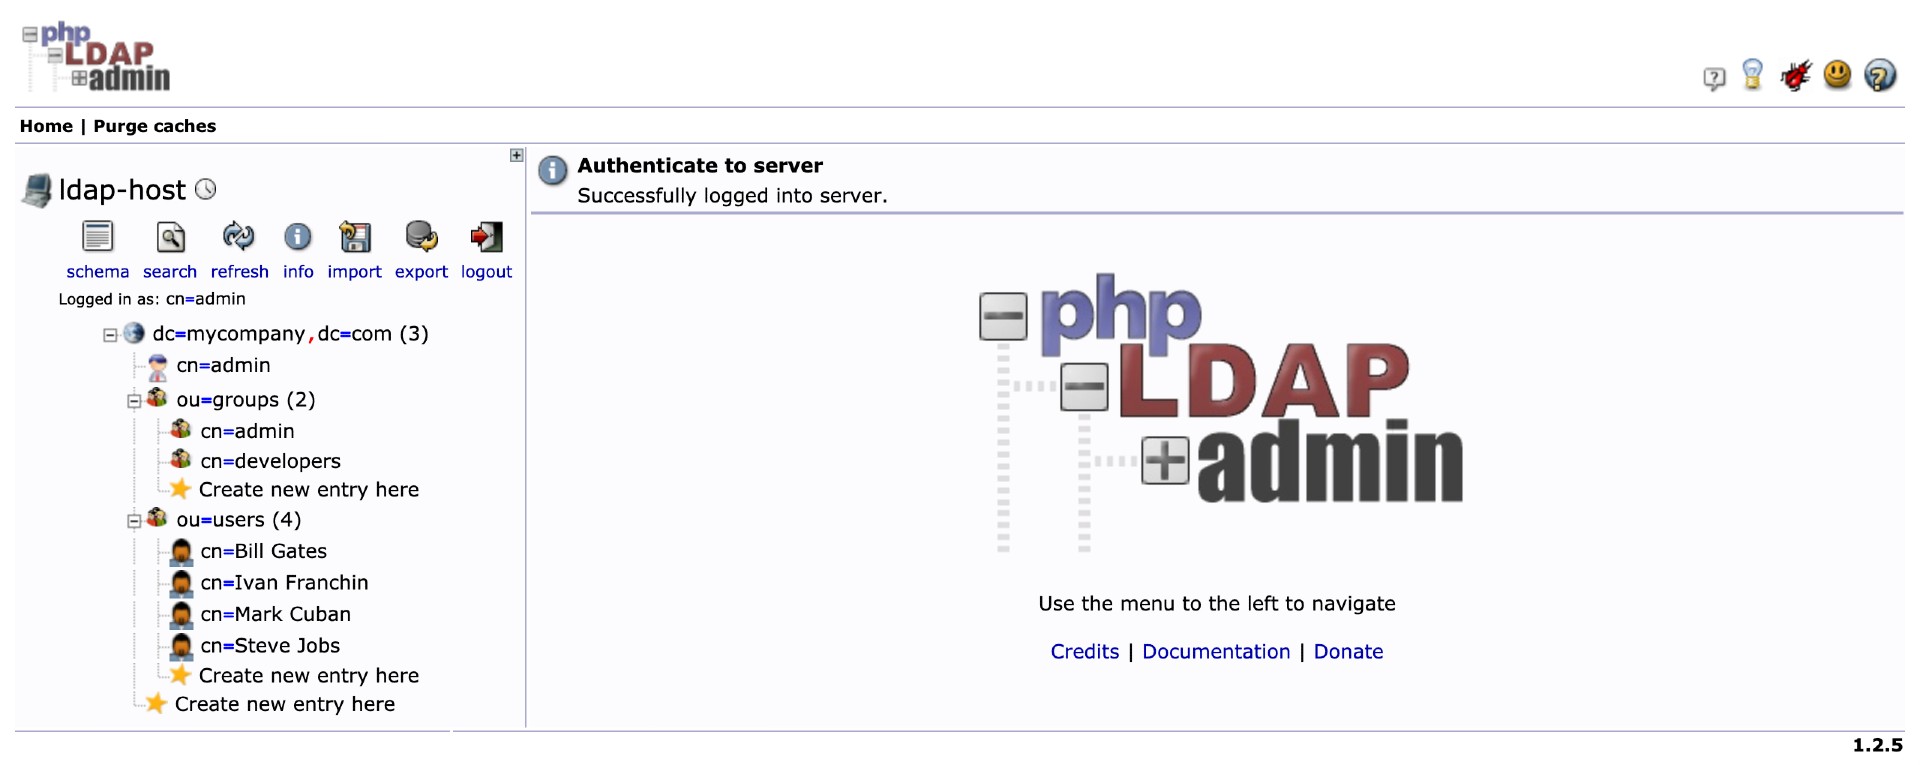
The LDIF file that we will use, springboot-keycloak-openldap/ldap/ldap-mycompany-com.ldif, contains a pre-defined structure for mycompany.com. Basically, it has 2 groups (developers and admin) and 4 users (Bill Gates, Steve Jobs, Mark Cuban and Ivan Franchin). Besides, it's defined that Bill Gates, Steve Jobs and Mark Cuban belong to developers group and Ivan Franchin belongs to admin group.
Bill Gates > username: bgates, password: 123
Steve Jobs > username: sjobs, password: 123
Mark Cuban > username: mcuban, password: 123
Ivan Franchin > username: ifranchin, password: 123
There are two ways to import those users: running a script or using phpldapadmin website
Running a script
-
In a terminal and inside
springboot-keycloak-openldaproot folder run./import-openldap-users.sh -
The command below can be used to check the users imported
ldapsearch -x -D "cn=admin,dc=mycompany,dc=com" \
  -w admin -H ldap://localhost:389 \
  -b "ou=users,dc=mycompany,dc=com" \
  -s sub "(uid=*)"
Using phpldapadmin website
-
Access https://localhost:6443
-
Login with the credentials
Login DN: cn=admin,dc=mycompany,dc=com Password: admin -
Import the file
springboot-keycloak-openldap/ldap/ldap-mycompany-com.ldif -
You should see a tree like the one shown in the picture below

Configure Keycloak
There are two ways: running a script or using Keycloak website
Running a script
-
In a terminal, make sure you are inside
springboot-keycloak-openldaproot folder -
Run the script below to configure
Keycloakforsimple-serviceapplication./init-keycloak.shIt creates
company-servicesrealm,simple-serviceclient,USERclient role,ldapfederation and the usersbgatesandsjobswith the roleUSERassigned. -
Copy
SIMPLE_SERVICE_CLIENT_SECRETvalue that is shown at the end of the script. It will be needed whenever we callKeycloakto get aJWTaccess token to accesssimple-service
Using Keycloak website

Login
-
Access http://localhost:8080/admin/
-
Login with the credentials
Username: admin
Password: admin
Create a new Realm
- On the left menu, click the dropdown button that contains
Masterand then, clickCreate Realmbutton - Set
company-servicesto theRealm namefield and clickCreatebutton
Create a new Client
- On the left menu, click
Clients - Click
Create clientbutton - In
General Settings- Set
simple-servicetoClient ID - Click
Nextbutton
- Set
- In
Capability config- Enable
Client authenticationtoggle switch - Click
Savebutton
- Enable
- In
Settingstab- Set
http://localhost:9080/*toValid Redirect URIs - Click
Savebutton
- Set
- In
Credentialstab, you can find the secret generated forsimple-service - In
Rolestab- Click
Create Rolebutton - Set
USERtoRole Name - Click
Savebutton
- Click
LDAP Integration
- On the left menu, click
User federation - Click
Add Ldap providers - Select
OtherforVendor - Set
ldap://openldaptoConnection URL - Set
cn=admin,dc=mycompany,dc=comtoBind DN - Set
admintoBind Credential - Select
READ_ONLYtoEdit Mode - Set
ou=users,dc=mycompany,dc=comtoUsers DN - Set
(gidnumber=500)toUser LDAP Filter(filter just developers) - Click
Test connectionbutton, to check if the connection is OK - Click
Test authenticationbutton, to check if the authentication is OK - Click
Savebutton
Configure users imported
- On the left menu, click
Users - In
Search userfield, type*and pressEnterto view all users. 3 users should be shown - Edit user
bgatesby clicking itsusernamelink - In
Role Mappingstab- Click
Assign rolebutton - Click
Filter by Origindropdown button and selectsimple-service - Select
USERrole and clickAssignbutton - Now,
bgateshas the roleUSERofsimple-service
- Click
- Do the same for the user
sjobs - Leave
mcubanwithout it
Run simple-service using Maven
-
Open a new terminal and make sure you are in
springboot-keycloak-openldaproot folder -
Start the application by running the following command
./mvnw clean spring-boot:run --projects simple-service -Dspring-boot.run.jvmArguments="-Dserver.port=9080"
Test using curl
-
Open a new terminal
-
Call the endpoint
GET /api/publiccurl -i http://localhost:9080/api/publicIt should return
HTTP/1.1 200 It is public. -
Try to call the endpoint
GET /api/privatewithout authenticationcurl -i http://localhost:9080/api/privateIt should return
HTTP/1.1 401 -
Create an environment variable that contains the
Client Secretgenerated byKeycloaktosimple-serviceat Configure Keycloak stepSIMPLE_SERVICE_CLIENT_SECRET=... -
Run the command below to get an access token for
bgatesuserBGATES_ACCESS_TOKEN=$(curl -s -X POST \ "http://localhost:8080/realms/company-services/protocol/openid-connect/token" \ -H "Content-Type: application/x-www-form-urlencoded" \ -d "username=bgates" \ -d "password=123" \ -d "grant_type=password" \ -d "client_secret=$SIMPLE_SERVICE_CLIENT_SECRET" \ -d "client_id=simple-service" | jq -r .access_token)Note: In jwt.io, you can decode and verify the
JWTaccess token -
Call the endpoint
GET /api/privatecurl -i http://localhost:9080/api/private -H "Authorization: Bearer $BGATES_ACCESS_TOKEN"It should return
HTTP/1.1 200 bgates, it is private. -
Run the command below to get an access token for
mcubanuserMCUBAN_ACCESS_TOKEN=$(curl -s -X POST \ "http://localhost:8080/realms/company-services/protocol/openid-connect/token" \ -H "Content-Type: application/x-www-form-urlencoded" \ -d "username=mcuban" \ -d "password=123" \ -d "grant_type=password" \ -d "client_secret=$SIMPLE_SERVICE_CLIENT_SECRET" \ -d "client_id=simple-service" | jq -r .access_token) -
Try to call the endpoint
GET /api/privatecurl -i http://localhost:9080/api/private -H "Authorization: Bearer $MCUBAN_ACCESS_TOKEN"As
mcubandoes not have theUSERrole, he cannot access this endpoint.The endpoint return should be
HTTP/1.1 403 {"timestamp":"...","status":403,"error":"Forbidden","path":"/api/private"} -
Go to
Keycloakand add the roleUSERto themcuban -
Run the command mentioned in
step 7)again to get a new access token formcubanuser -
Call again the endpoint
GET /api/privateusing thecurlcommand presented instep 8It should return
HTTP/1.1 200 mcuban, it is private. -
The access token default expiration period is
5 minutes. So, wait for this time and, using the same access token, try to call the private endpoint.It should return
HTTP/1.1 401 WWW-Authenticate: Bearer realm="company-services", error="invalid_token", error_description="Token is not active"
Test using Swagger
-
Access http://localhost:9080/swagger-ui.html

-
Click
GET /api/publicto open it. Then, clickTry it outbutton and, finally, clickExecutebuttonIt should return
Code: 200 Response Body: It is public. -
Now click
GET /api/privatesecured endpoint. Let's try it without authentication. Then, clickTry it outbutton and, finally, clickExecutebuttonIt should return
Code: 401 Details: Error: response status is 401 -
In order to access the private endpoint, you need an access token. So, open a terminal
-
Create an environment variable that contains the
Client Secretgenerated byKeycloaktosimple-serviceat Configure Keycloak stepSIMPLE_SERVICE_CLIENT_SECRET=... -
Run the following commands
BGATES_ACCESS_TOKEN=$(curl -s -X POST \ "http://localhost:8080/realms/company-services/protocol/openid-connect/token" \ -H "Content-Type: application/x-www-form-urlencoded" \ -d "username=bgates" \ -d "password=123" \ -d "grant_type=password" \ -d "client_secret=$SIMPLE_SERVICE_CLIENT_SECRET" \ -d "client_id=simple-service" | jq -r .access_token) echo $BGATES_ACCESS_TOKEN -
Copy the token generated and go back to
Swagger -
Click
Authorizebutton and paste the access token in theValuefield. Then, clickAuthorizebutton and, to finalize, clickClose -
Go to
GET /api/privateand call this endpoint again, now with authenticationIt should return
Code: 200
Response Body: bgates, it is private.

Using client_id and client_secret to get access token
You can get an access token to simple-service using client_id and client_secret
Configuration
- Access http://localhost:8080/admin/
- Select
company-servicesrealm (if it's not already selected) - On the left menu, click
Clients - Select
simple-serviceclient - In
Settingstab- Go to
Capability configand checkService accounts rolescheckbox - Click
Savebutton
- Go to
- In
Service account rolestab- Click
service-account-simple-servicelink present in the info message"To manage detail and group mappings, click on the username service-account-simple-service"
- In
Role mappingtab- Click
Assign rolebutton - Click
Filter by Origindropdown button and selectsimple-service - Select
USERrole and clickAssignbutton - Now,
service-account-simple-servicehas the roleUSERofsimple-service
- Click
- Click
Test
-
Open a terminal
-
Create an environment variable that contains the
Client Secretgenerated byKeycloaktosimple-serviceat Configure Keycloak stepSIMPLE_SERVICE_CLIENT_SECRET=... -
Run the following command
CLIENT_ACCESS_TOKEN=$(curl -s -X POST \ "http://localhost:8080/realms/company-services/protocol/openid-connect/token" \ -H "Content-Type: application/x-www-form-urlencoded" \ -d "grant_type=client_credentials" \ -d "client_secret=$SIMPLE_SERVICE_CLIENT_SECRET" \ -d "client_id=simple-service" | jq -r .access_token) -
Try to call the endpoint
GET /api/privatecurl -i http://localhost:9080/api/private -H "Authorization: Bearer $CLIENT_ACCESS_TOKEN"It should return
HTTP/1.1 200
service-account-simple-service, it is private.
Running simple-service as a Docker container
-
In a terminal, make sure you are in
springboot-keycloak-openldaproot folder -
Build Docker Image
- JVM
./docker-build.sh - Native
./docker-build.sh native
Environment Variable Description KEYCLOAK_HOSTSpecify host of the Keycloakto use (defaultlocalhost)KEYCLOAK_PORTSpecify port of the Keycloakto use (default8080) - JVM
-
Run Docker Container
docker run --rm --name simple-service \ -p 9080:8080 \ -e KEYCLOAK_HOST=keycloak \ --network=springboot-keycloak-openldap_default \ ivanfranchin/simple-service:1.0.0 -
Open a new terminal
-
Create an environment variable that contains the
Client Secretgenerated byKeycloaktosimple-serviceat Configure Keycloak stepSIMPLE_SERVICE_CLIENT_SECRET=... -
Run the commands below to get an access token for
bgatesuserBGATES_TOKEN=$( docker run -t --rm --network springboot-keycloak-openldap_default alpine/curl:latest sh -c ' curl -s -X POST http://keycloak:8080/realms/company-services/protocol/openid-connect/token \ -H "Content-Type: application/x-www-form-urlencoded" \ -d "username=bgates" \ -d "password=123" \ -d "grant_type=password" \ -d "client_secret='$SIMPLE_SERVICE_CLIENT_SECRET'" \ -d "client_id=simple-service"') BGATES_ACCESS_TOKEN=$(echo $BGATES_TOKEN | jq -r .access_token) -
Call the endpoint
GET /api/privatecurl -i http://localhost:9080/api/private -H "Authorization: Bearer $BGATES_ACCESS_TOKEN"
Shutdown
- To stop
simple-serviceapplication, go to the terminal where it is running and pressCtrl+C - To stop and remove docker-compose containers, network and volumes, go to a terminal and inside
springboot-keycloak-openldaproot folder, run the following commanddocker-compose down -v
Cleanup
To remove the Docker image create by this project, go to a terminal and, inside springboot-keycloak-openldap root folder, run the following script
./remove-docker-images.sh