Cloudinary is a Software-as-a-Service (SaaS) solution for managing all your web or mobile application’s media assets in the cloud. Cloudinary offers an end-to-end solution for all your image and video needs, including the upload, storage, administration, transformation and optimized delivery.
Images make up a large portion of the overall web traffic. On Instagram alone, over 95 million photos are shared daily. Delivery images in a fast and efficient way can improve the overall performance of a web application. In this article, we will cover some techniques that can be used with Cloudinary to make this seamless. We will demonstrate how one can use Cloudinary to speed up their web apps. At the end of this article we will have a web application that loads faster retains more users and provides a better user experience.
The final project can be viewed on PHPSandbox and the entire source code is available on my Github repository.
Using Cloudinary in your Laravel projects is pretty straightforward. However, for you to be able to easily follow along, you need to have a good command of your terminal, Git and entry knowledge of PHP specifically with the Laravel framework.
This assumes you already have composer installed. Laravel uses Composer to manage its dependencies. So, before we can start ensure you have Composer installed on your machine.
-
Install Composer and PHP on your development or production machine.
-
Install Laravel
-
Via Composer:
composer create-project --prefer-dist laravel/laravel cloudinary-speed -
Via Laravel Installer
composer global require laravel/installerlaravel new cloudinary-speed
-
-
In step 2 above we have created a project folder called
cloudinary-speed. Change the directory to this project folder and run the local development server by typing the following commands:cd cloudinary-speedphp artisan serve
The Laravel Project is now up and running.
Using Cloudinary allows you to optimize the performance of your Laravel backend by allowing you to upload, process, and deliver your media files. Cloudinary's servers automatically perform optimizations and scales to handle high loads and bursts of traffic with a global content delivery network (CDN) feature. This is great for our media platform.
To implement a content-aware crop for our media files with Cloudinary:
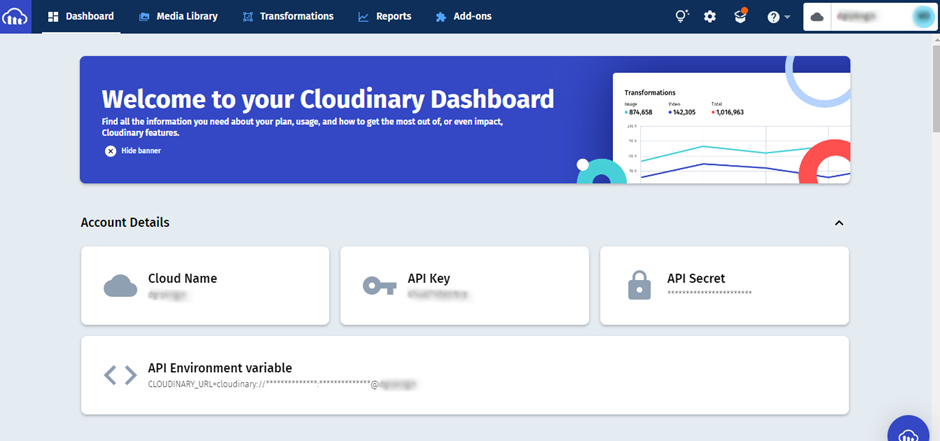
- Sign up for a free Cloudinary account then navigate to the Console page and take note of your Cloud name, API Key and API Secret.
-
Install Cloudinary’s Laravel SDK:
composer require cloudinary-labs/cloudinary-laravel
Note: Please ensure you follow all the steps in the #Installation section. Publish the configuration file and add the Cloudinary credentials you noted in Step 1 to the .env file.
To demonstrate image optimization we will need a UI (User Interface), we will be using the Laravel package Livewire to build this and the image file upload functionality.
-
Install Livewire Package by running the following command in your Laravel project:
composer require livewire/livewire -
Include Livewire scripts and styles on every page that will be using Livewire. In our case
welcome.blade.php:
...
    @livewireStyles
</head>
<body>
    ...

    @livewireScripts
</body>
</html>-
We will then create a Livewire Component to handle our image uploads:
php artisan make:livewire ImageUpload
This will create two files, one in app/Http/Livewire/ImageUpload and the other one
in resources/views/livewire/image-upload.blade.php
Now you can use this component anywhere in your Laravel project using the following snippet:
<livewire:image-upload/>
or
@livewire(‘image-upload’)
- Open
resources/views/welcome.blade.phpand add the following code within the<body></body>tags as shown below:
<body class="antialiased">
  <div>
    @livewire('image-upload')
  </div>
</body>
This basically includes the Livewire component we created earlier into our welcome.blade.php.
Note: Please ensure you go through the Livewire documentation, to learn how to install and set it up.
- Open the file
resources/views/livewire/image-upload.blade.phpand populate it with the following code:
<form class="mb-5" wire:submit.prevent="upload">
<div class="form-group row mt-5 mb-3">
<div class="input-group">
<input type="file" class="form-control @error('media') is-invalid @enderror"
placeholder="Choose file..." id="media-file" type="file" wire:model="media">
@error('media')
<div class="invalid-feedback">{{ $message }}</div>
@enderror
</div>
<small class="text-muted text-center mt-2" wire:loading wire:target="media">
{{ __('Uploading') }}…
</small>
</div>
<div class="text-center">
<button type="submit" class="btn btn-sm btn-primary w-25">
<i class="fas fa-check mr-1"></i> {{ __('Optimize') }}
</button>
</div>
</form>
<!-- Original Image -->
<div class="card-body">
<img class="card-img-top" src="{{ $media }}" alt="Original Image" width="400" height="600">
<h5 class="card-title mt-4 fw-bold">
Original Image
</h5>
</div>
<!-- Optimized Image -->
<div class="card-body">
<img class="card-img-top" src="{{ $optimizedImage }}" alt="Optimized Image" width="400" height="600">
<h5 class="card-title mt-4 fw-bold">
Optimized Image
</h5>
</div>This is our Livewire Component view, this basically will display the form and on successful optimization through Cloudinary will display the optimized image file.
The first part of the code above is a form with an input of type file and a submit button.
The second part will take the response from Cloudinary and display the non-optimized image and the optimized image from Cloudinary.
Note: you will see the implementation in code shortly.
Hold your horses, before we start coding away, we need to understand what image optimization is and specifically how to do it well with Cloudinary.
There are several image formats with PNGs and JPEGs being some of the most popular formats. Image formats have their strengths and weaknesses like PNGs allow you to display transparent images which JPEGs cannot.
As a rule of thumb we use:
- Vector Images - for simple shapes like logos, icons, texts etc
- Raster Images - for complex scenes, these are basically the image formats that users upload to platforms like Instagram. They are complex photos taken from device cameras.
We also have newer formats like WebP, JPEG-XR, with better encoding but are only supported in newer browsers. This makes it challenging choosing which format to send to the browser. You can take advantage of Cloudinary’s fetch (f_) transformation to choose and specify the format you want.
For instance, you want the PNG format, you can specify the format after the underscore f_png as follows:
https://res.cloudinary.com/demo/image/fetch/c_scale,h_400/f_png/https://en.wikipedia.org/wiki/File:Benedict_Cumberbatch_2008.jpg
In this transformation the original image is a JPG but thanks to Cloudinary and specifying f_png we will get back an optimized PNG image.
PNG is not the best in all scenarios, and we might need to take a more dynamic approach which will allow Cloudinary to automatically determine the best format suited for a particular browser based on its capabilities. RIP Internet Explorer. To do this we use f_auto:
https://res.cloudinary.com/demo/image/fetch/c_scale,h_400/f_auto/https://en.wikipedia.org/wiki/File:Benedict_Cumberbatch_2008.jpg
For more information on these transformations, check out the official Cloudinary guide.
Lazy Loading Images is a set of techniques in web and application development that defer the loading of images on a page to a later point in time - when those images are actually needed, instead of loading them up front. These techniques help in improving performance, better utilization of the device’s resources, and reducing associated costs.
When Lazy Loading images it is important to use the most efficient rendering method. By default, Cloudinary uses progressive rendering which is one of the two ways in which to optimize images and make them display faster even on sluggish connections.
We can specify this in our transformations using the transformation fl_progressive.
There is no standard quality and encoding setting that works for all images. Luckily Cloudinary provides a smart solution to handling image compression without compromising on visual quality. This is done using the transformation q_auto:
https://res.cloudinary.com/demo/image/upload/w_600/q_auto/beach_huts.jpg
Cloudinary automates the file size versus visual quality trade-off decision, on-the-fly, by using perceptual metrics and heuristics that tune the encoding settings and select the appropriate image quality based on the specific image content and format.
The last pillar of core web vitals when it comes to image optimization is sizing.
Web application design requires display of images in varied sizes. Delivering full size images and relying on browser-side resizing using CSS or HTML width and height attributes forces the user to render unnecessary bytes and suffer the cons of a slow loading application which is heavy on user resources like bandwidth, CPU and more.
Like magic, Cloudinary swoops in to save us by providing resizing transformations. The sizing (scaling/cropping) is performed on their servers, and always delivering an image to the browser at the requested size.
Enough theory lets code. We will use all the above techniques in our code.
Open the file app/Http/Livewire/ImageUpload.php. Here, we are going to add a method that will upload an image to
Cloudinary applying the necessary transformations for optimization, compression and resizing. Add the following code in this file.
-
First we use Livewires
WithFileUploadsto help us with file uploads, then create two variables$mediaand$optimizedImagewhich is an array that will contain the image URLs we get back from Cloudinary.use Livewire\WithFileUploads; public $media; public $optimizedImage;
-
Secondly, we will create the upload function which will upload the image file to Cloudinary and apply specific transformation which will compress, resize and optimize our images for a speedy web application.
public function upload() {
 ...
}
-
Lets populate our method in step 2 above:
public function upload() {
  // First we validate the input from the user
  $data = $this->validate([
    'media' => [
      'required',
      'image',
      'mimes:jpeg,jpg,png',
      ],
  ]);

  /*We will now set the transformations required to optimize the images based on recommended optimization solutions*/
  $cloud_name = env('CLOUDINARY_CLOUD_NAME', 'dgrpkngjn');
  $folder = 'cloudinary-speed';
  $media = $data['media'];
  $width = '700';
  $height = '800';
  $quality = 'auto';
  $fetch = 'auto';
  $crop = 'scale';

  $optimal = cloudinary()->upload($media->getRealPath(), [
    'folder'         => $folder,
    'transformation' => [
      'width'   => $width,
      'height'  => $height,
      'quality' => $quality,
      'fetch'   => $fetch,
      'crop'    => $crop
      ]
  ])->getSecurePath();

  $non-optimal = cloudinary()->upload($media->getRealPath(),[
    'folder_name' => $folder
  ])->getSecurePath();

  // Optimized image fetching
  /* Fetching an optimized image applying the transformations we specified which will compress, resize and optimize our images for a speedy web application */
  $slice = Str::afterLast($image, '/');
  $optimized = "https://res.cloudinary.com/{$cloud_name}/image/upload/w_{$width},h_{$height},c_{$crop}/{$folder}/{$slice}";

  $this->optimizedImage = $optimized;

  // Non optimized version for comparison
  $this->media = $non_optimal;
}
The code above will upload an image to Cloudinary and return an optimized image URL. Cloudinary automatically optimizes the image size with no compromise in quality. This is done by setting the
autovalue for thequalityandfetchattributes. We have also specified the image width and height which will instruct Cloudinary to resize and scale the image based on these parameters.Note: There is a non optimized image for comparison.
If you successfully implemented the code above, you should be able to see the following when you navigate to your project on the browser:
As you can see the Cloudinary Optimized Image loads faster. Don't take my word for it, you can test it out on this demo. Just upload a super large image, less than 10 MB of course.
Note: Cloudinary is super powerful for the management of your media assets in your project that will not only optimize your assets for visual quality but also cost savings in terms of performance, storage, AI powered transformations as well.
Cloudinary is your A to Z media management solution - upload, storage, administration, manipulation, optimization and delivery.
Get started with Cloudinary in your Laravel projects for FREE!


