This is the repository for the final project of Harvard AC215 Fall 2021 Course - Advanced Practical Data Science (DevOps for Deep Learning).
- Shih-Yi Tseng
- Steve Knapp
- Al-Muataz Khalil
- Matthew Stewart
- Ed Bayes
In this project, we trained a deep learning model for image captioning, and built a web-based AI App that allows users to upload images in the frontend and generate captions with the model.
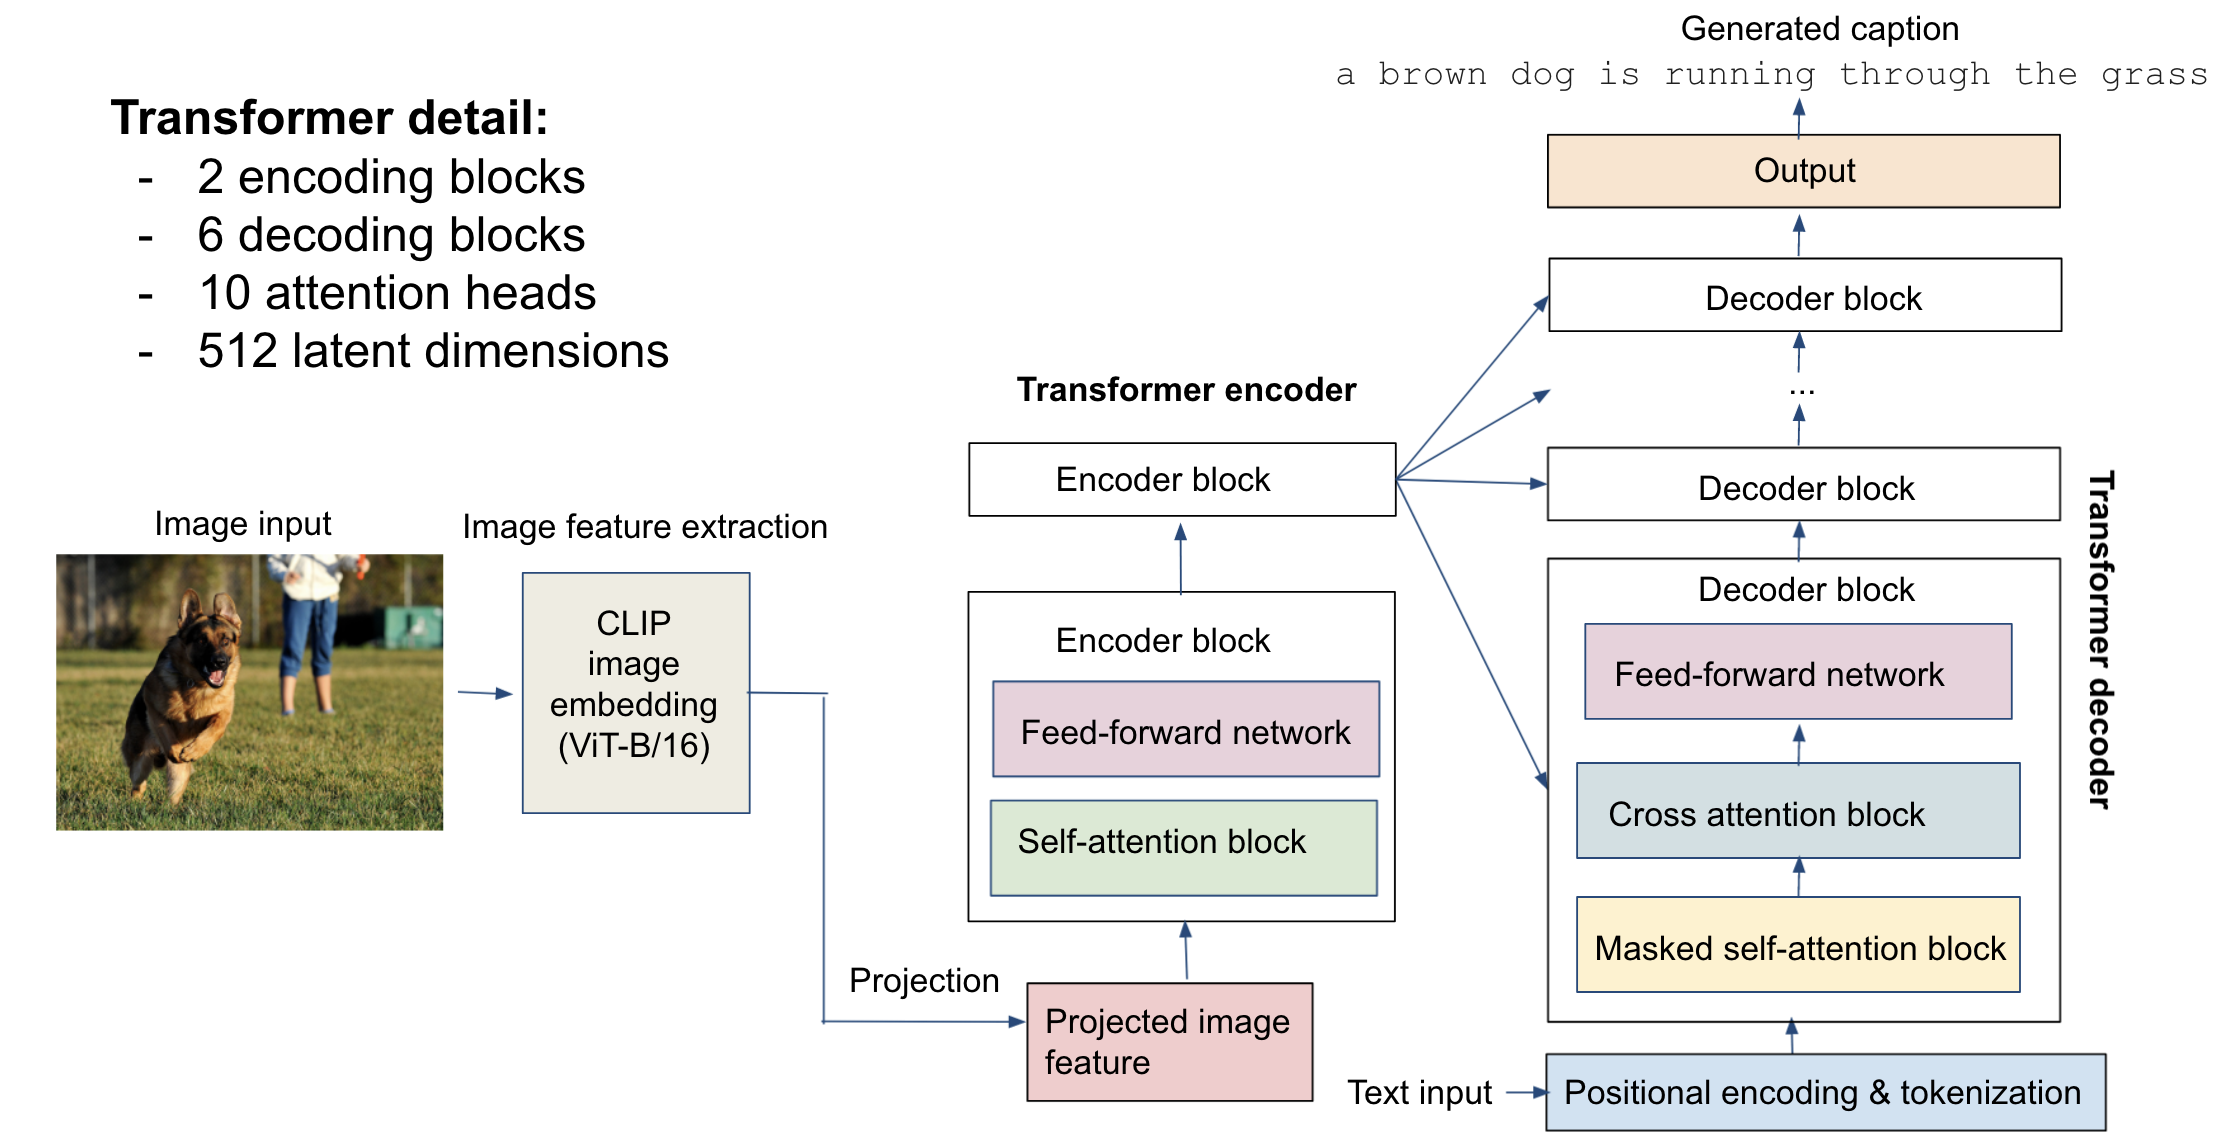
Our first image captioning model is a transformer-based, standard encoder-decoder model. It consists of an encoder part based on extracted features of an input image, and a decoder part that generates caption.
Schematic of the encoder-decoder model:
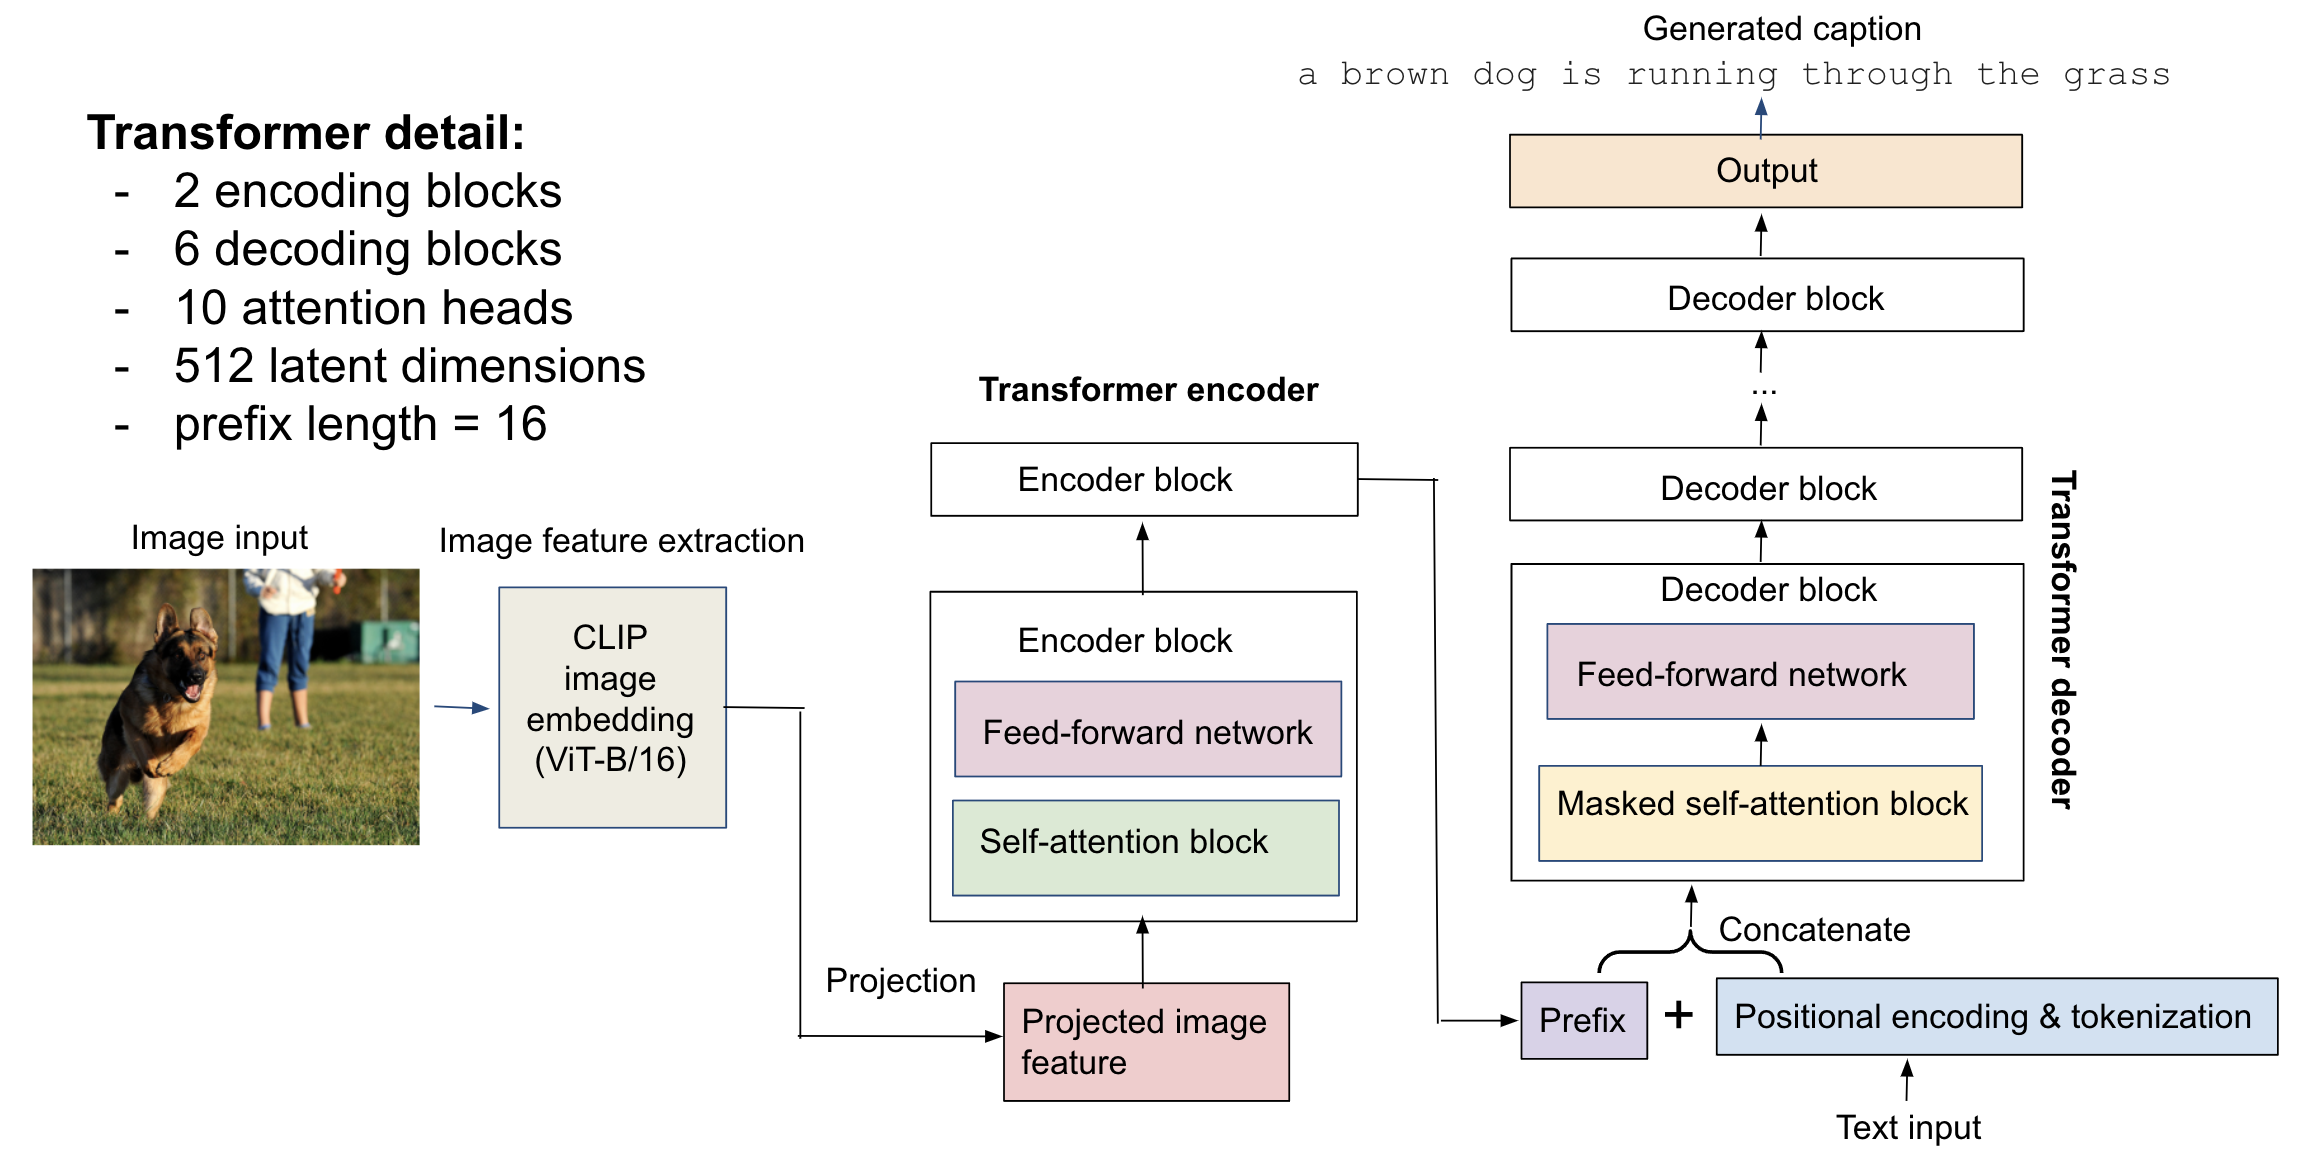
Our second model is a prefix model, which appends the encoded image feature to the embedded text as a prefix, and uses the decoder to generate caption (no cross-attention blocks for the decoder).
Schematic of the prefix model:
For image feature extraction, we use the ViT-B/16 image encoder of the OpenAI CLIP model as the feature extractor, which outputs a 512-dim embedding for an input image. The CLIP model was pre-trained to minimize contrastive loss between a large dataset with matching images and captions, which learns a latent embedding that represents details of an image and its corresponding langauge descritpion.
- Read about CLIP: https://openai.com/blog/clip/
- Github for CLIP: https://github.com/openai/CLIP
For the transformer, we implemented 2 extra encoder blocks (since the CLIP embedding is already an output of a visual transformer, ViT-B/16), together with 6 decoder blocks to generate captions. The embedded dimension for both image feature and tokenized text is 512, and each attention block in the encoder/decoder has 10 attention heads. The prefix / projected length of the image features is 16. Additionally, we trained a distilled model of the prefix model with smaller architecture (1 encoder block, 3 decoder blocks, 8 attention heads, prefix length 10). Both models were trained on the Flickr8k and MS-COCO datasets with ~600k image-caption pairs.
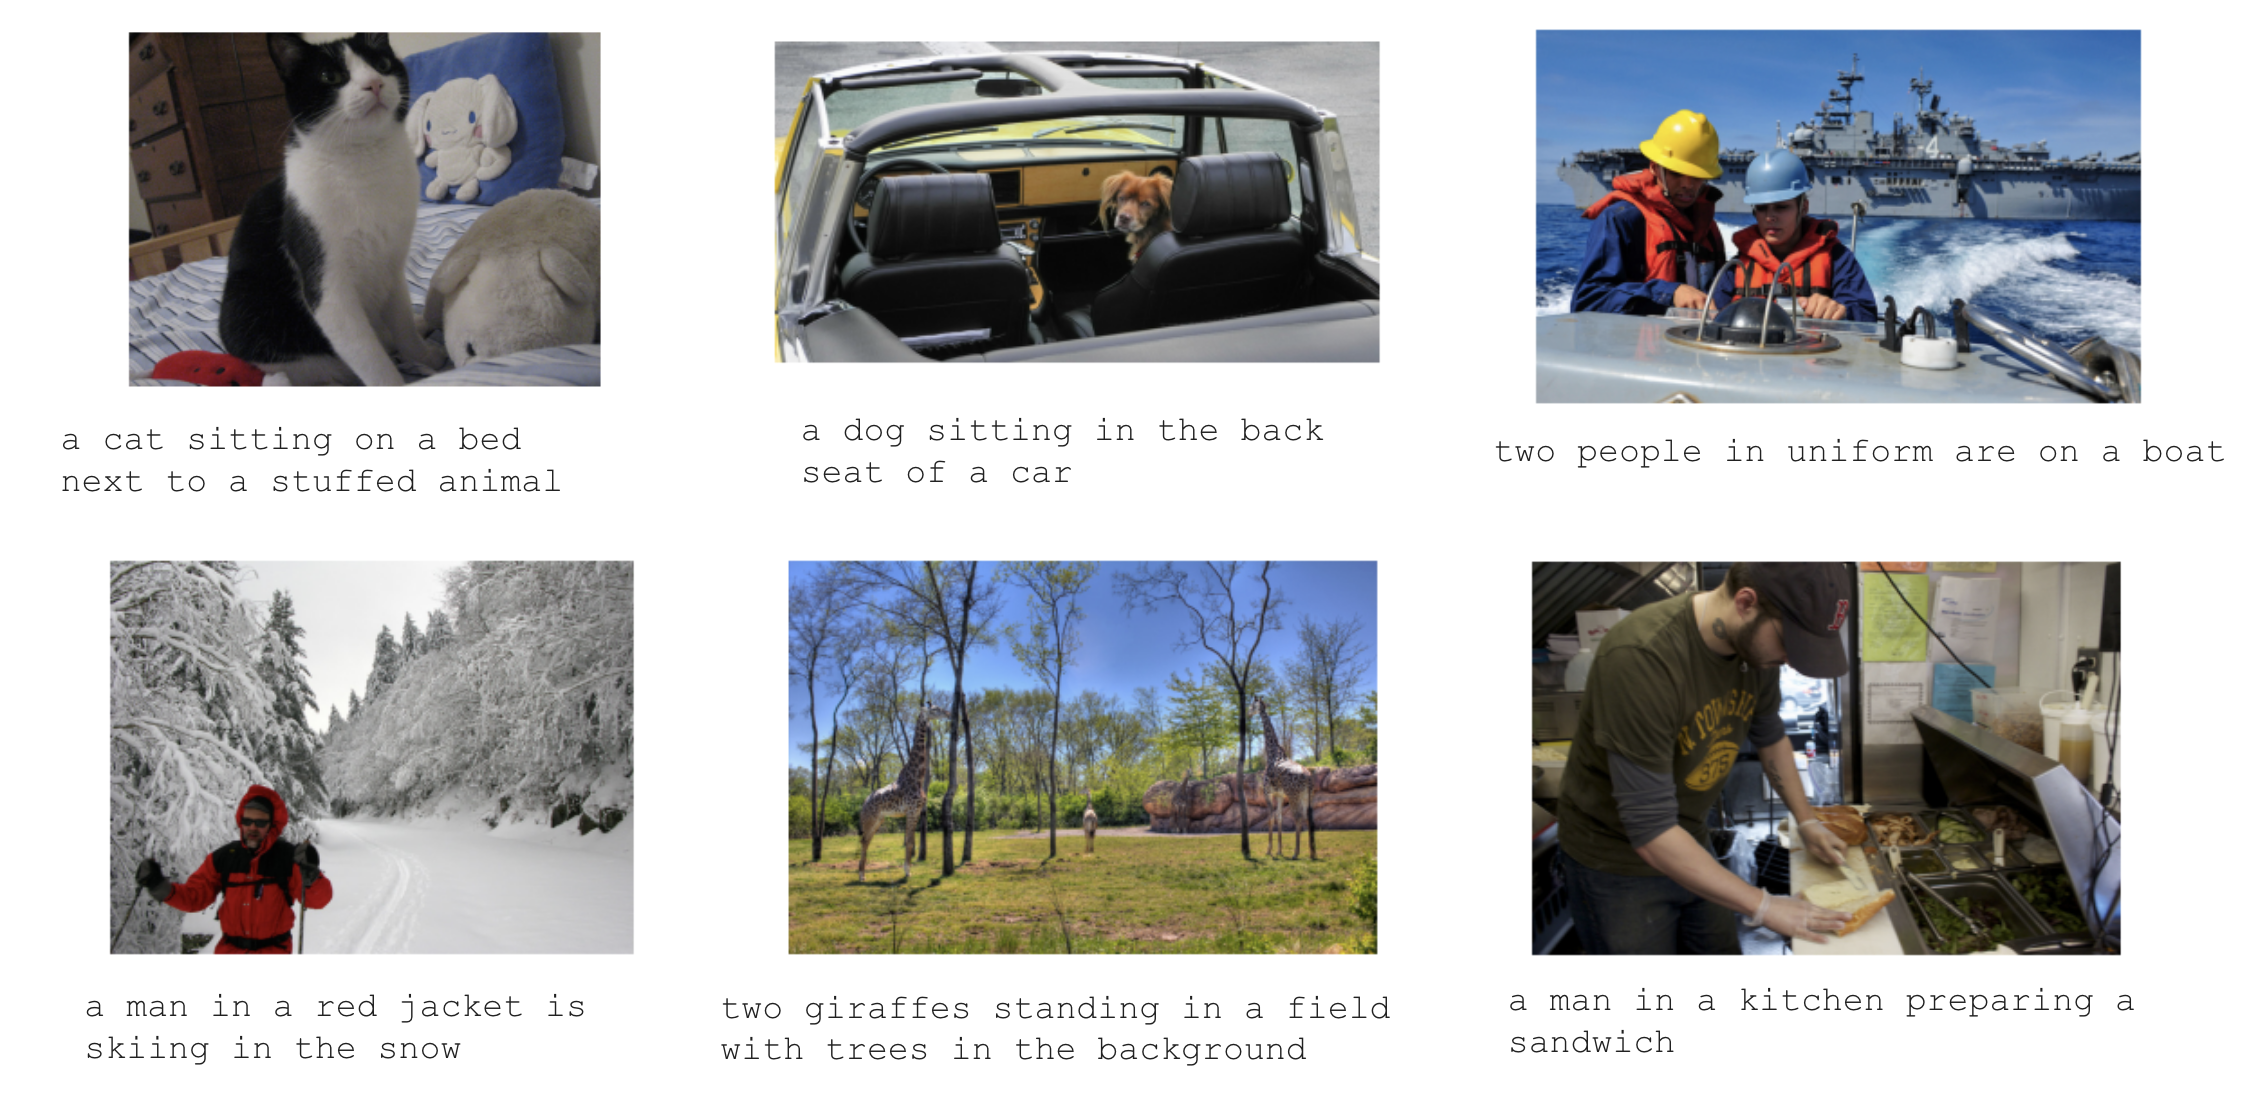
Some example captions generated on images in our test data from Flickr8k and MS-COCO datasets.
For details of the models, please refer to this Colab notebook for encoder-decoder model and this Colab notebook for prefix model with distillation in the notebooks folder.
The code can also be found in api-service/api folder or the models folder.
We built an API server to serve these models using FastAPI. Upon startup, the API server downloads the saved model weights from a GCP bucket, and when receiving an input image, it returns the generated caption for that image.
The api-service folder contains codes for the models and API server
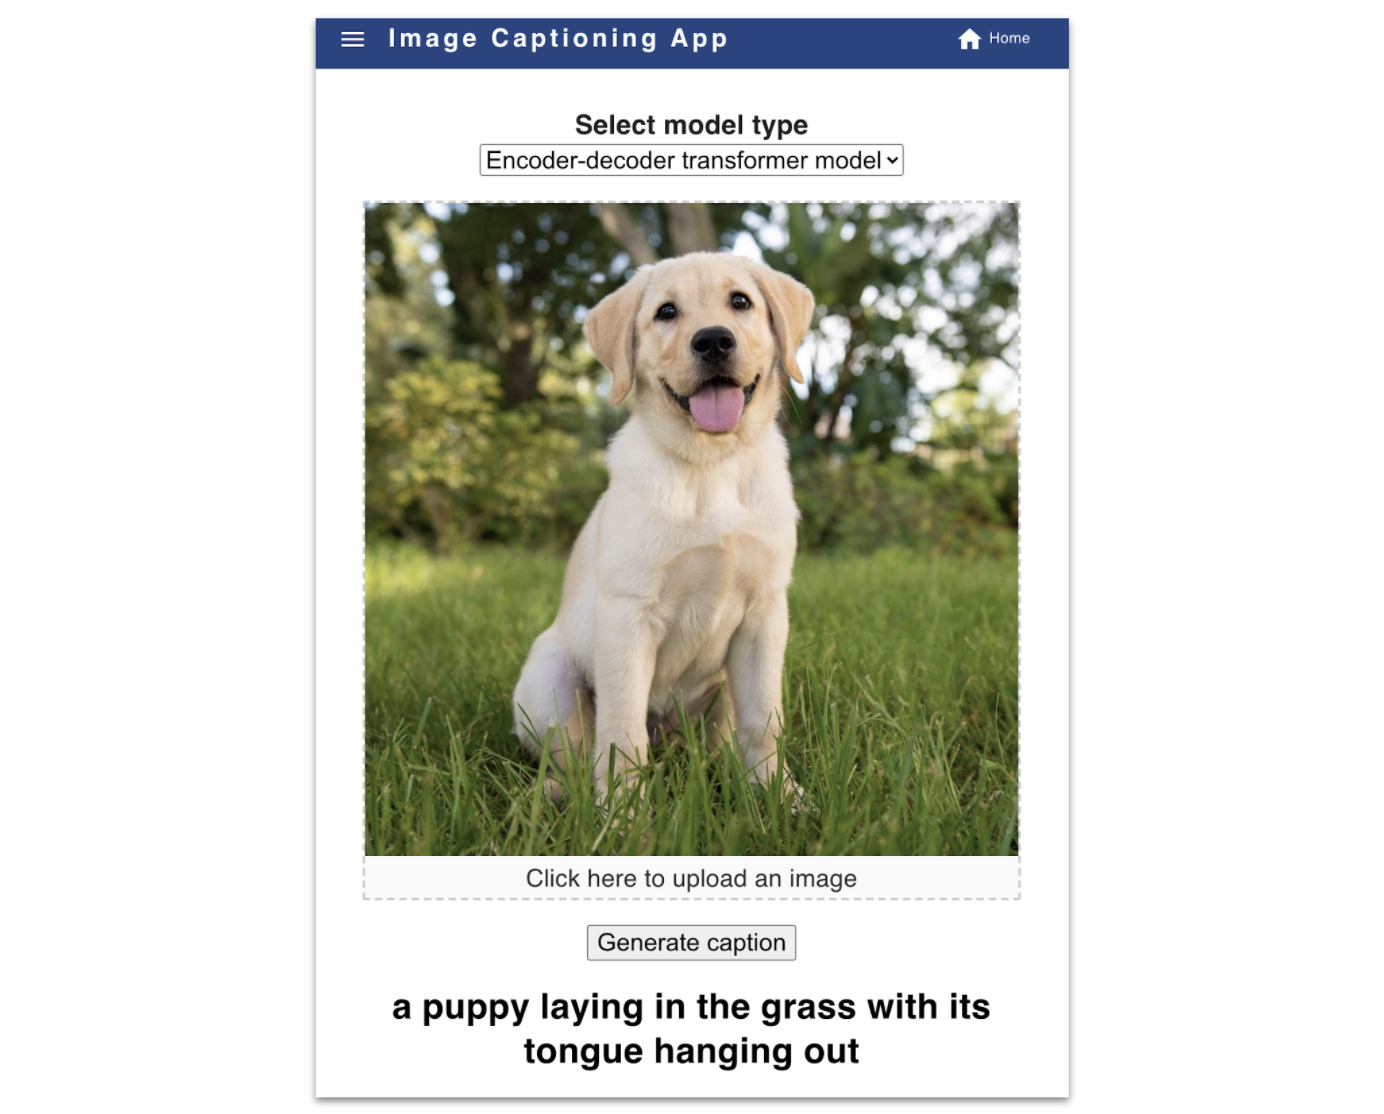
We used React.js to build the frontend of the Image Captioning App. The frontend allows users to upload an image and select a model type for captioning, and makes requests to the API. It then displays the caption generated by the selected model.
The frontend-react folder contains codes for the React frontend
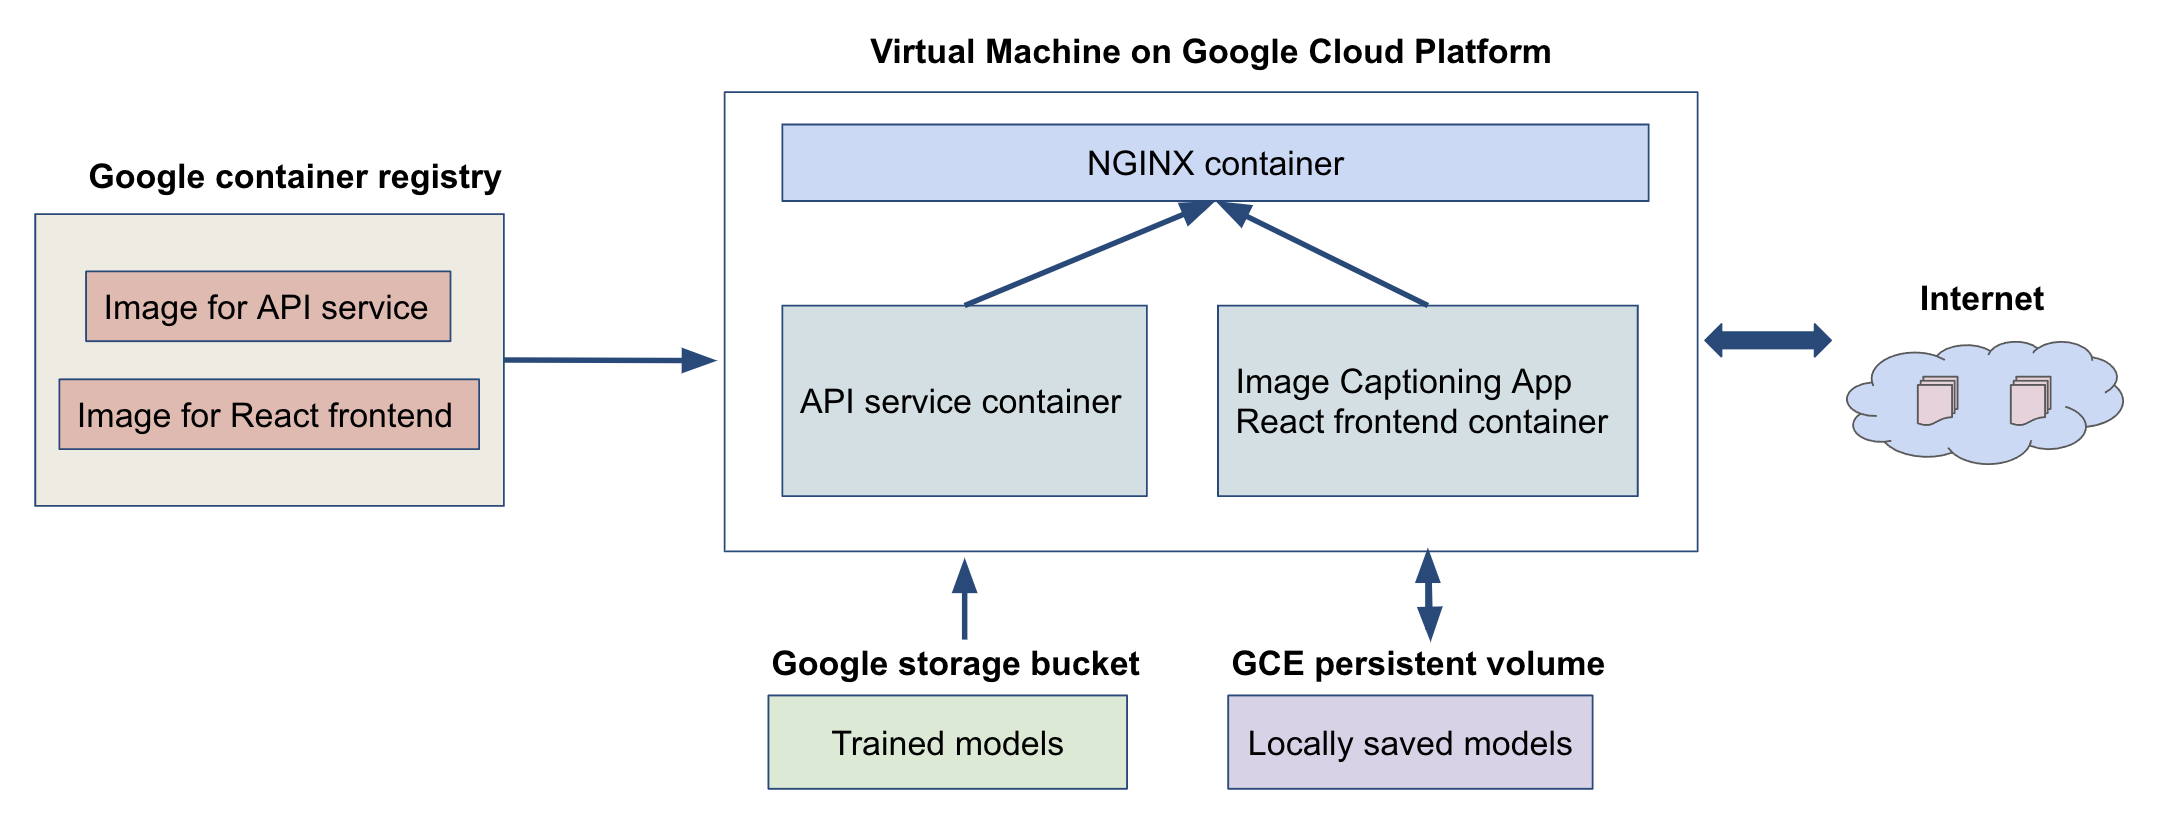
The App is then deployed onto Kubernetes Clusters on Google Cloud Platform. We stored the Docker images for both the API server and React frontend to Google Container Registry, and then created virtual machines that run these containers on the cluster with Kubernetes.
The deployment folder contains scripts for deploying the App on Google Cloud Platform (GCP)
This is how the App looks like:
The api-service folder holds the files to set up the Docker container and pipenv virtual environment, as well as Python codes (inside api subfolder) for running the API server to serve our image captioning model.
Before running, add the GCP bucket authorization file (from the authors) into the secrets folder in the parent directory, and name the file as bucket-reader.json.
Change directory back to this folder, run sh docker-shell.sh or docker-shell.bat to build and start the container, and then run uvicorn_server to start the API server at http://localhost:9000.
Upon startup, it executes the function in api/download_model.py to scrape tokenizer and model weights from the GCP bucket into the persistent-folder in the parent directory.
The /predict service uses the encoder-decoder transformer model (defined in api/model.py) to generate caption of an image, the /predict_prefix service uses the prefix transformer model, the /predict_distill service uses the distilled prefix model, and the /predict_rnn service uses the RNN model.
Upon interaction with the frontend, the server takes an upladed image as input and return a dictionary with the generated caption in the form of {'caption': generated_caption}.
The frontend-react folder holds the container for the react frontend app which creates a page that allows us to upload an image and view the predicted image caption.
To set up the react frontend, follow these steps:
- Run
sh docker-shell.shordocker-shell.bat - Wait for docker shell to start up
- Run
yarn install. This will ensure all your node packages for React are installed - Run
yarn startto start your React App - Go to the page http://localhost:3000
- Upload image to get predicted caption
The deployment folder contains the files to build the Docker container and Ansible scripts for deploying our Image Captioning App to web with Kubernetes on Googld Cloud Platform (GCP).
- Compute Engine API
- Service Usage API
- Cloud Resource Manager API
- Google Container Registry API
For deployment, we need to set up two GCP service accounts.
(1) deployment service account with required roles:
- Compute Admin
- Compute OS Login
- Container Registry Service Agent
- Kubernetes Engine Admin
- Service Account User
- Storage Admin
Once the account is created, make a json key named deployment.json and add it the the secrets folder.
(2) gcp-service service account with one required role:
- Storage Object Viewer
Once the account is created, make a json key named gcp-service.json and add it the the secrets folder.
Note that besides these two keys, make sure to put the bucket-reader.json file in the secrets folder too.
Within this folder, run sh docker-shell.sh or docker-shell.bat in the terminal to build and enter the docker container.
Once inside the container, check the versions of these tools:
gcloud --version
ansible --version
kubectl version --client
Next, run gcloud auth list to check the authentication to GCP.
First, configure OS Login for the service account:
gcloud compute project-info add-metadata --project <YOUR GCP_PROJECT> --metadata enable-oslogin=TRUE
Next, create SSH key for the service account in the secrets folder:
cd /secrets
ssh-keygen -f ssh-key-deployment
cd /app
Then, provide the public key to the gcloud compute instances:
gcloud compute os-login ssh-keys add --key-file=/secrets/ssh-key-deployment.pub
Copy the username of the output, which will be used in the next step.
Before deployment, go to the inventory.yml file, change the ansible user to the username copied from last step, and change the service account email and project name to your own.
First, build and push the Docker images for the api-service and frontend to Google Container Registry:
ansible-playbook deploy-docker-images.yml -i inventory.yml
Next, create a VM instance in GCP:
ansible-playbook deploy-create-instance.yml -i inventory.yml --extra-vars cluster_state=present
Once the VM is created, get the IP address of the compute instance from GCP Console and update the appserver>hosts in the inventory.yml file.
Provision:
ansible-playbook deploy-provision-instance.yml -i inventory.yml
Setup Docker containers in the Compute Instance:
ansible-playbook deploy-setup-containers.yml -i inventory.yml
Setup webserver in the Compute Instance:
ansible-playbook deploy-setup-webserver.yml -i inventory.yml
Last, go to http://<External IP>/ to see the Image Captioning App.
To delete the instnace, run
ansible-playbook deploy-create-instance.yml -i inventory.yml --extra-vars cluster_state=absent
Before deploying on K8s cluster, make sure the Docker images for the api-service and frontend have been pushed to Google Container Registry.
Within the deployment container, run gcloud auth list to check GCP authentification.
To deploy, run
ansible-playbook deploy-k8s-cluster.yml -i inventory.yml --extra-vars cluster_state=present
To view the App, copy the nginx_ingress_ip from the terminal after executing the create clsuter command, and then go to http://<YOUR INGRESS IP>.sslip.io to see the deployed App.
To delete the cluster, run
ansible-playbook deploy-k8s-cluster.yml -i inventory.yml --extra-vars cluster_state=absent
  .
  ├── LICENSE
  ├── README.md
  ├── api-service
  │   └── api
  ├── frontend-react
  ├── deployment
  ├── persistent-folder
  ├── secrets
  ├── models
  ├── notebooks
  ├── src
  ├── submissions
  │   ├── milestone1_KKST
  │   ├── milestone2_KKST
  │   ├── milestone3_KKST
  │   └── milestone4_KKST
  └── archive
      ├── api-baseline
      ├── frontend-simple
      ├── data
      ├── references
      ├── requirements.txt
      ├── setup.py
      └── test_project.py
Project based on the cookiecutter data science project template. #cookiecutterdatascience
