![]()
This backend version of the Spring Petclinic application only provides a REST API. There is no UI. The spring-petclinic-angular project is a Angular front-end application which consumes the REST API.
A modified version (specific to this project) of the spring-petclinic-angular project can be found HERE
NOTE
This project is based upon code from the commit reference f97f1d44580d9950463043b451902f2e4955dea7 of the repository spring-petclinic/spring-petclinic-rest.
See the presentation of the Spring Petclinic Framework version

./mvnw spring-boot:run
The application ca be packaged using:
./mnvw packageIt produces the spring-petclinic-rest-slim-{{version}}.jar file in the /target directory. The jar is already a fat-jar and can be executed with the following command:
java -jar ./target/spring-petclinic-rest-slim-{{version}}.jarBefore building the container image run:
./mvnw packageThen, build the image with:
docker build -f src/main/docker/Dockerfile.jvm -t mpbauer/spring-petclinic-rest-slim-jvm .Then run the container using:
docker run -i --rm -p 8080:8080 mpbauer/spring-petclinic-rest-slim-jvmYou can then access petclinic here: http://localhost:8080/petclinic/
Spring Native provides support to compile Spring application to a native executable by utilizing GraalVM.
🚧 Warning: This section is under heavy construction
At the time of writing the spring-native project is still in alpha and the number of supported dependencies is still relatively small. A native configuration will be implemented once the
spring-nativeproject is more stable and supports a wider range of dependencies.
The following URLs can be used to access a documentation about the spring-petclinic-rest-slim application:
Swagger UI
http://localhost:8080/petclinic/swagger-ui
Open API Schema Document
http://localhost:8080/petclinic/v3/api-docs
The spring-boot-starter-actuator dependency provides a health check endpoint at /actuator/health
Example:
http://localhost:8080/petclinic/actuator/health
The spring-boot-starter-actuator provides two metric endpoints:
/actuator/metrics- Shows ‘metrics’ information for the current application./actuator/prometheus- Exposes metrics in a format that can be scraped by a Prometheus server. Requires a dependency onmicrometer-registry-prometheus
Metrics endpoint:
http://localhost:8080/petclinic/actuator/metrics
Prometheus endpoint:
http://localhost:8080/petclinic/actuator/prometheus
The database support for this version of the spring-petlinic-rest project was significantly reduced. As of now this project only supports PostgreSQL and H2.
In its default configuration a PostgreSQL database is required to run the application. For the execution of tests an
embedded H2 is started.
For local development you may want to start a PostgreSQL database with Docker:
docker run --name petclinic -p 5432:5432 -e POSTGRES_PASSWORD=pass -d postgres
A Role Based Access Control is enabled by default when running the application with the default profile. When you
start the application with the local profile through ./mvnw spring-boot:run -Dspring-boot.run.profiles=local
authentication is disabled by default.
At the moment JWT based authentication is not implemented yet
In order to use the JWT based authentication functionality, you can turn it on by setting the following property in
the application.properties file:
petclinic.security.enable=trueThis will secure all APIs and in order to access them, basic authentication is required. Apart from authentication, APIs also require authorization. This is done via roles that a user can have. The existing roles are listed below with the corresponding permissions:
| Role | Controller |
|---|---|
| OWNER_ADMIN | OwnerController PetController PetTypeController ( getAllPetTypes() & getPetType()) |
| VET_ADMIN | PetTypeController SpecialityController VetController |
| ADMIN | UserController |
To make the use of this sample application as easy as possible a set of fixed JSON Web Tokens with different roles were
generated and signed with a secret that is hardcoded in application.properties. You can copy the pre-created tokens
and pass it via the Authorization header to the application.
Example:
curl --location --request GET 'http://localhost:8080/petclinic/api/owners' \
--header 'Content-Type: application/json' \
--header 'Accept: application/json' \
--header 'Authorization: Bearer eyJhbGciOiJIUzUxMiJ9.eyJzdWIiOiJYMDAwMDQiLCJpc3MiOiJodHRwczovL3NwcmluZy1wZXRjbGluaWMuZ2l0aHViLmlvL2lzc3VlciIsImdyb3VwcyI6WyJST0xFX09XTkVSX0FETUlOIiwiUk9MRV9WRVRfQURNSU4iLCJST0xFX0FETUlOIl0sImV4cCI6NDc3MDU1NDgzNCwiaWF0IjoxNjE0ODc3NjQxLCJqdGkiOiIwYTU2ZmU5My05YzU1LTRhZWYtYjRjZS1mMTg3YTcwMWYwYTYifQ.MEQQrmnNfoNTxVT1ZOiFT-UDGqzbv12u6jAlwPvKjSaaJYV84QKU3NTU79mp9hdHY3J7sKgfTGGJ1qMJtfSFpg'
❗ IMPORTANT: Never push a secret hardcoded and in plaintext in a Git repository. This application is just for showcasing the use of JSON Web Tokens in the Petclinic application but it should never be done this way for real applications.
Role: OWNER_ADMIN
eyJhbGciOiJIUzUxMiJ9.eyJzdWIiOiJYMDAwMDEiLCJncm91cHMiOlsiUk9MRV9PV05FUl9BRE1JTiJdLCJleHAiOjQ3NzA1NTUyMTEsImlhdCI6MTYxNDg3ODAxOCwianRpIjoiMzU0NzZkNWEtMjA1OC00YzliLTlhMDMtMzkxZmJkOTgyMWU3In0.qwMEcq7l3m4ppazuPpVKGhm4q1KOeNQeK_wC09iUjvs1wngFszU8fwhBVa4DuwHuVTxgo2WGGLZCr5XsRc3kgA
Role: VET_ADMIN
eyJhbGciOiJIUzUxMiJ9.eyJzdWIiOiJYMDAwMDIiLCJncm91cHMiOlsiUk9MRV9WRVRfQURNSU4iXSwiZXhwIjo0NzcwNTU1MjExLCJpYXQiOjE2MTQ4NzgwMTgsImp0aSI6ImU5ODNhMzY0LTNhMjMtNDRlMi05YTE0LTE4ZTNmYWQ2ZGRiZCJ9.8EWFF19GhHtjvIxQENnYkgLeCHje5RY2Jn67JyeErQDLsK6lZxspzmF7Eb2v-D1b_abf7Hxx0fWhtjVLQMEPPA
Role: ADMIN
eyJhbGciOiJIUzUxMiJ9.eyJzdWIiOiJYMDAwMDMiLCJncm91cHMiOlsiUk9MRV9BRE1JTiJdLCJleHAiOjQ3NzA1NTUyMTEsImlhdCI6MTYxNDg3ODAxOCwianRpIjoiOTU1YWVlOGEtYzFkYi00YmJkLTg0ZGMtYjQwMmZkOWI2OTc3In0.4iXV2RBTwT35CkzPwOz2w1q54ts0_ozsyOE980tMpWcTJVBQw7bJBl2Y7Z_Dc-heUbI4VvBlTLGEhyBZIN8B-g
Roles: OWNER_ADMIN, VET_ADMIN, ADMIN
eyJhbGciOiJIUzUxMiJ9.eyJzdWIiOiJYMDAwMDQiLCJncm91cHMiOlsiUk9MRV9PV05FUl9BRE1JTiIsIlJPTEVfVkVUX0FETUlOIiwiUk9MRV9BRE1JTiJdLCJleHAiOjQ3NzA1NTUyMTEsImlhdCI6MTYxNDg3ODAxOCwianRpIjoiNGVmMjY0MjctYWUyNi00MGJjLWEzYjYtYzk3NGE0YTc0YWEzIn0.ypi1TQiGEuWqTKZwNe1pqMn7aIGXPCgMfONEoYmL2mrYW66vF5B3wFxVHyApcOOqttqNWtxNw7kPCdmqtW730Q
This section explains the necessary setup details to build and deploy the quarkus-petclinic-rest application
to Google Cloud Platform (GCP)
and Google Kubernetes Engine where we use Knative
for serverless deployments.
GitHub Actions is building the container images with Google Cloud Build and stores the resulting container image in Google Container Registry. Afterwards the image is going to be deployed to Google Cloud Run and Google Kubernetes Engine (GKE). To do this with a CI/CD tool like GitHub Actions we need to create Service Accounts to manage and regulate access to Google Cloud ressources.
Before you start you should have already set up a GCP account with a billing account as well as a project. There are several ways to set up a service account with GCP. You can either use the Google Cloud SDK or the Management Console in your browser to create and configure service accounts.
-
Export these environment variables so that you can copy and paste the following commands:
export PROJECT_ID=<YOUR PROJECT ID>
export SERVICE_ACCOUNT_NAME=<ENTER A NAME FOR YOUR SERVICE ACCOUNT>
-
Log in with your Google account:
gcloud auth login
-
Select the project configured via
$PROJECT_ID:gcloud config set project $PROJECT_ID
-
Enable the necessary services:
gcloud services enable cloudbuild.googleapis.com run.googleapis.com containerregistry.googleapis.com container.googleapis.com -
Create a service account:
gcloud iam service-accounts create $SERVICE_ACCOUNT_NAME \
  --description="GitHub Actions service account for Petclinic repositories" \
  --display-name="$SERVICE_ACCOUNT_NAME"
-
Give the service account Cloud Run Admin, Storage Admin, and Service Account User roles. You can’t set all of them at once, so you have to run separate commands:
gcloud projects add-iam-policy-binding $PROJECT_ID \
  --member=serviceAccount:$SERVICE_ACCOUNT_NAME@$PROJECT_ID.iam.gserviceaccount.com \
  --role=roles/cloudbuild.builds.editor

gcloud projects add-iam-policy-binding $PROJECT_ID \
  --member=serviceAccount:$SERVICE_ACCOUNT_NAME@$PROJECT_ID.iam.gserviceaccount.com \
  --role=roles/iam.serviceAccountUser

gcloud projects add-iam-policy-binding $PROJECT_ID \
  --member=serviceAccount:$SERVICE_ACCOUNT_NAME@$PROJECT_ID.iam.gserviceaccount.com \
  --role=roles/run.admin

gcloud projects add-iam-policy-binding $PROJECT_ID \
  --member=serviceAccount:$SERVICE_ACCOUNT_NAME@$PROJECT_ID.iam.gserviceaccount.com \
  --role=roles/viewer

gcloud projects add-iam-policy-binding $PROJECT_ID \
  --member=serviceAccount:$SERVICE_ACCOUNT_NAME@$PROJECT_ID.iam.gserviceaccount.com \
  --role=roles/storage.admin

gcloud projects add-iam-policy-binding $PROJECT_ID \
  --member=serviceAccount:$SERVICE_ACCOUNT_NAME@$PROJECT_ID.iam.gserviceaccount.com \
  --role=roles/container.admin
-
Generate a key.json file with your credentials, so your GitHub workflow can authenticate with Google Cloud. After issuing the following command you can find the generated key in your current folder.
gcloud iam service-accounts keys create key.json \
    --iam-account $SERVICE_ACCOUNT_NAME@$PROJECT_ID.iam.gserviceaccount.com
The following tutorial explains this in more detail: link
Create a Service Account with GCP Management Console
-
Open the Google Cloud Management Console in your browser
-
Select your project with the dropdown on the top navigation bar

-
Go to IAM & Admin > Service Accounts and click
ADDto create a new service account -
Enter a name and a description (optional) for your new service account and click
CREATE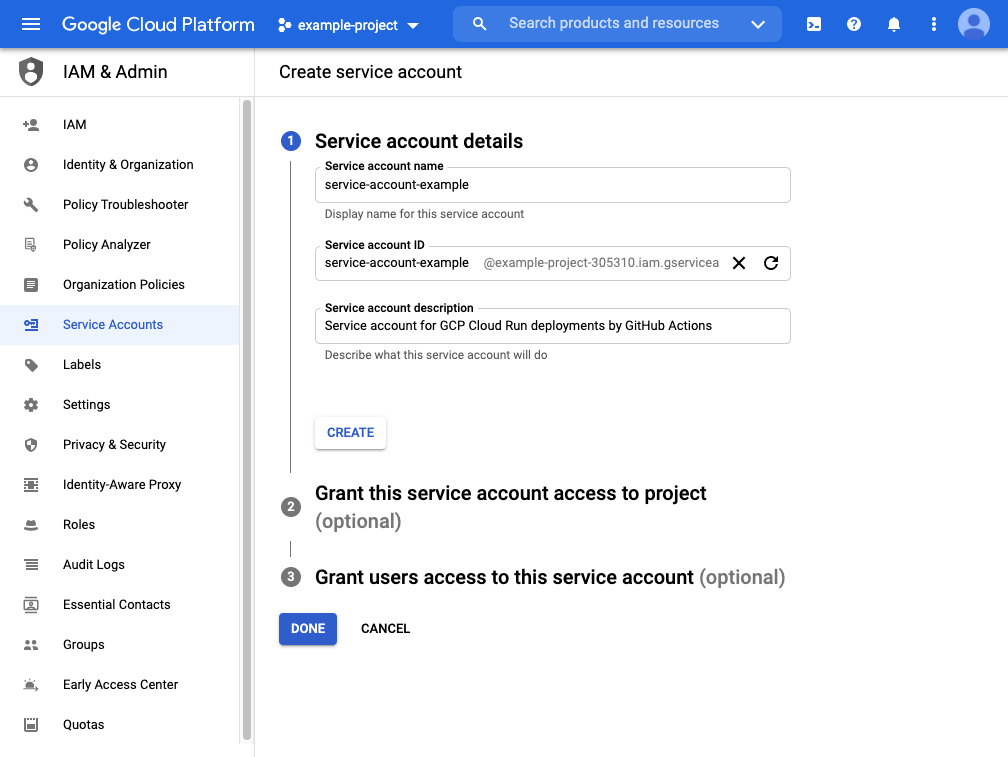
-
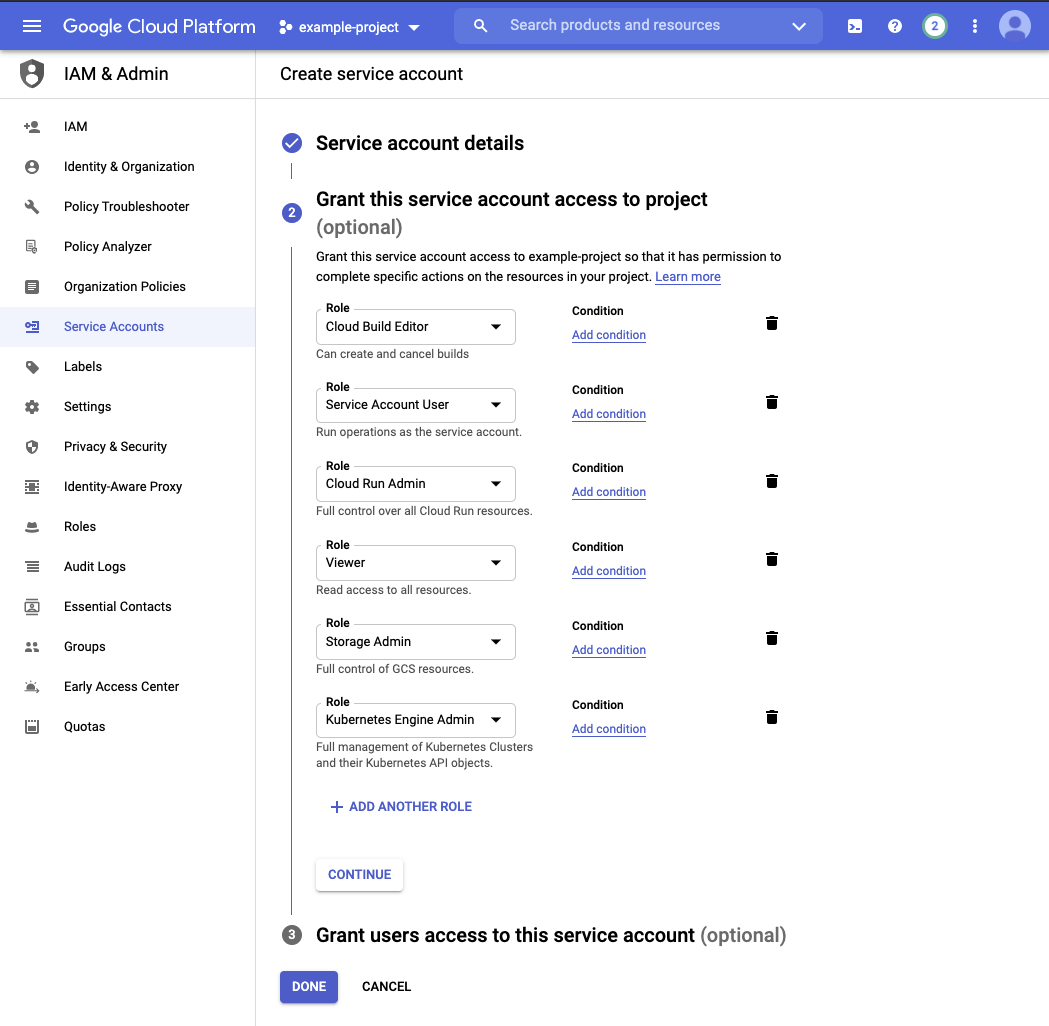
Add the following roles to your service account and click
DONE. The third step is not necessary and can be skipped.Cloud Build Editor (roles/cloudbuild.builds.editor)- Required for Cloud BuildService Account User (roles/iam.serviceAccountUser)- General Service Account permissionsCloud Run Admin (roles/run.admin)- Required for Cloud RunViewer (roles/viewer)- Required as a workaround for successful deployments in GitHub Actions (see explanation below)Storage Admin (roles/storage.admin)- Required for Container RegistryKubernetes Engine Admin (roles/container.admin)- Required for GKE deployments
Explanation of the Viewer Role:
Link: https://towardsdatascience.com/deploy-to-google-cloud-run-using-github-actions-590ecf957af0 Once the service account is created you will need to select the following roles. I tried a number of different ways to remove the very permissive project viewer role, but at the time of this writing this your service account will need this role or the deployment will appear to fail in Github even if it is successfully deployed to Cloud Run.
-
Now click on your newly created service account and click
ADD KEYon the service account details page. This will create new credentials which will be later used to authenticate your service account. SelectJSONand clickCREATEto generate and download your service account credentials.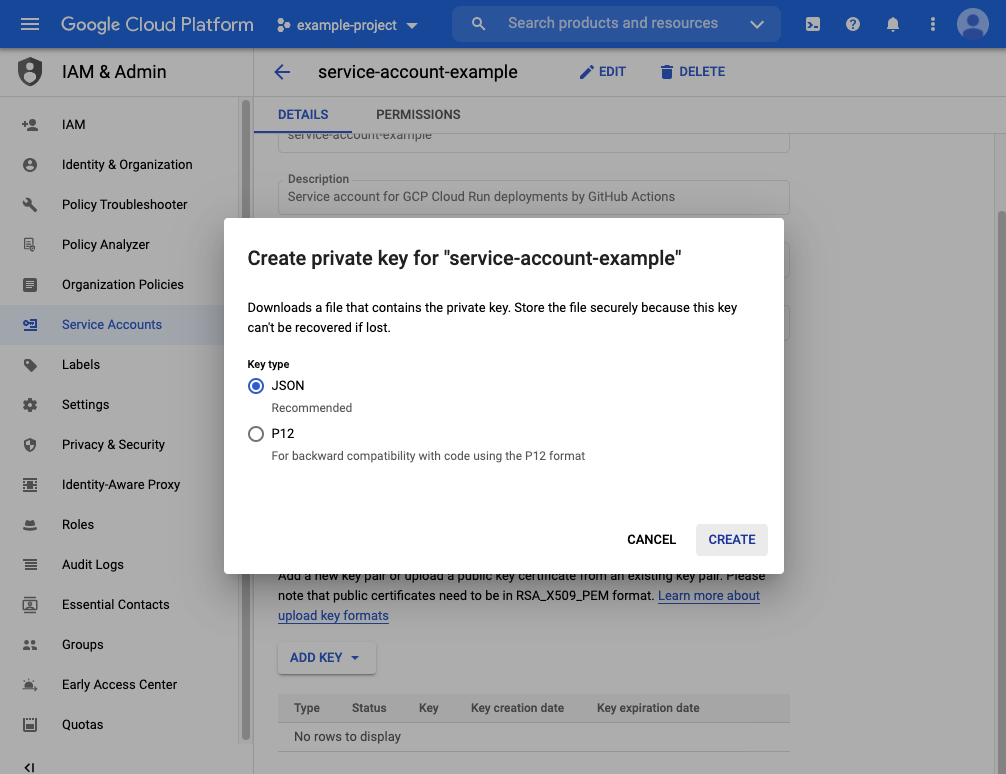
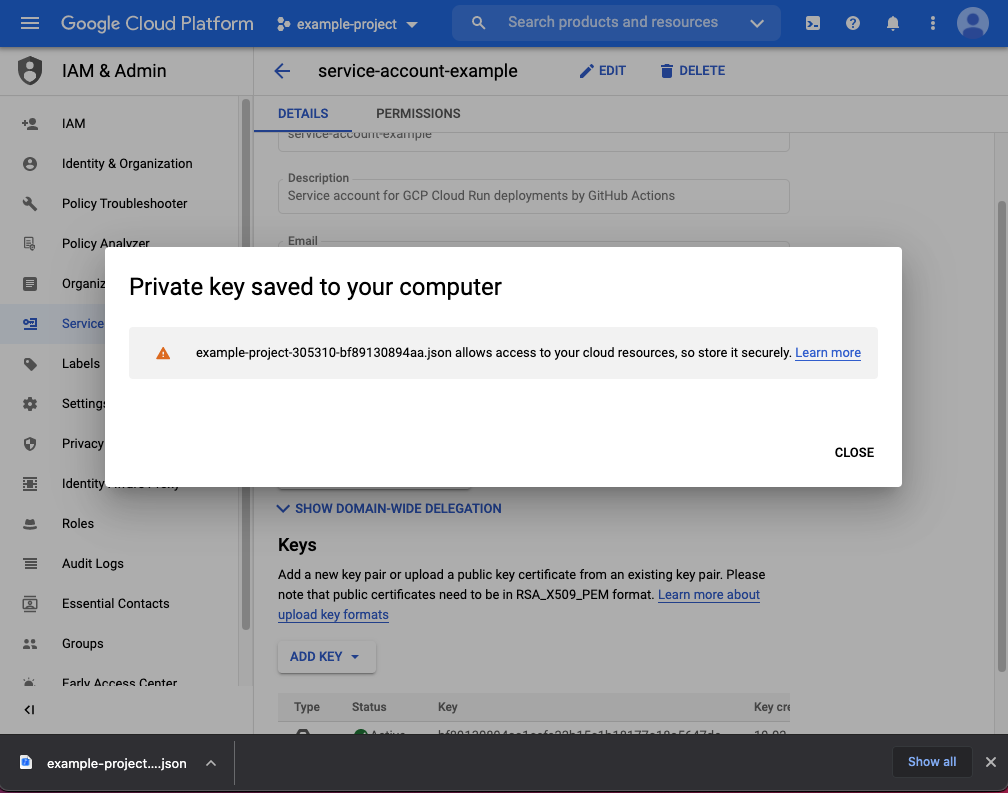
-
Your service account credentials have been generated and downloaded on your machine. Make sure to keep them safe!


-
Export these environment variables so that you can copy and paste the following commands:
export PROJECT_ID=<YOUR PROJECT ID>
export SERVICE_ACCOUNT_NAME=<ENTER A NAME FOR YOUR SERVICE ACCOUNT>
-
Log in with your Google account:
gcloud auth login
-
Select the project configured via
$PROJECT_ID:gcloud config set project $PROJECT_ID
-
Enable the necessary services (if not already enabled):
gcloud services enable container.googleapis.com -
Create GKE Cluster
gcloud beta container --project "$PROJECT_ID" clusters create "petclinic-cluster" \
--zone "europe-west3-c" \
--no-enable-basic-auth \
--cluster-version "1.18.12-gke.1210" \
--release-channel "regular" \
--machine-type "n2-standard-4" \
--image-type "COS" \
--disk-type "pd-standard" \
--disk-size "100" \
--metadata disable-legacy-endpoints=true \
--scopes "https://www.googleapis.com/auth/devstorage.read_only","https://www.googleapis.com/auth/logging.write","https://www.googleapis.com/auth/monitoring","https://www.googleapis.com/auth/servicecontrol","https://www.googleapis.com/auth/service.management.readonly","https://www.googleapis.com/auth/trace.append" \
--num-nodes "1" \
--enable-stackdriver-kubernetes \
--enable-ip-alias \
--network "projects/$PROJECT_ID/global/networks/default" \
--subnetwork "projects/$PROJECT_ID/regions/europe-west3/subnetworks/default" \
--default-max-pods-per-node "110" \
--no-enable-master-authorized-networks \
--addons HorizontalPodAutoscaling,HttpLoadBalancing,GcePersistentDiskCsiDriver \
--enable-autoupgrade \
--enable-autorepair \
--max-surge-upgrade 1 \
--max-unavailable-upgrade 0 \
--enable-shielded-nodes \
--node-locations "europe-west3-c"
After the cluster was successfuly created you should see the following output:
NAME LOCATION MASTER_VERSION MASTER_IP MACHINE_TYPE NODE_VERSION NUM_NODES STATUS petclinic-cluster europe-west3-c 1.18.12-gke.1210 X.X.X.X n2-standard-4 1.18.12-gke.1210 1 RUNNING -
Connect to your Kubernetes Cluster
gcloud container clusters get-credentials petclinic-cluster --region europe-west3 --project $PROJECT_ID -
Create namespaces for the Petclinic application
Create a Knative namespace for native executables on
devstagekubectl create namespace petclinic-native-knative-dev
Create a Knative namespace for native images on
prodstagekubectl create namespace petclinic-native-knative-prod
Create a Knative namespace for JVM images on
devstagekubectl create namespace petclinic-jvm-knative-dev
Create a Knative namespace for JVM images on
prodstagekubectl create namespace petclinic-jvm-knative-prod
-
Install the service component
kubectl apply --filename https://github.com/knative/serving/releases/download/v0.21.0/serving-crds.yaml
-
Install the core components of Serving
kubectl apply --filename https://github.com/knative/serving/releases/download/v0.21.0/serving-core.yaml
-
Install a properly configured Istio
kubectl apply --filename https://github.com/knative/net-istio/releases/download/v0.21.0/istio.yaml
-
Install the Knative Istio controller
kubectl apply --filename https://github.com/knative/net-istio/releases/download/v0.21.0/net-istio.yaml
-
Configure DNS with MagicDNS (xip.io)
kubectl apply --filename https://github.com/knative/serving/releases/download/v0.21.0/serving-default-domain.yaml
You might have to wait a few minutes and retry it later if you receive a connection time out error.
-
Monitor the Knative components until all of the components show a STATUS of
Runningor `Completed:kubectl get pods --namespace knative-serving
Show details about all Knative Services:
kubectl get ksvc --all-namespaces
Show details about
quarkus-petclinic-rest applicationkubectl get ksvc quarkus-petclinic-rest --namespace <CHOOSE NAMESPACE FROM LIST BELOW>
Available Namespaces:
petclinic-native-knative-dev- Namespace for Petclinicdevelopmentcontainers running as a native executablepetclinic-native-knative-prod- Namespace for Petclinicproductioncontainers running as a native executablepetclinic-native-knative-dev- Namespace for Petclinicdevelopmentcontainers running with a Java Virtual Machine (JVM)petclinic-native-knative-prod- Namespace for Petclinicproductioncontainers running with a Java Virtual Machine (JVM)
In GitHub, you need to set up the following secrets via your repositories settings tab:
GCP_PROJECT_ID- The GCP project id which was defined in$PROJECT_IDduring the service account creation stepGCP_SERVICE_ACCOUNT_EMAIL- The email from the previously created service accountGCP_SERVICE_ACCOUNT_CREDENTIALS- The content from thekey.jsonfile that was previously createdGCP_DB_HOST- The hostname or public IP address of the database serverGCP_DB_PORT- The port of the database serverGCP_DB_DATABASE- The database of your db server you are using for the applicationGCP_DB_USERNAME- The db username for your applicationGCP_DB_PASSWORD- The db user password for your application
In the end your secrets should look like this:

| Application | URL |
|---|---|
| Spring Petclinic (JVM) | https://spring-petclinic-rest-slim-jvm-dev-s2xflp6dzq-ey.a.run.app/petclinic/api |
| Application | URL |
|---|---|
| Spring Petclinic (JVM) | https://spring-petclinic-rest-slim-jvm-prod-s2xflp6dzq-ey.a.run.app/petclinic/api |