![]()
Automação para criação de projeto Magento na Heroku
Evangelizar a plataforma Magento
Para o aplicativo o Heroku usa o arquvo app.json
Para a implantação o Heroku usa o arquvo composer.json
Como a Heroku trabalha com o Composer, todas as dependências a ser usada no projeto está registrada no arquivo composer.json
Olá
Tenha sua loja virtual usando a plataforma Magento de forma fácil
Obtenha seu banco de dados MySQL com 100MB grátis para usar como quiser
A implantação na Heroku pode ser feito de qualquer uma das 2 formas a seguir
Clique no botão abaixo para implantar o aplicativo na sua conta na Heroku usando o plano gratuito

Efetue o preenchimento dos campos relativo ao banco de dados, para o campo "MAGE_URL" altere em "APP_NAME" pelo nome do aplicativo
Em seguida clique no botão "Deploy"
A seguir temos um modelo que ao acessar já preenche os campos previamente, apenas cerfifique se de ter feito as devidas alterações
https://heroku.com/deploy?env[MAGE_URL]=https://APP_NAME.herokuapp.com/magento/&env[MAGE_DB_HOST]=remotemysql.com&env[MAGE_DB_NAME]=???&env[MAGE_DB_USER]=???&env[MAGE_DB_PASS]=???&template=https://github.com/mozgbrasil/heroku-magento
Acesse a URL informe o nome da aplicação
Em seguida clique no botão "Deploy"
.
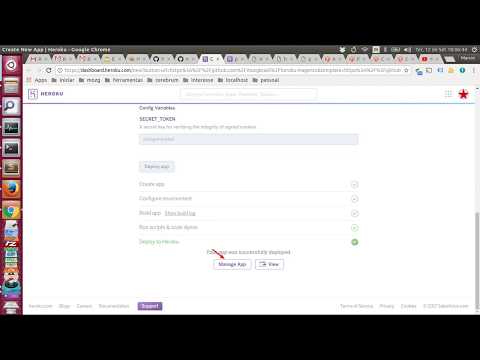
Ao finalizar a implantação do aplicativo será exibido a mensagem "Your app was successfully deployed."
Clique no botão "View"
Será carregado o aplicativo exibindo o diretório raiz, acesse a pasta magento para utilizar a plataforma
O aplicativo ainda não suporta a importação do sample data, a melhor solução é importar o banco antes de implantar o aplicativo na Heroku

No uso do HTTPS não carrega o projeto ou é carregado com lentidão, não usar
https://medium.com/elefante-yogue/usando-php-com-heroku-e7d4f2fee56a
git clone https://github.com/mozgbrasil/heroku-magento
cp env-example .env
nano .env
pwd && ls && rm -fr magento && rm -fr vendor && rm composer.lock && pwd && ls && composer install -vvv
  # 1 local: pre-update-cmd, post-update-cmd: command is executed without a lock file present.
  # 2 local, heroku 2: post-install-cmd: command has been executed with a lock file present.

composer show -s -vvv
composer install -vvv
(du -hsx ./* | sort -rh | head -10)
(du -hsx vendor/* | sort -rh | head -10)
Atualmente um projeto Magento ideal é gerenciado completamente pelo Composer, a fim de obter as seguintes melhorias
- [✓] Magento sempre atualizado;
- [✓] Módulos sempre atualizados;
- [✓] Template sempre atualizado;
Precisa de um projeto para ação de Comércio eletrônico, utilize a melhor plataforma, utilize o Magento, entre em contato conosco
Conheça a nossa trajetória de sucesso construída com muito empenho, compromisso, ética e profissionalismo.
Quer aprender sobre Magento, acesse a Comunidade Magento
Precisa de módulos para Magento, instale os módulos da MOZG em seu projeto Magento
Clique aqui para acesso ao backend
Utilize os seguintes dados para acesso
admin / 123456a
Clique aqui para acesso ao frontend
No uso do Composer todo os recursos é relacionado no manifesto do projeto
Clique aqui para acesso manifesto do projeto
Pelo seguinte repositório
https://www.magentocommerce.com/magento-connect/themes.html
Usando o Magento Connect podemos instalar módulos ou templates no Magento
Mas não é recomendado o uso do Magento Connect quando se trabalha com o Composer, pois pode ser feito download do arquivo composer.json de módulos de terceiros, corrompendo o arquivo composer.json do projeto
Portanto no uso do Composer com o Magento
Podemos usar o seguinte repositório
http://packages.firegento.com/
Onde vemos diversos temas, pesquise por "theme", vemos que essas bibliotecas se trata das mesmas registrada no Magento Connect mas por esse repositório podemos instalar via Composer
Ou
Podemos usar o seguinte repositório
Que se trata do repositório central de bibliotecas disponibilizada via Composer
Esse aplicativo foi desenvolvido pela MOZG e se encontra disponível no seguinte repositório no github https://github.com/mozgbrasil/heroku-magento, qualquer contribuição é bem vinda.
Se você gostou deste projeto, considere dar um 🌟 ou doar.


Verifique também minha Conta GitHub, onde eu tenho outros artigos e aplicativos que você pode achar interessantes.
Se você quiser que eu o ajude, estou disponível para contratar.
Entre em contato com suporte@mozg.com.br
Você pode me seguir nas mídias sociais 🐙😇, nos seguintes locais:
Eu não só vivo no GitHub, eu tento fazer muitas coisas para não me aborrecer 🙃. Para saber mais sobre mim, você pode visitar os seguintes links:

Heroku is a free hosting service for hosting small projects. Easy setup and deploy from the command line via git.
- Easy setup
- Free
- App has to sleep a couple of hours every day.
- "Powers down" after 30 mins of inactivity. Starts back up when you visit the site but it takes a few extra seconds. Can maybe be solved with Kaffeine
2 . Create an account on
https://heroku.com
3 . Install the Heroku CLI on your computer:
https://devcenter.heroku.com/articles/heroku-cli
4 . Connect the Heroku CLI to your account by writing the following command in your terminal and follow the instructions on the command line:
heroku login5 . Then create a remote heroku project, kinda like creating a git repository on GitHub. This will create a project on Heroku with a random name. If you want to name your app you have to supply your own name like heroku create project-name:
heroku create project-name6 . Push your app to Heroku (you will see a wall of code)
git push heroku master7 . Visit your newly create app by opening it via heroku:
heroku open8 . For debugging if something went wrong:
heroku logs --tail2 . Install now cli-tool globally
npm install -g now3 . Run the now command in this folder/repo where your project is. If you run it for the first time, you will be prompted to login, after login, run the command again:
now --public --docker
--public is to skip the prompt telling you that you will open source your project if you deploy it to now
4 . The URL will be copied automatically and you can just paste it into your browser.
- Optional: Rename the deployment:
now alias https://your-deployed-name.now.sh new-namefirst argument is the deployed site, second argument is the new name to give it

You can also use Microsoft Azure to deploy a smaller app for free to the Azure platform. The service is not as easy as Heroku and you might go insane because the documentation is really really bad at some times and it's hard to troubleshoot.
The pros are that on Azure the app will not be forced to sleep. It will sleep automatically on inactivity but you can just visit it and it will start up.
1 . Create a Microsoft Account that you can use on Azure:
https://azure.microsoft.com/
2 . Install the azure-cli:
https://docs.microsoft.com/en-us/cli/azure/install-azure-cli
This might cause some trouble, you will see. Remember to restart your terminal or maybe your computer if the commands after this does not work
3 . Login to the service via the command line and follow the instructions:
az loginYou will be prompted to visit a website and paste a confirmation code
2 . Create a resource group for your projects, replace the name to whatever you want just be sure to use the same group name in all commands to come. You only have to create the resource group and service plan once, then you can use the same group and plan for all other apps you create if you like.
az group create -n NameOfResourceGroup -l northeurope3 . Create a service plan:
az appservice plan create -n NameOfServicePlan -g NameOfResourceGroup
4 . Create the actual app and supply the service plan and resource group
az webapp create -n NameOfApp -g NameOfResourceGroup --plan NameOfServicePlan5 . Create deployment details. A git-repo is not created automatically so we have to create it with a command:
az webapp deployment source config-local-git -n NameOfApp -g NameOfResourceGroup6 . From the command in step 5 you should get a url in return. Copy this url and add it as a remote to your local git project, for example:
git remote add azure https://jesperorb@deploy-testing.scm.azurewebsites.net/deploy-testing.git7 . Now you should be able to push your app:
git push azure masterYou should be prompted to supply a password, this should be the pass to your account. If not, you can choose a different password at your Dashboard for Azure: https://portal.azure.com/
Choose App Services in the sidebar to the left and the choose your app in the list that appears then go to Deployment Credentials to change your password for deployment:
https://docs.microsoft.com/en-us/azure/app-service/app-service-deployment-credentials
🐈