Note: This document is a work in progress. Please feel free to contribute to it by submitting a pull request.
This page shows the steps to onboard a model or upload a dataset to the Content Moderation Model Onboarding Pipeline (MOP).
A MODEL in MOP normally contains all necessary files to run an inference, usually including environment setup configuration, model checkpoints, scripts to load the checkpoint files, and other dependencies.
A DATASET in MOP is a binary classification dataset, including a data file and a label file.
- An Azure Storage Account.
You should prepare your model checkpoint file(s), dependencies and loading script in a Blob Container as below:
<Your Model Name>
│
└───model               # Required
│   │   model_ckpt.onnx
│   │   model_ckpt.pkl
│   │   ...
│
│───privatepkgs         # Optional
│   │   privatepkg1.whl
│   │   privatepkg2.whl
│   │   ...
│
└───src
    │   inference.py        # Required
    │   requirements.txt    # Required
    │   settings.yml        # Required
There are three folders, each of which contains different types of files that will be used for model evaluation.
- model: This folder contains the model checkpoint files. The model checkpoint files can be in any format. The model checkpoint files will be used to run the model evaluation.
- privatepkgs: This folder contains the private packages that are required to run the model evaluation. The private
packages should be in the format of .whl. Notice that private package SHOULD NOT be inluded in
requirements.txt. - src: This folder contains the scripts that are required to run the model evaluation. The scripts will be executed
to run the model evaluation.
- inference.py (required): This script is used to load the model checkpoint files and run the model evaluation.
Install this package source code can be
found here and inherit
the
BaseModelWrapperclass and implement theinit,inferenceandinference_batchmethods. - requirements.txt (required): This file contains the required packages that are used to run the model
evaluation.
The required packages will be installed before running the model evaluation. If required packages are private
packages, they should be uploaded in the
privatepkgsfolder. - settings.yml (optional): This file contains the environment setup configuration that is used to run the model
evaluation.
The environment setup configuration should be in the format of .yml.
It supports following settings:
dynamicBatch.enable: Whether to enable dynamic batch. Default is false.dynamicBatch.maxBatchSize: The max batch size. Default is 12.dynamicBatch.idleBatchSize: The idle batch size. Default is 5. It should be less than or equal todynamicBatch.maxBatchSize.dynamicBatch.maxBatchInterval: The max batch interval (in second). Default is 0.002.
- inference.py (required): This script is used to load the model checkpoint files and run the model evaluation.
Install this package source code can be
found here and inherit
the
For detailed information, please check the model template and the sample model.
In MOP, the running environment is ubuntu20.04. CUDA Toolkit is cuda11.6-cudnn8
MOP uses Service Principal for authentication. Users should grant the Storage Blob Data Reader role to our system ( service principal: cm-model-onboarding-prod-sp). See Azure RBAC documentation for details.
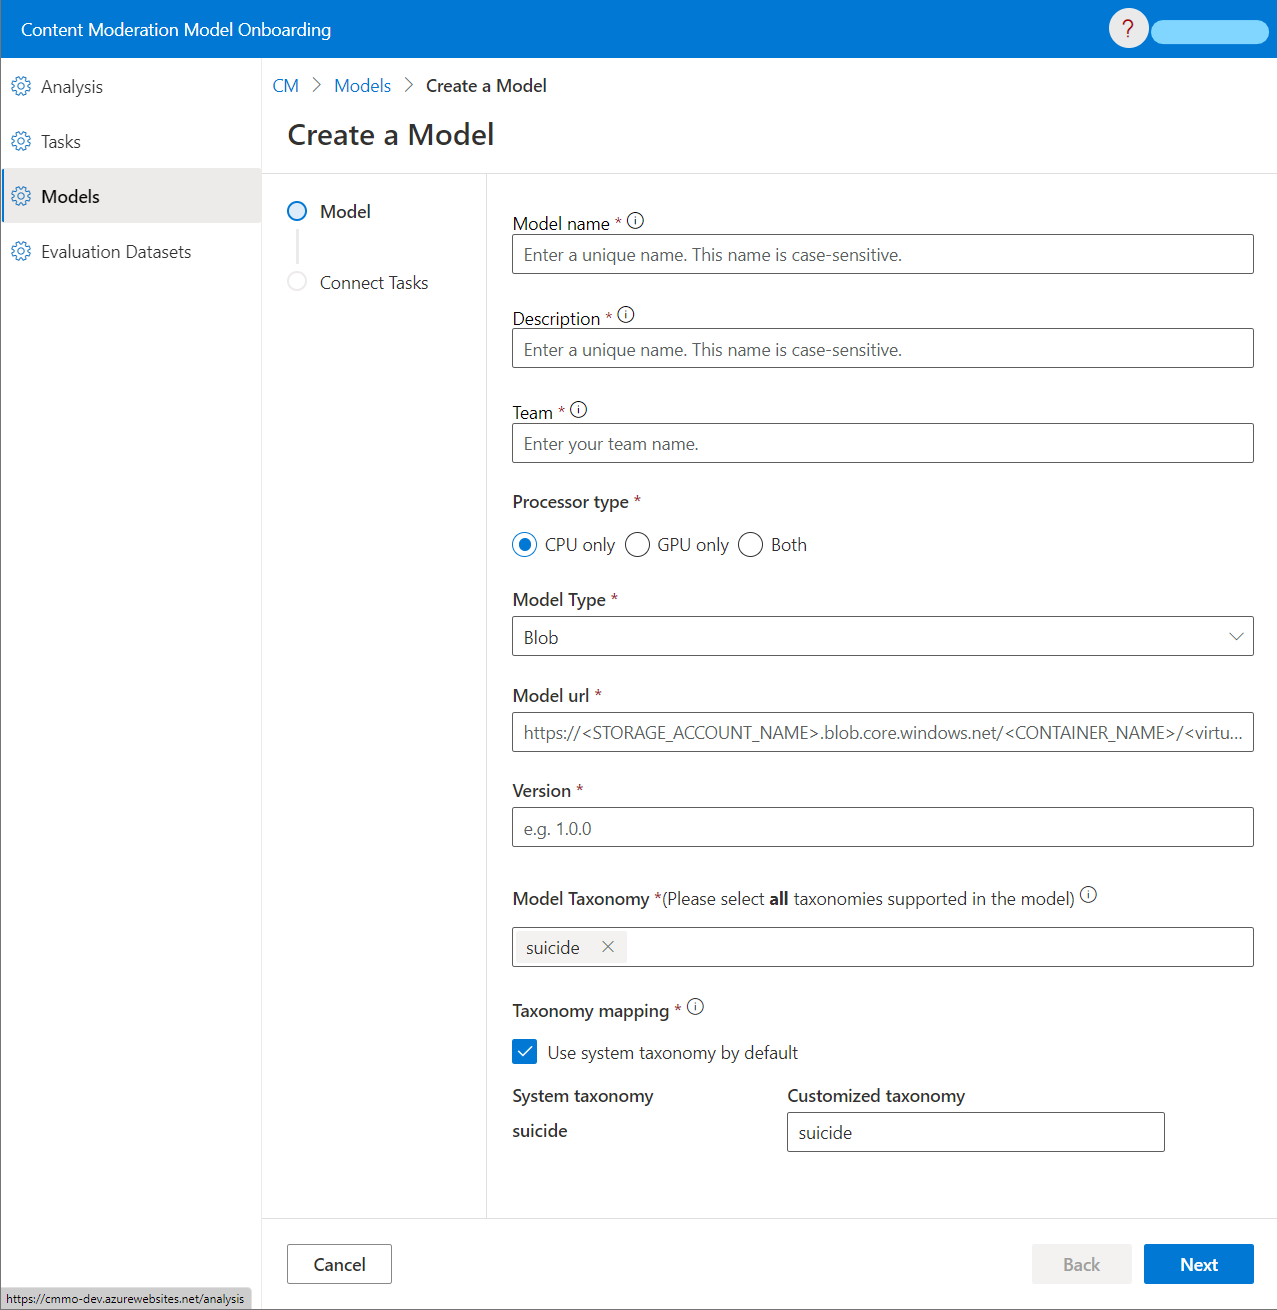
Go to the MOP portal, click “Models”, fill in information of your model.
- Model Name: The name of your model. It should be unique in MOP. It cannot be changed after the model is created.
- Model Description: The description of your model. It cannot be changed after the model is created.
- Team: The team that owns the model. It cannot be changed after the model is created.
- Processor Type: The processor type of your model. It should be one of the following values:
CPU only: The model is running on CPU.GPU only: The model is running on GPU.Both: The model is running on both CPU and GPU.
- Model Type: The model type of your model. It should be one of the following values:
Blob: The model is stored in a Azure Blob Container.
- Model url: the url of virtual directory in your container that contains those three “folders” mentioned in Prepare Your Model section. For example: https://myTestStorageAccount.blob.core.windows.net/myTestContainer/myTestModel/
- Version: The version of your model. It should be unique for this model in MOP.
- Model Taxonomy: All supported taxonomies of the model. This setting cannot be changed after the model is created.
- Taxonomy Mapping: The mapping between the system-defined taxonomy and the model output. This setting cannot be
changed after the model is created.

- Verify the requirments.txt locally using Conda
- Make sure Conda is downloaded.
- Put tool on your local directory where
srcandprivatepkgsfolder is put. - On windows, in the directory where
verify_conda.batlocated, run./verify_conda.bat environment=<envrionment-name> python=<version>, for example,./verify_conda.bat mop-env 3.9 - If you encounter error, you need to fix packages in
requirements.txtaccording. For example, there might be some package confliction.
- Run
inference.pylocally on the environment you created.
Any time after model creation, you can connect your model to one or more tasks. Only models that are connected to a task can be used to evaluated by MOP. If you cannot find a proper task, please contact the MOP team via Teams Channel and we will help you with it.
You can update your model by creating a new version of the model. Go to the MOP portal, click “Models”, click the model you want to update, click “Upgrade Version”, fill in information of your model.
- Processor Type: The processor type of your model.
- Model Type: The model type of your model.
- Model url: the url of virtual directory in your container that contains those three “folders” mentioned in Prepare Your Model section.
- Version: The version of your model. It should be unique for this model in MOP.
- An Azure Storage Account.
You should prepare your dataset in a Blob Container as below:
<Your Dataset Name>
│
└───data
│   │   dataset.csv     # Required
│
│───label
│   │   label.csv       # Required
For different modalities, we have different format requirements for these files.
- dataset.csv:
- Encoded using UTF-8 with no BOM (Byte Order Mark).
- Only one column with the header "text".
- Each row (except for the header) should be a sample text.
- The number of rows in dataset.csv should be the same as label.csv.
- Using “,” as delimiter.
- label.csv:
- Encoded using UTF-8 with no BOM (Byte Order Mark).
- Only one column with the header "label".
- Each row (except for the header) should be the corresponding label of the sample in dataset.csv.
- The number of rows in dataset.csv should be the same as label.csv.
- Using “,” as delimiter.
- The label should be one of the following values:
0: The sample is negative.1: The sample is positive.
- dataset.csv:
- Four columns with headers "base64_image", "file_name", "image_width_pixels", "image_height_pixels".
- The content of column "base64_image" should be the base64 encoded string of the image.
- The content of column " file_name " should include file name extension.
- The content of column "image_width_pixels" and "image_height_pixels" should be positive integer.
- Each row (except for the header) should be a sample encoded using UTF-8 with no BOM (Byte Order Mark).
- The number of rows in dataset.csv should be the same as label.csv.
- Using “,” as delimiter.
- label.csv:
- Encoded using UTF-8 with no BOM (Byte Order Mark).
- Only one column with the header "label".
- Each row (except for the header) should be the corresponding label of the sample in dataset.csv.
- The number of rows in dataset.csv should be the same as label.csv.
- Using “,” as delimiter.
- The label should be one of the following values:
0: The sample is negative.1: The sample is positive. After preparation, users should save these files in a container under a storage account as organized above.
MOP uses Service Principal for authentication. Users should grant the Storage Blob Data Reader role to our system (service principal: ** cm-model-onboarding-prod-sp**). See Azure RBAC documentation for details.
Go to the MOP portal, click “Evaluation Datasets” -> ”Add a Dataset”, fill in information of your dataset.
- Dataset Name: The name of your dataset. It should be unique in MOP. It cannot be changed after the dataset is created.
- Dataset Description: The description of your dataset. It cannot be changed after the dataset is created.
- Team: The team that owns the dataset. It cannot be changed after the dataset is created.
- Modality: The modality of your dataset. It should be one of the following values:
Text: The dataset is a text dataset.
- Source Type: The source type of your dataset. It should be one of the following values:
Blob: The dataset is stored in a Azure Blob Container.
- Dataset url: the url of virtual directory in your container that contains dataset.csv mentioned in Prepare Your Dataset section. For example: https://myTestStorageAccount.blob.core.windows.net/myTestContainer/myTestdata/
- Label url: the url of virtual directory in your container that contains label.csv mentioned in Prepare Your Dataset section. For example: https://myTestStorageAccount.blob.core.windows.net/myTestContainer/myTestLabel/
Any time after dataset upload, you can connect your dataset to a task. If you cannot find a proper task, please contact the MOP team via Teams Channel , and we will help you with it.
A: Basically all models and datasets in MOP is binary. Therefore, we use some popular binary classification metrics to evaluate the model quality.
-
Precision: tp / (tp + fp)
-
Recall: tp / (tp + fn)
-
F1_score: 2 * (precision * recall) / (precision + recall)
-
AUC: Area Under (ROC) Curve
-
PRAUC: Area Under (Precision-Recall) Curve
-
Best_f1_score: With the change of threshold, the maximum f1_score of the model on a dataset.
-
Best_presision: The precision score when we get the best f1_score.
-
Best_recall: The recall score when we get the best f1_score.
-
Best_threshold: The threshold when we get the best f1_score.
If we get multiple best_f1_score, we will use the precision/recall/threshold of a best_f1_score that has the highest recall score as the best_precision/best_recall/best_threshold.
A: For a version of a model (i.e. a model revision), MOP will evaluate it on all the datasets connected to a task. There might be multiple models (and different versions) that are connected to the same task.
The average rank percentile of a metric for a model version is calculated as below (we use f1_score as an example):
- For all model revisions and all datasets that are connected to the task, calculate the f1_score for each model revision on each dataset.
- Rank the f1_score of each model revision on each dataset from high to low.
- For a model revision, the average rank percentile of f1_score is the average of the rank percentile of f1_score on all datasets.
For example, if there are 3 datasets (D1, D2, D3), and each dataset has 3 model revisions (M1, M2, M3), and the f1_score of each model revision on each dataset is as below:
M1 on D1: 0.90   M1 on D2: 0.92   M1 on D3: 0.91
M2 on D1: 0.91   M2 on D2: 0.73   M2 on D3: 0.93
M3 on D1: 0.90   M3 on D2: 0.89   M3 on D3: 0.88
Now we can calculate the average rank percentile of f1_score for M1:
On dataset D1, M1 has the second highest f1_score (out of 3 model revisions), so the rank percentile D1 is 2/3 = 0.67;
On dataset D2, M1 has the highest f1_score (out of 3 model revisions), so the rank percentile D2 is 1/3 = 0.33;
On dataset D3, M1 has the second highest f1_score (out of 3 model revisions), so the rank percentile D3 is 2/3 = 0.67;
The average rank percentile of f1_score for M1 is (0.67 + 0.33 + 0.67) / 3 = 55%.
A: MOP deploys verified model as a service (on a single machine), and MOP will use http client to send requests to the service. MOP will gradually increase the number of clients, and each client will send a new request to the service as soon as it received the response of the previous request.
User failed means MOP get 4xx error code when doing load test. Usually it refers to 429 Too Many Request.
System Failed means MOP get 5xx error code when doing load test.
We have access control for evaluation results on each dataset for a model. By default, only model owner can see them.
If you are not the owner of the model, you can ask the model owner to publish these results so that others can see them
on MOP. Published evaluation results will be shown on Tasks -> Evaluation by datasets
page, Models -> Your Model -> Evaluation by datasets page and Dataset -> <related dataset> -> Evaluation result
page for all MOP users.
A model owner can go to Models -> Your Model -> Evaluation by datasets, choose the results that you want to publish,
and select Public evaluation result to publish them.
If you are the model owner, and you cannot see the expected evaluation results, please contact us via Teams Channel .