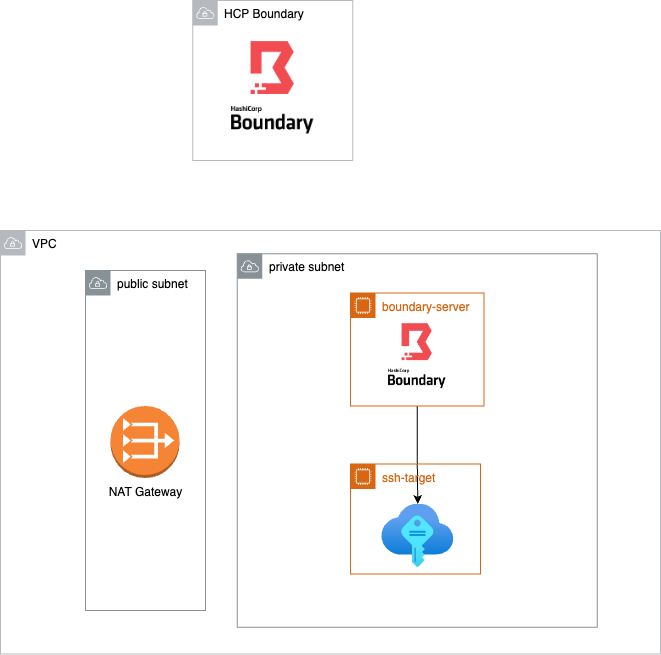
Minimal setup for testing out HCP Boundary multi-hop feature with SSH credentials injection
- Terraform
- AWS account with CLI access
- configure AWS profile locally
- running HCP Boundary cluster
Provisioning AWS resources for the sandbox
- VPC with private and public subnet
- EC2 instance for running
boundary-workerinside the private subnet - EC2 instance acting as a private ssh target
This way, both boundary-worker and SSH target are not reachable from the public internet (no public IP)
Create tfvars file to hold sensitive information
# dev.tfvars
hcp_boundary_auth_method = "<HCP boundary auth method ID>"
hcp_boundary_username    = "<username>"
hcp_boundary_password    = "<password>"
hcp_boundary_cluster_id  = "<cluster>"

aws_profile = "<aws-profile-name>"
aws_region = "us-west-2"
availability_zones = ["us-west-2a", "us-west-2b"]make buildNote: This step and Build and push container image must back-to-back so don't look away!
- run
terraform init
terraform plan -var-file=envs/dev.tfvars
terraform apply -var-file=envs/dev.tfvars
# Follow the promptAt this point, all resources are created in AWS; however, there's no available docker image for the boundary-worker yet.
To build and push the image, first find out what's the repository URL of the created ECR
# fetch ECR repo URL
terraform output
# ecr = "<account>.dkr.ecr.us-west-2.amazonaws.com/boundary-worker"

# login to ECR
aws ecr get-login-password --region <region> --profile <profile-name> | docker login --username AWS --password-stdin <ecr-repo-url>

# build and push
make docker

docker tag boundary-worker:latest <ecr-repo-url>:latest
docker push <ecr-repo-url>:latest- Login to AWS console
- Navigate to
Elastic Container Service - Navigate to
Clusters - Navigate to
boundary-worker-cluster - Click on
Servicestab and click intoboundary_worker - Go to
Taskstab - There should be 1 running task
- Optionally login to Boundary cluster under
Workerstab and validate that there is now an active worker
Install Boundary client
- Login to your Boundary cluster in the client
- Select
Terraria Server - SSHand clickConnect - run
ssh localhost -p <output-port>
- Login to the CLI
> export BOUNDARY_ADDR="https://<cluster-id>.boundary.hashicorp.cloud/"
> boundary authenticate password -login-name=<username> - Find the target ID
> boundary targets list  -recursive
# Note down the ID for both
Target information:
  ID:                    <ssh-id>
    Scope ID:            <scope-id>
    Version:             3
    Type:                ssh
    Name:                Terraria Server - SSH
    Description:         Used for SSH-ing into Terraria Server
    Address:             <ip>
    Authorized Actions:
      no-op
      read
      update
      delete
      add-host-sources
      set-host-sources
      remove-host-sources
      add-credential-sources
      set-credential-sources
      remove-credential-sources
      authorize-session

  ID:                    <tcp-id>
    Scope ID:            <scope-id>
    Version:             2
    Type:                tcp
    Name:                Terraria Server - Gameplay
    Description:         Used for connecting to Terraria Server with Terraria Client
    Address:             <ip>
    Authorized Actions:
      no-op
      read
      update
      delete
      add-host-sources
      set-host-sources
      remove-host-sources
      add-credential-sources
      set-credential-sources
      remove-credential-sources
authorize-session- SSH to Terraria Server
boundary connect -target-id=<ssh-id>After SSH into the host
# Guide can be found at https://terraria.fandom.com/wiki/Server

sudo apt install unzip
wget https://terraria.org/api/download/pc-dedicated-server/terraria-server-1423.zip
unzip terraria-server-1423.zip
cd 1423/Linux
chmod +x TerrariaServer.bin.x86*

# Launch server in the background
tmux
./TerrariaServer.bin.x86_64

# Setup world as you pleased
> Choose World: n
> Choose size: 1
> Choose difficulty: 2
> Choose world evil: 1
> Enter world name: Hello World
> Enter Seed: <blank>

# Start the server
> Choose World: 1
> Max Players: 1
> Server Port: 7777 # <--- MUST BE 7777
> Automatically forward port? (y/n): y # <--- MUST BE 'y'
> Server password (press enter for none): <blank>Select Terraria Server - Gameplay and click Connect
Find the target ID from previous steps
> boundary connect -target-id=<tcp-id>

  Address:             127.0.0.1
  Connection Limit:    -1
  Expiration:          Fri, 28 Jul 2023 23:19:57 PDT
  Port:                61103
  Protocol:            tcp
Session ID: s_FubJPlxppl- Launch Terraria Game
- Go to
Multiplayer - Click
Join with IP- IP: 127.0.0.1
- Port: <port-from-previous-steps>
