Operations Manual for usegalaxy.eu
Read-only Fridays
- NO EXCEPTIONS
- Do not merge things to the playbook repositories that will be auto-applied
- Do not do any manual systems administration
- Consider writing documentation or more test cases instead.
Custom Galaxy Subdomain
First, choose a name. In this tutorial we'll use example which will be example.usegalaxy.eu, with a brand of "Example". Remember to change as appropriate for your name.
Galaxy Configuration
-
Add your site to the temporary playbook and wait until the top of the hour for it to run. The css and HTML pages will be created for you. It shold look something like:
- name: example
  brand: Example
  index: /index-example.html
Name is used in creation of several filenames, such as
welcome-example.htmlandbase-example.csswhich are custom home pages and custom CSS just for your sub-galaxy. -
Create an index page in the website repository. Above we specified that
index: /index-example.html, so you should createindex-example.mdin the root of the website repository.
Subdomain and redirection
-
Add an entry for
example.usegalaxy.euto haproxy.yml /server_names. -
Edit
group_vars/haproxy.yml:- Add an ACL to match your domain
- Add two
use_backendstatements, going to<name>special, one for each of welcome and basecss. - Add a "special" backend that rewrites the URLs to the CSS and index file. E.g. replace metagenomics with another keyword.
-
Run
make haproxyat least untilhxr.dnsandgeerlingguy.haproxyare finished. Nothing else needs to run. -
Check that your new hostname is set (
nslookup example.usegalaxy.eu). Next test accessing that hostname which should load the galaxy homepage by default. It should load galaxy with a correct brand name and welcome page (if the galaxy playbook has run.)
Customizing Tools
- Edit global_host_filter.py, you'll want to edit both functions to define appropriate values for your galaxy subdomain.
Adding a User to Grafana
- They should login using GitHub auth.
- Note that they must be a member of an approved organisation. (Note that this link is to a specific revision where I could be sure the line number was correct, please check against
master)
- Note that they must be a member of an approved organisation. (Note that this link is to a specific revision where I could be sure the line number was correct, please check against
- (As an admin) Open the user list
- Find them and "edit"
- Under "Organizations" type "Main" and select the main organisation that shows up, adding them as the appropriate role.
TaaS Groups
-
Create a role in Galaxy
- Must use dashes
- Must be prefixed with
training-
-
Add users / groups to this role
-
Edit resources.yaml and create a section in the yaml file like the example training group.
-
Ensure that the
tag: training-some-training-identifierin the resources.yaml matches exactly to the role name you created in step 1.
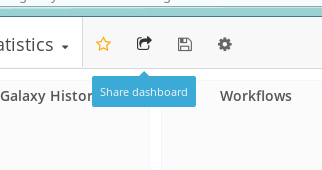
Linking to Grafana Graphs
-
First, share the entire dashboad.
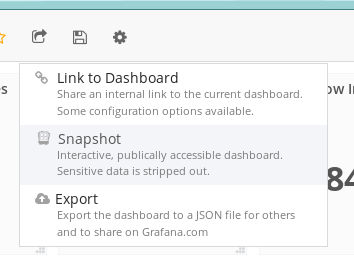
-
You'll want to make a snapshot
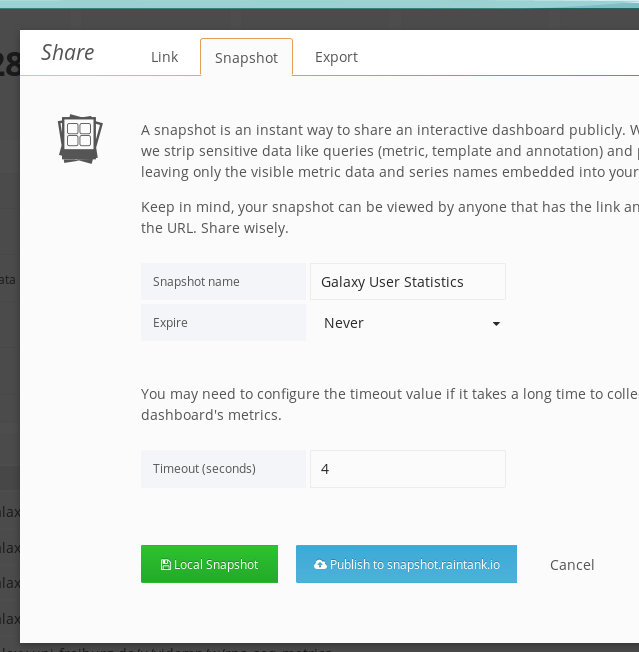
-
And finally use the green button to share it. Beware that if it is a data-heavy dashboard (e.g. featuring many large queries), you'll need to bump the timeout for fetching data.
-
Now you can embed individual portions of these graphs.


Updating a Tool
Please either use ephemeris from the command, or the admin interface. In the future this will be replaced completely by just editing the yaml file, but for now please use one of the previous options.
ephermeris method:
export PATH=/usr/local/tools/_conda/bin/:$PATH
source activate ephemeris
cd /usr/local/galaxy/galaxy-fr-tools
shed-install --name suite_openms --owner galaxyp --section_label 'Proteomics' --api_key $GALAXY_API_KEY --galaxy https://galaxy.uni-freiburg.de
bash fix_conda_env.sh
Adjusting a Tool's Requirements (Increasing Memory / CPU)
- Edit https://github.com/usegalaxy-eu/galaxy-playbook-temporary/blob/master/roles/galaxy_config/templates/tool_destinations.yaml
- PR is merged
- Wait until the end of the hour, at which the playbook will run. You should be able to confirm this via grafana
Restarting Galaxy
If you're doing a full restart of the server, use supervisorctl restart all
followed by supervisorctl stop gx:zergling1 as supervisor restart restarts
too much.
Restarting handlers can be done via supervisorctl restart hd:, in case
changes are made to job scheduling.
However if you just want to swap the zerglings in use (e.g. for a newly
installed set of tools), then you must use ~/galaxy-dist/restart.sh which
includes special logic for waiting until the new zergling is alive and then
stopping the old one, because they don't do the magic turning of the other one
off that is described in the galaxy training.
InfluxDB Events
For administration tasks, sending events to influxdb is a good way to note any potential impacts your actions had on the server. Here's an example bash function:
function influxdb_event(){
	q=`date +%s`000000000;
	desc=$1;
	tags=$2;
	curl -i \
		-XPOST \
		'http://influxdb:8086/write?db=rancher' \
		--data-binary "events description=\"$desc\",tags=\"$tags\" $q";
}

influxdb_event "testing some events with <b>description</b>" "galaxy,testing"
These functions are easy to insert anywhere and everywhere and let us make notes on Grafana about these events. When trying to correlate things like "I replaced the XML parsing in this service and restarted galaxy" annotated events can be helpful in seeing the effects downstream.

Galaxy Upgrading procedures
7 days before downtime
- Write an announcment about the Galaxy downtime explaining what is being upgraded. Be sure to link to the release annoucement.
1 day before downtime
- Check out the recent Galaxy version locally
- Check out out Galaxy playbook
- Sync
galaxy.inianddatatypes_conf.xmlwith their respective sample files - Create a PR with all changes to the playbook
1-2 hours before downtime
- Post a message to the Galaxy Frieburg lobby and the galaxy-fr channel
<1 hour before downtime
Assuming that you plan to start the upgrade procedure at the start of an hour:
- Merge the PR during that hour preceding so that the playbook will run normally at the top of the hour.
Downtime begins
As root:
-
Update
/etc/nginx/conf.d/galaxy.confto only allow the person that is updating Galaxy see the Galaxy site, everyone else sees a maintainence pageA diff like the following works well:
- uwsgi_pass      127.0.0.1:4002;
+ uwsgi_pass      127.0.0.1:9002; # Does not exist
+ if ($remote_addr ~* 132.XXX.YYY.ZZZ) {
+     uwsgi_pass      127.0.0.1:4002;
+ }
You can add multiple copies of the if block for your testers.
-
nginx -t -
service restart nginx
Switch to the galaxy user:
-
cd ~/galaxy-dist/ -
supervisorctl stop gx: hd: -
Commit any and all remaining local changes to the git repository. You should be on a branch like
release_xx.yy_freiburg -
Run
git format-patch release_xx.yywhich should produce a set of patches for all of the local changes since the previous release. -
git fetch origin -
git checkout release_aa.bb, Check out the newest release that you are switching to. -
git checkout -b release_aa.bb_freiburg -
Go through the patches you made in the format-patch step, resolving them one-by-one, in order. Delete them as you finish.
-
(optional?) We temporarily added
exit 0;to the top of~/galaxy-dist/restart.shin order to allow the playbook to run successfully. Otherwise it was finding that both handlers were offline and failing to execute. -
(optional?) Manually ran
galaxy-config/playbook.shto apply some more config changes. -
Run
run.shto make and database migrations and fetch new wheels,ctrl-conce it gets successfully started and says it is listening. Listening may look like:galaxy.tools.search DEBUG 2017-11-08 17:33:50,914 Toolbox index finished (40.040 ms) galaxy.queue_worker INFO 2017-11-08 17:33:50,916 Instance 'main' received 'rebuild_toolbox_search_index' task, executing now. galaxy.tools.search DEBUG 2017-11-08 17:33:50,916 Starting to build toolbox index. galaxy.tools.search DEBUG 2017-11-08 17:33:50,939 Toolbox index finished (22.785 ms)
At this point the upgrade is done and you need to start testing:
supervisorctl start gx: hd:supervisorctl stop gx:zergling1Stop the extra zergling, no need for it to even try to boot.glto follow galaxy logs- test features that have changed and ensure they are functional now
Now everything should be working fine and you're ready to start finishing the downtime.
- (as root) undo the nginx configuration that you've done
- (as root)
nginx -t - (as root)
service restart nginxopening Galaxy to everyone again - Add a blog post about this (an example)
Conda "read only" error on tool run
This happens because the ..checkenv command in conda actually tries to
symlink some stuff into the conda env. This only works on the head node.
Failed to activate conda environment! Error was:
An unexpected error has occurred.
Please consider posting the following information to the
conda GitHub issue tracker at:

    https://github.com/conda/conda/issues


Current conda install:

               platform : linux-64
          conda version : 4.2.13
       conda is private : False
      conda-env version : 4.2.13
    conda-build version : not installed
         python version : 3.5.2.final.0
       requests version : 2.11.1
       root environment : /usr/local/tools/_conda  (read only)
    default environment : /usr/local/tools/_conda
       envs directories : /usr/local/galaxy/.conda/envs
                          /usr/local/tools/_conda/envs
          package cache : /usr/local/galaxy/.conda/envs/.pkgs
                          /usr/local/tools/_conda/pkgs
           channel URLs : https://conda.anaconda.org/iuc/linux-64
                          https://conda.anaconda.org/iuc/noarch
                          https://conda.anaconda.org/bioconda/linux-64
                          https://conda.anaconda.org/bioconda/noarch
                          https://conda.anaconda.org/r/linux-64
                          https://conda.anaconda.org/r/noarch
                          https://repo.continuum.io/pkgs/free/linux-64
                          https://repo.continuum.io/pkgs/free/noarch
                          https://repo.continuum.io/pkgs/pro/linux-64
                          https://repo.continuum.io/pkgs/pro/noarch
                          https://conda.anaconda.org/conda-forge/linux-64
                          https://conda.anaconda.org/conda-forge/noarch
                          https://conda.anaconda.org/bgruening/linux-64
                          https://conda.anaconda.org/bgruening/noarch
            config file : /usr/local/galaxy/.condarc
           offline mode : False


`$ /usr/local/tools/_conda/bin/conda ..checkenv bash /usr/local/tools/_conda/envs/__disco@1.2`


    Traceback (most recent call last):
      File "/usr/local/tools/_conda/lib/python3.5/site-packages/conda/exceptions.py", line 479, in conda_exception_handler
        return_value = func(*args, **kwargs)
      File "/usr/local/tools/_conda/lib/python3.5/site-packages/conda/cli/main.py", line 94, in _main
        activate.main()
      File "/usr/local/tools/_conda/lib/python3.5/site-packages/conda/cli/activate.py", line 148, in main
        conda.install.symlink_conda(prefix, context.root_dir, shell)
      File "/usr/local/tools/_conda/lib/python3.5/site-packages/conda/install.py", line 541, in symlink_conda
        symlink_conda_hlp(prefix, root_dir, where, symlink_fn)
      File "/usr/local/tools/_conda/lib/python3.5/site-packages/conda/install.py", line 558, in symlink_conda_hlp
        symlink_fn(root_file, prefix_file)
    OSError: [Errno 30] Read-only file system: '/usr/local/tools/_conda/bin/conda' -> '/usr/local/tools/_conda/envs/__disco@1.2/bin/conda'
The resolution for this is to ..checkenv on cn029.
#!/bin/bash
for i in `find /usr/local/tools/_conda/envs/ -mindepth 1 -maxdepth 1 -type d`;
do
    if [ ! -f $i/bin/conda ]; then
        echo "$i missing /bin/conda -- fixing;"
        /usr/local/tools/_conda/bin/conda ..checkenv bash $i
    fi
done