- Goals and context
- What you will learn
- Run and test locally
- Demonstration script
- Deploy
- Deep Dive Tutorial for Watson Discovery
- Code Explanation
- FAQ
This project is part of the 'IBM Cognitive Reference Architecture', cyan compute validation, available at https://github.com/ibm-cloud-architecture/refarch-cognitive
This project implements a micro service deployable as a containerized application on IBM Bluemix to facade Watson Discovery service as there is always needs to support data mapping between the raw json response from Watson and to expose special user interface for the returned data. The value of this broker code is to support resiliency, service management, logging, and other integration. Therefore this broker server exposes REST api that user interface born on cloud or IBM BPM coaches can consume. It uses a Node.js backend to host the static content and implement the BFF (Backend for Frontend) pattern.
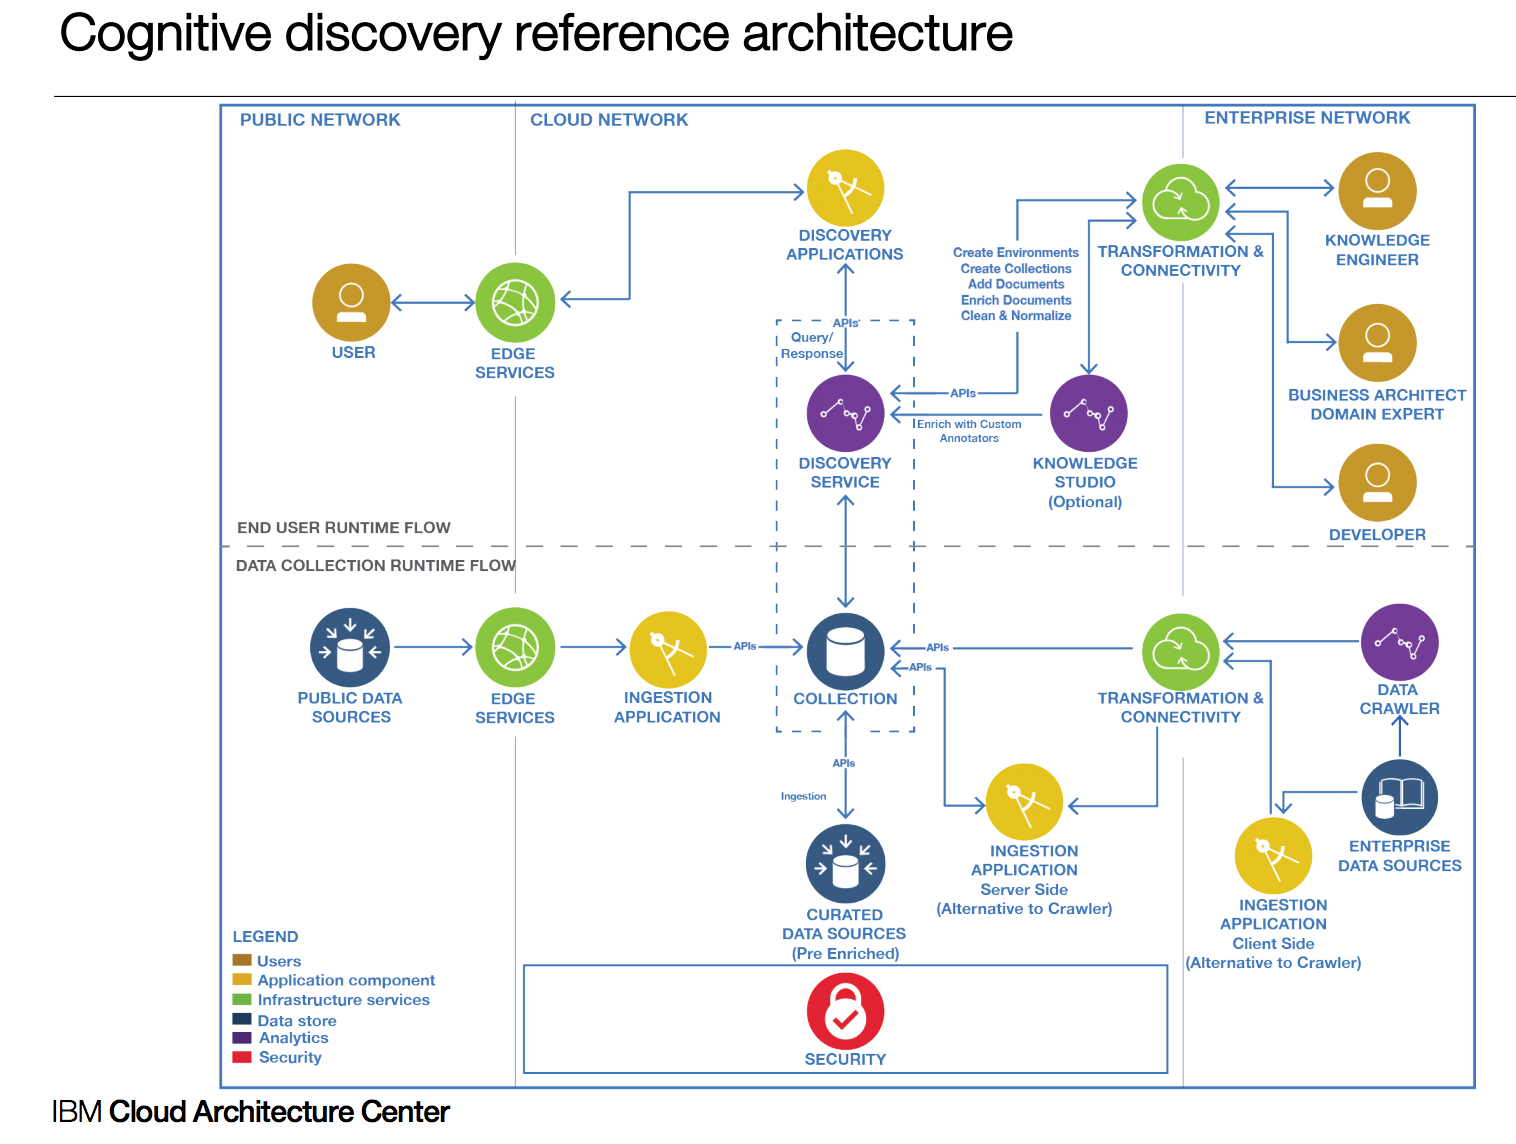
The concept of broker is presented in the IBM Cognitive Reference Architecture for Engagement and Discovery as illustrated in the figure below, as the 'Discovery Application' icon.
This version is under development. Here is an overview of the project's features:
- Angular 2 Single Page Application
- Node.js/express.js based Backend For Frontend application to access APIs
- Distributed as Docker container and deployed to Kubernetes cluster on Bluemix
- Integrate Watson Developer API for Discovery
You can fork it for your own purpose and develop your own solution by reusing the code. If you want to contribute please submit a pull request on this repository. The contribution guidelines are here
- Watson Discovery creation and development activities
- Watson Discovery API and how to integrate within a web application or a micro service
- How to add resiliency to your broker
- How to present the Discovery results in Angular 2 SPA.
You need to have your local development environment properly configured with all the tools installed, for example, Angular CLI, node, Docker and Kubernetes command line tool. If needed we packaged a shell to download all the CLI needed see this section
To understand how to build a Discovery collection the following tutorial will help to go step by step with weather related corpus. The audience of this tutorial is for beginner and developer and support different level of knowledge from simple to deeper dive.
Install git on Mac by installing the Command Line Tools for xCode.
To do this, open a terminal and execute the following command.
xcode-select --install
On Windows: Download and install the package from https://git-for-windows.github.io and install it.
To be able to run this Watson Discovery broker you need your own instance of a bluemix Watson Discovery Service. See the tutorial for how to do so.
Once you have created this service rename the server/routes/env-templ.json to env.json and modify the userid, password, environment_id and collection_id to point to your own service.
Be sure to have setup Cloud Foundry Command line interface and bluemix CLI.
To clone this repository to your local machine, please use 'git' or a graphical tool like 'sourcetree'. Example for git:
Go to a directory where you want the source to be created in, clone the repo:
mkdir ~/stsa/WatsonDiscovery
cd ~/stsa/WatsonDiscovery
git clone https://github.com/ibm-cloud-architecture/refarch-cognitive-discovery-broker.git
cd refarch-cognitive-discovery-broker
Be sure to run the npm installation to get the dependent javascript modules
# To update npm tool globally
sudo npm i -g npm
# install the following package globally too
sudo npm i -g node
sudo npm i -g node-gyp@3.6.2
sudo npm i -g @angular/cli@latest

# Then install the package from package json
npm install
Run ng build to build the client Angular 2 project. The build artifacts will be stored in the dist/ directory. Use the -prod flag for a production build.
If you want to work on the user interface only, you can use the command below (this is for UI work only and will not successfully connect to the Bluemix instance)
ng serve
So when we need to have the real server running perform the next step.
Be sure to have setup the content of the file env.json file under the server/routes folder. To do so rename the env-temp.json file in ./server/routes to env.json and open it with a text editor.
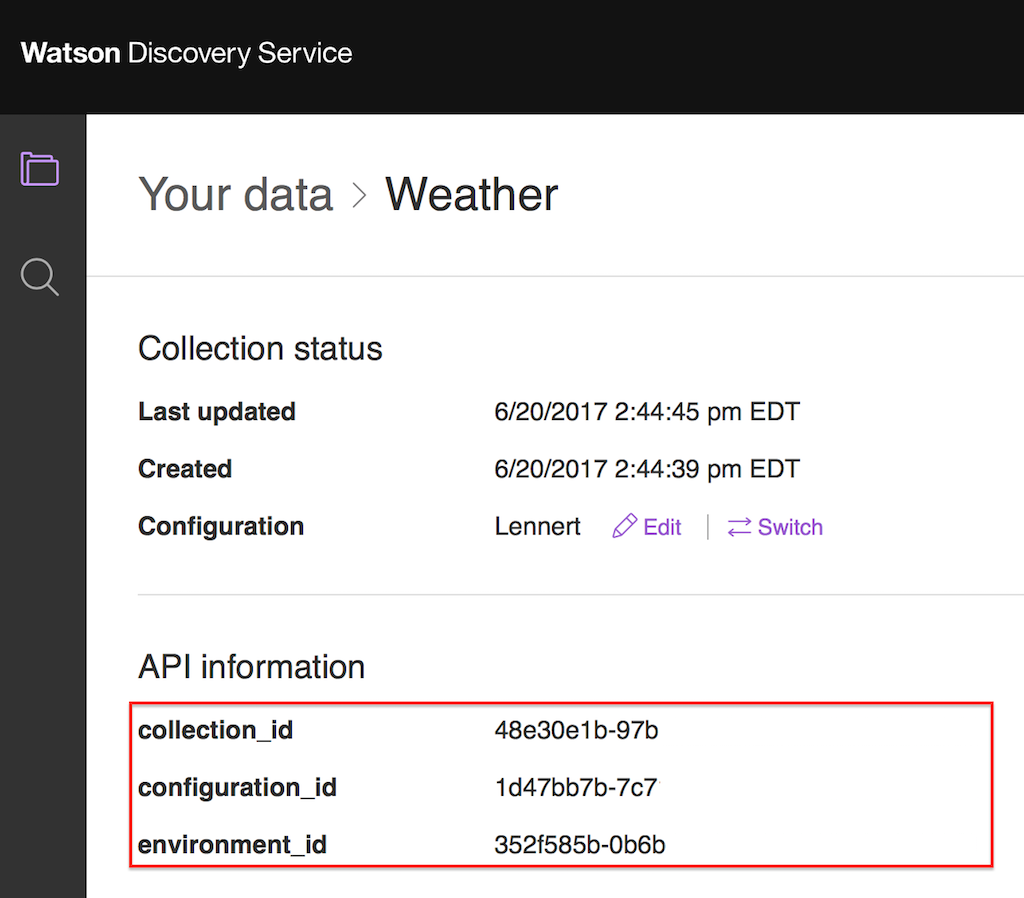
The environment information can be found in Collection screen in Watson Discovery Service:

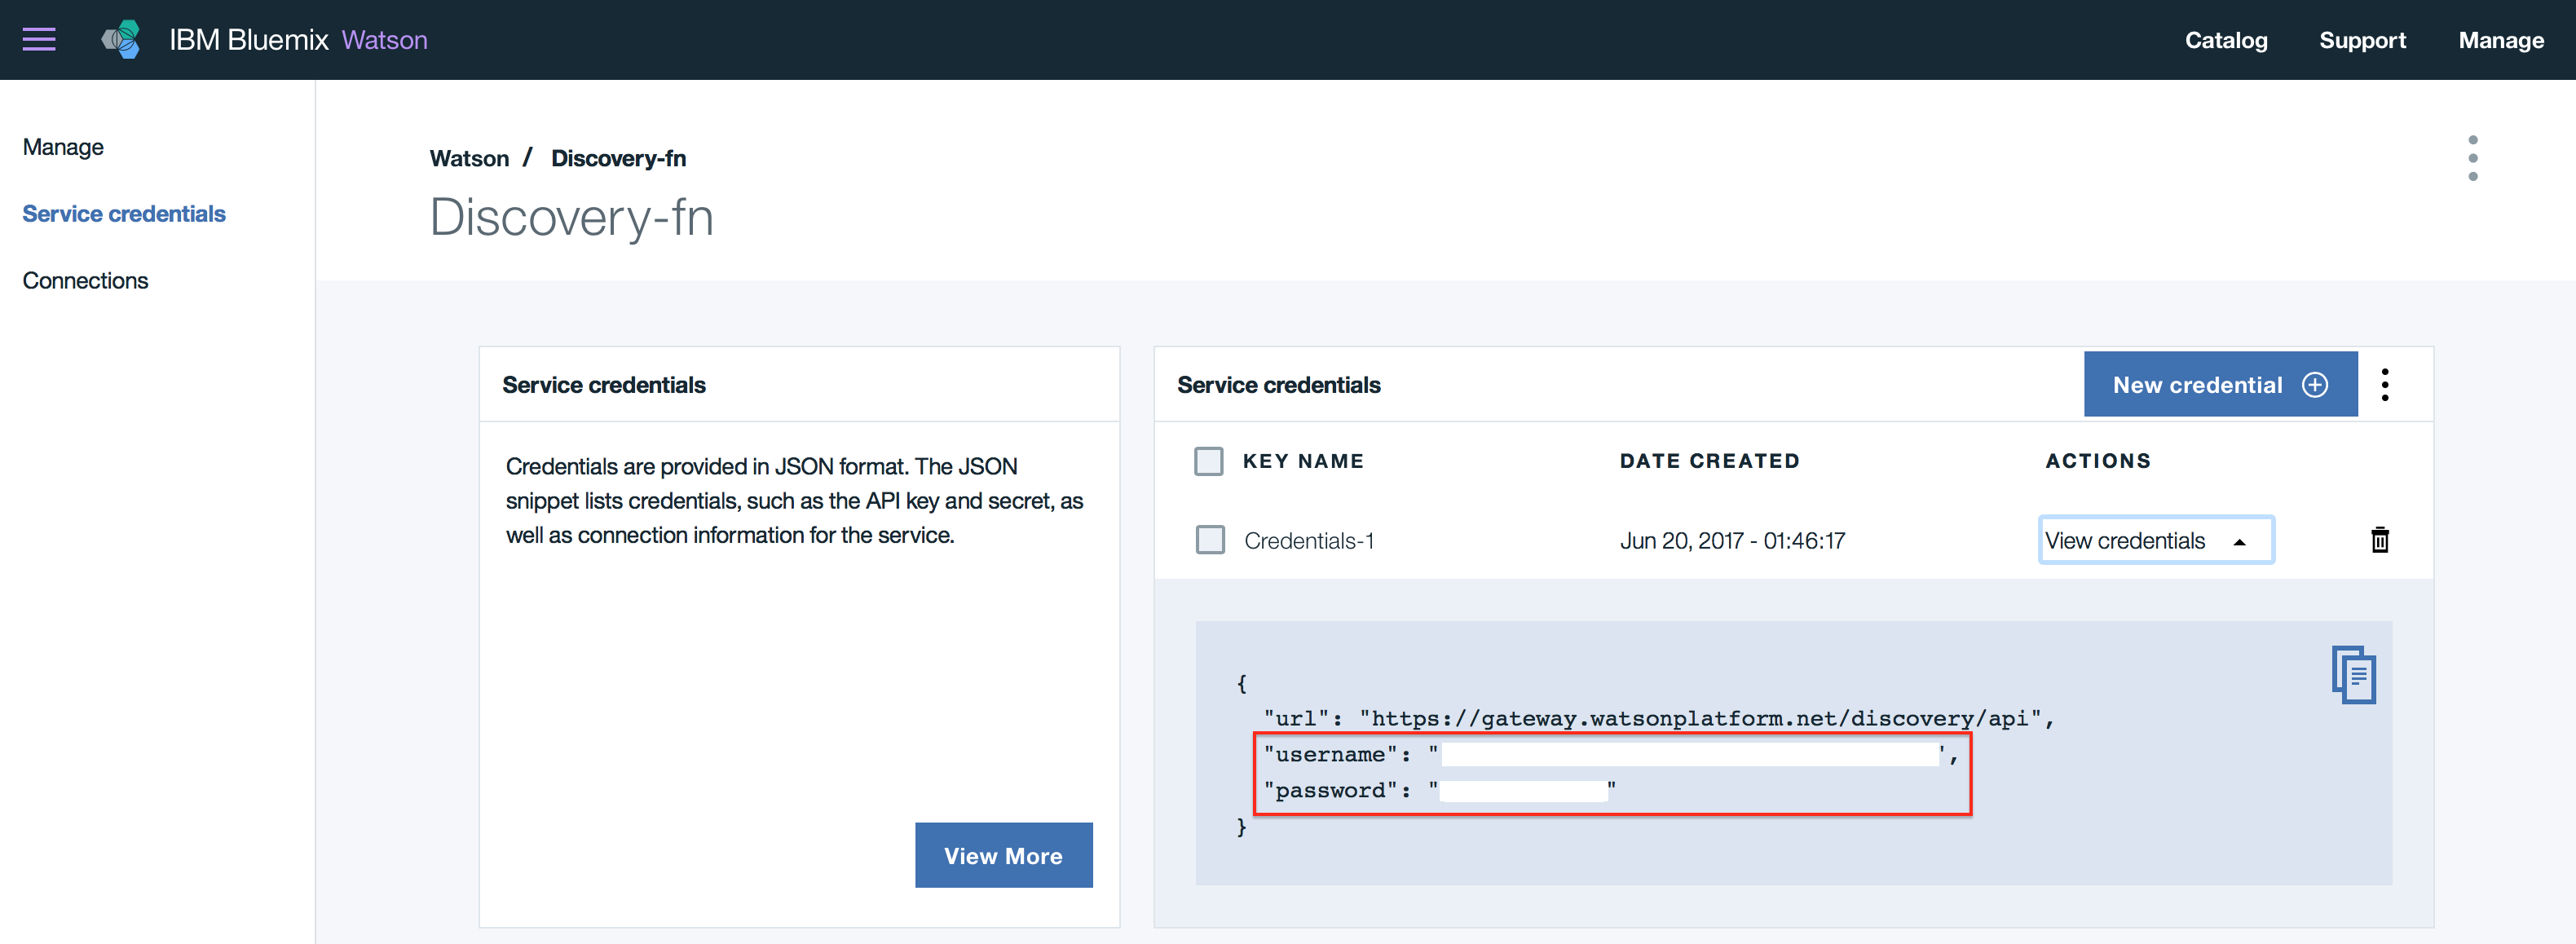
And from the Service Credentials screen in your Bluemix Dashboard

Add the username, password, environment_id, collection_id and configuration_id parameters where needed. DO NOT CHANGE the attributes' name as they are used to load the data in the broker.
{
    "discovery": {
        "username": "",
        "password": "",
        "version_date": "2017-06-25",
        "version":"v1",
        "environment_id": "",
        "collection_id": ""
    },
    "weatherCollection" : {
      "username": "",
      "password": "",
      "version_date": "2017-06-25",
      "version":"v1",
      "environment_id": "",
      "collection_id": "",
      "configuration_id":""
    }
}
To start the local BFF server, use the following command:
npm run dev
If you run into any npm dependency issues, or missing modules, add them using the command. Normally the package.json is accurate, and validated.
npm install <missing module>
And rerun the command to start the server
npm run dev
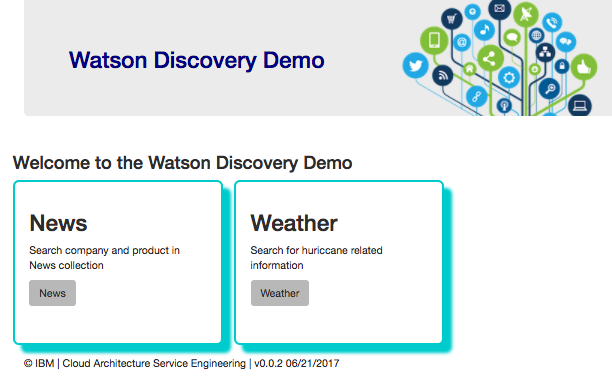
Finally use a web browser to http://localhost:6010 which should display a home page with different choices. (The port number may be different, consult the server trace)

See the demonstration script for information about running the demo here
We have two choices, using Cloud Foundry or using Docker container to be deployed on Kubernetes Cluster. We recommend the second choice.
We will not go over the detail on how to create a cloud foundry application in bluemix as it is covered a lot within other Bluemix blogs, but you need to do the following steps
- Using cloud foundry command line interface login to your region, organization and space.
cf login
- Ensure the file Manifest.yml reflects the name of the host and URL you have configured in Bluemix nodejs cloud application:
applications:
- path: .
  memory: 256M
  instances: 1
  domain: mybluemix.net
  name: refarch-wds-broker
  host: refarch-wds-broker
  disk_quota: 1024M
- perform a push with the name of the application, for example:
cf push refarch-cognitive-discovery-broker
- Validate the deployment on your Bluemix dashboard and using the defined URL.
As of June 2017 the Cyan compute uses Bluemix Kubernetes Service and containerized application, like this Discovery broker microservice, so it can be deployed to public and private cloud platform. You can read detail in this note
To get detail on how the code is working and organized see the node here
They are in a separate document here
