PedalinoMini™
![]()

The first cloud connected wireless IoT MIDI foot controller for guitarists and more.
- Plug-and-play with any MIDI-compatible app on iOS 8 and above as well as OS X Yosemite and above.
- High customizable using iOS or Android app
- Bluetooth, WiFI, USB and legacy MIDI interfaces
- No extra drivers to connect Windows, macOS, iOS (iPad/iPhone) and Android
- Bluetooth LE MIDI (iOS and macOS compatible)
- Network MIDI (aka AppleMIDI or RTP-MIDI)
- ipMIDI
- Open Sound Control (OSC)
- IEEE 802.11 b/g/n Wi-Fi 2.4 GHZ with WPA/WPA2 authentication
- Bluetooth Low Energy 4.0
- DIN MIDI IN and MIDI OUT connectors
- MIDI routing
- MIDI clock master and slave
- MIDI Time Code (MTC) master and slave
- OSC to MIDI and vicecersa
- Any number of pedals of any type in any order
- Auto-sensing footswitches and expression pedals
Features
- Support for digital foot switches (momentary or latch), analog expression pedals and jog wheels (rotary encoders)
- 10 banks of 6 controllers each
- 3 user configuration profiles
- 16 sequences of 10 steps each
- Each port can connect 1 expression pedal or up to 6 foot switches for a maximum of 36 foot switches.
- MIDI output via AppleMIDI (also known as RTP-MIDI) or ipMIDI via Wi-Fi
- Send almost every MIDI messages: Program Change, Control Code, Note On/Off, Channel Pressure, Pitch Bend, Bank Select, Start, Stop, Continue or a sequence of the previous messages
- MIDI channel, MIDI note, MIDI control code, MIDI program change can be configured by each pedal and by each bank
- Switch debouncing and analog noise suppression without decreasing responsiveness
- Up to 6 switches connected via a resitors ladder (TC HELICON Switch-6). Any resistors ladder can be calibrated just pressing footswitches in sequence.
- Invert polarity via software
- Individual automatic calibration of expression pedals. Manual fine tuning is not usually requested.
- Transform a linear expression pedal into log expression pedal and vice versa
- 6 status leds that can be controlled by MIDI remote devices too
- Responsive and mobile-first configuration web interface (http://pedalino.local)
- Smart Config technology to help users connect to a Wi-Fi network through simple app on a smartphone.
- OTA (Over the Air) firmware update or via HTTP (http://pedalino.local/update)
Features version 2.0
Additional features are under development and available on branch dev-2.0.
- Download and upload configuration (JSON)
- Bank numbers increased from 10 to 20
- Bank name (option to include bank number into bank name)
- Pedal name (option to include MIDI value into pedal name)
- New display mode
- Updated Arduino MIDI Library to v5 using AppleMidi, ipMIDI, BLE-MIDI trasport layers
More to come.
iOS and Android App
The app made with Blynk will be released soon. The app will not for free because Blynk is charging you Blynk.Energy cost (the required energy pack cost 13.99 euro). I will not earn any buck from Blynk.
Unfortunately there is no way to try before buying. Until they will not change their business model I am not suggesting any purchase because I cannot guarantee that the app will fit any purpose.
Blynk is the best solution I found to develop an iOS/Android app. With a resonable upfront cost you can receiving my app updates or you can decide to modify my app yourself according to your needs.
Blynk app is connected to PedalinoMini™ through Blynk cloud. A small delay is present. I think to solve it when BLE connection will be fully supported by Blynk.


Enabling Blynk could reduce responsiveness due to a Blynk bug.
Bill of materials
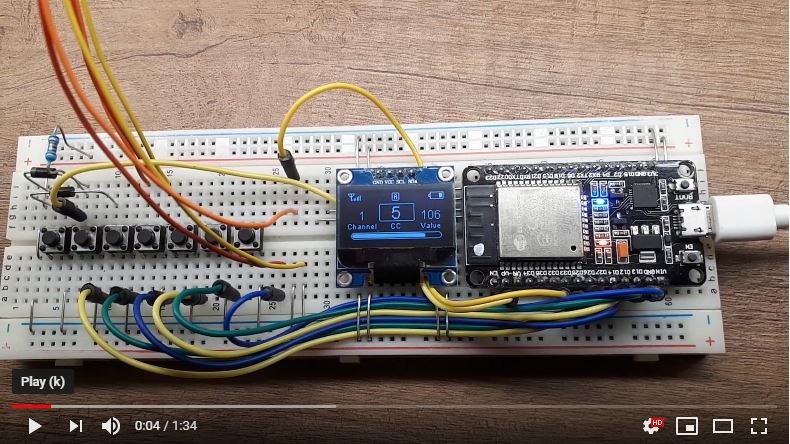
The shortest bill of materials ever: an ESP32 board and a OLED display. That's it.
- Any ESP32 board supported by Arduino core for ESP32 WiFi chip
- Tested on DOIT ESP32 DevKit V1 4M dual-mode Wi-Fi and Bluetooth module
- OLED I2C 0.96"/1.3" display 128x64 pixels SSD1306/SH1106 based
Not enough short?
- An all-in-one TTGO T-Eight ESP32 with a bigger OLED display (1.3"), 4MB PSRAM and lithium battery interface
USB MIDI and DIN MIDI connection requires additional hardware.
Schematic


Do not forget the add the pull-up resistors on PIN_A1 to PIN_A6 otherwise pins will be floating. A floating pin can trigger unexpected MIDI events. As alternative you can disable the not used pedals via web interface.
How to build and upload
PlatformIO 4.1 is the recommended IDE for Pedalino build and upload.
- Install PlatformIO IDE for VSCode
- Run the following commands from View->Command Palette (Ctrl+Shift+P)
- Git: Clone
- You will be asked for the URL of the remote repository (https://github.com/alf45tar/PedalinoMini) and the parent directory under which to put the local repository.
- PlaftormIO: Build
- PlatformIO: Upload
- Run “Upload File System image” task in PlatformIO IDE or use PlatformIO Core (CLI) and 'platformio run --target uploadfs' command
That's all folks.
USB MIDI
The cheapest and compact way to implement an USB MIDI connection is using an Arduino Pro Micro and the BlokasLabs/USBMIDI library. Upload the UsbMidiConverter example into the Arduino Pro Micro.
Serial1 of ESP32 (re-mapped to pin 18 RX and 19 TX) is connected to Serial1 (pin 1 TX0 and pin 2 RX1) of Arduino Pro Micro. Use a 3.3V Pro Micro board. A 5V Pro Micro board works too because the ESP32 is usually 5V tolerant.
Arduino Pro Micro is powered by the USB MIDI connection.
IMPORTANT: ESP32 board and Arduino Pro Micro must share GND.
OLED display screenshots
| Home screen | Device info | MIDI message |
|---|---|---|
 |
 |
 |
| MIDI Clock | MIDI Time Code |
|---|---|
 |
 |
WEB user interface


How to connect PedalinoMini™ to a WiFi network
PedalinoMini™ supports IEEE 802.11 b/g/n WiFi with WPA/WPA2 authentication (only 2.4 GHz).
PedalinoMini™ implements Wi-Fi Protected Setup (WPS) and Smart Config technology (Espressif’s ESP-TOUCH protocol). WPS needs access to the WPS button on the WiFi router. Smart Config requires a smartphone with one the following apps:
- ESP8266 SmartConfig for Android
- Espressif Esptouch for iOS
If the WiFi network is not available PedalinoMini™ will create an hotspot for you. Once connected to the PedalinoMini™ hotspot, you can use the web interface to set the SSID and password of an access point that you would like to connect to.
- On power on Pedalino will try to connect to the last know access point
- If it cannot connect to the last used access point within 15 seconds it enters into Smart Config mode
- Start one of the suggested apps to configure SSID and password
- If it doesn't receive any SSID and password during the next 15 seconds it enters into WPS mode
- Press WPS button on your WiFi router
- If it doesn't receive any SSID and password during the next 15 seconds it switch to AP mode
- In AP mode PedalinoMini™ create a WiFi network called 'Pedalino-XXXXXXXX' waiting connection from clients. The required password is XXXXXXXX (uppercase). XXXXXXXX is a variable string.
- Reboot Pedalino to restart the procedure.
void wifi_connect()
{
  auto_reconnect();           // WIFI_CONNECT_TIMEOUT seconds to reconnect to last used access point
  if (!WiFi.isConnected())
    smart_config();           // SMART_CONFIG_TIMEOUT seconds to receive SmartConfig parameters and connect
  if (!WiFi.isConnected())
    wps_config();             // WPS_TIMEOUT seconds to receive WPS parameters and connect
  if (!WiFi.isConnected())
    ap_mode_start();          // switch to AP mode until next reboot
}
Booting modes
PedalinoMini™ has 8 booting modes:
| Mode | Name | Description |
|---|---|---|
| 1 | Normal | BLE and WiFi are enabled. PedalinoMini™ starts the WiFi procedure on boot (connect to last AP -> SmartConfig -> WPS -> Access Point). After boot PedalinoMini™ will wait for BLE-MIDI connection. Web UI config is disabled. |
| 2 | Bluetooth Only | WiFi is disabled. PedalinoMini™ will wait for BLE-MIDI connection. |
| 3 | WiFi Only | PedalinoMini™ starts the WiFi procedure on boot (connect to last AP -> SmartConfig -> WPS -> Access Point). BLE is disabled. |
| 4 | Access Point with Bluetooth | PedalinoMini™ skip the WiFi procedure on boot and create a WiFi Access Point. PedalinoMini™ will wait for BLE-MIDI connection. Web UI config is disabled. |
| 5 | Access Point without Bluetooth | PedalinoMini™ skips the WiFi procedure on boot and create a WiFi Access Point. BLE is disabled. |
| 6 | Reset WiFi credentials | Forget the last connected access point. On next boot PedalinoMini™ can be connected to a new AP. |
| 7 | Ladder Config | Learn mode for your ladder pedal. Any resistors ladder can be calibrated just pressing footswitches in sequence. Select at least one Ladder pedal before to proceed with configuration. |
| 8 | Reset to factory default |
The last booting mode (1-5) is selected if you don't press any button on boot. The default boot mode is (3) WiFi Only or (2) Bluetooth if WiFi support it is not included.
To select a different mode:
- Press and release EN button (POWER button on TTGO T-Eight) and immediately after press and hold BOOT button (CENTER button on TTGO T-Eight)
- Follow the istructions on display. Keep it pressed until the progress bar reach the end to reset to factory default. If you release the button before the progress bar reach the end PedalinoMini™ will start in one of the supported boot mode.
| Mode | Name | USB-MIDI | Legacy MIDI | RTP-MIDI | ipMIDI | BLE MIDI | OSC | Web UI | OTA Firmware Update | HTTP Firmware Update |
|---|---|---|---|---|---|---|---|---|---|---|
| 1 | Normal | x | x | x | x | x | x | - | - | - |
| 2 | Bluetooth Only | x | x | - | - | x | - | - | x | - |
| 3 | WiFi Only | x | x | x | x | - | x | x | x | x |
| 4 | Access Point with Bluetooth | x | x | x | x | x | x | - | - | - |
| 5 | Access Point without Bluetooth | x | x | x | x | - | x | x | x | x |
- (x) Supported (-) Not supported
- USB-MIDI and DIN-MIDI are always available if hardware implemented.
- Web UI config is disabled in Normal (1) and Access Point with Bluetooth (4) due to memory limit.
- OTA/HTTP Firmware Update is available only when firmware is less than 2 MB.
Display mode
On start the live performance display is selected. On live performace mode the current profile and the current bank is shown using a vintage 7 segment LED style. First digit is the profile, the others two are for bank.
How to switch profiles
During normal operation
- Single press of BOOT button to move to the next profile
- Double press of BOOT button to move to the previous profile
- Long press of BOOT buttom to switch between live performance display and scrolling pages where configuration parameters (the device name, the IP address etc.) are displayed.
On TTGO T-Eight replace BOOT button with CENTER button.
Factory default configuration
All profiles has the same configuration.
Bank 1
| Pedal | Type | Name | On Press | On Release | Midi Channel |
|---|---|---|---|---|---|
| 1 | Momentary | A | Note On C3 (60) Velocity 100 |
Note Off | 1 |
| 2 | Momentary | B | Note On D3 (62) Velocity 100 |
Note Off | 1 |
| 3 | Momentary | C | Note On E3 (64) Velocity 100 |
Note Off | 1 |
| 4 | Momentary | D | Note On F3 (65) Velocity 100 |
Note Off | 1 |
| 5 | Analog | E | Control Change CC#12 Value 0-127 |
1 | |
| 6 | Analog | F | Control Change CC#13 Value 0-127 |
1 |
Bank 2
| Pedal | Type | Name | On Press | On Release | Midi Channel |
|---|---|---|---|---|---|
| 1 | Momentary | A | Control Change CC#20 Value 127 |
Control Change CC#20 Value 0 |
1 |
| 2 | Momentary | B | Control Change CC#21 Value 127 |
Control Change CC#21 Value 0 |
1 |
| 3 | Momentary | C | Control Change CC#22 Value 127 |
Control Change CC#22 Value 0 |
1 |
| 4 | Momentary | D | Control Change CC#23 Value 127 |
Control Change CC#23 Value 0 |
1 |
| 5 | Analog | E | Control Change CC#12 Value 0-127 |
1 | |
| 6 | Analog | F | Control Change CC#13 Value 0-127 |
1 |
Bank 3-4
Bank 3 is the same as bank 1 but on Midi channel 2
Bank 4 is the same as bank 2 but on Midi channel 2
Bank 5-6
Bank 5 is the same as bank 1 but on Midi channel 3
Bank 6 is the same as bank 2 but on Midi channel 3
Bank 7-8
Bank 7 is the same as bank 1 but on Midi channel 4
Bank 8 is the same as bank 2 but on Midi channel 4
Bank 9-10
Bank 9 is the same as bank 1 but on Midi channel 5
Bank 10 is the same as bank 2 but on Midi channel 5