
A Node Event Manager using RabbitMQ to exchange events.
Exchanges and Queues are automatically created.
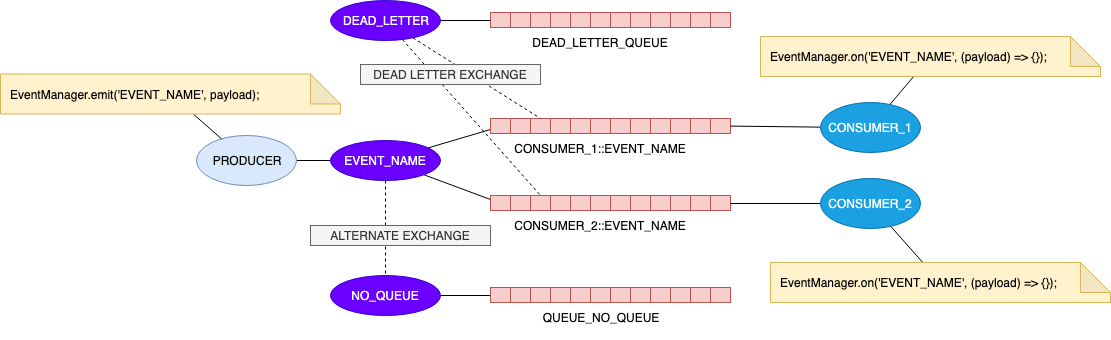
Here is a small schema :
npm install rabbitmq-event-manager
Or with Yarn
yarn add rabbitmq-event-manager
- Initialize
import EventManager from 'rabbitmq-event-manager';
const myEventManager = new EventManager({
  url: 'amqp://localhost',
  application: 'CONSUMER'
});
myEventManager.initialize()
    .then(()=>{
        /** Do something after initialization */
    })
    .catch((err)=> {
        /** An error occured while initialization */
});- Consumer
import EventManager from 'rabbitmq-event-manager';
const myEventManager = new EventManager({
  url: 'amqp://localhost',
  application: 'CONSUMER'
});
myEventManager.on('MY_EVENT_NAME', async (payload)=>{
    console.log(payload);
});
The handler function, by default will tell RabbitMQ to "acknowledge" the message.
This will create the following elements in RabbitMQ :
-
An Exchange of type fanout named :
MY_EVENT_NAME(the application name is not USED) -
One Queue
CONSUMER::MY_EVENT_NAMEbound to the ExchangeMY_EVENT_NAME(the application name IS USED) -
Producer
import EventManager from 'rabbitmq-event-manager';
const myEventManager = new EventManager({ url: 'amqp://localhost', application: 'PRODUCER_1' });

myEventManager.emit('MY_EVENT_NAME', payload);
Note: Since version 1.1.0 the emit function return a promise that resolves with the payload effectively sent to RabbitMQ (ie: you can access the _metas informations).
This will create the following elements in RabbitMQ :
- An Exchange of type fanout named :
MY_EVENT_NAME(the application name is not USED)
NOTE:
⚠️ A very good convention will be to prefix the name of the event name with the emitter application name, for example :PRODUCER_1.MY_EVENT_NAMEbut it's not mandatory.
If a new Consumer is created and listen the same event :
import EventManager from 'rabbitmq-event-manager';
const myEventManager = new EventManager({url:'amqp://localhost'}, appName:'OTHER_CONSUMER');
myEventManager.on('MY_EVENT_NAME', async (payload)=>{
    console.log(payload);
    return true;
});
It will add a queue OTHER_CONSUMER::MY_EVENT_NAME bound to the Exchange MY_EVENT_NAME.
This feature has been introduced in version 1.1.0, and allow you to emit an event and wait for a response (from another event, or from a generated event name).
import EventManager from 'rabbitmq-event-manager';
const myEventManager = new EventManager({ url: 'amqp://localhost', application: 'PRODUCER_1' });
const payload = { a: 42, b: 58 };
myEventManager.on('add', async eventPayload => {
  return { result: eventPayload.a + eventPayload.b };
});
const response = await myEventManager.emitAndWait('add', payload);

console.log(response.result); // 100
The above code, will generate a queue with a name : add.RESPONSE.$$GUID$$ where guid is the value of _metas.correlationId.
This queue should be deleted after event is received, if something wrong happened, the message may be flushed to the Dead letter queue.
| Name | Type | Default | Description |
|---|---|---|---|
| url | String | amqp://localhost |
The connection URL of the RabbitMQ Server |
| application | String | n/a | The name of the application (used for naming exchanges and queues). |
| metas | boolean or (function) | true | Weither or not to add _metas infirmations in the event, If a function this returned value, will become the _metas object (see ) |
| alternateExchangeName | String | DEAD_LETTER_EXCHANGE |
The name of the dead letter exchange you would like to use, (:warning: remember this must be the same value for producer and consumers) |
| alternateQueueName | String | DEAD_LETTER_QUEUE |
The name of the dead letter queue (bound to the dead letter exhange) you would like to use, (:warning: remember this must be the same value for producer and consumers) |
| deadLetterExchangeName | String | NO_QUEUE_EXCHANGE |
The name of the alternate exchange you would like to use, (:warning: remember this must be the same value for producer and consumers) |
| deadLetterQueueName | String | QUEUE_NO_QUEUE |
The name of the alternate exchange queue you would like to use, (:warning: remember this must be the same value for producer and consumers) |
| ttl | Number | 86400000 (24h) |
The default TTL before flushing event to the Dead Letter Exchange |
| maxNumberOfMessagesRetries | Numbner | 100 |
The number of tries the consumer will treat one specific message, before flushing it to the dead letter exhange. |
| logPrefix | string | [RABBITMQ] | The text that will be printed before the error log |
| logLevel | string | error | The log Level (see winston logLevels) |
| logTransportMode | string | console | Mute (no log), or output to console. Possible values are ("console" or "mute") |
| emitAndWaitTimeout | number | 30000 (30s) | Define the maximum time to wait for a event |
| defaultResponseSuffix | string | .RESPONSE |
The suffix to add to response event name when waiting for a response |
By defaut, some metas data are added to the payload :
- guid : A unique id generated, to be able to debug for example, or for following the event.
- timestamp : A number of milliseconds elapsed since January 1, 1970 00:00:00 UTC. (
Date.now()) - name : A string which is the name of the emitted event.
- applicationName: The value of the application which emits the Event.
- correlationId: (optional) a unique ID (guid) to be used when waiting for a response when using
emitAndWait - replyTo: (optional) the event to reply to when waiting for a response when using
emitAndWait
So if your payload is :
{
  userId: 42;
}
With Metas data it will be :
{
    _metas:{
        guid: '465e008c-d37f-4e31-b494-023e6d187946',
        name: 'MY_EVENT_NAME',
        timestamp: 1519211809934,
        applicationName: 'PRODUCER_1'
    },
    userId:42
}
You can remove metas informations by settings the option value "metas" to false.
You can also override the metas generation by giving a function as metas options value (on the emitter side only, as the event is generated there).
import EventManager from 'rabbitmq-event-manager';
const myEventManagerWithNoMetas = new EventManager({
  url: 'amqp://localhost',
  appName: 'PRODUCER_1',
  metas: false,
});
const payload = { userId: 42 };
myEventManagerWithNoMetas.emit('MY_EVENT_NAME', payload);
// Payload will be
// {
//    userId:42
// }import EventManager from 'rabbitmq-event-manager';
const myEventManagerOverrideMetas = new EventManager({
url: 'amqp://localhost',
appName: 'PRODUCER_1',
metas: sourceMetas => {
// sourceMetas contains the default metaa
return {
...sourceMetas,
otherProperty: 'MyValue',
};
},
});
const payload = { userId: 42 };
myEventManagerOverrideMetas.emit('MY_EVENT_NAME', payload);
// Payload will be
// {
// _metas: {
// guid : '465e008c-d37f-4e31-b494-023e6d187947'
// name: 'MY_EVENT_NAME',
// timestamp: 1519211809934,
// otherProperty:'MyValue'
// }
// userId:42
// }Since version 1.1.0 you can add (or override) the _metas property by setting it in the event paylaod :
import EventManager from 'rabbitmq-event-manager';
const myEventManagerOverrideMetas = new EventManager({
  url: 'amqp://localhost',
  appName: 'PRODUCER_1',
});
const payload = { _metas: { newKey: 'value' }, userId: 42 };
myEventManagerOverrideMetas.emit('MY_EVENT_NAME', payload);
// Payload will be
// {
//    _metas: {
//        guid : '465e008c-d37f-4e31-b494-023e6d187947'
//        name: 'MY_EVENT_NAME',
//        timestamp: 1519211809934,
//        newKey:'value'
//    }
//    userId:42
// }
This will be added only for this emit.
From the RabbitMQ documenation, the Dead Letter Exchange is a RabbitMQ Exchange, that is attached to a queue. And message in that queue can be "dead-lettered" if the queue reach its length limit, or, if the messages has expired (TTL).
By default, The Exchange DEAD_LETTER_EXCHANGE (and its bound queue DEAD_LETTER_QUEUE) is automatically created and attached to all queues.
The names of the queue and the exchange can be changed by setting the options properties.
See <Acknowledge / N-Acknowledge> to see how to send an event to the Dead Letter Exchange
⚠️ Be carefull, if you change the names of theDEAD_LETTER_EXCHANGEand theDEAD_LETTER_QUEUE, remember that you will have to do it for all producers and all consumers, as they will all use the same RabbitMQ server.
When an Event Exchange is created, an exchange NO_QUEUE_EXCHANGE is created and a queue named QUEUE_NO_QUEUE is created and bound to it.
When an event is emitted to the Event Exchange if the exchange has no queue bounded to it, all the messages are routed to the NO_QUEUE_EXCHANGE
The names of the queue and the exchange can be changed by setting the options properties.
⚠️ Be carefull, if you change the names of theDEAD_LETTER_EXCHANGEand theDEAD_LETTER_QUEUE, remember that you will have to do it for all producers and all consumers, as they will all use the same RabbitMQ server.
The return statement at the end of the handler function, will tell RabbitMQ to "acknowledge" the message.
You can "negatively acknowledge" and Requeue the message by returning false (rejecting the Promise).
If you don't want to requeue the message you can simply throw an exception ...
import EventManager from 'rabbitmq-event-manager';
const myEventManager = new EventManager({url:'amqp://localhost'}, appName:'OTHER_CONSUMER');
myEventManager.on('MY_EVENT_NAME', async (payload)=>{
    return {payload}; // the message will be acknowledge
    // or even
    // return;
    // or nothing
});
After the message is acknowledged, it will be removed from the queue and deleted.
import EventManager from 'rabbitmq-event-manager';
const myEventManager = new EventManager({url:'amqp://localhost'}, appName:'OTHER_CONSUMER');
myEventManager.on('MY_EVENT_NAME', async (payload)=>{
    throw new Error('This will flush the message to DEAD LETTER QUEUE')
});
After the message is negatively acknowledged, it will be send to the Dead Letter Exhange, so in the queue DEAD_LETTER_QUEUE.
In a world of events an event is fired, and some listeners will listen some events.
So with events sent by "Application", if we have an Application UserAdminApp which will send the event 'USER_CREATED', and we have an other application (WelcomeEmail) (or service) wanted to send on email to new users ...
So let's define that WelcomeEmail is listening USER_CREATED, it should knows that the event was fired by the UserAdminApp, but does we need to add the name of the application in event payload (_metas), or in the event name.
On the WelcomeEmail side :
myEventManager.on('UserAdminApp.USER_CREATED', payload => {
  /* ... */
});
Or
myEventManager.on('USER_CREATED', payload => {
  /*
    payload._metas.application = UserAdminApp
*/
});
If we consider RabbitMQ it means that the Exchange name will be UserAdminApp.USER_CREATED or USER_CREATED, so listening queues will be bound to the exchange.
Regarding this, I really think that the event should be USER_CREATED without any consideration of the application name, but as it is important to be able to know which application fires wich event, we may add the application name in the _metas information of the event's payload;
-
If the "Alternate Exchange" was not created first it's not a problem, as it's configured, the only thing is that if one message is sent to the exchange 'My*EVENT', and the *"Alternate Exchange"_ does not exists (if no queues are bound to the exchange 'My_EVENT'), the message will be lost !
-
When we listen to an event :
import EventManager from 'rabbitmq-event-manager';
const myEventManager = new EventManager({url:'amqp://localhost'}, appName:'CONSUMER');
myEventManager.on('MY_EVENT_NAME', async (payload)=>{
    console.log(payload);
    return true;
});
It will automatically create an exchange of name MY_EVENT_NAME, and a Queue : CONSUMER::MY_EVENT_NAME bound to that exchange.
The Queue CONSUMER::MY_EVENT_NAME is configured with the DEAD LETTER EXHANGE, even if that exchange does not exists yet. It means that if a MY_EVENT_NAME is emmited, and the "listener" mark the event to be flush (dead lettered), the message will be lost (as no DEAD LETTER EXHANGE is define, so ne queue are bound to it...).
It could be very intersting to "negatively acknowledge" a message and ask to be requeue after a delay, but this will be (if can) in version 2 !
I recently wrote another npm package rabbitmq-delete-message to be able to delete a message from a RabbitMQ Queue, this package aimed to delete some messages from the DEAD_LETTER_QUEUE or the QUEUE_NO_QUEUE.
You can find two dummies examples in the /demo folder, here is how to run them.
If you have docker on your laptop, you can create a RabbitMQ instance running tthe following command :
docker run -d --hostname my-rabbit --name rabbitmq -p 5672:5672 -p 15672:15672 rabbitmq:3-management
and then run (from root folder)
yarn demo:docker
You need to have an account on the https://www.cloudamqp.com/ website and to have created an instance, ones it's done you can run the folowwing command (from root folder) :
RABBITMQ_URL=amqp://user:password@bullfrog.rmq.cloudamqp.com/home yarn demo:cloudamqp