Animal Rescue
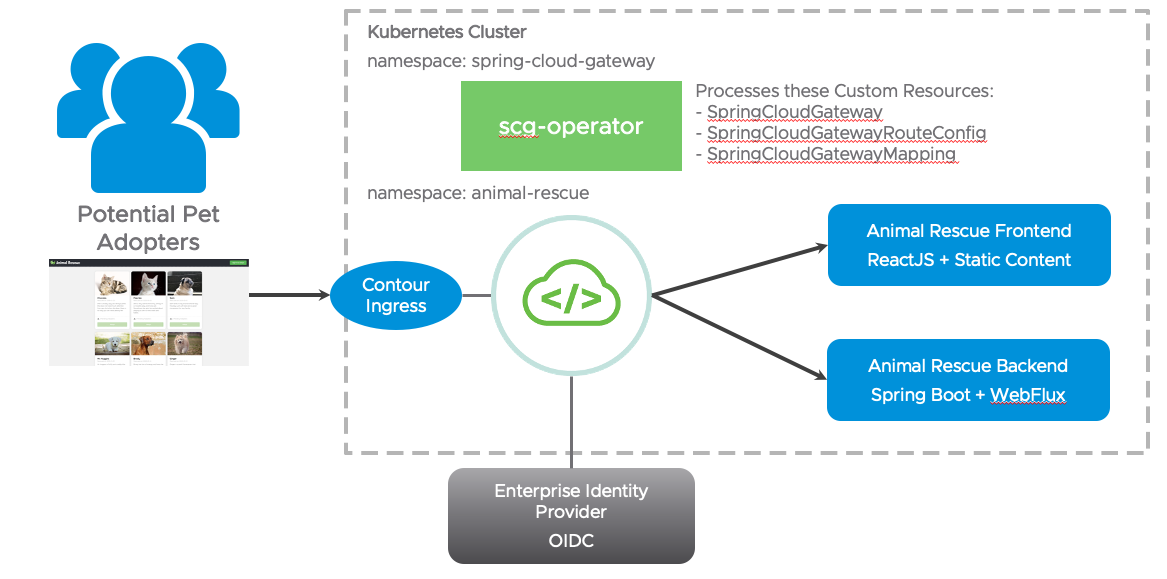
Sample app for VMware's Spring Cloud Gateway commercial products. Features we demonstrate with this sample app:
- Routing traffic to configured internal routes with container-to-container network
- Gateway routes configured through service bindings
- Simplified route configuration
- SSO login and token relay on behalf of the routed services
- Required scopes on routes (tag:
require-sso-scopes) - Circuit breaker filter
Table of Contents
- Deploy to Kubernetes
- Deploy to Tanzu Application Service
- Special frontend config related to gateway
- Gateway and Animal Rescue application features
- Development
Deploy to Kubernetes
The Kubernetes deployment requires you to install kustomize. You will also need to install Spring Cloud Gateway for Kubernetes successfully onto your target Kubernetes cluster.
Configure Single Sign-On (SSO)
For Animal Rescue sample Single Sign-On (SSO) to work, you will need to create two text files that will be used to create Kubernetes secrets:
- ./backend/secrets/sso-credentials.txt
- ./gateway/sso-secret-for-gateway/secrets/test-sso-credentials.txt
Before you start, and for validation, please locate the JWKS endpoint info from your SSO identity provider. The endpoint typically exists at:
https://YOUR_DOMAIN/.well-known/openid-configuration
For example, when using Okta the configured Issuer URI and JWKS URI can be retrieved at:
https://<issuer-uri>/.well-known/openid-configuration

$ curl https://dev-1234567.okta.com/oauth2/abcd12345/.well-known/openid-configuration

{
  "issuer": "https://dev-1234567.okta.com/oauth2/abcd12345",
...
  "jwk-set-uri": "https://dev-1234567.okta.com/oauth2/abcd12345/v1/keys",
....

# Please note that the format used by Okta is jwk-set-uri="<issuer-uri>/v1/keys"
The contents of the ./backend/secrets/sso-credentials.txt file for example would be the following:
jwk-set-uri=https://dev-1234567.okta.com/oauth2/abcd12345/v1/keys
The contents of the ./gateway/sso-secret-for-gateway/secrets/test-sso-credentials.txt file includes the following values from your OpenID Connect (OIDC) compliant SSO identity provider:
scope=openid,profile,email
client-id={your_client_id}
client-secret={your_client_secret}
issuer-uri={your_issuer_uri}
Deploy with Kustomize (recommended)
Assuming you are authenticated onto target Kubernetes cluster, you can run the following command from top-level directory in the repository:
kustomize build . | kubectl apply -f -This will create a namespace named animal-rescue, create a new gateway instance named gateway-demo in that namespace, deploy the frontend and backend Animal Rescue applications and finally apply the application specific API route configurations to gateway-demo.
Deploy with Kubectl
If you don't want to use kustomize, you can apply each yaml file in the kustomization.yaml file manually into the animal-rescue namespace (or any namespace you prefer) as well as create the sso-credentials secret from backend/secrets/sso-credentials.txt and animal-rescue-sso secret from gateway/sso-secret-for-gateway/secrets/test-sso-credentials.txt.
Make sure to create the SSO credentials secret in the SCG installation namespace (spring-cloud-gateway by default).
The gateway instance created, named gateway-demo, doesn't have any API routes defined initially. Once the API route definitions defined in a SpringCloudGatewayRouteConfig objects are mapped to gateway-demo using the SpringCloudGatewayMapping objects, you will see the routes added to the gateway.
Accessing Animal Rescue Site
After deploying Animal Rescue, there will be a service named gateway-demo. Expose the gateway-demo Service in your favorite way, e.g. ingress or port forwarding, then access /rescue path to view the animal-rescue app.
Example: if you have installed the animal-rescue app in the animal-rescue namespace, and you wish to simply access the app quickly, you can validate the deployment and port-forward the gateway-demo service:
$ kubectl get all -n animal-rescue
NAME                                          READY   STATUS    RESTARTS   AGE
pod/animal-rescue-backend-757bb96466-pzr4l    1/1     Running   0          21h
pod/animal-rescue-frontend-5c6f9bfc9b-kgxzg   1/1     Running   0          21h
pod/gateway-demo-0                            1/1     Running   0          22h
pod/gateway-demo-1                            1/1     Running   0          21h

NAME                             TYPE        CLUSTER-IP    EXTERNAL-IP   PORT(S)    AGE
service/animal-rescue-backend    ClusterIP   10.0.25.68    <none>        80/TCP     7d18h
service/animal-rescue-frontend   ClusterIP   10.0.31.179   <none>        80/TCP     7d18h
service/gateway-demo             ClusterIP   10.0.23.250   <none>        80/TCP     7d18h
service/gateway-demo-headless    ClusterIP   None          <none>        5701/TCP   7d18h

NAME                                     READY   UP-TO-DATE   AVAILABLE   AGE
deployment.apps/animal-rescue-backend    1/1     1            1           7d18h
deployment.apps/animal-rescue-frontend   1/1     1            1           7d18h

NAME                                                DESIRED   CURRENT   READY   AGE
replicaset.apps/animal-rescue-backend-757bb96466    1         1         1       7d18h
replicaset.apps/animal-rescue-frontend-5c6f9bfc9b   1         1         1       7d18h

# port-forward the gateway-demo service
$ kubectl -n=animal-rescue  port-forward service/gateway-demo 8080:80

# animal-rescue is available at
http://localhost:8080/rescue
Deploy to Tanzu Application Service
Run the following scripts to set up everything:
./scripts/cf_deploy init    # installs dependencies and builds the deployment artifact
./scripts/cf_deploy deploy  # handles everything you need to deploy the frontend, backend, and gateway. This script can be executed repeatedly to deploy new changes.
Then visit the frontend url https://gateway-demo.${appsDomain}/rescue to view the sample app.
Once you have enough fun with the sample app, run the following script to clean up the environment:
./scripts/cf_deploy destroy # tears down everythingSome other commands that might be helpful:
./scripts/cf_deploy push                     # builds and pushes frontend and backend
./scripts/cf_deploy dynamic_route_config_update  # update bound apps' configuration with calling the update endpoint on the backing app. You will need to be a space developer to do so.
./scripts/cf_deploy rebind                   # unbinds and rebinds frontend and backend
./scripts/cf_deploy upgrade                  # upgrade the gateway instance
All the gateway configuration can be found and updated here:
- Gateway service instance configuration file used on create/update:
./api-gateway-config.json - Frontend routes configuration used on binding used on bind:
./frontend/api-route-config.json - Backend routes configuration used on binding used on bind:
./backend/api-route-config.json
Special frontend config related to gateway
The frontend application is implemented in ReactJS, and is pushed with static buildpack. Because of it's static nature, we had to do the following:
homepageinpackage.jsonis set to/rescue, which is the path we set for the frontend application in gateway config (frontend/api-route-config.json). This is to make sure all related assets is requested under/rescuepath as well.Sign in to adoptbutton is linked to/rescue/login, which is a path that issso-enabledin gateway config (frontend/api-route-config.json). This is necessary for frontend apps bound to a sub path on gateway because the Oauth2 login flow redirects users to the original requested location or back to/if no saved request exists. This setting is not necessary if the frontend app is bound to path/.REACT_APP_BACKEND_BASE_URIis set to/backendin build script, which is the path we set for the backend application in gateway config (backend/api-route-config.json). This is to make sure all our backend API calls are appended with thebackendpath.
Gateway and Animal Rescue application features
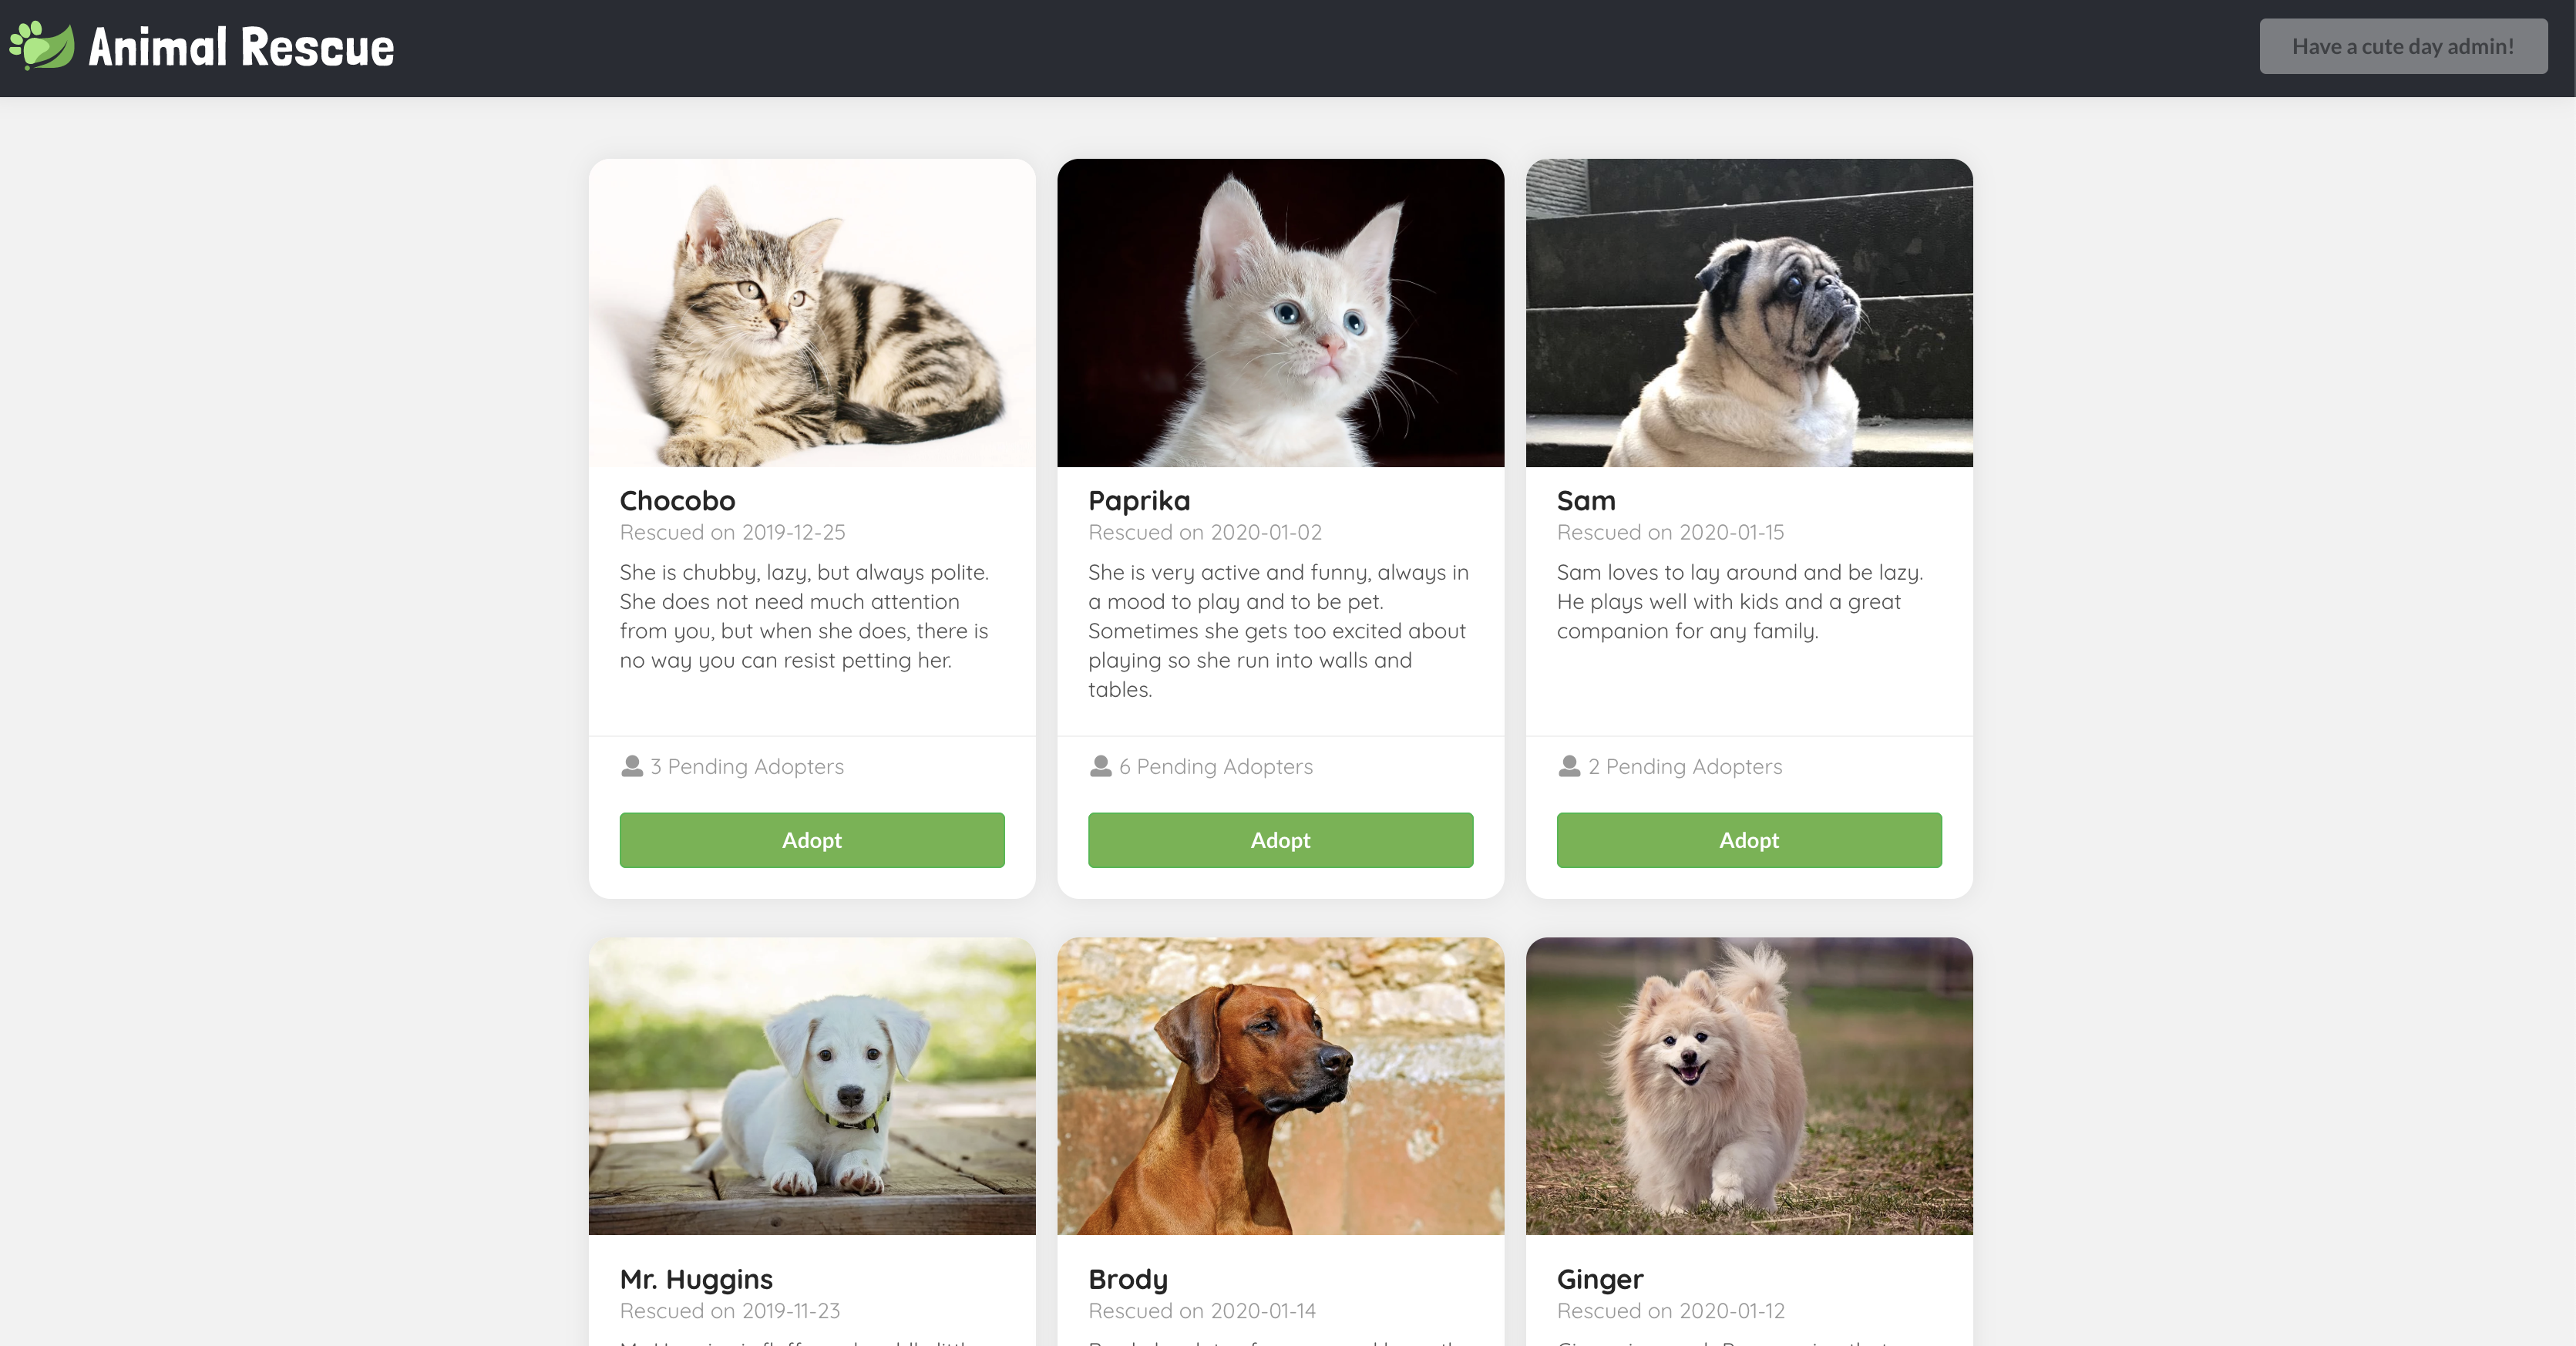
Visit https://gateway-demo.${appsDomain}/rescue, you should see cute animal bios with the Adopt buttons disabled. All the information are fetched from a public GET backend endpoint /animals.

Click the Sign in to adopt button on the top right corner, you should be redirected to the SSO login page if you haven't already logged in to SSO.

Once you logged in, you should see a greeting message regarding the username you log in with on the top right corner, and the Adopt buttons should be enabled.
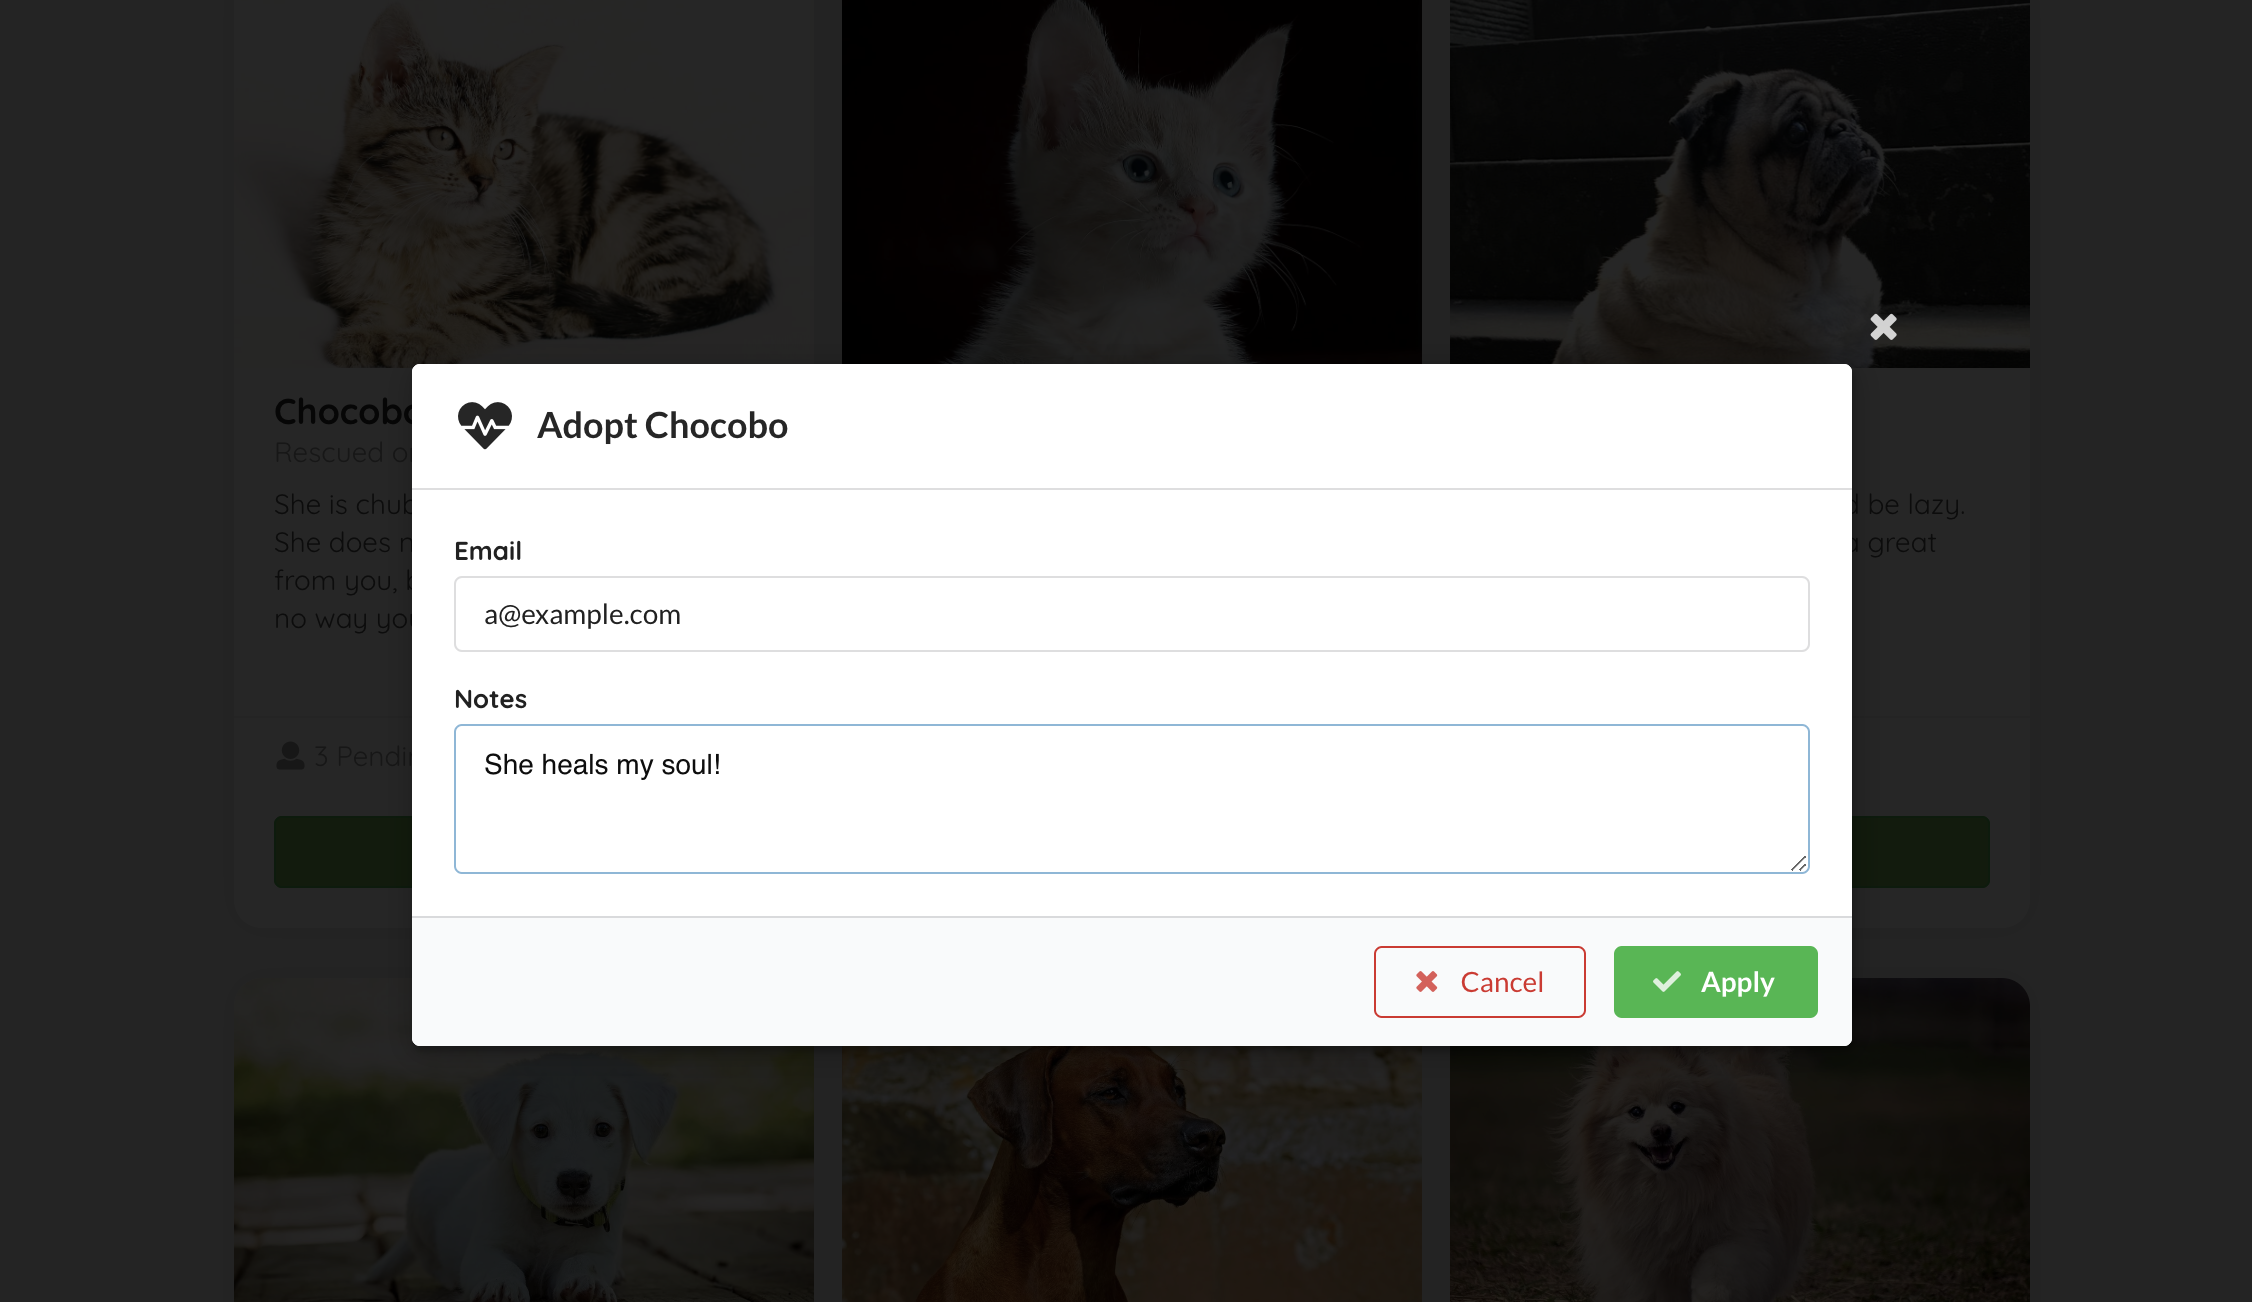
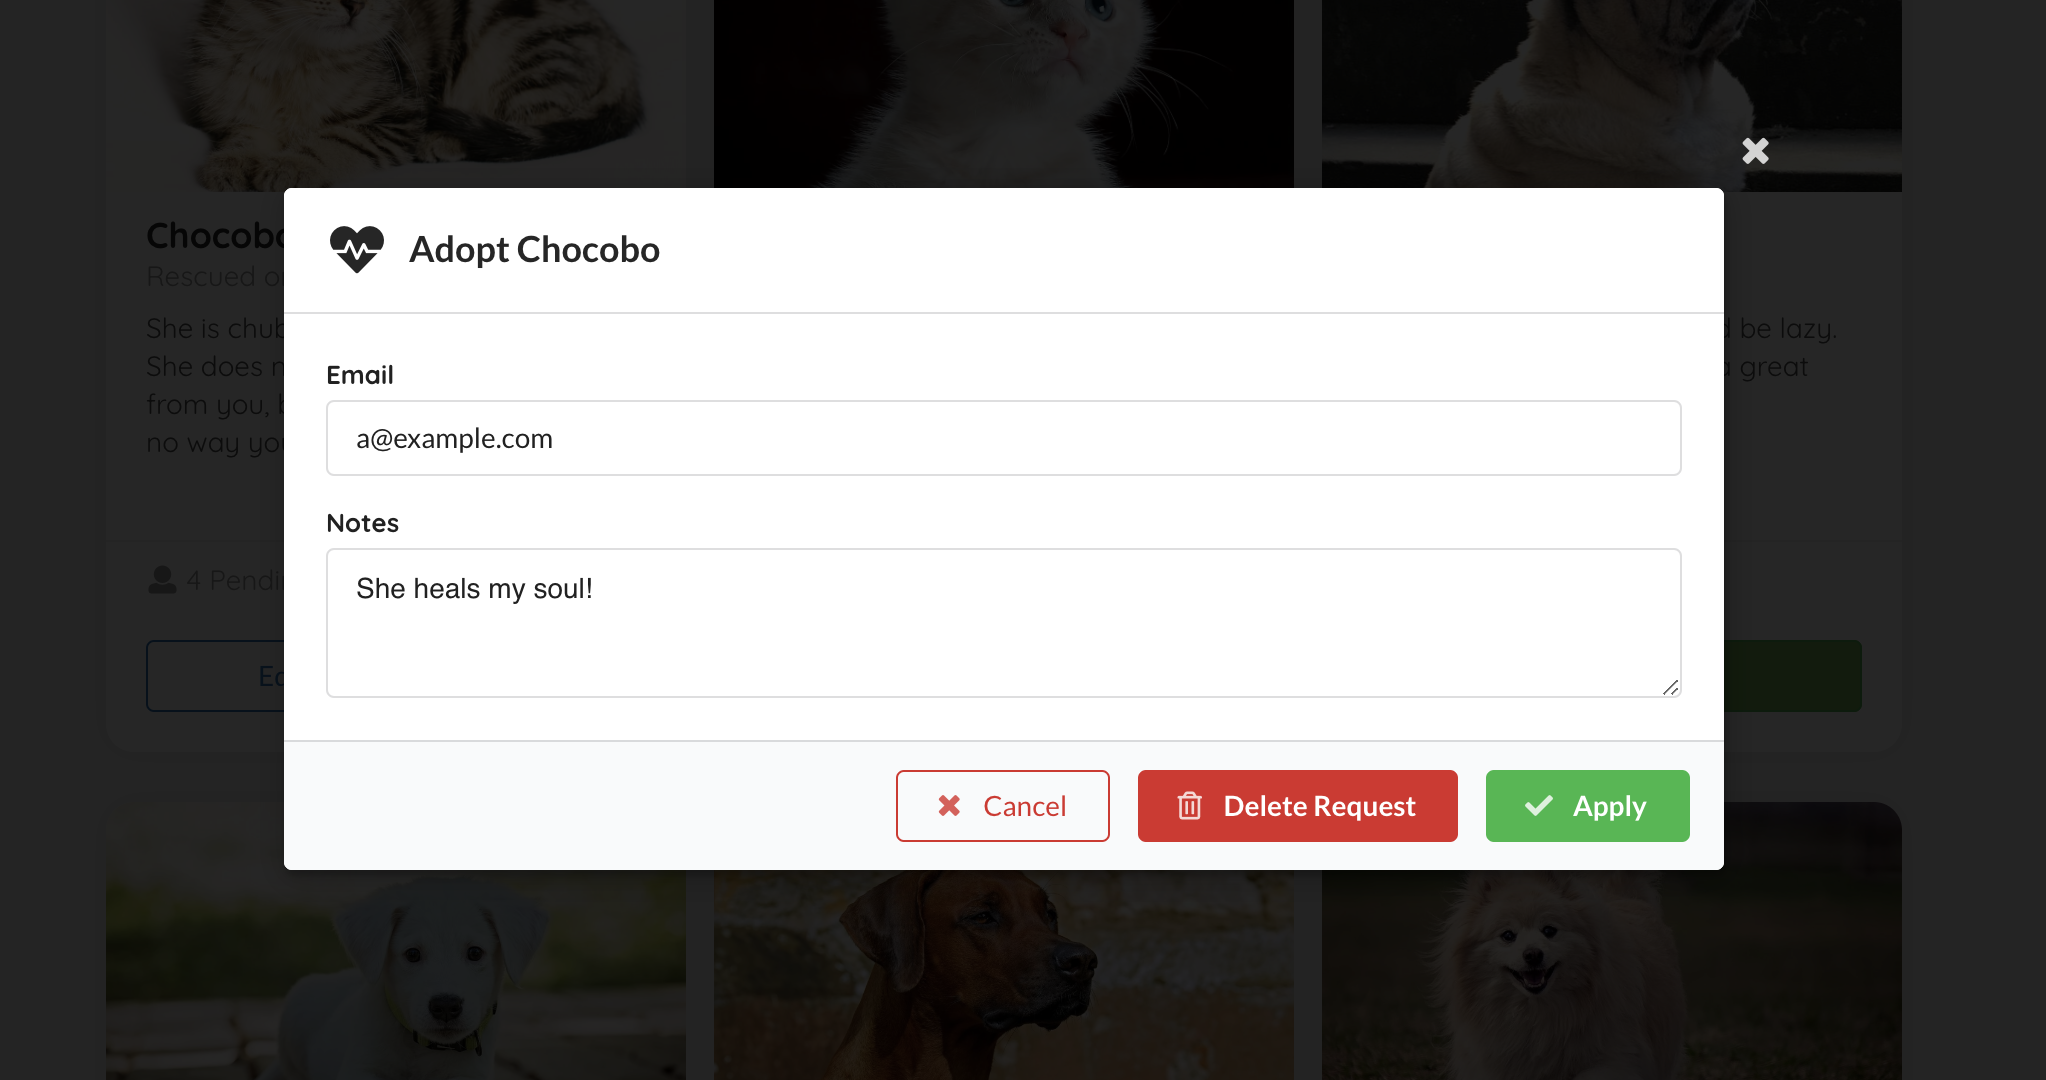
Click on the Adopt button, input your contact email and application notes in the model, then click Apply, a POST request should be sent to a sso-enabled backend endpoint /animals/{id}/adoption-requests, with the adopter set to your username we parsed from your token.
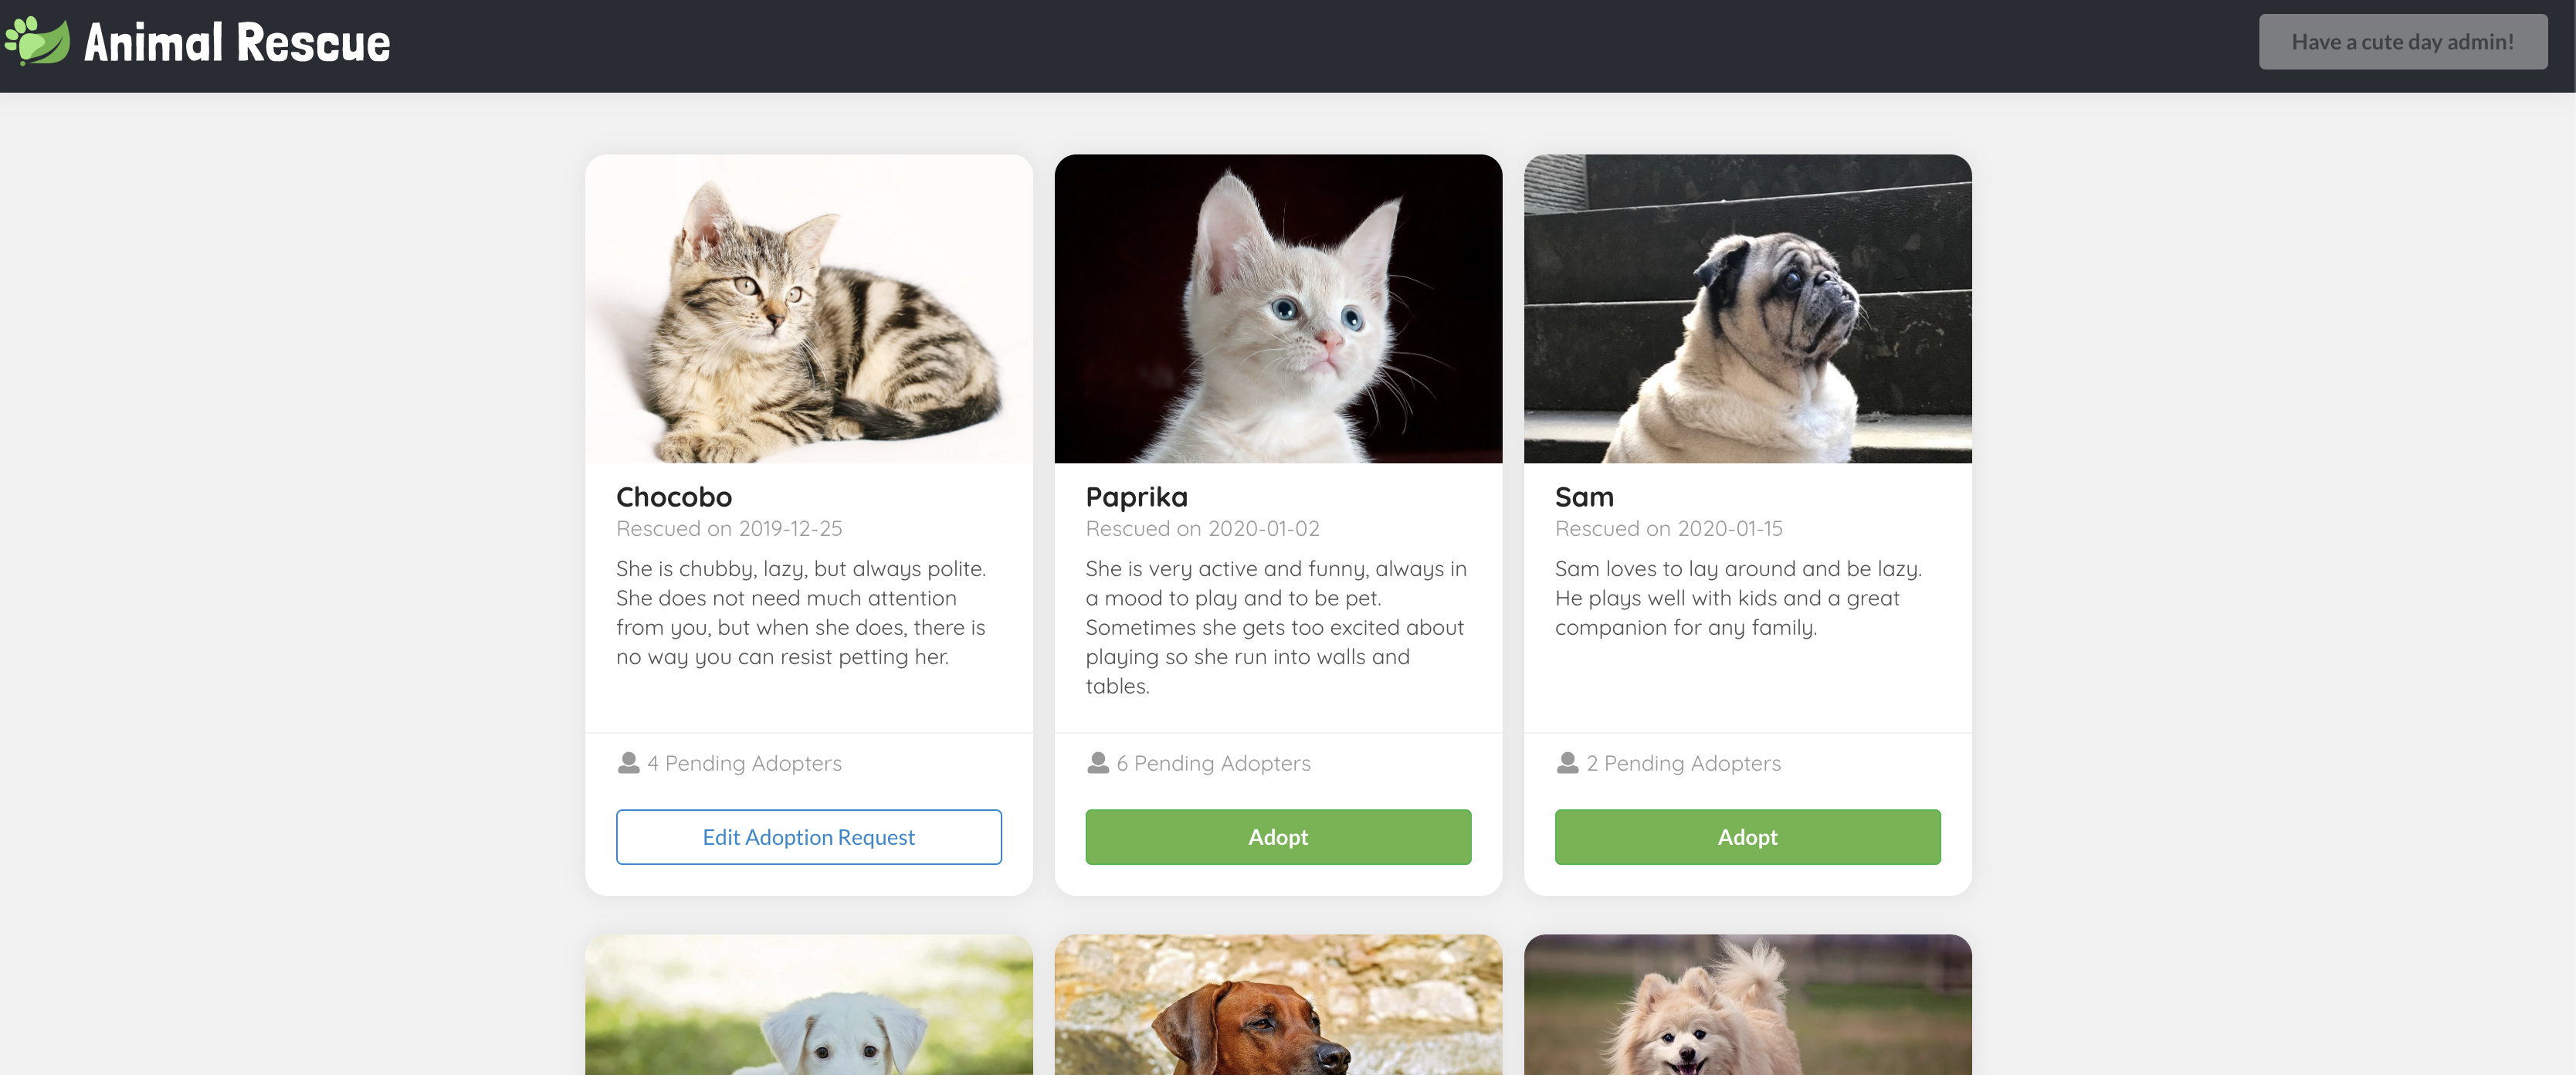
Then the model should close, and you should see the Adopt button you clicked just now has turned into Edit Adoption Request. This is matched by your SSO log in username.
Click on the Edit Adoption Request again, you can view, edit (PUT), and delete (DELETE) the existing request.
**Note**
Documentation may get out of date. Please refer to the [e2e test](./e2e/cypress/integration/) and the test output video for the most accurate user flow description.
To see circuit breaker filter in action, stop animal-rescue-frontend application and refresh page. You should see a response from https://example.org web-site, this is configured in api-route-config.json file in /fallback route.
Development
Run locally
Use the following commands to manage the local lifecycle of animal-rescue:
./scripts/local.sh start         # start auth server, frontend app, and backend app
./scripts/local.sh start --quiet # start everything without launching the app in browser, and redirects all output to `./scripts/out/`
./scripts/local.sh stop          # stop auth server, frontend app, and backend app. You would only need to do this if you start the app in quiet mode.
Local security configuration
Backend uses Form login for local development with two test accounts - alice / test and bob / test.
Note that in a real deployment with Gateway, OAuth2 login will be managed by the gateway itself, and your app should use TokenRelay filter to receive OpenID ID Token in Authorization header. See CloudFoundrySecurityConfiguration class for an example of Spring Security 5 configuration to handle token relay correctly.
It is also possible to use OAuth2 login flow for the app. This requires running an authorization server locally. See
local-oauth2-flowfor an example of using Cloud Foundry User Account and Authentication (UAA) running in a Docker container locally.
Tests
Execute the following script to run all tests:
./scripts/local.sh init          # install dependencies for the frontend folder and the e2e folder
./scripts/local.sh ci            # run backend tests and e2e tests
./scripts/local.sh backend       # run backend test only
./scripts/local.sh e2e --quiet   # run e2e test only without interactive mode
You can find an e2e test output video showing the whole journey in ./e2e/cypress/videos/ after the test run. If you would like to launch the test in an actual browser and run e2e test interactively, you may run the following commands:
./scripts/local.sh start
./scripts/local.sh e2e
More detail about the e2e testing framework can be found at cypress api doc
CI
GitHub Actions
GitHub Actions run all checks for the master branch and all PR requests. All workflow configuration can be found in .github/workflows.
Concourse
If you'd like to get the most updated sample app deployed in a real TAS environment, you can set up a concourse pipeline to do so:
fly -t ${yourConcourseTeamName} set-pipeline -p sample-app-to-demo-environment -c concourse/pipeline.yml -l config.ymlYou will need to update the slack notification settings and add the following environment variables to your concourse credentials manager. Here are the variables we set in our concourse credhub:
- name: /concourse/main/sample-app-to-demo-environment/CF_API_HOST
- name: /concourse/main/sample-app-to-demo-environment/CF_USERNAME
- name: /concourse/main/sample-app-to-demo-environment/CF_PASSWORD
- name: /concourse/main/sample-app-to-demo-environment/SKIP_SSL_VALIDATION
- name: /concourse/main/sample-app-to-demo-environment/CF_ORG
- name: /concourse/main/sample-app-to-demo-environment/CF_SPACE
Check out our tags
Tags that looks like SCG-VT-v${VERSION}+ indicates that this commit and the commits after are compatible with the specified VERSION of the SCG-VT tile.
The other tags demonstrate different configuration with SCG-VT, have fun exploring what's possible!
