
OpenPAI VS Code Client is an extension to connect OpenPAI clusters, submit AI jobs, simulate jobs locally, manage files, and so on.
Before using OpenPAI VS Code Client, follow below steps connecting to an OpenPAI cluster.
Notice, the version of OpenPAI cluster must equal or greater than 0.8.0, and the authn_type of the cluster should be basic.
-
Use shortcut key Ctrl+Shift+P to open command palette.
-
Input and look for PAI: Add PAI Cluster as below.

-
Press Enter, and input the host of an OpenPAI cluster. It can be domain name or IP Address. After that, press Enter again.

-
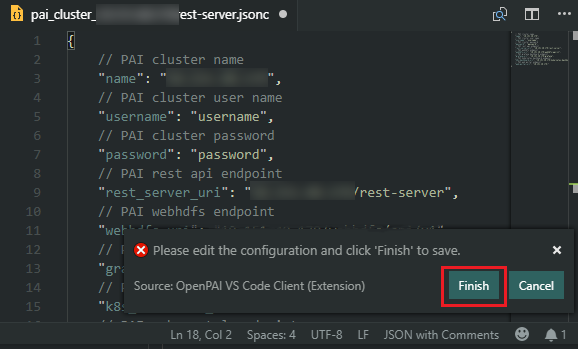
A configuration file is opened, and username and password fields are needed at least. Once it completes, click Finish button at right bottom corner. Notice, it won't be effect, if you save and close the file directly.
If there are multiple OpenPAI clusters, you can follow above steps again to connect with them.
Notice, the version of OpenPAI cluster must equal or greater than 0.14.0, and the authn_type of the cluster should be OIDC.
-
Use shortcut key Ctrl+Shift+P to open command palette.
-
Input and look for PAI: Add PAI Cluster as below.
-
Press Enter, and input the host of an OpenPAI cluster. It can be domain name or IP Address. After that, press Enter again.
-
If the
authn_typeof the cluster isOIDC, a webside will be open and ask you to login, after that a configuration file is opened, and if your login was successful the username and token fields are auto filled, you can change it if needed. Once it completes, click Finish button at right bottom corner. Notice, it won't be effect, if you save and close the file directly.
If there are multiple OpenPAI clusters, you can follow above steps again to connect with them.
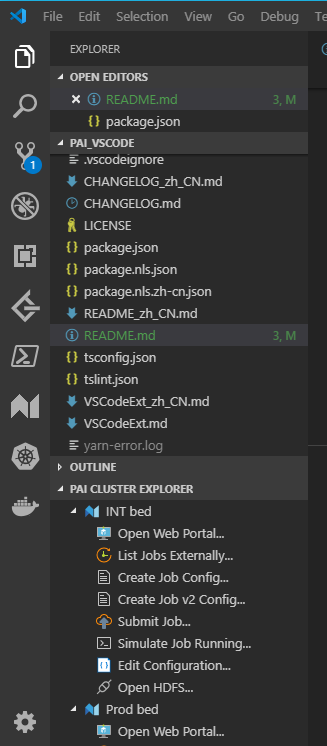
There is a tutorial for OpenPAI job submission, please refer to Submit job to OpenPAI. After added a cluster configuration, you can find the cluster in PAI CLUSTER EXPLORER pane as below.
Submit V2 job (For OpenPAI v0.13.0 and above):
You can create a job v2 configuration and submit to OpenPAI as below steps.
-
Create job config file:
- Double click
Create Job Config...in OpenPAI cluster Explorer, and then specify file name and location to create a job configuration file (Make sure the value ofprotocol_versionproperty in cluster configuration is'2'). - Right click python or cntk file in VSCode Explorer and select
Create PAI Job Config V2, and then specify file name and location to create a job configuration file.
- Double click
-
Update job configuration as needed. If you are not familiar with this configuration file, learn from here.
-
Right click on the created job v2 configuration file, then click on
Submit Job to PAI Cluster. The client will upload files to OpenPAI and create a job. Once it's done, there is a notification at right bottom corner, you can click to open the job detail page.If there are multiple OpenPAI clusters, you need to choose one.
This animation shows above steps.
Submit V1 Job (deprecating, only for OpenPAI version under 0.13.0):
You can create a job configuration and submit to OpenPAI as below steps.
-
Create job config file:
- Double click
Create Job Config...in OpenPAI cluster Explorer, and then specify file name and location to create a job configuration file (Make sure the value ofprotocol_versionproperty in cluster configuration is'1'). - Right click python or cntk file in VSCode Explorer and select
Create PAI Job Config V1, and then specify file name and location to create a job configuration file.
- Double click
-
Update job configuration as needed. If you are not familiar with this configuration file, learn from here.
-
Right click on the created job configuration file, then click on
Submit Job to PAI Cluster. The client will upload files to OpenPAI and create a job. Once it's done, there is a notification at right bottom corner, you can click to open the job detail page.If there are multiple OpenPAI clusters, you need to choose one.
This animation shows above steps.
As it needs sometime to wait job starting in OpenPAI cluster, local simulation can help identifying and debugging most code, environment and configuration issues quickly.
Docker MUST be installed to use local simulation.
-
As submit a job, you can right click a configuration file to find local simulation.
-
Click Simulate PAI Job Running, after a while below notification shows.
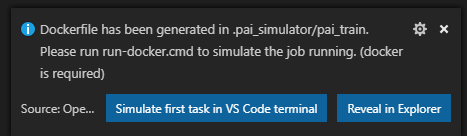
-
you can click on Simulate first task in VS Code terminal to simulate directly, or Reveal in Explorer to view created docker files and start simulation manually.
This animation shows above steps.
As local simulation is a close but still different environment with OpenPAI cluster, there are some issues cannot be found by simulation. Some examples,
- The job may need much more memory or distributed environments. It cannot be simulated locally.
- The job may need GPU, but local computer may not have one. It may need code logic to handle this situation. It also needs a different docker image if you are using TensorFlow. As TensorFlow has different package for GPU and non-GPU runtime.
- The job may run much more time locally. In most case, the computing power of local computer is much lower than servers in the OpenPAI cluster. If you need to simulate a job end-to-end, it may need to reduce iterations to get result faster.
- Local machine may not be able to access some storage. The OpenPAI cluster may be deployed in a private environment, so that local computer may not able to access resource of cluster.
- Local simulated can't support OpenPAI cluster runtime plugin (e.g. SSH plugin, teamwise storage plugin, tensorboard plugin), user should install them manully.
Please refer to Auto Upload.
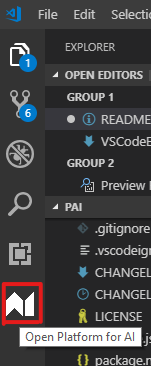
The client has two GUI parts. First is the PAI CLUSTER EXPLORER in explorer and used in above introduction. Second can be opened by the icon in activity bar.
There are three parts in the side bar.
-
Storage Explorer (For PAI > 0.14.0)
Please refer to Storage Explorer.
-
HDFS Explorer (For PAI <= 0.14.0)
You can view, upload and download folder and files of the OpenPAI cluster storage.
-
Job List
You can view jobs in OpenPAI cluster. The lists refresh periodically, and the icon shows the status of each job. You can open a job in browser with double clicking it.

| Name | Description |
|---|---|
| PAI: Add PAI Cluster | Add a new OpenPAI cluster |
| PAI: Open Website | View OpenPAI cluster in browser |
| PAI: Submit Job to PAI Cluster | Submit an OpenPAI job |
| PAI: Create PAI Job Config File | Create an OpenPAI configuration file |
| PAI: Simulate PAI Job Running | Generate Docker file for local simulation |
| Name | Description |
|---|---|
| Open Web Portal... | Browse to OpenPAI's web portal |
| List Jobs... | Open PAI's job list page in VS Code |
| Create Job Config... | Create an OpenPAI configuration file |
| Submit Job... | Submit an OpenPAI job |
| Simulate Job Running... | Generate Docker file for local simulation |
| Edit Configuration... | Edit OpenPAI cluster configuration |
| Open HDFS... | Open HDFS storage explorer of OpenPAI cluster |
| ID | Description |
|---|---|
| pai.job.upload.enabled | Whether will upload files to codeDir of configuration |
| pai.job.upload.exclude | Excluded files and folders for uploading |
| pai.job.upload.include | Included files and folders for uploading |
| pai.job.generateJobName.enabled | Whether add a random suffix to job name when submitting |
| pai.job.jobList.recentJobsLength | The number in Recent Submitted Jobs from VS Code |
| pai.job.jobList.allJobsPageSize | The page size of the All Jobs list |
| pai.job.jobList.refreshInterval | The refresh interval of job list (in seconds) |
| pai.hdfs.location | Where HDFS storage will be shown |
-
Install prerequisites:
- latest Visual Studio Code
- Node.js v10.0.0 or higher
- yarn v1.17.3 or higher
-
Install extension dependencies:
- In the VS Code Extensions tab, search for RedHat YAML and install that extension
-
Fork and clone this repository and go into the folder:
git clone https://github.com/Microsoft/openpaivscode cd openpaivscode -
Install the dependencies:
yarn install
Press F5 to launch debug window
yarn packageSubmit at GitHub
This project welcomes contributions and suggestions. Most contributions require you to agree to a Contributor License Agreement (CLA) declaring that you have the right to, and actually do, grant us the rights to use your contribution. For details, visit https://cla.opensource.microsoft.com.
When you submit a pull request, a CLA bot will automatically determine whether you need to provide a CLA and decorate the PR appropriately (e.g., status check, comment). Simply follow the instructions provided by the bot. You will only need to do this once across all repos using our CLA.
This project has adopted the Microsoft Open Source Code of Conduct. For more information see the Code of Conduct FAQ or contact opencode@microsoft.com with any additional questions or comments.
MIT