Please read the full "RAGs to Riches" blog series:
https://dev.to/aws-heroes/rags-to-riches-part-1-generative-ai-retrieval-4pd7
This OpenAI based RAG chat application that can help you learn about AI retrieval patterns. The technologies here are beginner friendly and easy to deploy to AWS Lambda. As your needs grow, feel free to productionize this application with more robust components. What is a RAG? From IBM Research:
RAG is an AI framework for retrieving facts from an external knowledge base to ground large language models (LLMs) on the most accurate, up-to-date information and to give users insight into LLMs' generative process.
You MUST have an OpenAI API key to run this application. You can get one for free using this Where do I find my Secret API Key? guide. Once you have your OpenAI key, create a .env.development.local file at the root of this project with the following, replacing sk... with your key:
OPENAI_API_KEY=sk...
This project supports Development Containers which means you can use VS Code to open this folder in a container and your development environment will be created for you. Run the following commands in your integrated terminal or on your local machine assuming you have Node installed.
./bin/setup
./bin/server
The server command will start both a front and back end development server. Use this URL to access your application. http://localhost:5173
This demo application uses a split-stack architecture. Meaning there is a distinct front-end and back-end. The front-end is a 💚 Vue.js application with 🍍 Pinia for state and ⚡️ Vite for development. The front-end also uses 🌊 Tailwind CSS along with 🌼 daisyUI for styling. The back-end is a 🟨 Node.js application that uses ❎ Express for the HTTP framework, and 🪶 SQLite3 VSS along with 🏆 better-sqlite3 for vector storage and search.
Throughout the post we will explore various technologies in more detail and how they help us build a RAG application while learning the basics of AI driven integrations and prompt engineering. This is such a fun space. I hope you enjoy it as much as I do!
So let's start with the end in mind. Our LambdaRAG Demo runs locally to make it easy to develop and learn. At some point though you may want to ship it to production or share your work with others. So why deploy to Lambda and what benefits does that deployment option offer? A few thoughts:
- Lambda makes it easy to deploy containerized applications.
- Lambda's Function URLs are managed API Gateway reverse proxies.
- The Lambda Web Adapter makes streaming API responses simple.
- Container tools like Crypteia make secure SSM-backed secrets easy.
- Lambda containers allow images up to 10GB in size. Great for an embedded SQLite DB.
Of all of these, I think Response Streaming is the most powerful. A relatively new feature for Lambda, this enables our RAG to stream text back to the web client just like ChatGPT. It also allows Lambda to break the 6MB response payload and 30s timeout limit. These few lines in the project's template.yaml along with the Lambda Web Adapter make it all possible.
FunctionUrlConfig:
  AuthType: NONE
  InvokeMode: RESPONSE_STREAM
Before you run ./bin/deploy for the first time. Make sure you to log into the AWS Console and navigate to SSM Parameter Store first. From there create a secret string parameter with the path /lambda-rag/OPENAI_API_KEY and paste in your OpenAI API key.
Our backend has a very basic src/utils/openai.js module. This exports an OpenAI client as well as a helper function to create embeddings. We cover Embeddings briefly in the Basic Architect section of the first part of this series. This function simply turns a user's query into a vector embedding which is later queried against our SQLite database. There are numerous ways to create and query embeddings. For now we are going to keep it simple and use OpenAI's text-embedding-ada-002 model which outputs 1536 dimensional embeddings.
import { OpenAI } from "openai";

export const openai = new OpenAI({
  apiKey: process.env.OPENAI_API_KEY,
});

export const createEmbedding = async (query) => {
  const response = await openai.embeddings.create({
    model: "text-embedding-ada-002",
    input: query,
  });
  return JSON.stringify(response.data[0].embedding);
};
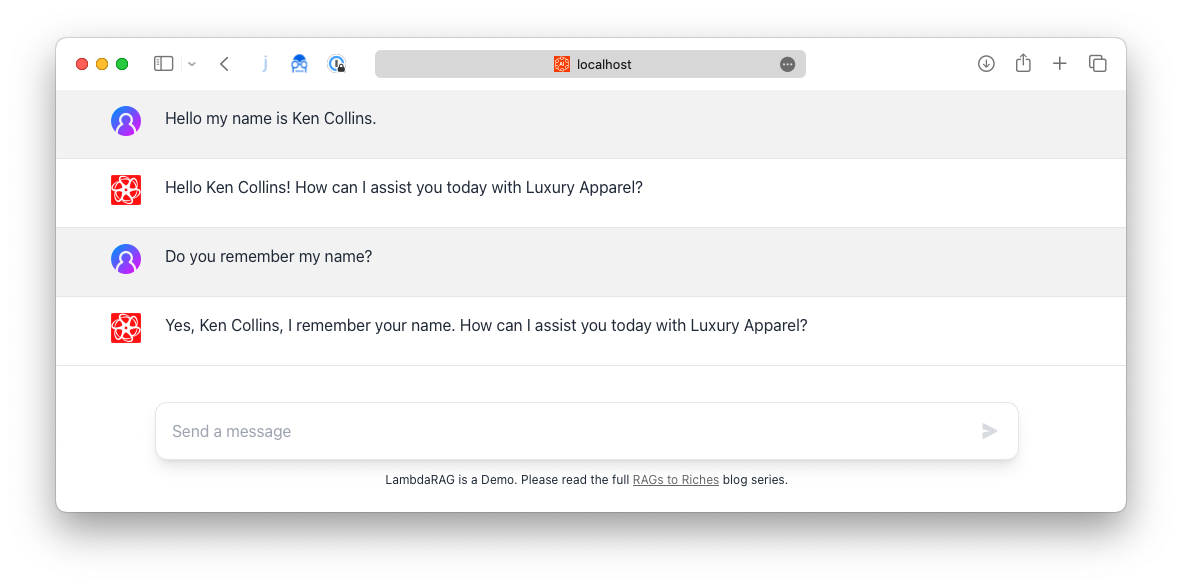
So how does OpenAI's API work to create a chat interface and how does the Context Window discussed in part one come into play? Consider the following screenshot where I tell LambdaRAG my name and then ask if it remembers.

ChatGPT is stateless, like most web applications. It has no session for the LLM model. Every time you send a message you have to send all the previous messages (context) to the Completions endpoint. This is why we use 🍍 Pinia for client-side state management. So from an API perspective, it would look something like this below.
await openai.chat.completions.create({
 model: "gpt-3.5-turbo-16k",
 messages: [
    { role: "user", content: "Hello my name is Ken Collins." },
    { role: "assistant", content: "Hello Ken Collins! How can I..." },
    { role: "user", content: "Do you remember my name?" },
 ]
});
Did you notice how the assistant responded not only with my name but also knew it was here to help us with Luxury Apparel? This is a technique called Role Prompting. We do this in the LambdaRAG Demo by prepending this role to the user's first message in the src-frontend/utils/roleprompt.js file.
You may have noticed that the LambdaRAG Demo is written entirely in 💛 JavaScript vs. Python. As you learn more about building AI applications you may eventually have to learn Python as well as more advanced frameworks like 🦜️🔗 LangChain or Hugging Face's 🤗 Transformers.js. All of which have JavaScript versions. I hope this trend of providing JavaScript clients will continue. It feels like a more accessible language.
In the next section, we will cover how to create embeddings with your data and query for documents using SQLite's new VSS extension.
💁♂️ The LambdaRAG Demo application contains a ready-to-use SQLite database with ~5,000 products from the Luxury Apparel Dataset on Kaggle. It also has vector embeddings pre-seeded and ready to use!
Before we dig into sqlite-vss, I'd like to explain why I think this extension is so amazing. To date, I have found sqlite-vss the easiest and quickest way to explore vector embeddings. Many GenAI projects use Supabase which seems great but is difficult to run locally. The goal here is to learn!
As your application grows, I highly recommend looking at Amazon OpenSearch Serverless. It is a fully managed, highly scalable, and cost-effective service that supports vector similarity search. It even supports pre-filtering with FAISS.
Let's look at sqlite-vss a bit closer. This article A SQLite Extension for Vector Search does an amazing job covering the creation of standard tables as well as virtual tables for embeddings and how to query them both. The LambdaRAG Demo follows all these patterns closely in our db/create.js file. Our resulting schema is:
CREATE TABLE products (
    id INTEGER PRIMARY KEY,
    name TEXT,
    category TEXT,
    subCategory TEXT,
    description TEXT,
    embedding BLOB
  );
CREATE TABLE IF NOT EXISTS "vss_products_index"(rowid integer primary key autoincrement, idx);
CREATE TABLE sqlite_sequence(name,seq);
CREATE TABLE IF NOT EXISTS "vss_products_data"(rowid integer primary key autoincrement, _);
CREATE VIRTUAL TABLE vss_products using vss0 (
    embedding(1536)
  );
If you want to re-create the SQLite database or build a custom dataset, you can do so by changing the db/create.js and running npm run db:create. This will drop the existing database and re-create it with data from any CSV file(s), supporting schema, or process you are willing to code up.
> npm run db:create
> lambda-rag@1.0.0 db:create
> rm -rf db/lambdarag.db && node db/create.js
Using sqlite-vss version: v0.1.1
Inserting product data...
 ██████████████████████████████████░░░░░░ 84% | ETA: 2s | 4242/5001
Afterward you would need to run the npm run db:embeddings script which uses the OpenAI API to create embeddings for each product. This takes a few minutes to complete all the API calls. The task includes a local cache to make it faster to re-run. Lastly, there is a npm run db:clean script that calls a VACUUM on the DB to remove wasted space for the virtual tables. Again, all of this is only required if you want to re-create the database or build a custom dataset. There is a ./bin/setup-db wrapper script that does all these steps for you.
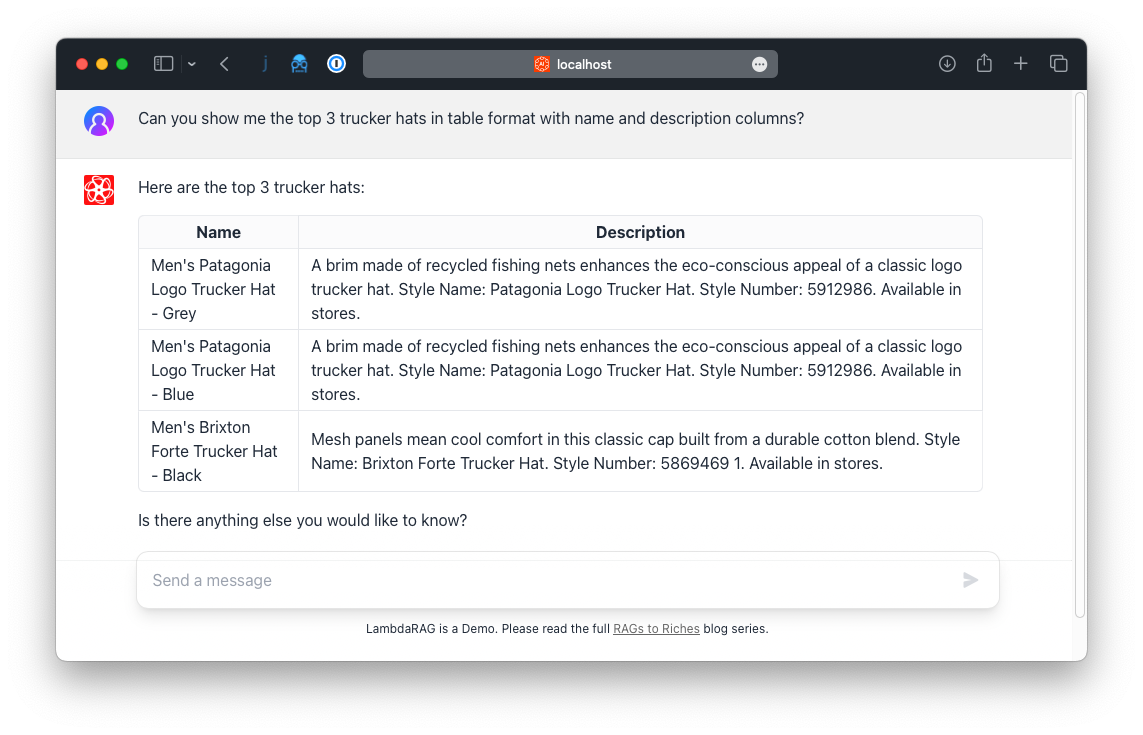
OK, so we have a database of products and their matching vector embeddings to use for semantic search. How do we code up going from chat to retrieving items from the database? OpenAI has this amazing feature named Function Calling. In our demo, it allows the LLM to search for products and describe the results to you.

But how does it know? You simply describe an array of functions that your application implments and during a chat completion API call. OpenAI will 1) automatically make a determination a function should be called 2) return the name of the function to call along with the needed parameters. Your request looks something like this.
await openai.chat.completions.create({
  model: "gpt-3.5-turbo-16k",
  functions: '[{"search_products":{"parameters": {"query": "string"}}}]',
  messages: [
    { role: "user", content: "I need a cool trucker hat." }
  ]
});
If a function has been selected, the response will include the name of the function and parameters. Your responsibility is to check for this, then call your application's code matching the function and parameters. For LambdaGPT, this will be querying the database and returning any matching rows. We do this in our src/models/products.js file.
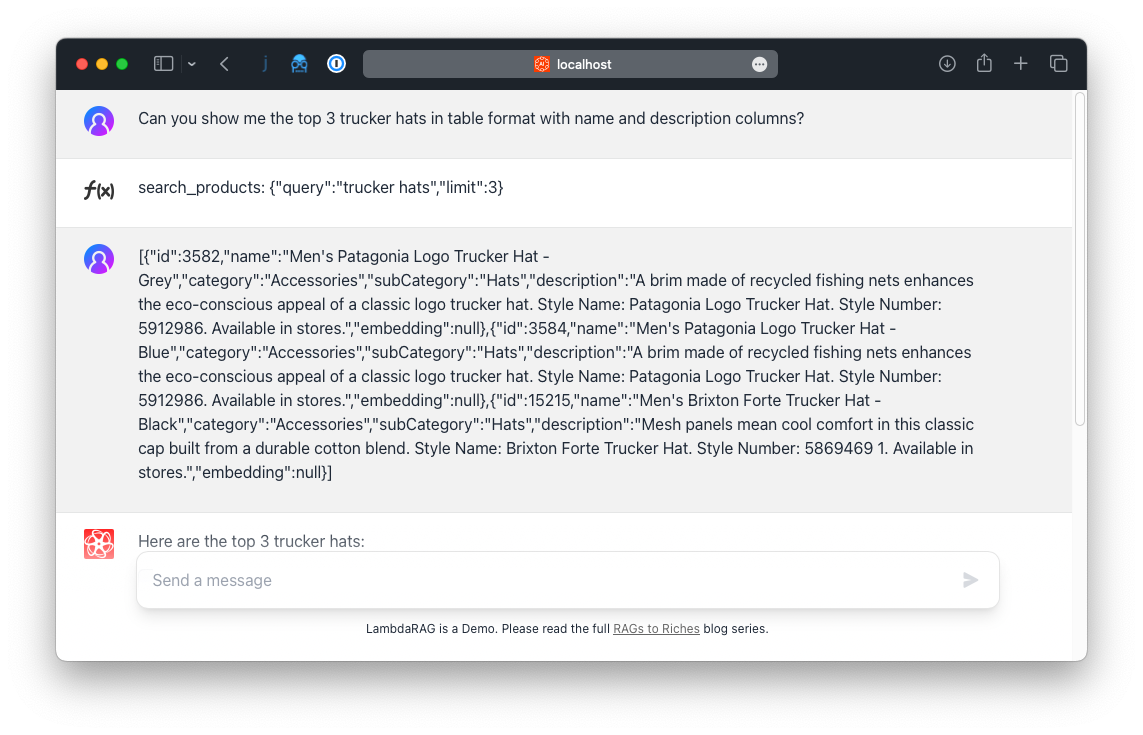
For OpenAI to respond with the results, we send it another request that now has two additional messages included. The first is of type "function" and includes the name and parameters of the function you were asked to call. The second is of type "user" which includes the JSON data of the products returned from our retrieval process. OpenAI will now respond as if it has this knowledge all along!
await openai.chat.completions.create({
  model: "gpt-3.5-turbo-16k",
  functions: '[{"search_products":{"parameters": {"query": "string"}}}]',
  messages: [
    { role: "user", content: "I need a cool trucker hat." },
    { role: "function", name: "search_products", content: '{"query":"trucker hats"}' },
    { role: "user", content: '[{"id":3582,"name":"Mens Patagonia Logo Trucker Hat..."}]' },
  ]
});
Since all messages are maintained in client-side state, you can see them using a neat debug technique. Open up the src-frontend/components/Message.vue file and make the following change.
  'border-b-base-300': true,
  'bg-base-200': data.role === 'user',
- 'hidden': data.hidden,
+ 'hidden': false,
You can now see all the messages' state in the UI. This is a great way to debug your application and see what is happening.

I hope you found this quick overview of how OpenAI's chat completions can be augmented for knowledge retrieval. There is so much more to explore and do. Here are some ideas to get you started:
- All responses are streamed from the server. The
fetchResponsein thesrc-frontend/stores/messages.jsPinia store does all the work here and manages client side state. - That same file also converts the streaming responses Markdown code into HTML. This is how the demo can build tables just like ChatGPT does.
- Sometimes the keywords passed to the search products function can be sparse. Consider making an API call to extend the keywords of the query using the original message. You can use functions here too!
- Consider adding more retrieval methods to the
src/utils/functions.jsonfile. For example, afind_styleby ID method that would directly query the database.
❤️ I hope you enjoyed these posts and find the LambdaRAG Demo application useful in learning how to use AI for knowledge retrieval. Feel free to ask questions and share your thoughts on this post. Thank you!


